Advertisement
Quick Links
GMR2638-2CK
Congratulations on your purchase of the Uniden
English
GMR2638-2CK (General Mobile Radio Service)
radio. This lightweight, palm-sized, radio is a state-
of-the-art device, equipped with many valuable
• 15 GMRS / 7 FRS Channels
• Roger Beep
features. Use it at sporting events, to stay in
• 121 Sub Codes
• Battery Charger
contact with family and friends, hiking, skiing,
(CTCSS Tone and DCS Code)
• Battery Level Meter
outdoors, or in a neighborhood watch for vital
• Up to 26 Mile Range*
• Channel Monitor
communication.
• Internal VOX Circuitry
• Channel Scan
• 10 Selectable Call Tone Alerts
• Keypad Lock
• Backlit LCD Display
• 2 Belt Clips
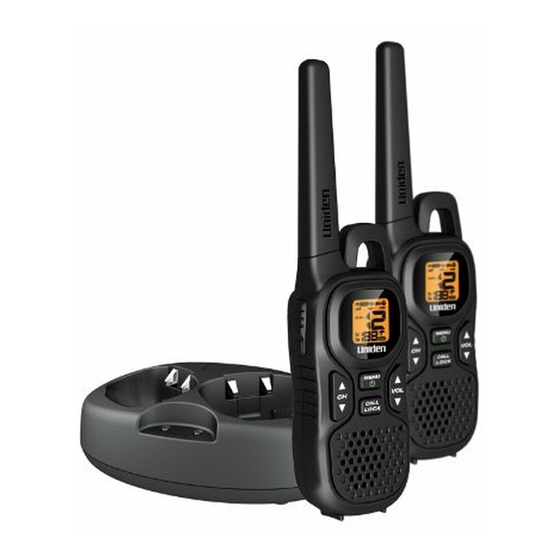
Your package contains two radios, two rechargeable
• Optional Headset Accessories
NiMH battery packs, one AC adapter, one charging
• Headset Jack
cradle, two belt clips and this reference guide. You
can operate each unit using the rechargeable NiMH
battery pack or 3 AAA alkaline batteries (not
*Range may vary depending on environmental and/or topographical conditions.
included). To order the following optional
accessories, visit our web site at www.uniden.com
GMR2638-2CK RADIO
or call 1-800-554-3988 during regular business
hours. Use only Uniden accessories.
• NiMH Battery Pack - #BT-1028 or BP-1028
• Charging Cradle - #RC-1287
• AC Adapter - #AD-0001
The radio operates on the General Mobile Radio
Service (GMRS) frequencies when using
Channels 1-7 and channels 15-22. You must
have a GMRS license issued by the Federal
Communications Commission to legally use
these channels. For licensing information and
application forms, visit the FCC online at: www.
fcc.gov/wtb/uls or call the FCC hotline at
1-800-418-3676. If you have any questions, you
can contact the FCC direct at 1-888-225-5322.
No license is required for operation on channels
8-14 or operation on any channel in Canada.
CHARGE
Each radio uses a supplied NiMH battery pack or
3 AAA alkaline batteries (not included).
To install the NiMH battery pack:
1) Make sure your radio is OFF.
1 Antenna
13 Call Indicator
2 PTT (Push-To-Talk) Button
14 Scan Indicator
2) Remove the battery compartment door by
3 Monitor Button
15 Channel Indicator
4 Channel Up/Down Button
16 Hi Power Indicator
5 Call/Lock Button
17 Low Power Indicator
3) Install the NiMH battery pack into the battery
6 Speaker
18 Transmit Indicator
7 Headset Jack
19 Volume Setting Indicator
8 Menu/Power Button
20 Keypad Lock Indicator
9 Volume Up/Down Button
21 VOX Indicator
10 Microphone
22 Sub Code Indicator
11 Battery Level Meter
23 Charging Contacts
12 Receive Indicator
4) Replace the battery compartment door.
BATTERY LEVEL AND LOW
BATTERY ALERT
This unit has a battery level meter on the display to
indicate the status of the batteries. When the
battery in the unit is low, the battery level meter
icon
flashes. Recharge the NiMH battery
pack immediately or if you are using the alkaline
PACKAGE CONTENTS
batteries, you must replace the alkaline batteries in
order to continue using the radio.
Warning! To avoid the risk of personal injury or
property damage from fire or electrical shock, only
use the Uniden accessories specifically designated
for this product.
CHARGING THE RADIO
If you use the rechargeable NiMH battery pack, two
radios can be charged directly or by using the
supplied charging cradle.
USING The ChaRGING CRadle
1) Connect the charging cradle (#RC-1287) to a
standard 120V AC wall outlet.
GMRS LICENSE
2) Set the charging cradle on the desk or tabletop,
and place the radio in the charging cradle with
the keypad facing forward.
3) Make sure that the LED illuminates. Charge the
battery pack for 16 hours and remove the radio
from the charging cradle after charging.
Note:
• Use only the supplied battery and AC adapter or
approved accessories from Uniden.
• Charge time may vary depending on the battery
life remaining.
• Do not recharge alkaline batteries. Doing so can
create a safety hazard or damage the radio.
• For fastest charging, turn off the radio before
INSTALL THE BATTERY
charging.
• Battery must be installed for operation, even from
external power.
• If battery Power is low, you cannot operate the
radio even using external power. Allow the
batteries to charge before using. If you try to
transmit while power is low, the radio will
pressing the tab at the bottom of the
automatically turn off.
compartment door, and remove the cover.
compartment. Be certain to follow the
instructions written on the label on the battery
pack. Installing the battery pack incorrectly will
prevent the unit from operating.
To turn ON the Monitor Mode:
USING THE RADIO
• For brief listening, press MON button. The
In order to get the most out of your new radio, read
icon blinks.
this reference guide completely before attempting to
• Press and hold MON button for 2 seconds until
operate the unit.
two beeps sound for continuous listening. The
receiver circuit stays open, letting both the noise
TURNING The RadIo oN aNd
and weak signals to be heard.
adjUSTING The VolUMe
To turn OFF Monitor Mode:
1) Press and hold the MENU/
key to turn the
radio ON, and increase the speaker volume by
• Press MON button to return to "Normal" mode,
and the
icon stops blinking and disappears.
pressing VOL ▲. To decrease the volume, press
VOL ▼.
adVaNCed FUNCTIoNS (MeNUS)
2) Press and hold the MENU/
key again to turn
Use MENU/ to access your radio's advanced
the radio OFF.
functions.
adjUSTING The SoUNd (KeY BeepS)
Normal
VOX Level
Your radio emits a beep each time one of the keys
(except for the PTT button and CALL/LOCK key) is
Sub Code
OFF, 1-121
Call Tone
pressed. To turn this sound OFF, press and hold the
CALL/LOCK key while turning ON the radio. Repeat
Scan
ON/OFF
Normal
this step to turn the sound ON.
ChooSING a ChaNNel
1) Press MENU/ to enter the menus.
Your radio has 22 channels and 121 Sub codes you
2) Additional presses of MENU/ advance you
can use to talk to others. In order to speak to
through the menus until exiting to "Normal"
someone, each of you must be set to the same
operating mode.
channel and Sub code.
3) Other methods of exiting the Menu function are:
With the radio in "Normal" operating mode press
a. Press and hold MENU/ again.
CH ▲ / CH ▼ to increase or decrease the channel
b. Press any key except CH ▲ / CH ▼ or VOL ▲
number. The channel number blinks. Press the
/ VOL ▼ and wait 10 seconds until the unit
MENU/
key to set the channel.
returns to "Normal" mode.
Note: Channels 1-7 have an typical range of up to
Sub Code Menu
26 miles. Channels 8-14 have an typical range of
Each of the channels 1-22 may have any one of
up to 5 miles. Channels 15-22 have an typical
the codes, OFF, or 1-121 selected. Code oF (OFF)
range of up to 26 miles. You can know which GMRS
indicates no Sub code selected and your radio can
or FRS channel is active by the icon. hi icon is
receive a signal regardless of the code settings of
displayed while scanning GMRS channels, and the
lo icon is displayed while scanning FRS channels.
the transmitting radio.
1) Press MENU/ to enter Menu mode. The
TalKING oN YoUR RadIo
subcode indicator flashes.
To talk to others using the radio:
2) Press CH ▲ / CH ▼ key to increase or
decrease the code number displayed. You can
1) Press and hold the PTT button and speak in a
also select oF (OFF) at this stage.
clear, normal voice about 2-3 inches away from
3) Press MENU/ to exit Menu mode.
the microphone. While you are transmitting, the
icon appears on the display. To avoid cutting
4) Press any key other than CH ▲ / CH ▼ or VOL
off the first part of your transmission, pause
▲ / VOL ▼ and the radio returns to Idle mode
in 10 seconds.
slightly after pressing the PTT button before you
Scan Menu
start talking.
Your radio has a channel scan feature that allows
2) When you have finished speaking, release the
you to easily scan all 22 channels. When an active
PTT button. You can now receive incoming calls.
channel is detected, the radio pauses on that
While receiving, the
icon appears on the
channel until the channel is clear. Then, after a 2
display.
second delay, the radio continues scanning.
MoNIToR Mode FeaTURe
Pressing the PTT button while the scan is paused
on a channel allows you to transmit on that
Your radio allows you to listen for weak signals on
the current channel at the press of a key.
channel.
disappears.
To turn ON channel scan:
aUToMaTIC poWeR SaVe
1) Press MENU/ repeatedly until the scan...
Your radio has a circuit designed to dramatically
icon and oF blink.
extend the life of the batteries. If there is no
2. Press CH ▲ / CH ▼ to select Scan mode and
transmission or an incoming call within 3 seconds,
press MENU/ to start it.
your radio switches to Power Save mode. The radio
is still able to receive transmissions in this mode.
To turn OFF channel scan:
lCd BaCKlIGhT
1) Press MENU/ when the scan setting is oF.
The LCD Backlight automatically turns ON when any
2) Press any key other than CH ▲ / CH ▼ or
key (except the PTT button) is pressed. The LCD
VOL ▲ / VOL ▼ to turn channel scan off in 10
seconds.
display illuminates for 10 seconds before turning
OFF.
Voice Operated Transmission Menu
Your radio is equipped with a user selectable Voice
RoGeR Beep
Operated Transmitter (VOX) that can be used for
OFF, 1-5
Roger Beep is a BEEP that is sent to notify the end of
automatic voice transmissions. The VOX feature is
transmission (both PTT and VOX transmission).
designed to be used with or without a headset with
1-10
Roger Beep can be heard through the speaker when
a microphone. Transmission is initiated by speaking
both Roger Beep and Key Beep are set to ON. When
into the microphone instead of pressing PTT.
Roger Beep is set to ON and Key Beep is set to OFF,
To select VOX level:
Roger Beep will not be heard from the speaker but it
will be transmitted to your party. When Roger Beep is
1) Press MENU/ repeatedly until the vox icon
set to OFF, Roger Beep will neither be heard nor
and the VOX sensitivity level (OFF, 1-5) blink.
transmitted.
2) Press CH ▲ / CH ▼ to change the VOX
To change Roger Beep setting:
sensitivity levels. Use level 1 for increased
sensitivity to voice in normally quiet environments,
Press and hold VOL ▲ while turning the radio on and
and use a higher level to reduce undesired
off. If Roger Beep is ON, it will be turned off; if it is
activation in very noisy environments.
OFF, it will be turned on.
Call Tone Menu
Your radio is equipped with 10 selectable call tones
that are transmitted when CALL/LOCK is pressed.
To select a call tone:
1) Press MENU/ repeatedly until the CALL icon
and Call Tone start to blink on the display.
2) Press CH ▲ / CH ▼ to move through the
available call tones. Each tone will be heard
through the speaker but will not be transmitted.
Cycle through these tones and stay on the tone
you want to select.
3) Exit Call Tone to set the selected tone.
KeY loCK
To lock the keypad:
1) Press and hold CALL/LOCK;
displays.
These functions are not affected by Key Lock:
• Volume adjust
• Call tone transmission
• Enter monitor mode
• PTT transmission
• Power off
To unlock the keypad:
1) Press and hold CALL/LOCK again;
Advertisement

Related Manuals for Uniden GMR2638-2CK


Summary of Contents for Uniden GMR2638-2CK
- Page 1 VOL ▼. adVaNCed FUNCTIoNS (MeNUS) seconds. display illuminates for 10 seconds before turning • Headset Jack property damage from fire or electrical shock, only cradle, two belt clips and this reference guide. You 2) Press and hold the MENU/ key again to turn use the Uniden accessories specifically designated Use MENU/ to access your radio's advanced OFF. Voice Operated Transmission Menu can operate each unit using the rechargeable NiMH the radio OFF. for this product. functions. Your radio is equipped with a user selectable Voice...
-
Page 2: Specifications
38 Sub-Audible Tones Tone octal Tone octal Tone octal protect the environment and unit and leak inside, causing permanent damage. accessories (unless approved by the manufacturer) Some states do not allow this exclusion or limitation 83 DCS Codes Code Code Code conserve natural resources, Use a dry, lint-free cloth to clean the battery should be avoided as these might not comply with FCC of incidental or consequential damages so the Operating Frequency 462.5500 - 467.7125 MHz Uniden voluntarily participates in contacts. Do not submerge the unit in water. If the RF exposure guidelines. above limitation or exclusion may not apply to you. Power Source NiMH Battery Pack (BT-1028 an RBRC ® industry program to unit gets wet, turn it off and remove the batteries For more information about RF exposure, please LEGAL REMEDIES: This warranty gives you or BP-1028) collect and recycle used Ni-MH immediately. visit the FCC web site at www.fcc.gov. specific legal rights, and you may also have other or 3 AAA Alkaline Batteries batteries within the US.
Need help?
Do you have a question about the GMR2638-2CK and is the answer not in the manual?
Questions and answers