NextBase 522GW Manual
- User manual (48 pages) ,
- Update instructions (3 pages) ,
- User manual (49 pages)
Advertisement
- 1 Introduction
- 2 Precautions
- 3 How a Dash Cam works
- 4 Useage Precautions
- 5 Notices
- 6 Technical Specifications
- 7 Package Contents
- 8 Product Features
- 9 Camera Parts & Controls
- 10 In Vehicle Installation
- 11 Position your Dash Cam
- 12 Polarising Filter
- 13 First Time Use
- 14 First Time Use - Screens
- 15 Menus
- 16 Settings
- 17 Driver Assistance - Emergency SOS
- 18 Driver Assistance - Emergency SO FAQs
- 19 Alexa Built-In
- 20 Video Mode
- 21 Folder Selection Screen
- 22 Playback Mode - Photo
- 23 Playback Mode - Video
- 24 Video Editing
- 25 MyNextbase Connect
- 26 MyNextbase Player - Playback
- 27 MyNextbase Player - Edit
- 28 MyNextbase Cloud
- 29 PC Connection
- 30 Firmware Updates
- 31 TV Connection
- 32 Nextbase SD Cards
-
33
Frequently Asked Questions
- 33.1 Video Image is blurred
- 33.2 I cannot insert the MicroSD card
- 33.3 I cannot remove the MicroSD card
- 33.4 Video Files cannot be played on my computer
- 33.5 Video File playback is jumpy
- 33.6 The sound is not synchronised with video during playback
- 33.7 Video has no sound
- 33.8 Photograph is blurred
- 33.9 Access Files does not work
- 33.10 The battery will not charge
- 33.11 The battery only lasts 30 seconds
- 34 Product Warnings
- 35 Documents / Resources
Introduction
This range of Nextbase™ Dash Cams has been designed specifically with ease of use in mind; it is recommended NOT to change the default settings, which have been carefully selected to give the best performance for day to day use. Please check the firmware version of the Dash Cam, the version can be found in the Setup menu under System Info. The latest versions are available to download from our website, where you can download and update when necessary.
www.nextbase.com
Before you can use your Dash Cam, it is essential to make sure it is fully charged. Connect your Dash Cam via the USB port to a home power source such as a PC or home USB socket for approximately 2 hours.
Basic Operation
A U3 type Micro SD card is required to use this Dash Cam. This is due to the very large data rate generated by high resolution recording. For best results, we recommend using our Nextbase branded SD cards with your Dash Cam. For use with Rear Cam attached, a U3 Card is required. Your Nextbase Dash Cam is set to record video, in files of just 1 minute in length. This means that each video file is a manageable size should you need to download and send to your insurance company. Eventually your MicroSD card will fill up with video files but don't worry, the camera automatically deletes the oldest file to make space for new recordings. This way you never run out of space and have plenty of driving data saved. Typically a 16Gb card will store the last 45 minutes of driving footage. The GPS will automatically adjust for Daylight Savings Time.
Automatic Start / Stop Technology
The Dash Cam will automatically power on and be ready to use once power is available. In some vehicles this will be when connections are made, for others the Dash Cam will power on once the ignition has been turned on. When power is cut off, the Dash Cam will perform an automatic shutdown process.
- Tips for capturing best video footage:
- Position the Dash Cam in the centre of the windscreen and ideally behind the rear view mirror so it is not a distraction to the driver.
- Ensure that the area on the windscreen that the Dash Cam is looking through is clear of dirt and is within the wiper zone. This will ensure that your videos are as clear as possible.
- Reduce the amount of sky in the picture, by angling the view of the camera towards the road. Too much sky will make the road appear darker due to the automatic exposure compensation.
- Remove unnecessary items from your dashboard. If objects are placed on your dashboard these can cause reflections to be seen on the windscreen and these reflections may be captured during recording.
- Tips for stable memory card performance:
- Periodically format the memory card. Every 2-3 weeks we recommend that you format the memory card. This will wipe any files from the card and set it up afresh for continued use with your Dash Cam. Of course, you should only do this AFTER you've downloaded any files from the card that you may want to keep, as formatting the card will remove all content.
- Format your memory card using the Dash Cam. This will make sure that the card is structured specifically for your camera. Within the Setup menu, select 'Format SD Card' and follow the on-screen instructions.
- Switch off the Dash Cam before removing the SD card, to prevent the chance of damage being caused to the memory card or the files stored upon it.
Nextbase SD Cards
For best results, we strongly recommend using our Nextbase branded SD cards with your Dash Cam, available to purchase online from nextbase. com, or your nearest retailer. A card that is not made specifically for a Dash Cam may appear to work perfectly in the beginning, although failure tends to happen after prolonged use, this could be days, weeks, or months. In a worst-case scenario, you may only discover recording failure after your SD card fails to record a serious incident, therefore using a suitable SD card is imperative. See SD card information page for more info.
Precautions
Please read this manual carefully before operation and keep it for future reference. It will be helpful should you encounter any operational problems.
 | Do not expose this product to rain, moisture or water under any circumstances, doing so may result in the risk of electric shock or fire. |
 | To reduce the risk of electric shock, do not perform any servicing other than that contained in the instruction manual unless you are qualified to do so. Have the unit serviced by a qualified service technician if; The unit has been exposed to rain or water. The unit does not seem to operate normally. The unit exhibits a marked change in performance. |
| LCD: | A Liquid Crystal Display (LCD) screen is a multilayer complex component, containing 1,229,760 pixels. Pixels can however fail during normal product life. 1 pixel = 0.0000008% failure rate, and one pixel failure per year of operation is considered normal and not a cause for concern. |
| Choking Warning: | Some Products may contain components that are small enough to be swallowed. Please keep out of reach of children. |
Distractions can lead to accidents, and the risk of injury or death. Always keep your eyes on the road, and keep aware of your surroundings.
 Cautions on Using this Product
- Ensure that the windscreen is free of dirt or grease before placing mount upon it.
- Do not obscure the view of the road ahead or impede the deployment of any airbags in the event of an accident.
- When not in use, please disconnect the car adaptor from both the 12/24Vdc outlet in your vehicle and the Dash Cam itself.
- Only clean the Dash Cam with a soft dry cloth, for tough dirt, apply some neutral detergent diluted in 5 to 6 parts water to a soft cloth. Please note that alcohol, thinner, benzene etc could cause damage to the paint or coatings.
- Avoid making contact with the lenses as damage may be caused.
- If required clean the glass lens carefully using spectacle lens cleaning fluid on a soft cloth only.
- Before you can use your Dash Cam, it is essential that it is fully charged. Connect your Dash Cam via the USB port to a home power source such as a PC or home USB socket for approximately 2 hours.
- You agree to use your Nextbase Dash Camera in compliance with all applicable laws, including local laws of the country or region in which you reside or in which you use your Nextbase Dash Camera. When you use your Nextbase Dash Camera, you do so at your own initiative and you are responsible for compliance with any applicable laws, including but not limited to applicable privacy and data collection laws, and laws prohibiting or restricting the placement of objects on the windshield of a motor vehicle. IT IS THE USER'S RESPONSIBILITY TO MOUNT THE DEVICE IN COMPLIANCE WITH ALL APPLICABLE LAWS AND ORDINANCES. Portable Multimedia Limited trading as Nextbase is not responsible if you access or use your Nextbase Dash Camera in any manner that violates applicable law
- The video recordings made by this Dash Cam are intended for personal use only.
- Publication of the recordings on Youtube, the internet or other methods are subject to the Data Protection Act and the requirements thereof must be adhered to. If the Dash Cam is to be used within a commercial environment, i.e. truck use, then the CCTV regulation apply also, in addition to the Protection Act regulations. This includes labelling to identify the use of CCTV is taking place, the omission of Audio recording and informing the relevant authorities of who controls the data.
- Video playback upon the Dash Cam which is visible to the driver is prohibited or restricted in some countries or States. Please adhere to these laws.
- Whilst driving, do not adjust the controls of your Dash Cam as this is a distraction to driving.
How a Dash Cam works
Camera
Your Piqo has a front facing camera to keep an eye on the road ahead.
Power Source
When connected to your vehicle using the 12V car adaptor, Pro Install Cable* or Piqo Quick Connect Cable*, your Piqo automatically turns on and starts recording when the engine starts.
Recording
The camera continuously records video footage while you're driving. Video is recorded in short segments, one minute long, to make it easier to manage the files.
Storage
Recorded video footage is stored on an SD card inserted into your Piqo. The SD card acts as storage, similar to an SD card in a digital camera.
Nextbase App
The all-new Nextbase App ensures a seamless connection to access, edit and share footage easily. Cutting edge features such as Emergency SOS are included to give you the best Dash Cam experience. Search for 'Nextbase App' in the app store.
Loop Recording
As the memory card fills up with recorded video, your Piqo uses a feature called "loop recording" to overwrite the oldest footage with new recordings. This ensures that the camera can ke when the memory card is full. Important files should be the Dash Cam using the Nextbase App.
Event Recording
Your Piqo has a built in G-Sensor+ which detects sudden movement or impacts to your vehicle. When an event like a collision or sudden braking is detected, your Piqo will automatically protect the footage surrounding the event and mark it as a protected file to be reviewed.
Playback and Accessing Footage
To view the recorded footage, use the Nextbase App or use a USB-C data cable* to connect your Piqo to your computer. Or you can read the SD card with a card reader on your computer. Once the footage is accessed, you can review, edit, or share the recordings as needed.
*sold seperately
Useage Precautions
Failure to heed the following precautions could result in personal injury or property damage, or negatively impact the device functionality.
Battery Precaution
- Do not immerse or expose the Dash Cam or batteries to rain, water or other liquids.
- Do not leave the device exposed to a heat source or in a high-temperature location, such as in the sun or in an unattended vehicle. To prevent the possibility of damage, remove the Dash Cam from the vehicle or store it out of direct sunlight, such as in the glove box.
- Do not operate the Dash Cam outside of the following temperature range: from -20° to 45°C (from -4° to 113°F).
- When storing the Dash Cam for an extended time period, store within the following temperature range: from 0° to 25°C (from 32° to 77°F).
- Do not use a power and/or data cable that is not approved or supplied by Nextbase™.
- Contact your local waste disposal department to dispose of the Dash Cam/batteries in accordance with applicable local laws and regulations.
Windshield Mounting Legal Restriction Precaution
Before using the Dash Cam on your windshield, check the state and local laws and ordinances where you drive. Some laws prohibit or restrict the placement of objects on the windshield of a motor vehicle. IT IS THE USER'S RESPONSIBILITY TO MOUNT THE DEVICE IN COMPLIANCE WITH ALL APPLICABLE LAWS AND ORDINANCES. Always mount your Nextbase Dash Cam in a location that does not obstruct the driver's view of the road. Nextbase does not assume any responsibility for any fines, penalties, or damages that may be incurred as a result of any state or local law or ordinance relating to the use of your Nextbase Dash Cam.
Camera Legal Requirements Precaution
In some jurisdictions it could be considered an invasion of privacy rights to take or publicly display photographs or videos of people or their vehicles using this product. It is your responsibility to know and comply with applicable laws and rights to privacy in your jurisdiction and in any jurisdiction in which you may use this device. Video recordings made by this Dash Cam should be for personal use only. Publication of the recordings on YouTube, the internet or other methods is subject to the data protection legislation and the requirements thereof must be adhered to. Such data protection legislation may prohibit the use and dissemination by you of Dash Cam footage or may impose restrictions on it – we recommend that you check the legal requirements with your legal advisor before disseminating any Dash Cam footage. If the Dash Cam is to be used within a UK commercial environment, i.e. truck use, then the CCTV regulations apply in addition to the Data Protection Act regulations. This includes labelling to identify the use of CCTV is taking place, the omission of Audio recording and informing the relevant authorities of who controls the data. For use in a commercial environment in non-UK countries, please refer and adhere to local regulations and requirements. For non-UK operation, specific legal requirements may apply where Dash Cams are to be used in a commercial or employment context - again, we recommend that you check the legal requirements with your legal advisors prior to commencing use of Dash Cams in commercial or employment contexts.
Notices
G Sensor Notice
The G Sensor within the Dash Cam measures forces exerted upon it, with reference to one g which is the nominal force exerted upon us when stationary on the earth's surface. The G Sensor will also trigger to protect any recording currently in progress, if a pre-determined threshold of force is exceeded. The G Sensor protection will be adversely affected if the Dash Cam is NOT mounted in the vertical direction i.e. with the lens pointing to or from the direction of travel. G Force information derived from a G Sensor is not warranted to be totally accurate at all times, as it is derived from the G Sensor through a sampling method over time. The precision of the G Sensor value recorded depends upon when the acceleration took place at the instance of the sample taken. The thresholds to trigger the video protection rely upon a trigger value being exceeded between two successive samples, in any one of the three G Sensor axis. If the Automatic G Sensor protection does NOT trigger during an event, then the Protect button should be pressed, in order to protect the file. Protecting the file can also be performed using the Playback function upon the Dash Cam (models with LCD screens), or through the MyNextbase Connect™ App for applicable Wi-Fi models.
Parking Mode Notice
We only recommend enabling Parking Mode when the Dash Cam is installed using a permanently live power supply (live when the ignition is off) provided by a Nextbase Hardwire Kit, the use of this feature without continuous power being fed to the Dash Cam will not be sufficient for a consistent and reliable Parking Mode experience.
Protected Files
Protected Files may be overwritten, or deleted; make sure to back up important files to a separate, secure place as soon as possible to avoid accidental deletion from the Dash Cam's SD Card. We recommend storing important files on a separate SD or hard drive. If a video file has been protected, this does not mean that the file will remain protected forever. Many of our latest Dash Cam models will overwrite the oldest protected files, if the protected files on the SD card begin taking up too much storage space. The table shown below lists the file limit for each Dash Cam model.
| Model | Protected File Limit |
| 122 | N / A |
| 122HD | 40% |
| 222 | 30% |
| 222G | 30% |
| 222X | 30% |
| 322GW | 33% |
| 422GW | 33% |
| 522GW | 33% |
| 622GW | 33% |
In conclusion, if an incident occurs and a photo or video is important to you, BACK IT UP to a separate storage place as soon as possible. Format (delete all files) your SD regularly, after backing up important files, in order to keep it in good working condition.
Technical Specifications
| Model Number / Name | NBDVR522GW |
| Power Requirements | 5V / 1.5A |
| Power Supply | 12-24Vdc Car Power Cable (supplied) Fuse Type: 32mm / 2A Output: 5Vdc Hardwire Kit also available to purchase for a hidden, permanent power supply. |
| Sensor Resolution | 5.14MP (2616 x 1964) |
| Lens - Type / Angle / Aperture | 6G / 140° / F1.3 |
| Recording Resolution | 2560×1440 @ 30 FPS day & night |
| Screen Size | 3" |
| Screen Resolution | 960 (W) X 480 (H) pixels |
| Screen Ratio | 16:9 |
| Card Reader | MicroSD, U3, up to 256GB; 64-128GB recommended |
| SD Card (Recommended Type) | 64-128GB SDHC / SDXC, U3, Class 10 (48Mb/s) For best results, use a Nextbase branded SD card. |
| SD Card Recorded File Capacity (based on default settings. Recording times are reduced with Rear Cam attached) | 8GB MicroSD = 30 minutes of recording 16GB MicroSD = 60 minutes of recording 32GB MicroSD = 120 minutes of recording 64GB MicroSD = 240 minutes of recording 128GB MicroSD = 480 minutes of recording |
| Recording Format | MP4 |
| Internal Battery | Lithium-Polymer 3.7V / 320mAh (approx. 15 mins recording time) Battery design allows the 'Auto Power Off' feature to function in event of power loss within the vehicle. It is not intended as an alternative power source to replace the supplied car power cable. |
| GPS | Dual System |
| Unit Dimensions (mm) | 94 x 53 x 45 |
| Unit Weight | 125g |
Package Contents

Product Features
 | HD Recording Capability 1440p recording at 30 FPS, to record the road ahead. Inbuilt polarising filter reduces windscreen reflection and glare. |
 | HD Touch Panel Display Bright, clear, high definition 3" screen with IPS technology for a wide viewing angle. |
 | Click & Go Pro Powered Mount Our exclusive Click and Go Pro powered magnetic car mount to easily install and remove your Dash Cam with just one hand. |
 | G Sensor / File Protection In the event of an impact the device will automatically 'protect' the recording, stopping the file from being over-written. This can also be performed manually, by pressing the 'protect' button. Individual files can also be 'protected' when viewed within playback mode. |
 | Inbuilt GPS and 'what3words' Inbuilt GPS to keep track of your journeys. By partnering with what3words we can provide you with your exact location to a 3m square location. In the event of an incident, this location can be shared with the emergency services to quickly and precisely locate you. |
 | Automatic Start / Stop Technology When the vehicle ignition is turned on, the Dash Cam will start to record automatically. When ignition is turned off, the Dash Cam will perform an automatic shutdown process. |
 | Intelligent Parking Mode Intelligent Parking Mode triggers recording automatically when the G-Sensor is triggered, keeping your car safe when parked. |
 | Built-in Microphone & Speaker Record audio to compliment the video recordings. |
 | MyNextbase™ Suite MyNextbase Connect App - View, manage and upload videos, set up Alexa and Emergency SOS features. MyNextbase Cloud - Upload your video to the Nextbase server to get a shareable link to send to friends, insurers, and social media. MyNextbase Player - Playback software for viewing, managing, editing, and sharing your videos. |
 | Alexa Built-In Operate your Dash Cam through Alexa voice control (must have Alexa app installed; see installation and usage details). |
 | Dash Cam Accessories Your Dash Cam can be fitted with a range of Nextbase accessories to enhance your recordings, including Rear Facing Cameras to record the road behind you, or the interior of your vehicle. See the Nextbase Accessories Manual on www.nextbase.com for more ininformation. |
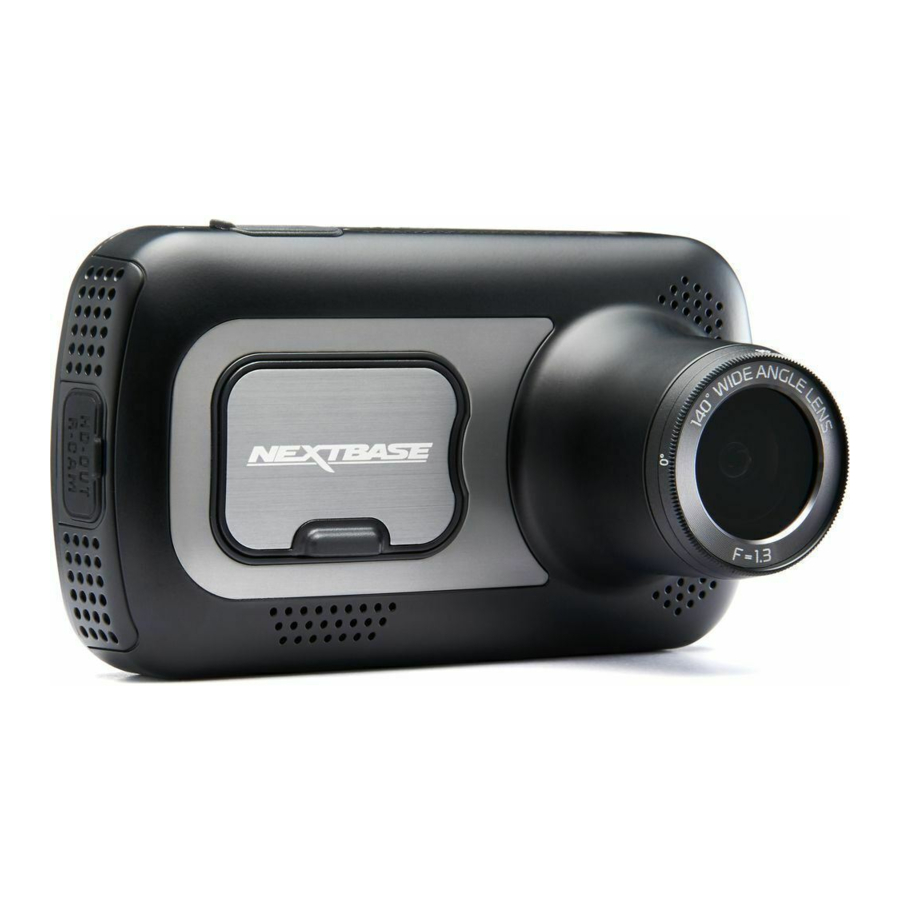
Camera Parts & Controls

In Vehicle Installation
- Insert MicroSD Card
Insert a suitable MicroSD card (U3 Type) in to the Dash Cam, taking care that the gold contacts are facing towards the LCD screen side of the Dash Cam. Push the memory card until it clicks into place.
![]()
Note:- Use the edge of a small coin (or similar object) to push the memory card in place if required. Take care that card has 'clicked' into place, a second push inwards will release the memory card.
- For best results, we recommend using Nextbase branded SD cards.
- Do not remove or insert the memory card when the Dash Cam is turned on. This may damage the memory card, or any stored recordings.
- Remove dust cover from the Dash Cam
Remove the dust cover that is located on the front of the Dash Cam to gain access to the mounting point. To remove the dust cover, lift the cover away from the body of the Dash Cam.
![]()
Note:- If the Dash Cam is not to be used for a period of time replace the dust cover to help keep the components free of dust or other contaminants.
- Plug the power cable into the 12-24Vdc outlet of your vehicle
The Dash Cam will automatically power on and start recording once power is available. In some vehicles this will be when connections are made, for others the Dash Cam will power on once the ignition has been turned on. Route the power cable around the windshield to the 12-24Vdc socket Ensure your view is not obstructed, and the cable is not a distraction. Use the cable fitting tool (bottom, left) included with your Dash Cam to more easily open the lining of your vehicle, within which you can stow the cable. See page 'Positioning your Dash Cam' for more details.
![]()
Note:- Do NOT wire the Dash Cam directly to a 12Vdc supply by cutting the cigarette plug off the end of the cable, or permanent damage will result.
- Also available to purchase is a Nextbase™ Hardwire Kit. This connects your Dash Cam directly to the vehicle's fusebox to power it leaving your 12Vdc outlet available for Phone / Sat Nav charging. Nextbase Hardwire Kit includes the necessary 12-24Vdc to 5Vdc convertor and battery protection circuitry. See the Nextbase Accessories Manual for further information.


- Scan the QR Code for adhesive mount installation guide
Watch the video to see how to best install the adhesive mount. This covers steps 5 - 10.
![]()
- Clean the area of the windscreen you will mount the Dash Cam
Ensuring that the windscreen is clear of grease and dirt allows the most effective adhesion, keeping your Dash Cam securely mounted. ideally, choose an area within the wiper zone to allow clear recordings in all weather conditions.

- Use the wet wipe (green pack) to clean the windscreen in the target area.
- Use the dry wipe (pink pack) to dry the windscreen in the target area.
- Remove the adhesive pad from the Dash Cam mount
Firmly slide the adhesive pad to the left to detach it from the mount. You will hear a click as the pad detaches.
![]()
- Remove the adhesive cover on the pad
Gently lift the cover layer to expose the adhesive pad beneath.
![]()


- Attach the Adhesive pad to the windscreen
Firmly press the adhesive pad to the clean area of windscreen. Press for 5 seconds to ensure a strong bond between the pad and windscreen.
Note
When positioning the pad on the windscreen, ensure that the thick end is pointing down, with the 'notch' at the bottom. This will allow you to attach the mount the correct way up.

- Reattach the mount to the adhesive pad
Ensure that the adhesive pad is securely attached to the windscreen. Slide the mount back onto the pad, moving from left to right. A click will be heard when the mount connects to the pad. Check that the mount is securely attached.
![]()
- Connect power and Dash Cam
Connect the power cable to the mount (attached to the windscreen). Connect the Dash Cam to the mount using the magnetic pull to guide the Dash Cam. Once the Dash Cam is connected, check that the Dash Cam feels secure.

- Adjusting the Dash Cam
With the mount attached to the windscreen, ensure that objects on the Dash Cam display are level and adjust as required. Ensure that the road ahead is at the centre of the image, in the central third of the display. If too much of the sky is visible it may risk underexposing details on the road; ensure that the road ahead is clearly visible on the Dash Cam display. Do NOT attempt to adjust the Dash Cam while driving.


Position your Dash Cam

Before using the device on your windscreen, check the state and local laws and ordinances where you drive. Some laws prohibit or restrict the placement of objects on the windscreen of a motor vehicle. IT IS THE USER'S RESPONSIBILITY TO MOUNT THE DEVICE IN COMPLIANCE WITH ALL APPLICABLE LAWS AND ORDINANCES. Always mount your Nextbase™ device in a location that does not obstruct the driver's view of the road. Nextbase does not assume any responsibility for any fines, penalties, or damages that may be incurred as a result of any state or local law or ordinance relating to the use of your Nextbase device. As per the installation instructions, you must install the Dash Cam so it does NOT obstruct the driver's view of the road, preferably on the passenger side of the vehicle and behind the rear view mirror. The Dash Cam needs to view through a clear section of windscreen in an area swept by the windscreen wipers. However, the Dash Cam should be installed so as not to intrude significantly within the wiped area. A 40mm intrusion into the green wiped area is the maximum permitted by UK law.
Hiding the Cable
Make sure the hanging cable does not obstruct your view out of your rear window. Ensure that there are no kinks in the cable as you are stowing it. If necessary, use the cable tidy tool supplied with your Dash Cam; this can be used to help pry open the lining of your car (see illustration below).

- Do NOT mount the Dash Cam in front of the driver, as depicted by the red area in the illustration to the left of this page.
- When installing the Dash Cam in a vehicle, always place the device securely against the windscreen and where possible conceal the power cable under trim.
- Make sure that the Dash Cam power cable does not interfere with the drivers operating controls, such as the steering wheel, pedals or gear levers.
- Do NOT mount the Dash Cam in front of an airbag field of deployment or in a position to obscure any mirrors.
- Clean the windscreen at the point of location, prior to fitting the Dash Cam.
- The 522GW comes with a built-in polarising filter on the lens, designed to reduce glare and improve the clarity of your recordings. Looking at the Dash Cam's display, rotate the bezel at the front of the lens until the captured image is at it's clearest, and glare is at a minimum.
- It is recommended NOT to operate the Dash Cam whilst driving. The automatic Start-Stop technology incorporated within the device negates any need to operate the controls whilst driving.
- Adjust any settings or review recordings whilst stationary, not whilst driving.
- After the preliminary SETUP has been carried out upon the Dash Cam, adjust the Screen Saver settings to either ON or Speed display (showing only your speed). Turning the Screen Saver ON will blank the screen 30 seconds after starting the vehicle and therefore the screen will NOT be a distraction to the driver.
Accessories

Multiple accessories can be purchased for your Nextbase Dash Cam, including a rear window camera, Dual USB charger, and a rear facing camera. Some of these products can effect where you should position your camera. For more information on how to position and use these products, download the 'Nextbase Accessories Manual' PDF at www.nextbase.com.
Polarising Filter
The Polarising Filter (highlighted on the Dash Cam, below) is designed to reduced the glare on your windscreen as seen through the Dash Cam, allowing you to record the road ahead clearly. In bright sunlight the filter will also enhance the colour and contrast levels to help capture number plates and other vital details.


Do not place fingers on the glass lens of the filter. Do not adjust the filter while in control of the vehicle.
Adjust the Polarising Filter
The most effective way to set up your Polarising Filter (1) is to place a piece of plain white paper (2) on your dashboard (3) under the rear view mirror. With your camera turned ON you will see the reflection (4) of the paper in the LCD screen of the Dash Cam. Look at the reflection (4) on the windscreen through the Dash Cam display (5).


Gently rotate the front bezel to adjust the filter. Rotate the filter until the windscreen reflection can no longer be seen on the Dash Cam display (see below). Once the reflection can no longer be seen, operate the Dash Cam normally. Please note; it may not be possible to fully remove the reflection, but using the Polarising Filter will noticeably improve your video quality.

The above diagrams for illustration purposes only.
First Time Use

Before you can use your Dash Cam, it is essential to make sure it is fully charged. Connect your Dash Cam via the USB port to a home power source such as a PC or home USB socket for approximately 2 hours.
To ensure the set up of this Dash Cam is as quick and simple as possible, there is an easy to follow 'First Time Use' menu. This menu is used to set your preferred Language, Country (inc. Time Zone) and Speed Units.

This menu will appear when:
- The Dash Cam is first turned on.
- There has been a Firmware Update applied to the Dash Cam and 'Keep User Settings' has been set to OFF. If It is set to ON, your Dash Cam will start normally, with your settings intact.
- After the Dash Cam's settings have been reset, by using the 'Default Settings' option in the Setup Menu.
Follow the on-screen instruction to select the Language, Country, and Speed Units. The settings that influence the displayed time & date will be applied upon receiving a GPS connection.
Note
The First Time Use menu is in place to get you up and running quickly and smoothly. The settings you choose during First Time Use can be changed at any later time in the setup menus. See next page for the First Time Use screens.
First Time Use - Screens

Menus

The default settings have been carefully selected to allow you to use your Dash Cam without the need to change any settings. However, should you wish to change a setting then please see below:
- Use the touch screen to select a settings submenu (Video Settings, Setup, Driver Assistance, Connect Apps)
- Once in the submenu, use the touchscreen to select which function to change.
- When swiping through the menu pages, swipe from the middle of the screen, to avoid accidentally selecting a submenu/function.
Notes:
- Menus are not accessible whilst the Dash Cam is recording.
- Within the Setup Menu there is a 'Default Settings' option to allow you to reset the Dash Cam to the factory defaults, if required.
Menu Tree
See below for the settings to be found under each submenu:
| Video Settings | Setup | Driver Assistance | Connected Apps |
| Resolution Exposure Video Length Audio Time Stamp Speed Stamp GPS Stamp Model Stamp Dual Files Time lapse Number Plate G Sensor Enhanced Image Stabilization Extreme Weather Mode | Screen Saver Alerts Recording History Parking Mode Language Country Time Zone / DST Time & Date Speed Units Device Sounds Screen Dimming Auto Power Off Keep User Settings System Info Format SD Card Default Settings | Emergency SOS Reversing Camera | MyNextbase Amazon Alexa |
Settings
- Resolution
Change your Dash Cam's recording resolution. The resolution of an attached Rear Facing Camera is dictated by the chosen resolution of the Front Facing camera. The resolution of the Rear Camera cannot be altered independently of the resolution of the Front Camera; the two resolutions are linked together to ensure maximum performance. See the table below for the Rear Camera resolutions:Selection Front Camera Resolution Rear Camera Resolution (if connected) 1440P @ 30FPS 2560 x 1440 1920 x 1080@ 30FPS 1080P @ 60FPS 1920 x 1080 1920 x 1080@ 30FPS 1080P @ 30FPS 1920 x 1080 1920 x 1080@ 30FPS
- Exposure
Adjust the exposure level for different lighting conditions. - Video Length
Set the length of the individual recorded video files. The Dash Cam will continue recording, filling the memory card. When the memory card becomes full, the oldest file will be automatically deleted to make space for the new recording. Note Old Protected Files can be overwritten; back up important files as soon as possible to avoid losing your footage. If 'Recording History' is set to Minimum (as required in some territories) the Video Length is locked at 1 minute. This cannot be changed until Recording History is set to Maximum. - Audio
Turn On/Off the microphone for video recording. - Stamps
Turn On/Off the stamps shown on recorded files. Time, Speed, GPS, and model stamps available.
- Dual Files
When recording, both a high and low quality video are saved. If a Rear-Cam is attached, and Dual Files is switched ON, High and Low resolution files will be saved for the Rear view as well, for a total of 4 files (Front High, Front Low, Rear High, Rear Low). Recording high and low resolution versions will take up more space on the SD card. - Time Lapse
TTime-lapse is a technique that makes time appear to pass faster by capturing frames at a slower rate than they are played back. For example, a recording taken over three minutes would be played back as a 30 second movie.
Notes
- When Time Lapse is turned On, Recording History will be turned Off.
- Time lapse is considered as a leisure activity setting and not for use in order to collect evidence in the case of an incident. Time Lapse should be turned off for normal driving conditions.
- Number Plate
Input your vehicle's number plate to add a number plate stamp to your recordings. - G Sensor
Turn off or adjust the sensitivity of the internal G Sensor. The G Sensor detects forces which will protect the current recording in the event of a collision. The higher the G Sensor sensitivity, the less force will be needed to trigger automatic file protection.
- Screen Saver
Turn on the screen saver function to shut down the screen after 30 seconds without any interaction. With the screen off, recording will continue as normal. Touch the display to re-open the screen. You can also choose for the Screen Saver to show your current speed (GPS signal required). - Alerts
Turn On/Off the ascending/descending beeps that sound when a recording starts/stops, the tone when there is an SD Card error, and the chime that sounds when a file is protected. - Recording History
In some territories, there are laws prohibiting the amount of footage your Dash Cam should hold. The default setting is 'Maximum', where your Dash Cam records and stores videos without restriction. If 'Minimum' is selected you will first be asked to Format (wipe) your SD Card; be sure to back up any files you wish to keep before doing this. If you choose not to Format the SD Card, no action is taken and the function will not be activated. Once the SD Card has been formatted, the file recording length will be automatically set to 1 minute. The Dash Cam will now be limited to storing only 4 unprotected files at any one time. When a new file is recorded it will overwrite the oldest file, keeping the number of stored files at the maximum of 4. As protected files cannot be overwritten, these do not count towards the 4 file maximum, and are stored to the capacity of the SD Card. When Recording History is turned On, Time Lapse will be turned Off.
- Parking Mode
When Parking Mode has been turned on, the Dash Cam enters standby mode when the 12Vdc supply has been turned OFF (typically removing your ignition key). The Dash Cam will also enter standby mode if no physical movement is detected for 5 minutes, this is designed to allow use of a permanent 12Vdc supply i.e hard-wire kit. Should physical movement of the vehicle be detected, the Dash Cam will power on and start recording a 45 second protected video. If no further physical movement is detected then the Dash Cam physical movement is detected subsequently, then the camera will continue to record normally. - Language
Select your preferred language. - Country
Select your country to adjust your Dash Cam's time display. - Time Zone/DST
Manually adjust your time zone to adjust your Dash Cam's time display. Manually changing your time zone will change your Country setting to Other. - Time & Date
Adjust the time & date as required. Press MENU to exit and return to the Setup Menu. Note Time and date settings will be over-written upon satellite connection.
Please note there will be a delay between the trigger event and the start of the recording while the Dash Cam turns on. - Speed Units
Choose between MPH and KMH
- Device Sounds
Turn On/Off the beep that sounds when the touch panel is pressed, and startup/shutdown sounds. - Screen Dimming
The Dash Cam automatically adjusts the brightness of the display to match ambient light levels. This is to ensure that a bright screen is not a distraction while driving at night. - Auto Power Off
While recording, if Auto Power Off is turned OFF and the Dash Cam loses power: the Dash Cam will turn off after 10 seconds. While recording, if Auto Power Off is turned ON and the Dash Cam loses power: the Dash Cam will turn off after 30 seconds.
- Keep User Settings
Turn this ON in order to keep your preferred individual user settings during the Dash Cam firmware update process. Select OFF in order to clear all user settings and return them to defaults during the Dash Cam update process. - System Info
Information such as Dash Cam model, Battery status, Firmware version, and SD card information can be found here. This information covers multiple screens (pages), swipe left or right on the display to scroll through as required. - Format SD Card
Format the inserted SD card. This will delete all content. If the format is unsuccessful, a message will appear on the display; "Format failed, please try another SD Card (U3, 256 GB Max)." Note For stable performance, it is recommended that you format the SD card every 2-3 weeks. You should only do this AFTER you've downloaded any files from the card that you may want to keep. - Default Settings
Resets the Dash Cam to default settings. Your recordings will not be affected.
- Emergency SOS
See next. - Reversing Camera
With a rear-facing camera connected (Rear View, Cabin View, Rear Window), tapping the Rear View Display on the screen will make it full screen (tap again to minimise). With the Reversing Camera function activated, when the Rear View Display is in full screen mode, the image will be flipped horizontally to mimic looking in a mirror, making it easier to reverse. Recordings made with Reversing Camera ON are not affected.
Note
Objects may appear further away than they are in reality; always stay aware of your surroundings while driving and do not rely exclusively on the Dash Cam while reversing.
- MyNextbase Connect
In order for this function to work, you must have MyNextbase Connect™ installed on your smart-phone, have an internet connection, and have Bluetooth turned on. Within this menu, you will be able to manage your connected devices. You will be able to connect and set up new devices (as seen in your Dash Cam's First Time Use), and manage devices which are already connected.
Setup Phone
Install the MyNextbase Connect App from the Google Play Store or the Apple App Store. Once installed, select 'Connect to Dash Cam' on the app. Once a connection is established, a confirmation message will appear on both devices. You may then proceed to use both your Dash Cam and smartphone as usual. Your paired device can be viewed on the 'Paired Devices' screen.
Paired Devices
This screen shows you which smart-phones are currently linked to your Dash Cam. Here you can also unpair devices by pressing the cross (X) to the right of the device's name.
![]()
This page describes the connection process between your Dash Cam to the App. For more information about using the App, see the MyNextbase Connect page.
Google Play Store
![]()
Apple App Store
![]()
- Alexa Built-In
In order for this function to work, you must have MyNextbase Connect™ and Amazon Alexa™ installed on your smart-phone, have an internet connection, and have Bluetooth turned on. Within this menu, you will be able to turn your Dash Cam's Alexa functions ON or OFF, and manage paired devices. Note that you will need up to date firmware for Alexa to function. On the Dash Cam, you will be prompted to download and install the Alexa App from either the Google Play Store (for Android users), or from the Apple App Store (for iPhone users), using one of the two QR codes below.
![]()
Android Store
![]()
App Store
![]()


From the MyNextbase Connect app, click on the 'Learn More' Amazon Alexa button on the Home page. Click to 'Enable' Alexa, and press 'Open in App' to sign in to Alexa using your Amazon login. You must accept all permissions to for Alexa to work. Once your Dash Cam is successfully paired with the Alexa app on you smart-phone you can begin using Alexa. The Alexa button will appear on your Live View screen as shown in the image, above.
Status
Select to turn Alexa Voice Control ON and OFF.
Setup Phone
You will be prompted to download the Alexa app using one of the two QR codes above.
Privacy Mode
With Privacy Mode ON, the Dash Cam will NOT respond to the wake-word, "Alexa". In this instance, the Dash Cam will only respond by using the Alexa button on the Live View screen of the Dash Cam.
This page describes the setup of the Alexa on your Dash Cam. For more information about using Alexa, as well as some prompts to get you started, see the Alexa information page.
Driver Assistance - Emergency SOS
Emergency SOS
Your Nextbase™ Dash Came and MyNextbase Connect App features life-saving crash detection and emergency alerting technology. It is designed to automatically and directly connect you to the nearest Ambulance Service in the event of an accident when you're unable to call for assistance. If your Dash Cam detects a crash, the MyNextbase Connect app monitors key sensors in your phone. If you're unable to call for help, it will automatically send your last known GPS location, medical and vehicle details to the nearest Emergency Service within minutes of the crash. Providing you have a valid subscription, you can drive with total peace of mind; knowing that your phone is being monitored by this award-winning technology.
App
Once MyNextbase Connect is installed, you must set up Emergency SOS with your personal and medical information. Follow the Emergency SOS setup menu in the app, filling out the information fields. This will include information such as your name, medical history, and any pre-existing conditions, Providing accurate medical and vehicle details helps emergency responders locate and treat you as quickly and appropriately as possible. You will also be asked to enter your mobile phone number, as this will be the number the emergency services will call in the event of an incident. When entering your phone number, be sure to enter it with your country dialling code (see below for examples):

Google Play Store

Apple App Store

Enter your phone number to receive a verification code to enter. If you do not receive a verification request, re-enter your phone number. Once you have entered all of your Emergency SOS information and are paired with the Dash Cam, the Dash Cam will automatically turn Emergency SOS ON.
Dash Cam Screen Icon
If Emergency SOS is turned ON and you have not set up your Emergency SOS information on the app, or it has disconnected, you will see a pop-up on your Dash Cam: "Emergency SOS Error. Please open MyNextbase Connect on your phone to reconnect". Once turned ON, the Emergency SOS icon will appear on the Dash Cam's Live view screen.
In the event of an incident
The camera immediately notifies the MyNextbase Connect app to begin monitoring key sensors in your smartphone such as GPS, accelerometers and the pedometer. The camera and app will notify you that it has begun monitoring your smartphone's sensors with on-screen messages and an alarm tone. Should the accident render you unconscious and/or you are unable to cancel the on-screen Emergency SOS countdown, the MyNextbase Connect app will automatically send a crash alert containing your GPS location, mobile number, medical details and vehicle information to the Emergency Services. If you are ok, you can deactivate the alert manually or respond to the follow-up call from an emergency services operator. If the alert does not get cancelled, Emergency Response operators will automatically begin the process of dispatching paramedics to your last known location. If EmergencySOS is triggered inadvertently, the MyNextbase Connect app is designed to detect a range of vehicle and customer movements such as continued driving, walking around or moving the phone. It will automatically cancel the Emergency SOS process if movement is detected as we expect you can call the emergency services if medical assistance is required.
During countdowns the screen on the Dash Cam will alternate between red and black backgrounds to be as noticeable as possible.


- Press to cancel the countdown; emergency services will not be automatically contacted.
- Countdown; time remaining until emergency services are automatically contacted.
When the countdown is cancelled, the Dash Cam and App will revert to normal usage mode. See next page for an additional overview of the Emergency SOS system. Please note that the emergency services response may differ from territory to territory, and not all territories are covered within this feature. If you are unsure, or would like further information, refer to the Emergency SOS FAQs' page or contact our support team at support@nextbase.com.
Emergency SOS is not available in all regions; check the MyNextbase Connect app for the list of supported areas

Driver Assistance - Emergency SO FAQs
If I crash, will you notify the Police? | No. The MyNextbase Connect™ app automatically sends your location, medical and vehicle details to the nearest Ambulance or Emergency Response Service only. |
Can I set it off inadvertently? | The Emergency SOS feature has a range of safeguards to ensure it won't alert the emergency services unless it has validated that assistance is required. This is tried and tested technology has been UK Government approved for connecting directly to the emergency services. |
| What happens if I receive a call and don't need an ambulance? | The Emergency SOS countdown gives you 150 seconds to deactivate the phone sensor monitoring process. Failure to deactivate will then result in a call from the Emergency Services operator. If you are ok you can simply cancel the process via the camera or app within 150 seconds or answer the emergency services call. If you do not manage to do either, simply press the 'Call Emergency Services' button and tell the operator that the crash detection feature sent an alert and that you missed the call back. |
| What happens if I am out of mobile phone signal range? | In the event of an accident, the MyNextbase Connect app requires a network connection and mobile signal. The network connection is needed to send a very small data packet (about 1.5kb) to the emergency services, and the mobile signal is required for the Emergency operator to call your phone. If there is no network coverage, then the MyNextbase Connect app cannot send the data. |
What happens if the phone battery dies? | If your phone's battery dies while the MyNextbase Connect app is monitoring your phone's key sensors, then this data can NOT be sent. |
| What testing and evaluation has the MyNextbase Connect App undergone? | Due to the nature of the Emergency SOS feature and it's ability to connect directly to the Emergency Services, rigorous testing and evaluations are carried out on a regular basis. These include but are not limited to:
|
Alexa Built-In
Your Dash Cam can be connected to your Alexa account to enable voice control options. You can start and stop recording, ask about traffic on your route, play music, and much more. You must have both the 'MyNextbase Connect™' and 'Amazon Alexa' apps installed on your smart-phone, have an internet connection, and have Blu he Alexa App can be the QR Codes or by le App Store® or Google Play®.
Android Store


App Store


Setup
On the Dash Cam, you'll be prompted to download and install the Alexa App from either the Google Play Store or from the Apple App Store. In the MyNextbase Connect app, click on the Amazon Alexa button on the Home page. Click to 'Enable' Alexa, and press 'Open in App' to sign in to Alexa using Amazon login. Accept all permissions for Alexa to work. Once your Dash Cam is successfully paired with the Alexa app on your smart-phone, you can begin using Alexa (starting phrases listed below).
Notes
Audio from Alexa will come from your smartphone, NOT from your Dash Cam. If your smart-phone is connected to your vehicle's speaker system, via Bluetooth or via an aux cable, Alexa's audio output will use your vehicle's speaker system. Make sure the volume on your smartphone is turned up to hear Alexa's responses. When Alexa is in use, a blue bar will be visible along the bottom of your Dash Cam's Live View.
Below are a selection of example phrases to get started:


Video Mode
The key below explains the various information displayed on the screen when your Dash Cam is in Video mode, some icons will only be displayed once the relevant function has been selected within the Video menu, as described below.

Folder Selection Screen

Playback Mode - Photo

The on-screen icons timeout after 5 seconds. Press the screen to bring up the icons.
Playback Mode - Video

Video Editing

How to edit a video
Once in Edit Mode, you will see a white timeline bar with a green indicator and red indicator at either end. A white ball indicates how far through playback of the current file you are. While paused, press the 'Trim Start' button (top left) to move the green indicator bar to the current point on the timeline. Once saved, anything before this point will be trimmed off. While paused, Press the 'Trim End' button (top right) to move the red indicator bar to the current point on the timeline. Once saved, anything after this point will be trimmed off. During playback, the editing controls are greyed out, and cannot be activated, pause to use the trim tools, remove audio, and save functions.
Note: When moving the Start/End trim tools, make sure that the Green (start) indicator comes before the Red (end) indicator on the timeline. if the Red is placed before the Green, the save function will not work.

Press Play to begin playback.

Playback. The white ball indicates your position.

Press Trim Start to move the Trim Start Indicator.

Continue Playback. The white ball indicates your position.

Press Trim End to move the Trim End Indicator. Press Save to export the new file. The new file will be saved as the original file name + EDI (i.e. 180125_175618_009_FH_EDI). If you are editing a protected file, the new file will also be protected. The original file is unaffected.
MyNextbase Connect
MyNextbase Connect™ is an easy-to-use app that will enable you to effortlessly manage and share your videos. In addition to this, there are features on the Dash Cam that can only be used in conjunction with the app; for example, the Emergency SOS function and Alexa Voice Control. Use the QR Codes below to download MyNextbase Connect App from the Apple App Store® or the Google Play Store®. Please note that the app is only compatible with Nextbase™ Dash Cam models 322GW and above (322GW, 422GW, 522GW, and 622GW).
| Compatible with | |||
| 122 |  | 422 |  |
| 222 | | 522 | |
| 322 | | 622 | |
Google Play Store

Apple App Store

Features
Camera Live View: see what your Dash Cam is seeing Download files from your Dash Cam to your smartphone/mobile device Share videos to popular social media platforms National Dash Cam Safety Portal Emergency SOS services (322GW, 422GW, 522GW & 622GW) Check for and install Firmware Updates FAQs Nextbase™ latest offers and deals
MyNextbase Connect™ is an easy-to-use app that will enable you to effortlessly manage and share your videos. In addition to this, there are features on the Dash Cam that can only be used in conjunction with the app; for example, the Emergency SOS function and Alexa Voice Control. Use the QR Codes below to download MyNextbase Connect App from the Apple App Store® or the Google Play Store®. Please note that the app is only compatible with Nextbase™ Dash Cam models 322GW and above (322GW, 422GW, 522GW, and 622GW). For latest supported operating systems please see the Play Store / Apple Store.

Emergency SOS
In order for this function to work, you must have an internet connection, have Bluetooth turned on, be paired with your Dash Cam, and have your Emergency SOS information set up in MyNextbase Connect. The Nextbase Emergency SOS feature is deigned to automatically contact the emergency services in your time of need, and send them to your last known location. To set up this feature, select the menu button, and select 'Emergency SOS'; you will then be prompted to enter personal and medical information that would help emergency responders locate and treat you as quickly and appropriately as possible. Please note that this information is stored ONLY on your smart-phone; we will ONLY send it to emergency responders if the Emergency SOS system is triggered.
MyNextbase Player - Playback
View, edit, and share your footage on your computer with the new easy to use free PC/Mac software. The software also allows you to view in-depth analysis of your journeys, including information on dates and times, speed, GPS location, and more. Connect your Dash Cam via USB or use an SD card reader (integrated or external). When you connect your Dash Cam, if MyNextbase Player™ is already open it will ask if you would like to import all files directly to your video library. MyNextbase Player can be downloaded for free from the 'Support and Downloads' page at: www.nextbase.com.

MyNextbase Player - Edit
To use MyNextbase Player™ to edit your recorded files, you need to ensure that the file you wish to edit is currently playing in the Playback Window. You can do this by double clicking the file as it appears in the File List window. When the file is playing, click on the 'Edit' button to begin the 6 step editing process.
- Join Videos
The videos you join together must all be the same resolution. Your video will have the option to add additional videos before or after the chosen video file. Clicking either of these buttons will open up the list of files in your library that can be added. The order of the video files can be altered by clicking and dragging a video. To remove a video, hover over the chosen file and a 'Remove Video' option will appear. Once you are happy with the video(s) selected, click on the continuebutton to move to step 2. - Trim Video
Shorten your selected clip to only include the incident or event that you are interested in. A green marker on the timeline indicates the beginning of your video. A red marker on the timeline indicates the end of your video. These can be dragged to a point on the Timeline of your choosing The white marker indicates your current playback position. - Annotate Video
Highlight an object or add text to your video. When you annotate a frame, your video will pause at the specified frame and display annotations you have added. The video will resume after 4 seconds. To add annotations, find the frame you wish to annotate using the white marker, and use the 'Add Annotation' button. Along the top of the annotation screen you will see the annotation tools; Draw, Circle, Square, Rectangle, and Text. Clicking any of these options will add an editable annotation to that frame. When you have finished your annotation, click 'Save and Close' to return to the Add Annotation screen, where more annotations can be added. When finished, press 'Continue' to proceed.
![]()

- Add Title Screen (Optional)
Add a title screen to your video. The title will be displayed for 4 seconds at the start of your video. To add a title, click inside the white rectangle and type the desired title. Press 'Continue' to proceed. - Output Settings (Optional)
The flast step allows you to specify the quality of your video file and the data included. Video Resolution determines the quality of the video footage; by default the Video Resolution will be set to output at the same quality as the original files. Stamps for GPS, number plate, and time can also be removed, as well as the audio and GPS data from the video by ticking the corresponding box. Once the data has been removed it cannot be added back into the edited video. This will not affect the original file. Specify the name of the file being created and the location that you would like it saved. When you have chosen your output settings click on the 'Confirm' button to begin processing your video. - Process Video
MyNextbase Player will process your video clip(s) and edits, and produce a single file in the location specified. This can take some time and will depend on the number and length of video files being joined and video resolution. Once the video has been processed, it will be added to your MyNextbase Player file list.
Video Sharing
Videos can be shared to social media and insurers through the 'Share Video' button. Videos can also be upload to the Nextbase™ server; you will be e-mailed a secure link to view or download your video. This link can be sent to your insurer, without the need to transfer a large video file. Videos will be automatically deleted 30 days after upload.
More Features
When a video is being played back in the Playback Window, press 'Crtl + i' to open a window displaying all of the metadata for that video including information such as, file name and size, resolution and frame rate, max and average speeds, GPS information, and more.
Some functions, such as GPS data, are available only on select models
MyNextbase Cloud™
MyNextbase Cloud is our free online video sharing service where you can safely and securely store your Dash Cam files. Upload your file to the Nextbase™ Server using the 'Share Video' function on either MyNextbase Player™, or the MyNextbase Connect™ app. Please note that upload times are dependent on video file size. Once your video has finished uploading you will be given a secure link to watch your video online and/or download it to your computer/device. This link can be shared with others (including your insurer) to view/download the video. Videos will be automatically deleted 30 days after they are uploaded.

 | The upload window will guide you through the upload process; next, you will be prompted to enter your e-mail. |
 | You will have the option to protect your video with a password. |
 | Once the setup of the video has been decided, the upload will begin. Upload times are dependent on file size and internet speed. |
 | Once upload has finished, you'll be given a unique web address to link to your video hosted on the Nextbase server. This link can be shared with others (including your insurer) so that they can view/ download the video. When you first view the video online you may see this message: "This video was uploaded very recently, it may take up to half an hour to generate the online preview however your video can be downloaded immediately." This is normal and the preview will become available within half an hour. |
PC Connection

Use the supplied USB cable to connect the Dash Cam directly to your PC via the USB socket; do NOT connect the USB cable to the Powered Mount. Once connected the Dash Cam will turn on with three options available; 'Access Files', 'Power On', and 'Update Firmware', as described below.
Access Files (Windows)
The Dash Cam will function as a card reader for your PC. An extra drive will appear, and you will be able to view / manage the stored files on the MicroSD card in the Dash Cam. You can view your files using MyNextbase Player™, free editing and sharing software available to download from www.nextbase.com. The Dash Cam is a 'read-only' device; uploading files to the SD card is not possible.
Access Files (Mac)
The Dash Cam will function as a card reader for your MAC. The 'Nextbase' external USB disk icon will appear on your MAC and you will be able to view and/or manage stored files. You can view your files using MyNextbase Player™, free editing and sharing software available to download from www.nextbase.com. The Dash Cam is a 'read-only' device; uploading files to the SD card is not possible. When the Dash Cam is connected to either a Windows or Mac system you will see a pop up on the Dash Cam that will read 'Use MyNextbase Player to review, edit, save, and share recordings'.
Power On (Windows & Mac)
When selected, the Dash Cam will power on with all functions available. This includes charging of the internal battery, a full charge will take approximately 2 hours.

Always turn OFF the Dash Cam before disconnecting from your PC/Mac.
Firmware Updates

Firmware controls the basic functioning of the Dash Cam. If your Dash Cam is not functioning correctly, you may need to update your firmware. Firmware updates may also be released to fix bugs, and improve the general functionality of the Dash Cam. It's important to keep the firmware on your Dash Cam up to date so it can operate to it's full capacity.
How to Check your Dash Cam's current Firmware Version
Within the Setup Menu select 'System Info'. Here you will find information relating to your Dash Cam, including what firmware version is currently active (i.e R05.3).
Ways to Update Firmware on your Dash Cam
There are a number of ways for you to update your firmware version. Connect your Dash Cam's SD Card to PC or Mac™ using a card reader. This will open a file explorer drive, and show the contents of your SD Card. Go to the 'Support & Downloads' page on nextbase.com and download the newest firmware version (i.e R05.4); this will download as a.bin file. Drag and drop the.bin file to the SD Card. Eject the SD Card and insert it back into your Dash Cam. When power is supplied to your Dash Cam it will turn on, and will automatically begin updating. While updating, the red LED to the left of the screen will start flashing. Once the update has been completed your Dash Cam will automatically restart. If you have a PC, You can also update your Dash Cam using the 'Update Dash Cam' function on MyNextbase Player™. This function will NOT work on a Mac. Connect your Dash Cam to PC via USB, select 'Firmware Update' and open up MyNextbase Player™ (available to download for free from nextbase.com). Select 'Update Dash Cam'. A pop-up will appear on your PC describing your current firmware, and the latest version available. When you select 'Update', your Dash Cam will automatically begin updating. While the Dash Cam is updating, the red LED will flash. Once the update has been completed your Dash Cam will automatically restart. Please note that an internet connection is required for the Dash Cam to be updated.
Notes
If 'Keep User Settings' is turned ON in the Setup Menu, your Dash Cam will boot up normally, straight into video live view mode, ready to use. If 'Keep User Settings' is turned OFF, after the update is complete, the Dash Cam will boot up into the First Time Use menu, which must be completed before the Dash Cam can be used. Files saved on the SD card will not be affected by the firmware update.
TV Connection
The Dash Cam can be connected to external video equipment such as a television or monitor to allow you to view your videos on a larger screen. You can connect your Dash Cam to any television or monitor using an HD-Out cable. Please note that not all televisions/monitors will be compatible with your Dash Cam. Connect the HD-Out cable (available from your nearest retailer) between the Dash Cam and your external device (see diagram below), then turn on the Dash Cam.
The screen on the Dash Cam will be blank as the video image is now being sent to the external device, the red power LED on the Dash Cam will be lit indicating the unit is turned on. You can then proceed to use the Dash Cam as you would normally. Make sure that the Dash Cam battery is charged prior to use, as power is not supplied to the Dash Cam via the HD-Out cable.
For prolonged use, an external power supply may be required; use the supplied USB cable with a 5Vdc/USB adaptor, of the type typically supplied with mobile phones.
Note
ENSURE that any external power sources are of the correct 5Vdc output, otherwise damage will be caused that is not covered under the manufacturer's warranty.

Nextbase SD Cards
For best results, we recommend using our Nextbase branded SD cards with your Dash Cam, available to purchase online from nextbase.com, or your nearest retailer.

We recommend formatting your SD Card every 2 weeks to ensure that there is enough space to record and store new footage. When formatting, protected files WILL be deleted. If you wish to keep these protected files, you must back then up externally, most commonly by saving files to a desktop computer, or another secure storage point. To clear your SD card, go to the 'Format SD Card' function in your Dash Cam's Setup settings Menu and follow the instructions on screen.

Which SD Card should I use in a Dash Cam?
Nextbase have designed SD cards specifically for use in our Dash Cams. We work directly with the factory to ensure consistency of the SD card quality. Nextbase have spent years testing, training, and developing SD cards to optimise their performance with our Dash Cams. Due to the differences in technology an SD card that works with a mobile phone or computer won't necessarily work well with a Dash Cam. The main differences between SD cards are the storage size (16GB-128GB) and the READ speed. READ speed isn't important when it comes to Dash Cams, as a Dash Cam WRITES data to the SD card when recording. The ability to maintain a high WRITE speed consistently is what Nextbase SD cards are designed to do better than competitor SD cards. Fluctuations in WRITE speed causes video footage to buffer, and in some cases stop recording entirely. A large requirement our Dash Cams place on the SD card is the ability to re-WRITE over older footage when the SD card becomes full. This means the Dash Cam is always Loop Recording; when the Dash Cam is On, it is recording. Most non-Nextbase SD cards struggle to do this as efficiently as our SD cards. We always recommend using a Nextbase SD card with our Dash Cams to ensure max compatibility, and to minimize the loss of video data.
SD Card Q&A
"Why should I buy a Nextbase branded SD card? Can't I just use my card?"
Our cameras have different requirements to other recording devices; this is because they need to keep recording when the card is full whilst overwriting the oldest unprotected files at the same time.
"Why are Nextbase SD cards more expensive than other brands' SD card?"
Years of research and development have led to the creation of an SD card with superior abilities that ensures it works efficiently with our Dash Cams. The Dash Cams have higher technological requirements than a mobile phone or digital camera, thus the larger price tag.
"Do non-Nextbase SD cards work at all?"
A card that is not made for a Dash Cam may work well in the beginning, but the effectiveness can decrease over time as the SD card is put under sustained strain of re-WRITING video. Our SD cards ensure longevity with our specific recording requirements. In times when you need video evidence of an incident, we cannot guarantee the effectiveness of using other brands of SD cards in our Dash Cams.
"I have a rear camera module, which SD card do I need?"
If you are using a Rear Camera module with your Dash Cam you need a U3 SD card. Using a Rear Camera approximately double the amount of recordings, as there are 2 videos streams. In this case, we recommend larger SD cards to accommodate the increased load of videos.
"What errors may I encounter using a faulty or incompatible SD card?"
You may experience any of the following: SD error messages, Recording failure, Automatic recording failure, Frozen Screen, Gaps between recordings, Corrupted or unplayable files, Failure to startup or shutdown, Inoperable buttons. If you experience any of the faults listed above, we strongly recommend that you replace your SD card with a Nextbase SD card. All our Dash Cams are tested using Nextbase branded SD cards, therefore we cannot attest to the compatibility of other manufacturer's products. For best results we always recommend using Nextbase branded cards.
Frequently Asked Questions
Video Image is blurred | Remove the protective lens cover, clean the lens, make sure the windshield is clean and clear of grease, dirt, and debris. Ensure that the Polarising Filter has been set properly; see instruction page for set up guide. |
I cannot insert the MicroSD card | MicroSD cards are very small and require delicate use. Align the card with the diagram shown upon the Dash Cam and insert the card until you feel a slight spring resistance. You now need to push the card, using your finger nail until you hearand feel a small click. Release pressure and the card will stay retained within the Dash Cam. If you are having difficulty, use the edge of a small coin. |
I cannot remove the MicroSD card | With the card installed, using your fingernail, you now need to push the card further inwards slightly, until you hear and feel a small click. If you are having difficulty, use the edge of a small coin. Release pressure and the MicroSD card will spring out far enough for you to take a hold of it. |
Video Files cannot be played on my computer | The video files from the Dash Cam are in. MP4 format and may not be compatible with your PC if suitable playback software is not installed. |
Video File playback is jumpy | Remove the SD card and format to remove non-contiguous files. For best recording use a Nextbase branded U3 micro SD card of 8 to 256GB. PC may not be sufficient for the playback task, try a different PC. Copy the recorded video files onto the PC / Mac for playback directly rather than use the Dash Cam as a card reader, as the USB system on your PC may be too slow for HD video playback. |
The sound is not synchronised with video during playback | The Codecs upon your PC may not be compatible or the latest standard. Download the latest Codecs from: www.nextbase.com. |
Video has no sound | Ensure that 'Audio' setting is turned ON within the Video Menu. |
Photograph is blurred | Make sure the Dash Cam is still while taking the photo. The Dash Cam has a minimum focal range of around 2 meters. Objects closer than this are likely to become blurred. |
| I can only record a few minutes of video on my MicroSD card. | Change the recording size (Video Length function) to a smaller size. Increase the size of the MicroSD card. Max 128/256GB. In the Setup Menu, ensure that Recording History is set to Maximum. Minimum limits the total number of recordings on your Dash Cam to 4. |
Access Files does not work | The Access Files function will work on both Windows and Mac. Restart the PC, as this may be required for the necessary driver to be loaded correctly. Disconnect and reconnect the Dash Cam. Be aware that you cannot transfer files to the Dash Cam in 'Access Files'. Files can be transferred to the SD Card using an SD Card reader. |
| I cannot save files to the memory card when the Dash Cam is connected to my computer under 'Access Files'. | The Dash Cam is a 'read-only' device. It is not recommenced to save files from other sources to the same memory that you will use for recording within the Dash Cam, as these may have a negative effect on the performance of the Dash Cam. |
| My Dash Cam shuts down by itself after a while. | Either the battery has gone flat, there is no power to the Dash Cam and the Auto Power Off period has been triggered or Parking Mode has been turned on and no vehicle movement has been detected for 5 minutes. |
| No power to my Dash Cam but it works on my computer. | The cigarette power cable is not working. Inspect the fuse in the Car Power Cable plug. Replacement fuse = 2A 32mm type. If the fuse is found to be blown, inspect the power cable for damage which may have caused the fuse to blow. |
| I can't delete files on my SD card within the Dash Cam. | Check to see if these files are 'protected'. If so please follow instructions to 'un-protect'. |
| The Dash Cam screen blanks after a few minutes. | The screen saver is set to ON. Change settings to OFF if required. Default setting is OFF. |
| I get the message: "Cluster size wrong. Please format SD card" on screen. | The SD card has been formatted in another device and the Cluster size is not compatible. Use the Setup Menu to format the SD card from within the SD card. |
The battery will not charge | Ensure the Dash Cam is connected to a reliable power source and that the supplied Car Power Cable is being used, with the blue LED lit. |
The battery only lasts 30 seconds | The battery will only receive charge when the Dash Cam is connected to a power source. Charging takes approximately 2 hours and a full charge is indicated when the blue LED on the Dash Cam goes out. To charge, take the camera indoors and charge it for 2 hours; once fully charged, check to see if the problem persists. If it persists, the car power supply may be causing the issue. |
| The battery only lasts 10 - 15 minutes | This is normal, the battery design allows the 'Auto Power Off' feature to function in event of power loss within the vehicle. It is not intended as an alternative power source to replace the supplied car adaptor. |
| I get the message "SD Card Error" on screen. | The SD card has become unusable by the Dash Cam. Back up useful files to your PC and then Format your SD card from within the Dash Cam setup menu. |
| I get the message "Card Full" on screen. | The SD card has become full as there are too many protected files which cannot be deleted to allow for further recording to take place. Transfer useful files to your PC and delete unnecessary files, or Format the SD card from within the Dash Cam setup menu. |
| When connected to a TV/monitor via HDMI cable, there is no image visible. | The Dash Cam is not compatible with all TVs and monitors. Ensure that all connections are correctly attached. |
| I have turned on 'Parking Mode' and now can't stop the recording. | The Dash Cam will start recording whenever motion is detected. To turn off Parking Mode shutdown the Dash Cam and remove the SD card, this will avoid recording being activated accidentally. Switch the Dash Cam On and turn off 'Parking Mode' in the menu. |
| When I press the Menu button nothing happens | This is normal during recording. Stop the recording before pressing the MENU button. If recording re-starts before you can press MENU, then see the Parking Mode section above. |
| Downloading files from nextbase. com using Google Chrome results in a Malicious Software message. | This is not a cause for concern, as this message will appear whenever new software is the internet. Simply go to the settings within Google Chrome and turn off the malicious software protection tempor nd install the playback software. Reinstate previous Google Chrome settings afterwards. |
| There's no PC Connection Screen when connected to my computer. | Try multiple USB ports and an alternative mini USB cable (if possible). Please ensure it is inserted into the USB port on the Dash Cam and not into the mount. |
| My Camera feels warm when it is on | It's normal for the camera to feel warm when in use, especially when it's recording high definition video or communicating via Wi-Fi. |
| Alexa is not working on my Dash Cam. | Ensure you have both the Alexa App and the MyNextbase Connect app installed. We recommend signing into Alexa through the MyNextbase Connect home screen to ensure that the apps are successfully paired. Ensure that the volume is turned up on your paired smartphone. |
| The QR codes are not working. | There is some variability in the effectiveness of QR Code scanning apps. If yours is not working, try a different one. If the problem persists, you can visit the Google Play Store/Apple App Store and search for MyNextbase Connect or Amazon Alexa manually. |
Product Warnings
Failure to heed the following warnings could result in an accident or collision resulting in death or serious injury.
Distraction Warning
This device is intended to enhance the situational awareness when used properly. If used improperly, you could become distracted by the display, which could lead to an accident causing serious personal injury or death. DO NOT seek to access the information stored on the device or change the device settings whilst driving. Information stored on the device should be reviewed only when your vehicle is stationary, and you are parked in a safe place in compliance with local laws. The device settings should only be changed when your vehicle is stationary, and you are parked in a safe place in compliance with local laws. Always maintain awareness of your surroundings and do not stare at the display or become distracted by the display. Focusing on the display could cause you to miss obstacles or hazards. Use the device at your own risk. Video playback upon devices with display which are visible to the driver, is prohibited or restricted in some Countries or States. Please adhere to these laws.
Vehicle Installation Warnings
When installing the device in a vehicle, do not place the device where it obstructs the driver's view of the road or interferes with vehicle operating controls, such as the steering wheel, foot pedals, or transmission levers. Do not place unsecured on the vehicle dashboard. Do not place the device in front of or above any airbag. Nextbase is not responsible for any costs or expenses associated with void warranties or vehicle repairs.
Battery Warnings
Lithium-ion batteries are used in most Nextbase™ devices. If these guidelines are not followed, batteries may experience a shortened life span or may present a risk of damage to the device, fire, chemical burn, electrolyte leak, and/or injury.
- Do not disassemble, modify, remanufacture, puncture, or damage the device or batteries.
- Do not remove or attempt to remove the non-user replaceable battery.
- Do not expose the device to fire, explosion, or other hazard.
- Do not expose the device to rain or water.
Documents / Resources
References
![www.nextbase.com]() Koop de bekroonde dashcams direct bij Nextbase
Koop de bekroonde dashcams direct bij Nextbase![play.google.com]() Google Play
Google Play![apps.apple.com]() Amazon Alexa on the App Store
Amazon Alexa on the App Store![play.google.com]() Google Play
Google Play![apps.apple.com]() MyNextbase Connect on the App Store
MyNextbase Connect on the App Store
Download manual
Here you can download full pdf version of manual, it may contain additional safety instructions, warranty information, FCC rules, etc.
Advertisement


Need help?
Do you have a question about the 522GW and is the answer not in the manual?
Questions and answers