Table of Contents
Advertisement
Advertisement
Table of Contents

Related Manuals for NextBase 380GW


Summary of Contents for NextBase 380GW
- Page 1 Instruction Manual...
-
Page 2: Table Of Contents
TABLE OF CONTENTS TABLE OF CONTENTS ....................................INTRODUCTION TO USING A DASH CAM ............... USING CCTV IN A COMMERCIAL ENVIRONMENT PRECAUTIONS ........................................CAUTIONS ON USING THIS PRODUCT ......................FCC STATEMENT ....................PRODUCT SPECIFICATION ....................... PACKAGE CONTENTS ....................... PRODUCT FEATURES .................... -
Page 3: Introduction To Using A Dash Cam
INTRODUCTION TO USING A DASH CAM The Nextbase range of Dash Cams have been designed specifically with ease of use in mind, it is recommended NOT to change the default settings, which have been carefully selected to give the best performance for day to day use. -
Page 4: Using Cctv In A Commercial Environment
USING CCTV IN A COMMERCIAL ENVIRONMENT When using the NEXTBASE 380GW in a commercial vehicle you must ensure that you comply with any applicable legislation set out by the Government in your location. The following guide is written for usage of the product in the UK. - Page 5 8. The Data Controller must state how long data is to be stored by the company. The CCTV Code of Practice states that data should be deleted once it is no longer needed. An example of a CCTV Data Storage Policy is included in the “NEXTBASE Policy and Procedure Examples” Folder on the Software Disk.
-
Page 6: Precautions
PRECAUTIONS Please read this manual carefully before operation and keep it for future reference. It will be helpful should you encounter any operational problem. WARNING: Do not expose this product to rain, moisture or water under any circumstances, doing so may result in the risk of electric shock or fire. CAUTION: To reduce the risk of electric shock, do not perform any servicing other than that contained in the instruction manual unless you are qualified to do so. -
Page 7: Fcc Statement
FCC STATEMENT This device complies with Part 15 of the FCC Rules. Operation is subject to the following two conditions: (1) this device may not cause harmful interference, and (2) this device must accept any interference received, including interference that may cause undesired operation. This equipment has been tested and found to comply with the limits for a Class B digital device, pursuant to Part 15 of the FCC Rules. - Page 8 Mailing Address: Unit 2, Caerphilly Business Park, Van Road, Caerphilly. CF83 3ED. UK Contact: Graham Lambert Tel: +44 02920 866429 Email Address : Support@nextbase.co.uk 2. Product Info Product Name: Dash Cam Model No.: NBDVR380GW...
- Page 9 Mailing Address: Unit 2, Caerphilly Business Park, Van Road, Caerphilly. CF83 3ED. UK Contact person: Graham Lambert Signature: Email Address: Support@nextbase.co.uk Tel: +44 02920 866429 Date : 15 January 2018 8.
-
Page 10: Product Specification
Windows is a registered trademark of Microsoft Corporation in the United States and other countries. NEXTBASE Replay 3 is a registered trademark of Portable Multimedia LTD in the United Kingdom. NEXTBASE Cam Viewer is a registered trademark of Portable Multimedia LTD in the United Kingdom. -
Page 11: Package Contents
Dash Cam. Designed in the UK the 380GW is discreet and fits neatly at the top of the windscreen to record the road ahead in FULL 1080p HD to ensure that you capture every detail such as road signs and number plates. -
Page 12: Powered Gps Mount
There are two sockets available, one for use with the supplied 90 car adaptor, the other for use with the Nextbase Hardwire Kit (sold separately) which uses a straight connector. Please contact your Nextbase retailer to purchase the Nextbase Hardwire Kit. -
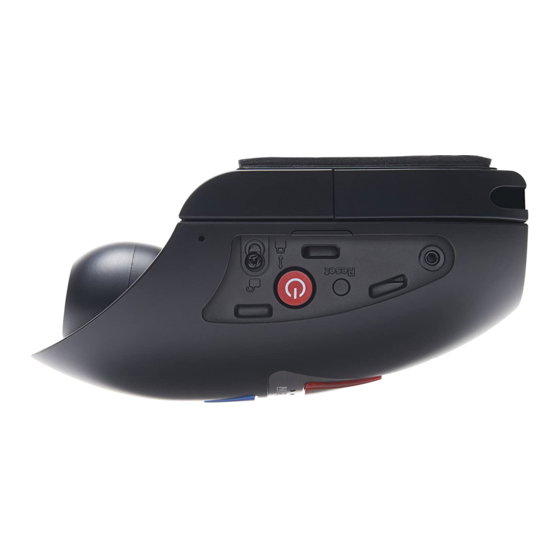
Page 13: Camera - Parts & Controls
CAMERA - PARTS & CONTROLS Please see below to identify the parts and controls of your Dash Cam. Left side: Reset 1. Side cover There are two types of side cover supplied: Standard covers: These are fitted when the Dash Cam as standard and are used during normal operation. Remember to replace the side cover before use. - Page 14 CAMERA - PARTS & CONTROLS (CONTD.) Left side continued: 4. Power & Start / Stop recording button Long press (2 seconds) power On/Off the Dash Cam. Short press to start / stop recording. 5. Camera to Mount locking screw The camera can be secured to the mount to prevent un-authorised removal, see pages 30 - 31 for further details.
- Page 15 CAMERA - PARTS & CONTROLS (CONTD.) Please see below to identify the parts and controls of your Dash Cam. Right side: 1. Side cover Removable side cover, remember to replace the side cover before use. 2. Anti-tamper screw insert Insert thread for the anti-tamper screw. 3.
- Page 16 Formatting SD Card GPS Locked Note: - The blue LED will only function when there is a NEXTBASE 380 Battery Pack installed, this is sold separately. Please contact your NEXTBASE retailer to purchase the NBDVR380BAT. - This Dash Cam uses Negative Temperature Coefficient (NTC) technology to protect the battery.
- Page 17 CAMERA - PARTS & CONTROLS (CONTD.) 2. Speaker Used for the two types of ‘notification’ sounds. Sounds: There are two sounds, these are used to identify when recording starts and stops. 1. Start recording A three-tone beep sound (ascending) will be heard when recording starts. 2.
- Page 18 CAMERA - PARTS & CONTROLS (CONTD.) 3. Protect button & indicator Press the protect button whilst recording to protect the current file, the button will illuminate, red in colour indicating the file is protected. Depending on at which point during the current recording the file is protected, the camera will also save the previous or subsequent recordings, as follows:- If the protection takes place during the first 3rd of the recording, the previous recording will also be protected.
- Page 19 For use with the battery pack (sold separately), required if using the Parking Mode function on a 'switched' live power source, i.e. a 12Vdc outlet that only provides power when the vehicles ignition is turned on. Please contact your Nextbase retailer to purchase the battery, part number NBDVR380BAT.
-
Page 20: In Vehicle Installation
IN VEHICLE INSTALLATION 1. Remove side cover Using the finger nail slot, remove the right hand side cover, under which the SD card slot is located. 2. Insert micro SD Card Insert the MicroSD card here, taking care that the gold contacts are facing towards the bottom of the Dash Cam. - Page 21 IN VEHICLE INSTALLATION (CONTD.) 3. Replace side cover Click the side cover back in to place, with the curved edge engaging firstly. 4. Remove camera from mount Slide the mount towards the camera lens to disengage the mount.
- Page 22 6. Connect power Connect the supplied Car Power cable in to the Mini USB socket marked ‘For use with 90 connector’. Note: - The Nextbase hardwire kit connector will utilize the mini USB socket marked ‘For use with straight connector’.
- Page 23 IN VEHICLE INSTALLATION (CONTD.) 7. Refit cable lock The cable lock can now be refitted by firstly inserting the tang fully and then rotating the cable lock until it engages fully around the power cable and then clicks in to place in the mount. The cable clamp can be secured to the mount to prevent un-authorised removal, see pages 30 - 31 for further details.
- Page 24 IN VEHICLE INSTALLATION (CONTD.) 9. Download and install the APP Visit the appropriate APP store for your smartphone / tablet and download the Nextbase Cam Viewer APP. Install the APP upon your device and then open the APP in readiness to connect to the Dash Cam.
- Page 25 If the vehicle in which the Dash Cam is installed has permanent live cigarette lighter sockets, the user can simply use the power button to switch the Dash Cam off when the vehicle stops. To take advantage of the Automatic Start / Stop Technology a Nextbase Hardwire Kit can be installed on a switched-live power supply.
- Page 26 With the Nextbase Cam Viewer APP working upon the Smartphone / tablet, press “Connect to Dash Cam” and then choose the 380GW Dash Cam option. This will show the Live View image from the Dash Cam upon the Cam Viewer APP.
- Page 27 13. Remove the 3M protective sheet Peel off the red layer to expose the 3M sticky pad beneath. 14. Locate and then check the 380GW camera position using App Offer the Dash Cam towards the windscreen whilst looking at the Live View on the connected Smartphone / Tablet.
- Page 28 IN VEHICLE INSTALLATION (CONTD.) 15. Apply mount to windscreen Lightly press the mount against the windscreen and double check that the image as seen upon the smartphone / tablet is correct. Make any adjustments if required, prior to pressing the Dash Cam firmly against the windscreen to ensure that the 3M tape is securely attached.
- Page 29 IN VEHICLE INSTALLATION (CONTD.) Please read and follow the notes below for the safe operation of your Dash Cam within your vehicle. As per the installation instructions, you must install the camera so it does NOT obstruct the drivers view of the road, preferably behind the rear view mirror. Whilst the camera clearly needs to view through the windscreen in an area swept by the windscreen wipers, the camera should be installed so as not to intrude significantly within the wiped area.
-
Page 30: Anti-Tamper Security Installation
ANTI-TAMPER SECURITY INSTALLATION This allows the Dash Cam to be setup for 'Authorised use only', therefore preventing un-authorised operation, or removal of the camera. Three elements of anti-tamper security are available, which can be used individually or all together, as required. This is a three stage process, using the supplied Security Pack: 2x Locking covers 2x Anti-tamper screws (machined screws for use with the locking covers) -
Page 31: Cam Viewer App
ANTI-TAMPER INSTALLATION (CONTD.) 2. Camera to Mount locking screw The camera can be secured to the mount to prevent un-authorised removal. Remove the two side covers to gain access to the ‘camera to mount’ locking screws, these are found on both sides of the camera. With the camera attached to the mount and using the supplied security screwdriver, loosen the two anti-tamper screws, taking care NOT to remove them fully. -
Page 32: Introduction
CAM VIEWER - INTRODUCTION Nextbase Cam Viewer is a an APP specifically designed for use with the Nextbase range of Dash Cams and works with Android & iOS for use on Smartphones and tablets alike. See Product Specification section for minimum Operating System requirements. -
Page 33: Connect Your Device
CAM VIEWER - CONNECT YOUR DEVICE Connecting your mobile device to your Dash Cam Once you have downloaded Nextbase Cam Viewer for your mobile device, you will need to turn on the Wi-Fi function on your Dash Cam. With the dash Cam powered on, press and hold the button until it starts to flash blue. -
Page 34: Main Screen
Nextbase Cam Viewer Menu options. 1. Menu Tap here to access the Nextbase Cam Viewer Menu options, these include Dash Cam Settings. 2. Live View This window displays a live image from your Dash Cam. Tapping the Live View window will display the Live View full screen and allow you to stop and start recording 3. -
Page 35: Downloading Recordings
To download files from your Dash Cam to your mobile device first tap on the View Dash Cam Videos button on the Main screen. Nextbase Cam Viewer will then display a list of videos stored on your Dash Cam as shown below:- DASH CAM VIDEOS 150118_185507_003.MOV... - Page 36 To download files from your Dash Cam to your mobile device first tap on the View Dash Cam Videos button on the Main screen. Nextbase Cam Viewer will then display a list of videos stored on your Dash Cam as shown below:- DASH CAM VIDEOS 150118_185507_003.MOV...
-
Page 37: Sharing Recordings
YouTube or Twitter as well as the option to use Nextbase Private Share. Nextbase Private Share will allow you to upload your videos to the Nextbase Servers and when upload is completed you will be given a link which you can then send to friends or your insurance company allowing them to watch your video online. -
Page 38: Dash Cam Settings
Dash Cam Settings Dash Cam Update Dash Cam Update Disconnect Dash Cam Disconnect Dash Cam FAQs About About Acknowledgements Acknowledgements Acceptable Usage Policy Acceptable Usage Policy Visit Nextbase.co.uk Visit Nextbase.co.uk VIEW VIEW VIEW VIEW VIEW VIEW DOWNLOADED DOWNLOADED DOWNLOADED DASH CAM... - Page 39 DASH CAM SETTINGS (CONTD.) Video menu: The default settings have been carefully selected to allow you to use the Dash Cam without the need to change any settings. However, should you wish to change a setting then please see below. Note: - Menus are not accessible whilst the Dash Cam is recording.
- Page 40 5 minute period. Switched live: This method requires the Nextbase 380 battery pack to provide power to the Dash Cam, as when the vehicles ignition is turned off the 12Vdc outlet will no longer supply power to the Dash Cam.
- Page 41 Default Setting: On 9. GPS Location Stamp Turn On / Off the GPS co-ordinates that are shown on recorded files. When a recording is viewed using the supplied NEXTBASE Replay playback software the GPS co-ordinates remain available. Options: On and Off Default Setting: On 10.
- Page 42 DASH CAM SETTINGS (CONTD.) Setup menu: The default settings have been carefully selected to allow you to use the Dash Cam without the need to change any settings. However, should you wish to change a setting then please see below. Note: - Menus are not accessible whilst the Dash Cam is recording.
- Page 43 DASH CAM SETTINGS (CONTD.) DASH CAM SETTINGS (CONTD.) Setup menu continued: 2. Format SD Card Format the inserted memory card. This will delete all content upon the SD card. The SD card can also be formatted by pressing and holding the Protect button for 6 seconds, the yellow LED indicator will flash (quickly) during formatting.
- Page 44 DASH CAM SETTINGS (CONTD.) DASH CAM SETTINGS (CONTD.) Setup menu continued: 8. Sounds Turn Off / On the device sounds, these will cancel the notification Sounds and also the Startup & Shutdown chimes. Options: On and Off Default Setting: On 9.
-
Page 45: Pc Connection
- Update mode is ‘read+write’, this means that content on the SD card can be updated and erased. This in turn lets NEXTBASE Replay 3 write the new firmware to the SD card, allowing the automatic update to take place. -
Page 46: Trouble Shooting
TROUBLE SHOOTING PROBLEM SOLUTION The mount will not stay in place Ensure that the red protective cover (plastic film) has been removed upon my windscreen. from the mount pad. Make sure that the glass is smooth and clean. Press the mount firmly to the glass ensuring that there is 100% contact with the glass. - Page 47 The video files from the Dash Cam are in .MOV format and may not be compatible with your PC if suitable playback software is not installed. Install the Nextbase Replay 3 playback software which is freely available from www.Nextbase.co.uk Video Image is blurred.
- Page 48 The NEXTBASE Cam Viewer Please uninstall the NEXTBASE Cam Viewer app and re-download app will not open. again from your devices App Store. When I open the NEXTBASE...
- Page 49 Dash Cam will need to have new firmware installed to reset the password (and all other settings) back to the defaults. Visit www.nextbase.co.uk for product firmware and instructions upon how to perform the update. Unresolved issues.
- Page 50 NOTES...
- Page 51 NBDVR380GW-IM-ENG-R2...
Need help?
Do you have a question about the 380GW and is the answer not in the manual?
Questions and answers
Do you need a special tool to remove side cover to access stop recording button 380GW As it doesn't seem to move very easily and I don't want to cause damage to the outer casing
No, a special tool is not needed. The side cover can be removed using the fingernail slot.
This answer is automatically generated
when I press the blue connect button it does not flash and I **** unable to connect to my phone
If the blue Wi-Fi button on the NextBase 380GW is not flashing, it means the camera is not in Wi-Fi mode. To connect to your phone, press the Wi-Fi button until it starts flashing. If the button remains solid blue, the camera is already connected to a mobile phone. If you still experience issues, try resetting the camera and reconnecting from scratch.
This answer is automatically generated