VAPamore Primo MR-100 Manual
- Instruction book and users manual (27 pages) ,
- Instruction handbook manual (15 pages) ,
- Instruction book and users manual (15 pages)
Advertisement
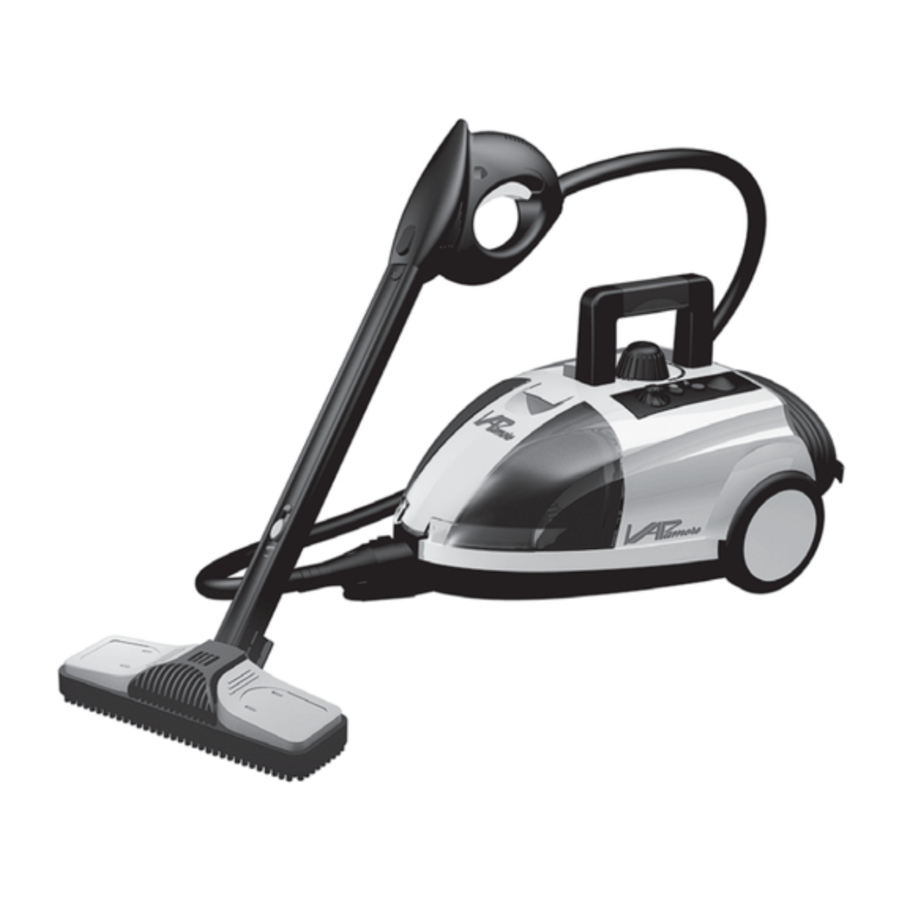
STEAM CLEANER PARTS OVERVIEW

- Funnel
- Measuring jug
- Steam gun with hose and connector
- Accessory adaptor
- Detail nozzle
- Jet nozzle attachment
- (A) Nylon grout brush
(B) Nylon medium duty brush - Metal brush
- 2 in 1 attachment (clothes steamer)
- Cotton cover
- 2 in 1 attachment (window cleaner)
- Large cleaning cloth
- Floor cleaning head
- 3 extension tubes
- Steam cleaner
- Cord reel
- Accessory storage bag (not pictured)
Technical Specification
Model: MR-100
Power supply: 120V 60Hz
Heating element power: 1500W
Steam pressure: 3.5 bar (max)
Permissible pressure: 5 bar
Volume of water tank: 1.6 litres (max)
Steam availability: 50 minutes/tank (max)
Heating time: Approx.11 minutes
Steam flow rate: 40g/ min (max)
Sound level: 30 dB(A)during use
Weight: Appliance without accessories 4.5kg
Subject to technical change without notice.
STEAM CLEANER ASSEMBLEY

Never unscrew the tank cap during use. The tank is under pressure.
Do not operate a damaged appliance or damaged accessories
ACCESSORIES
The steam cleaner has an accessories compartment that houses the detail nozzle, both brush nozzles, the jet nozzle and the 2- in-1 nozzle. Open the accessories compartment by pulling the locking handle upwards and lifting the transparent cover of the accessories compartment off towards the front
(Figs.3/1 and 3/2).

Remove the required steam accessory and replace the cover. Slide the nose of the cover into the recess above the steam socket and press it down firmly at the back until the cover clicks into place
(Figs.3/1 and 3/2).
First connect the hose to the steam socket on the front of the steam cleaner. To do this, flip the black cover flap down and push the connector of the hose firmly into the steam socket until it clicks into place (Fig. 3/3).

To remove the hose, press in both release buttons on the right- hand and left- hand sides of the steam connector and pull it out of the steam socket (Fig.3/4).

EXTENTION TUBES
Assemble the extension tubes if the steam cleaner is to be used to clean floors or difficult to reach areas. To do this, push the open end of a tube Steam trigger onto the steam gun. Push it onto the steam gun until the release button of the steam gun clicks into place. Add one - three extension tubes as required (Fig. 3/5).

Press in the appropriate release button and pull the tubes apart with a downward movement to take the extension tube off again (Fig. 3/6).

FILLING & OPERATION
The steam cleaner water tank holds 1.6 liters. Switch the steam cleaner off and remove the main plug from the socket. The steam cleaner must always be disconnected from the main when filling up with water. Unscrew the tank cap (Fig.4/ 1) by pressing the cap down and simultaneously turning it counterclockwise. Use the funnel and measuring jug supplied when filling with water (Fig.4/2).

 NOTE:Only fill with pure water without additives of any kind, e. g. perfume, cleaning agents, alcohol. It's advisable to use distilled water to prevent lime scale deposits. Otherwise boil the water first to extend the life of the steam cleaner.
Do not exceed the maximum of 1.6 litres when filling the tank! Screw the tank cap firmly back on by turning it clockwise while pressing down.
Plug the steam cleaner main plug into a proper socket (Fig.4/ 3) and switch the steam cleaner on by pressing the on/ off switch (Fig.4/4).

The green light will glow amber when the switch is in the on position. The red light will glow when the steamer is in heating mode and will turn off in approximately 11 minutes once steamer is fully heated and ready for use. The red light will cycle on and off with the heater to maintain full temperature during use. (Fig. 4/4)
Never aim the steam outlet of the steam gun at people, animals, plants or electrical systems. There is a risk of scalding or electric shock.
Always purge the residual water upon first operation after the machine has heated fully or between extended breaks in use. This will release the water that has accumulated in the lines of the machine. This is done by holding down the trigger and releasing the excess water into a rag or container.
Release the locking device (child- proof device) by pushing the triangular pin on the right- hand side of the steam gun in towards the left (Fig.4/5). Hot steam now escapes if the steam button is operated. Hold the steam gun over an old cloth to absorb any initial spray water. Operate the steam button until the steam is emitted evenly. Cleaning can now begin.

OPERATION
NOTE:Always test the steam cleaner first on inconspicuous or invisible areas of the surfaces or fabrics to be cleaned to check their tolerance to hot steam.
* Steam may result in bleaching of painted / varnished wood.
* Steam may discolor shiny plastics.
* Acrylic, velvet and linen react very sensitively to the hot steam.
NOTE: For understandable reasons, the manufacturer cannot be held responsible for damage to objects, materials, people, animals or plants that occurs due to unsuitable use of hot steam or due to improper use of the appliance.
NOTE:The steam cleaner is fitted with an overheating cut-out. The steam cleaner switches off automatically on reaching atemperature of 180 C to prevent overheating. Disconnect from the main power immediately by removing the plug. The steam cleaner may be operated again after a 30- minute cooling period.
Do not aim the steam outlet at one point for too long.
The flow rate of the steam emitted can be regulated by turning the steam controller and can be adjusted to the level required. Turn the steam controller clockwise for less steam and counter clockwise for more steam (Fig.4/6).

Do not tip or tilt the steam cleaner by more than 45 degree during use and ensure that the appliance always stands on a firm base. One full tank is enough for a maximum of 50 minutes use. Do not leave the machine unsupervised while switched on and if necessary use the child proof lock to secure the steam switch. To do this, press the triangular pin on the left hand side of the steam gun in to the right.
The housing and accessories become hot during operation. Allow the steam cleaner to cool down beforechanging the accessories. Never open the tank cap while the steam cleaner is switched on as the tank is under pressure.
REFILLING WATER
The tank must be filled up if the steam flow emitted starts to decrease. Switch off the steam cleaner by pressing the on / off switch. The green operating pilot lamp goes off. Press the steam button on the steam gun to release the remaining pressure and then lock the gun. Remove the main plug from the socket and allow the appliance to cool down for at least 15 minutes. Open the tank cap by pressing it down andturning it counter- clockwise.

Hot steam may escape on opening. There is a risk of burns from the cap thread and the tank.
Add water using the measuring jug and funnel then carefully close thetank cap again. The steam cleaner can now be plugged in again and switched on. The steam cleaner is ready for use as soon as the heating pilot lamp goes off.
ACCESSORIES / FLOOR CLEANING HEAD
The floor head adapter attaches and is removed by twisting the adapter 180 degrees so its facing upside down. This will allow it to be released from the floor cleaning brush. Improper installation or forcing the adapter into place can break the latch inside the floor head and void the warranty on this part. (Fig. 5/ 1)

Attach the floor head to the end of the extension tube. Ensurethat the head clicks into place on assembly (Fig.5/1). The floor head is ideal for cleaning washable wall and floors. It may be used with or without the cleaning cloth. Placethe floor head on the cleaning cloth and secure the overhanging material under the cleaning cloth clips on the left and right. ( Fig.5/2)

ACCESSORY ADAPTOR
The steam cleaner has a range of different attachment nozzles. First assemble the accessory adaptor so that these attachments can be connected to the steam hose. The accessory adaptor can be attached directly to both the steam gun and the end of one or more extension tubes.
Ensure that the adaptor is firmly pushed on until it clicks into place (Fig.5/3). Pressin the appropriate release button and pull apart with a downward movement to take the adaptor off again.

DETAIL NOZZLE
The detail nozzle may be used on its own for cleaning or may also be fitted with one of the brush nozzles, the jet nozzle or the 2 in 1 nozzle.
Push the nozzle onto the accessory adaptor and give it a firm quarter- turn in the direction of the arrow stamped on the nozzle (Fig.5/4).

Reverse the sequence to take the detail nozzle off. twist the nozzle a quarter- turn in the opposite direction to the arrow and pull it off with a downward movement.
JET NOZZLE
Simply push the jet nozzle firmly onto the detail nozzle to attach it (Fig.5/5). This nozzle makes it possible to clean hard to reach places. The jet nozzle may be removed by pulling it off with a downward movement.

BRUSH NOZZLES
The two brush attachments are pushed firmly onto the detail nozzle in the same way as the jet nozzle. Even the most stubborn dirt can be removed from blinds, central heating radiators, valves, etc. using the small nylon brush. For hard less sensitive surfaces and grout lines use the grout brush. (Fig. 5/6). The metal brush (Fig. 5/ 7) is suitable for heavy staining on less sensitive materials such as stainless steel or stone. The brush nozzles are removed by simply pulling them off with a downward movement.

2 IN 1 ATTACHMENT
The 2 inl nozzle consists of a right- angledclothes steam attachment onto which the window cleanercan be attached. Push the right- angled steam attachment firmly onto the detail nozzle. Pull the cotton cover over the nozzle for more thorough cleaning and to protect the work surface (Fig.5/8).

Fix the window cleaner with the rubber blade to the right-angled steam attachment if windows, mirrors or tiles are to be cleaned (Fig. 5/9).

Glass may crack if subjected to thermal shock. Pre-heat areas of glass prior to steam cleaning by spraying steam in a wider arc from a distance of 20 to 25cm. Slowly reduce the distance to 10 to 15cm to heatthe glass up further.
CLEANING
Always ensure before cleaning or maintaining the steam cleaner that it is switched off and unplugged from the main power. Only clean the steam cleaner by wiping over the housing with a slightly moistened cloth. Do not use any cleaning agents, abrasives or alcohol since they may damage the housing. The tank shall be rinsed out after 5 filling operations and allow the tank to dry out completely before closing. The water tank should be treated with lime scale remover approx. every 6 months to prolong the steam cleaner's life. Place one (or at most two) lime scale removal sticks in 1 liter of warm water and fill the water tank with it. Allow the solution to work for approx. 30 minutes then pour away the water with the dissolved solids. Repeat this process if necessary then rinse out the tank with water.
STORAGE
Switch the steam cleaner off. The green operating pilot lamp goes off. Press the steam button on the steam gun to release the remaining pressure. Secure the steam gun by pushing the locking pin on the left- hand side of the handle in to the right.
Remove the main plug from the socket and allow the appliance to cooldown. Empty the water tank so that no deposits can settle
The steam cleaner must have cooled down completely before being put away. Store the steam cleaner so that it is out of the reach of children. The extension tube with assembled floor nozzle may be inserted in the parking holder on the back of the steam cleaner for storage purposes or for short breaks while working.
TROUBLESHOOTING
TO REDUCE RISK OFPERSONAL INJURY - UNPLUG STEAM CLEANER BEFORE SERVICING.
PROBLEM: Operating pilot lamp fails to light.
Cause:The steam cleaner is not plugged into a socket or is not switched on.
Solution: Insert the main plug into a socket or switch the steam cleaner on.
Cause: The socket is faulty.
Solution: Check the socket by unplugging the steam cleaner and plugging in a different appliance.
Cause:The power cable is damaged.
Solution: Have the cable replaced by a Service Agent.
PROBLEM: No steam is emitted when the steam button is pressed.
Cause: The child proof lock is preventing release of the steam button.
Solution: Push the pin on the right- hand side of the steam gun inwards and to the left.
Cause: The water tank is empty.
Solution: Fill in water.
PROBLEM: Only a very small amount of steam flows out.
Cause: The steam controller is set to minimum.
Solution: Turn the steam controller counter clockwise until sufficient steam is emitted.
PROBLEM: The steam cleaner takes a very long time to heat up.
Cause: The water tank is furred up.
Solution: De- scale the water tank.
NOTICE:
To provide continued protection against risk of electric shock, connect to properly grounded outlets only.
*Not for space heating purposes.
SAFETY INFORMATION
When using the steam cleaner, basic safety precautions should always be observed, including the following:
- Do not leave the steam cleaner unattended when plugged in/ Unplug it from socket when not in use.
- To prevent electric shock do not use outdoors
- Not to be used as a toy. Close supervision is necessary when used near children.
- Use only as described in this manual
- Do not use with a damaged cord or plug. If the supply cord and/or plug is damaged, they must be replaced by the manufacturer, a Service Agent or similarly qualified persons i n order to avoid hazard
- Do not pull or carry by the cord, use the cord as a handle, allow the cord to come into contact with hot or sharp surfaces or close a door on the cord
- Do not unplug by pulling on the cord.
- Do not handle the plug or steam cleaner with wet hands.
- Do not put any objects into openings or operate with openings blocked.
- Do not use without the tank cap in place.
- Turn off all controls before unplugging
- Keep the steam cleaner on the floor
- Do not use an extension cord
- Do not attempt to remove blockages with sharp objects as hey may cause damage.
- Store indoors, put away after use to prevent tripping accidents.
- Using improper voltage may result in damage to the steam cleaner and possible injury to the user. The correct voltage is Stated on the rating label
- This steam cleaner is intended for household use only
- A hazard may occur if the steam cleaner runs over the power supply cord.
- The steam cleaner must be kept level during operation.
- Never immerse the steam cleaner in water or other liquids
- Keep the steam cleaner away from rain and moisture. The steam cleaner is not suitable for outdoor use.
- Only use the steam cleaner in containers / pools that are not filled with water or other liquids.
- Do not operate the steam cleaner without watering the tank. Always top off with water w hen needed.
- Empty the water tank if stored for an extended period of time
- Never fill the tank with anything other than water. Never put additives ( such as perfume, stain remover or products containing alcohol) in the water as they may damage the steam cleaner or make it dangerous to use
- Always remove the main plug from the socket and allow the steam cleaner to cooldown completely before topping with water.
- Do not over fill the tank. Do not exceed the maximum filling level. Please use the measuring jug and funnel included.
- Ensure that the water tank' closure cap has been screwed down fully before use.
- Only carry the steam cleaner by the carry handle
- Do not touch any hot areas on the steam cleaner, It is normal for the steam cleaner to heat up during operation
- Do not use the steam cleaner to treat any items of clothing that are still being worn on the body
- The force and heat of the steam may have an adverse effect on some materials. Aways check whether a surface is suitable for treatment With the steam cleaner by carrying out a test beforehand on a concealed area.
- Always include these operating instructions if passing the steam cleaner on to a third party
- Never aim the steam cleaner at people, animals or plants (risk of scalding)! Do not aim the steam cleaner at electrical systems.
- Do not operate the steam cleaner without supervision. Please always switch the appliance off and remove the mains plug from the socket if leaving the work area
- The steam cleaner is fitted with a thermostat and a thermal cut-out as protection against overheating.
- Accessories become hot during use-allow them to cooldown before handling
Documents / ResourcesDownload manual
Here you can download full pdf version of manual, it may contain additional safety instructions, warranty information, FCC rules, etc.
Advertisement


Need help?
Do you have a question about the Primo MR-100 and is the answer not in the manual?
Questions and answers