Advertisement
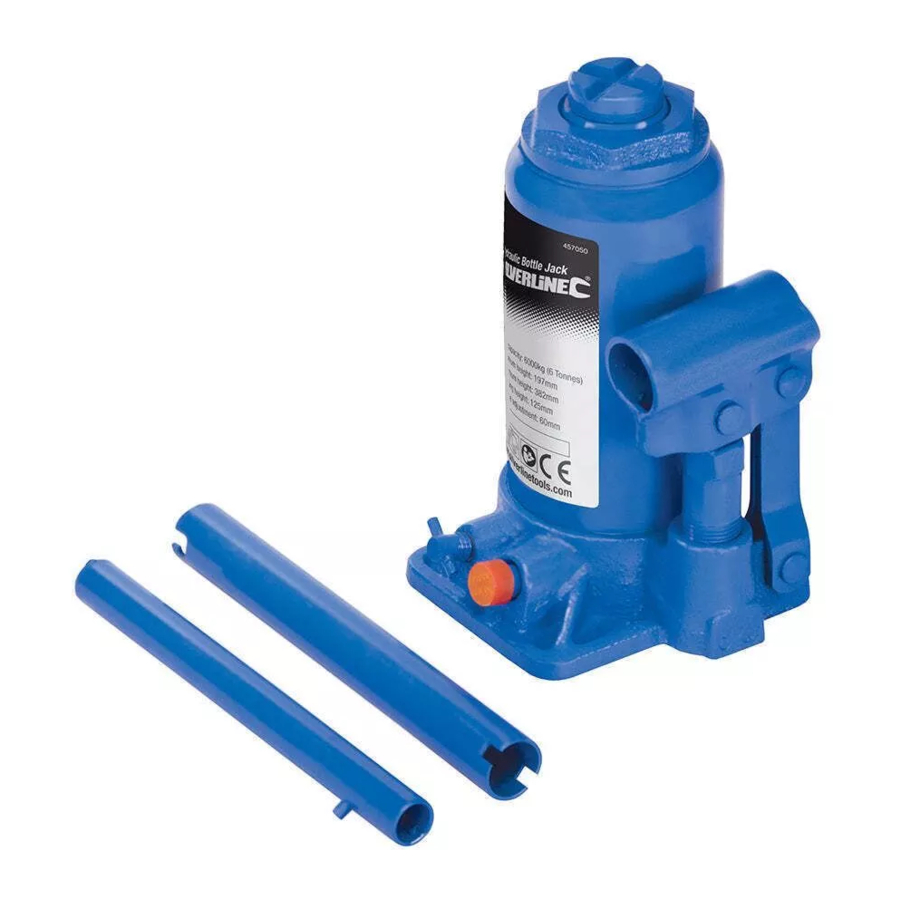
Product Familiarisation

- Saddle
- Handle Socket
- Lifting Cylinder
- Pump Cylinder
- Release Valve
- Handles
Specification
| Rated max capacity: | 6000kg (6 Tonnes) |
| Min height: | 197mm |
| Max height: | 382mm |
| Lifting height: | 125mm |
| Saddle adjustment: | 60mm |
| Saddle diameter: | 30mm |
| Cylinder diameter: | 70mm |
| Oil type: | 22 grade hydraulic oil |
| Operating temperature: | -20°C – +50°C |
| Standard: | BS EN 1494:200+A1:2008 |
| Dimensions (L x W x H): | 115 x 114 x 197mm |
| Weight: | 4.0kg |
As part of our ongoing product development, specifications of Silverline products may alter without notice.
Jack Safety
- Never use to lift people or animals.
- Only lift in a manner that ensures that the load is stable and will remain stable through the lifting process.
- Ensure the jack and the load are in view of the operator throughout any lifting operation.
- Only use on a level surface capable of withstanding the lifting load at the base of the bottle jack. Use with caution on tarmac as this surface may sink under load.
- Whenever any object is being lifted, the area directly below and around it should be considered highly dangerous.
- Never place any body part beneath an unsupported jacked load.
- Never leave an unattended jacked load unsupported.
- Do not exceed the rated lifting capacity even by a minimal amount.
- If the lifting equipment is unable to raise a load, stop immediately. The capacity may have been exceeded or the equipment may require maintenance.
- Always check the condition of your equipment. Hydraulic fittings should be in good condition and free from leaks. No part should show damage or wear.
- Any additional supports should be capable of taking the full weight of the object to be lifted, along with some additional capacity as a safety measure.
- Do not modify any lifting equipment. Any attempt to tamper with this equipment will invalidate its guarantee, and could result in serious injury to yourself, or others around you.
- When jacking a vehicle at the roadside to change a wheel, take appropriate precautions to reduce risks from traffic (lighting, signage etc.).
- When jacking a vehicle ensure that all occupants have left the vehicle.
- Only use jacking points specified by the manufacturer, ensuring they are in good condition and not corroded.
- Product must be stored in an upright position.
- Do not expose to or lift hazardous materials such as acids and solvents.
- Do not use in explosive atmospheres.
- If you are in any way unsure about how to use this equipment safely, DO NOT USE IT.
Intended Use
Hydraulic bottle jack with 6 tonne capacity for lifting vehicles.
Note: Not suitable for material handling applications. Not intended for commercial use.

This jack is designed to be a lifting device only and must be used with proper load supports.
Before Use
- Check hydraulic oil levels (see Maintenance section).
- Ensure the tool is clean, especially on screws, ram, seals and Saddle (1).
- Ensure that the work area is stable, free of slippery contaminants and sufficiently solid so that it does not deform when the load is lifted.
- Check the load to be lifted is within the capacity of the jack.
Inspection & examination
Regular inspections should be carried out according to local and national safety requirements. Record the results of each inspection and keep findings safe for reference. In particular, attention should be paid to:
- Saddle (1) slipping or creeping down
- Signs of damage to the body, Handles (6) or base such as cracks or distortion
- Signs of hydraulic oil leakage
- Signs of damage to the ram, such as scoring, scratches or distortion
- Unusual lifting or lowering action including failure to lift or lower
- Release Valve (5) not working
Any of the above may indicate damage to the jack. Damaged jacks can be extremely dangerous if used. If it is suspected that the jack is damaged, remove from service and have the tool serviced by a competent person. This list is not exhaustive and training may be required for proper inspection of this tool.
Operation
Note: The information provided here is minimal. You may require additional information or training to use this tool for your intended application. When using with vehicles ensure you have all necessary information from the manufacturer.
Never work or place any body part underneath a raised object without using proper support devices (e.g. axle stands).

Before first use it may be necessary to purge/bleed air out of the bottle jack. See Maintenance section.
Lifting

Apply handbrake and use wheel chocks as appropriate when lifting vehicles.
- Using the end of the Handle (6), rotate the Release Valve (5) fully clockwise to its closed position.
- Place the bottle jack on a firm surface, underneath the object to be lifted. Check that the Saddle (1) aligns with a recommended lifting point of the object.
Ensure that the bottle jack will be lifting vertically: do not use the bottle jack in any other direction. - Rotate the Saddle anti-clockwise until it comes into contact with the lifting point.
- The bottle jack is now ready to lift. Double check that the object to be lifted is stable and secure, and that the load is centralised.
- Fit the Handles (6) together and insert into the Handle Socket (2). Pump the handle up and down to raise the load.
- When the object has been raised to the required height, position supports (e.g. axle stands) and lower load to a secure position.
Lowering
- Lift the object from the support stands, following the lifting procedure above.
- Remove the handle from the Handle Socket (2) and place onto the Release Valve (5).
- Very slowly rotate the Release Valve anti-clockwise. A small movement of the valve will allow the bottle jack to lower slowly, and larger movement will allow it to lower quickly. Do not open Release Valve more than one full turn.
- To stop lowering, rotate the Release Valve clockwise, back to its closed position.
Note: When lifting a vehicle to change a wheel, slightly loosen wheel nuts before lifting and tighten wheel nuts before lowering.
Maintenance
Bleeding air from the system
- Open the Release Valve (5) and remove the painted rubber plug from the rear side of the Lifting Cylinder (3).
- Operate the pump rapidly to force air bubbles out of the system.
- Replace the rubber plug. Check operation and repeat if necessary.
Topping up oil
- Open the Release Valve (5) and press the Saddle (1) down fully.
- Stand the bottle jack vertically.
- Remove the rubber plug from the rear side of the Lifting Cylinder (3).
- Fill with high-quality 22-grade hydraulic oil to the level of the hole.
![]()
Do not use brake fluid or any other type of oil. The seals of the bottle jack could be damaged causing it to fail in use.
![]()
Servicing should be carried out by the manufacturer's agent or a similarly qualified person.
Storage
- Store this tool carefully in a secure, dry place out of the reach of children.
- Store the jack upright with ram and Saddle (1) in lowered position.
- Remove Handles (6) and store carefully in a way that enables easy identification.
Contact
For technical or repair service advice, please contact the helpline on (+44) 1935 382 222
Web: www.silverlinetools.com;
UK Address: Toolstream Ltd., Boundary Way, Lufton Trading Estate, Yeovil, Somerset, BA22 8HZ, United Kingdom
EU Address: Toolstream B.V., Hogeweg 39, 5301 LJ Zaltbommel, The Netherlands
Description of Symbols
The rating plate on your tool may show symbols. These represent important information about the product or instructions on its use.
 | Wear hearing protection Wear eye protection Wear breathing protection Wear head protection |
 | Wear hand protection |
 | To reduce the risk of injury, user must read instruction manual |
Documents / ResourcesDownload manual
Here you can download full pdf version of manual, it may contain additional safety instructions, warranty information, FCC rules, etc.
Advertisement


Need help?
Do you have a question about the 457050 and is the answer not in the manual?
Questions and answers