Table of Contents
Advertisement
Quick Links
USER MANUAL
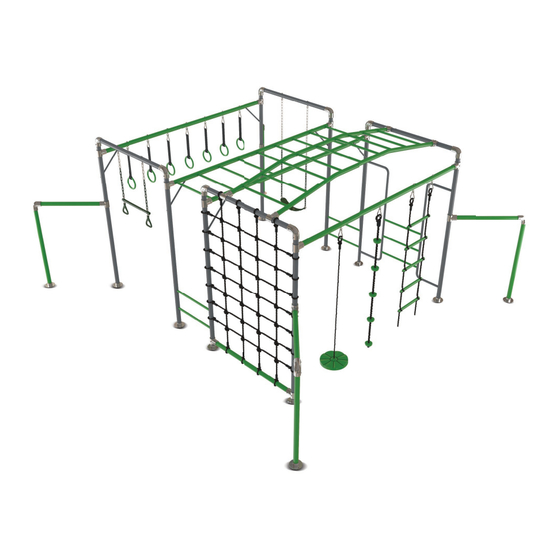
Junior Jungle
Kakadu
WARNING:
which pose a choking hazard to children under 3.
IMPORTANT:
The owner's manual contains safety, assembly, use and maintenance instructions. This product must
be assembled by an adult who has read and understood these instructions. Keep the packaging away
from children and dispose of all packaging before use.
For the installer and your children's safety, it is important to fully read and understand the instructions
and safety hazards before commencing the assembly of the product.
NOTE:
This manual should not be used to guide your purchasing decision. Your product, and the contents
inside its carton, may vary from what is listed in this manual. This manual may also be subject to
updates or changes. Updated manuals are available through our website at www.lifespankids.com.au.
The disassembled product may contain small parts
Find the Digital
Manual Online
Advertisement
Table of Contents

Related Manuals for LifeSpan Kids Junior Jungle Kakadu


Summary of Contents for LifeSpan Kids Junior Jungle Kakadu
- Page 1 USER MANUAL Junior Jungle Kakadu Find the Digital Manual Online WARNING: The disassembled product may contain small parts which pose a choking hazard to children under 3. IMPORTANT: The owner’s manual contains safety, assembly, use and maintenance instructions. This product must be assembled by an adult who has read and understood these instructions.
-
Page 2: Table Of Contents
TABLE OF CONTENTS I. GENERAL SAFETY INSTRUCTIONS 1.1 Danger for Children 1.2 Risk of Injuries 1.3 Product Damage 1.4 Assembly Advice II. SAFETY INSTRUCTIONS III. ASSEMBLY INSTRUCTIONS IV. MAINTENANCE V. CLEANING VI. WARRANTY... -
Page 3: General Safety Instructions
I. GENERAL SAFETY INSTRUCTIONS NOTE: This product is intended for outdoor domestic use only. WARNING! • This product must be assembled by an adult. • Children must not use the product until properly installed. • Not suitable for children under 3 years. •... -
Page 4: Danger For Children
DANGER FOR CHILDREN WARNING: No eating while using the product at the same time. • Children do not recognize potential dangers from this product. The unassembled product must be stored out of reach of children and pets. • This product may only be used with adult supervision at all times. •... -
Page 5: Assembly Advice
ASSEMBLY ADVICE • The assembly of the product must be done carefully and by an able-bodied adult. If in any doubt, ask a technically qualified person. • Before you start with the assembly, read the instructions carefully. • Remove all packaging materials and lay down all parts on an open space. This gives you an overview and simplifies the assembly procedure. -
Page 6: Safety Instructions
II. SAFETY INSTRUCTIONS • The safety instructions of the product should always be considered and obeyed. • Using the product incorectly may result in permanent injury such as paralysis, or even death. Falling off the product may lead to injuries, particularly to the back, neck or head. •... - Page 7 Consumer Information Sheet for Playground Surfacing Materials The US Consumer Product Safety Commission (CPSC) estimates that about 100 000 playground equipment-related injuries resulting from falls to the ground surface are treated annually in US hospital emergency rooms. Injuries involving this hazard pattern tend to be among the most serious of all playground injuries, and have the potential to be fatal, particularly when the injury is to the head.
-
Page 8: Assembly Instructions
III. ASSEMBLY INSTRUCTIONS 1. SET UP FOR THE FIRST PART Overview for first part, please look at the view and clear about the position of each part, then Refer to the detailed guide of each point for the successful assembly. KA03 KA05 KA03... - Page 9 ATTENTION: WHEN YOU ASSEMBLE LEG S KA02, PLEASE ADJUST THE HOLES DIRECTION AND ENSURE IT IS RIGHT FOR SWING BAR ASSEMBLY LOCK BOLT M8X48MM LOCK BOLT M8X48MM LOCK BOLT LOCK BOLT M8X48MM M8X48MM ASSEMBLY INSTRUCTIONS...
- Page 10 LOCK BOLT M8X48MM LOCK BOLT M8X42MM ASSEMBLY INSTRUCTIONS...
- Page 11 2. SET UP FOR THE SECOND PART Overview for the second part, please refer to the images for the correct position of each part and to the detailed guide of each point for assembly. KA18 BR01 KA12 KA18 BR02 KA10 KA13 KA06 KA17...
- Page 12 ATTENTION: WHEN YOU ASSEMBLE LEGS KA10 & KA11, PLEASE ADJUST THE HOLES DIRECTION AND ENSURE IT IS RIGHT FOR SWING BAR ASSEMBLY KA18 NET ASSEMBLY 1. Lay out the net on flat surface. 2. Insert one top beam - KA18 through KA12 the net loops on the top first, then insert two legs (KA10 &...
- Page 13 LOCK BOLT M8X45MM LOCK BOLT M8X25MM LOCK BOLT LOCK BOLT M8X48MM M8X48MM LOCK BOLT LOCK BOLT M8X48MM M8X48MM ASSEMBLY INSTRUCTIONS...
- Page 14 3. SET UP FOR THE THIRD PART Overview for the third part, please look at the view and clear about the position of each part, Then refer to the detailed guide of each point for the successful assembly. KA04 KA09 KA20 KA21 BR02...
- Page 15 CLIMBING FRAME ASSEMBLY: 1. Build top beam KA20 & KA21 first, use lock Bolts M8X42MM 4pcs to secure it. 2. Insert rungs KA23, use normal bolts M8X35MM 18pcs to secure it. LOCK BOLT NORMAL BOLT M8X48MM M8X50MM LOCK BOLT M8X42MM LOCK BOLT M8X42MM ASSEMBLY INSTRUCTIONS...
- Page 16 4. SET UP FOR THE FOURTH PART Overview for the fourth part, please look at the view and clear about the position of each part, then refer to the detailed guide of each point for the successful assembly. KA23 KA04 KA24 BR03 KA25...
- Page 17 CLIMBING FRAME ASSEMBLY: 1. Insert the top beam - KA24 & KA25 into connectors first, use lock bolts - M8X48MM 16pcs to secure it. 2. Insert rungs KA23, use normal bolts M8X35MM 18pcs to secure it. 3. Attach climbing frame to the main frame, use bracket BR02 and lock bolts M8X48MM 8pcs to secure it.
- Page 18 LOCK BOLT M8X48MM ASSEMBLY INSTRUCTIONS...
- Page 19 5. SET UP FOR THE FIFTH PART Overview for the fifth part, please look at the view and clear about the position of each part, then attach each accessory in right position. Series # Part # Description / Size Quantity AS01 MONKEY SWING AS02...
- Page 20 HANG POINT BOLT IN 50MM USED FOR AS04 & AS05 BOLT IN 57MM USED FOR AS01, AS02, AS03 & AS06 ATTENTION 1. Ensure anchors are properly fixed into ground. ANCHOR FIXING POINT 2. Check the anchor location before use. Any loose ground you can try re-fitting in the other 2 holes on the feet.
-
Page 21: How To Use
6. SET UP FOR GYM RINGS FITNESS RINGS SET-UP GUIDE 1. Place the webbing straps over an overhead structure such as a beam, bar or tree, where you would like to hang your rings. The straps can also go through an eye screw mounted to the ceiling. -
Page 22: Maintenance
IV. MAINTENANCE WARNING: Please keep for future reference. We recommend regular maintenance to be conducted at the beginning of each season as well as at regular intervals during the usage session for your play equipment to ensure all main parts/fixings are tightly secured, well-oiled and intact to avoid failure, injury or hazards. -
Page 23: Cleaning
Any claim against this warranty must be made through your original place of purchase. Proof of purchase is required before a warranty claim may be processed. If you have purchased this product from the Official Lifespan Kids website, please visit www.lifespankids.com.au/warranty-form For support outside of warranty, if you wish to purchase replacement parts or request a repair or service, please visit www.lifespankids.com.au/warranty-form and fill in our Repair/Service Request Form or... - Page 24 www.l if esp a nkids .c om .a u...
Need help?
Do you have a question about the Junior Jungle Kakadu and is the answer not in the manual?
Questions and answers