Behringer X-TOUCH ONE Manual
- Quick start manual (65 pages) ,
- Documentation (16 pages) ,
- Quick start manual (24 pages)
Advertisement
Step 1: Hook-Up
Typical simple DAW control system

Typical studio system with MIDI Keyboard/Controller

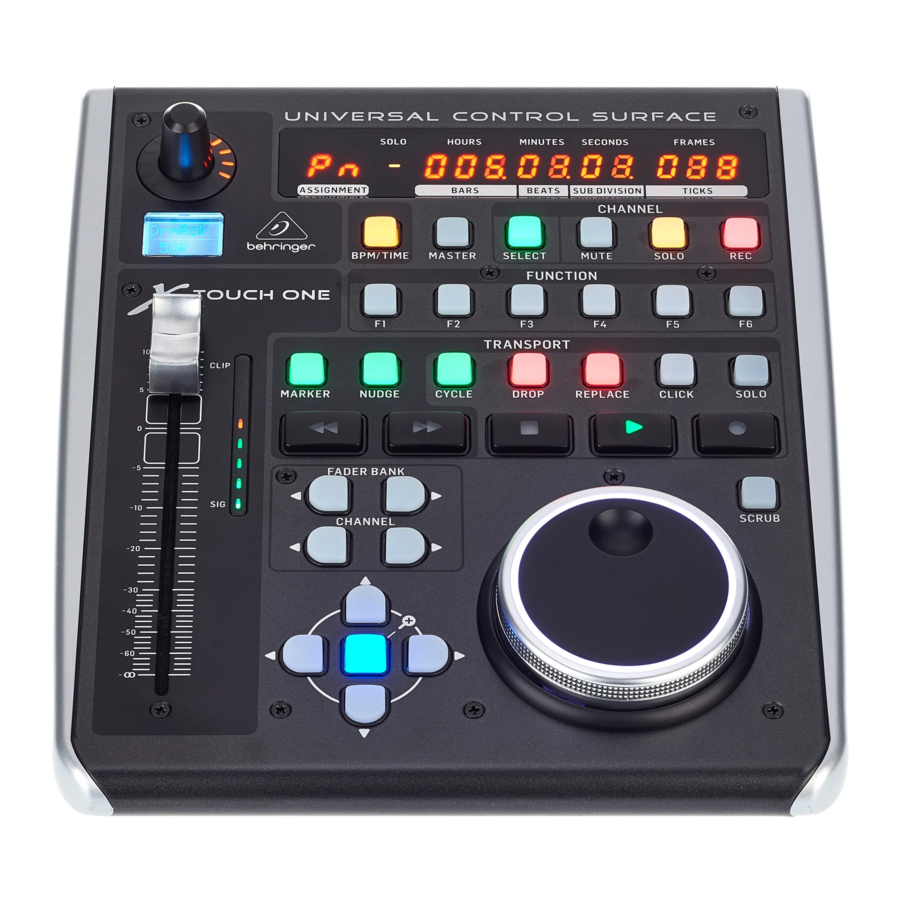
Step 2: Controls

Operation Modes
The X-TOUCH ONE supports Mackie Control, HUI, and MIDI communication protocols for seamless integration with every compatible music production software. The procedure for changing modes and adjusting the display brightness and contrast is shown in the Getting Started section of this guide.
The exact function of the buttons of the
X-TOUCH ONE will vary widely from one Digital Audio Workstation (DAW) to the next. We recommend that you read your DAW's documentation regarding how it operates with external control surfaces.
Overlay Templates
The X-TOUCH ONE shipping box contains various overlays for the most popular DAWs. These fit over the X-TOUCH ONE top panel, and are marked with text labels that indicate the typical button functions for each DAW.
If you are using a different DAW, you can use the "MC User" Template and mark it with your own assignments for what each button does in your DAW.
Typical Operation
The X-TOUCH ONE comes from the factory in standard Mackie Control mode, and the top panel printing is for this mode. The following details show some of the typical uses of the X-TOUCH ONE controls in DAW applications in standard Mackie Control mode:
 Push encoder knob – this endless encoder has a detent and push function (not illuminated), and a 13-segment amber LED ring. This is typically used in DAW applications for fine control of the channel left/ right Pan.
 LCD Display – this display indicates various parameters and labels as shown in your DAW. (The DAW completely controls which items are displayed.) The display will also show the mode during the procedure for changing the operation mode.
 BPM/Time – Press this to toggle the display between BPM display or Time display.
 Fader – this touch-sensitive motorized 100 mm fader is typically used for fine Level control of the currently selected channel in DAW applications. If the MASTER button is engaged, then the fader will adjust the Master level in your DAW.
 Channel meter – this 8-LED meter shows the signal level of the channel, and indicates when a signal is present (SIG LED), and when it is clipping (CLIP LED). The meter reading is completely controlled by your DAW.
 Display – the display can show SMPTE timecode of hours, minutes, seconds and frames, or BBT bars, beats, and ticks. The BPM/Time button is used to switch between these two display modes.
 Master/Channel Select buttons – these buttons are used for individual DAW mixer channel applications:
Master – this allows the X-TOUCH ONE fader to be used for fine control of the Master Level.
Select – this selects the current channel for editing. The mixer controls are then dedicated to setting up the selected channel.
Mute – mutes the channel.
Solo – isolates the channel in the mix.
Rec – arms the channel for recording.
 Transport buttons – the five lower buttons have familiar markings used for DAW transport applications (REWIND, FAST FORWARD, STOP, PLAY, and RECORD).
 Note: the STOP button can also be used to change operation modes. Press and hold it and then press the encoder knob. Rotate the knob to select the operation mode.
 Fader Bank and Channel – the left or right bank buttons move the channels up and down by 8 channels at a time. The channel buttons move the channels up and down in single steps.
 Jog/Shuttle – the wheel is used for editing the audio in the DAW. Press the SCRUB button to switch the wheel between Jog and Shuttle.
 Navigation buttons – these allow you to navigate up/down and left/right, and zoom within the DAW screen.
Rear Panel
 DC IN – securely connect the supplied 9 VDC power adapter here. Connect the other end of the power adapter to your local AC mains supply. Use only the supplied power adapter.
 USB HUB – these 2 USB type A connectors are used for connecting external USB hardware such as a USB mouse, a keyboard, and USB MIDI keyboards.
The hub communicates directly to the computer and not to the X-TOUCH ONE. Each connector can supply 5V USB power. The hub is only active when the X-TOUCH ONE is powered on, and connected to a live computer via the USB MIDI connector.
 USB MIDI – this USB type B connector is used to connect to a computer's USB port for MIDI data transfer (send/receive), and USB Hub communications.
 Foot Switch – this ¼" connector is used for standard sustain pedals for MIDI data control.
 Kensington Lock – this security hole allows the connection of anti-theft devices.
Step 3: Getting started
OVERVIEW
This Getting Started guide will help you set up the X-TOUCH ONE and briefly introduce its capabilities.
The X-TOUCH ONE allows you to control your software DAW with the accurate touch and feel of a high quality controller. With 34 handy illuminated buttons, a rotary push-encoder, a large jog/shuttle wheel, and a touch sensitive motorized 100 mm fader, it can operate a wide variety of DAWs in various operation modes.
SOFTWARE SET-UP
The X-TOUCH ONE is a USB Class Compliant MIDI device, and so no driver installation is required for Windows or Mac OS operation.
HARDWARE SETUP
Connect the X-TOUCH ONE directly to an available USB port on your computer using the supplied USB cable. Make all other connections in your system. Apply AC power to the supplied power supply adapter connected to the X-TOUCH ONE, and it will turn on. The current firmware version number will be indicated briefly (for example 1.02).
OPERATION MODES
The X-TOUCH ONE supports Mackie Control, HUI, and MIDI communication protocols for seamless integration with every compatible music production software.
The text printed on the unit corresponds to the standard Mackie Control MC protocol. Other modes have their own dedicated printed overlays that fit over the front panel.
MC - there are eight MC modes, each set up for a different popular DAW. One of these is the standard Mackie Control mode, which is the default mode for the X-TOUCH ONE from the factory. Another mode is the "MC User" mode where individual buttons can be assigned by the user as desired.
HUI - there are two HUI modes: one standard and one HUI PRO for Pro Tools.
MIDI - there are four MIDI Controller modes, where each element can send fixed MIDI messages. Two are modes where the buttons send out Note messages, and two where they send Control Change CC messages. Each mode has the encoder either absolute, or relative. The various operation modes are shown in the table in "X-TOUCH ONE Operation Modes".
CHANGING THE OPERATION MODE
- To change the operation mode of the X-TOUCH ONE, press and hold down the Encoder Knob while you turn on power to the X-TOUCH ONE.
- Alternatively, if the unit is already on, press and hold the large STOP transport button and then press the encoder knob to enter the setup mode.
- Rotate the encoder knob until the desired mode is shown in the LCD display.
- Press the encoder knob again and rotate it to adjust the LCD display contrast.
- Press the encoder knob again and rotate it to adjust the LED display brightness.
- Press the encoder knob to save the settings and return to normal operation.
- Choose the appropriate overlay template for your operation mode, and lay it on top.
MC USER MODE
In MC User mode, you can assign a function to any of the buttons from the list of available MC functions shown un "MC USER MODE – BUTTON ASSIGNMENT OPTIONS" (except for the top five buttons in the Master/ Channel section). Please see the diagram in "X-TOUCH ONE - MC User Mode".
The assignment of the buttons is done just after putting the X-TOUCH ONE into MC User mode (before adjusting the LCD contrast and LED brightness).
- Press and hold down any desired button, and the text "ASSIGN" will appear in the LCD display.
- With the button still held down, rotate the encoder knob to select the new MC function of the button from the list. Then release the button.
- Repeat Steps 1 and 2 until all buttons are assigned to your liking.
- Press the encoder knob again to adjust the LCD contrast and LED brightness and return to the normal operation of the X-TOUCH ONE.
DAW SETUP
In your DAW software, select the appropriate control surface as follows:
MC - If you are using the X-TOUCH ONE in an MC mode, select Mackie Control (or Mackie Control Universal) as the control surface in your DAW. The X-TOUCH ONE in MC mode emulates the operation of the Mackie Control, so this is the control surface you must choose in your DAW. The different MC operation modes are matched to different DAWs. If you are not happy with the pre-assignment, you can choose "MC User" operation mode and make your own assignment for your DAW.
HUI - If you are using the X-TOUCH ONE in a HUI mode, select Mackie HUI as the control surface in your DAW. Select HUI PRO if you are using Pro Tools.
MIDI - If you are using the X-TOUCH ONE in a MIDI mode, select it in your DAW as a MIDI controller. Become familiar with your DAW's MIDI Learn functions, and you will be able to map each button and feature of the X-TOUCH ONE to a function and control on your DAW, or plug-in controls.
FIRMWARE UPDATE
Please check the X-TOUCH ONE product page on our website for any firmware updates. If there is a firmware version later than the currently-loaded firmware, download the new file onto your host computer. (The unit's firmware version is briefly displayed after power on.)
To enter the firmware update mode, hold down the REC button in the CHANNEL section in the top right corner, while you turn on power to the X-TOUCH ONE.
You will need a MIDI utility such as MIDI OX in order to send the firmware file using SysEx commands. Follow the detailed instructions that come with the firmware download.
X-TOUCH ONE Operation Modes
| LCD | LED | Description | Overlay templates (11 in total) | |
| MC Std | MC* | Mackie Control Mode... | Standard Assignment (as printed on the panel) | No template |
| MC Live | Li | Mackie Control Mode for... | Ableton LIVE | Ableton LIVE |
| MC Cub | Cu | Mackie Control Mode for... | Steinberg CUBASE | Steinberg CUBASE |
| MC Logc | Lo | Mackie Control Mode for... | Apple LOGIC | Apple LOGIC |
| MC S1 | S1 | Mackie Control Mode for... | Presonus STUDIO ONE | Presonus STUDIO ONE |
| MC Reap | rE | Mackie Control Mode for... | Cockos REAPER | Cockos REAPER |
| MC TWfm | t | Mackie Control Mode for... | Tracktion / Waveform | TRACKTION / WAVEFORM |
| MC user | U | Mackie Control Mode for... | Free assignment of the buttons** | Empty template (with free text fields) |
| HUI Std | HU | HUI Mode... | Standard Assignment of Mackie HUI protocol | HUI Standard |
| HUI Pro | HP | HUI Mode for... | Avid PRO TOOLS | Avid PRO TOOLS |
| Midi | NI | Standard MIDI mode... | Buttons use NOTE commands, others CC, Encoder turn = ABSOLUTE mode | MIDI Standard (push = Notes) |
| MidiRel | Nr | Standard MIDI mode... | Buttons use NOTE commands, others CC, Encoder turn = RELATIVE mode | (Same template as row above) |
| CChg | CC | Standard MIDI mode... | Buttons use CC commands, all other elements too, Encoder turn = ABSOLUTE mode | MIDI Standard (push = CCs) |
| CChgRel | Cr | Standard MIDI mode... | Buttons use CC commands, all other elements too, Encoder turn = RELATIVE mode | (Same template as row above) |
* During a change in the Operation Mode, the ASSIGNMENT section in the left of the main display will show the abbreviation for the currently assigned mode. The text in this left section will also change depending upon your DAW, or it may even be blank.
**In MC user mode, buttons can be freely assigned with Mackie Control parameters (see "X-TOUCH ONE - MC User Mode" and "MC USER MODE – BUTTON ASSIGNMENT OPTION").
X-TOUCH ONE MIDI Modes
MIDI Send CC
Buttons Send (MIDI CC mode): CC #0 to 34 (push: value 127, release: value 0)
Fader Move: Control Change 70 (value 0 to 127), receive and transmit
Fader Touch: Note On #110 (touch: velocity 127, release: velocity 0)
Encoder Absolute mode: Control Change 80 (value 0 to 127) Encoder Relative mode: Control Change 80 (increment: value 65, decrement: value 1)
Jog Wheel: Control Change 88 (turn Clockwise: value 65, turn Counter Clockwise: value 1)
Foot Switch: Control Change 64 (push: value 127, release: value 0)
MIDI Send Note
Buttons Send (MIDI Note mode): Note #0 to 34 (push: velocity 127, release: velocity 0)
Fader Move: Control Change 70 (value 0 to 127), receive and transmit
Fader Touch: Note On #110 (touch: velocity 127, release: velocity 0)
Encoder Absolute mode: Control Change 80 (value 0 to 127) Encoder Relative mode: Control Change 80 (increment: value 65, decrement: value 1)
Jog Wheel: Control Change 88 (turn Clockwise: value 65, turn Counter Clockwise: value 1)
Foot Switch: Control Change 64 (push: value 127, release: value 0)
MIDI Receive
When the X-TOUCH ONE receives MIDI commands (either in MIDI CC mode or Note mode) then the following components can be controlled:
- Encoder LED Ring
Encoder Receive CC 80, value 0...127 controls the LED ring indication (from left to right, only 1 LED on at a time) - Button LEDs
Button Receive CC with value 0...63 = button LED off; value 64 = button LED blinking; value 65...127 = button LED on
Button Receive Note with velocity 0...63 = button LED off; velocity 64 = button LED blinking; velocity 65...127 = button LED on - LED Meter
Level Meter Receive CC 90, value 0...127 (bottom/SIG to the top/CLIP, only 1 LED on at a time). - Fader Position
Fader Receive CC 70, values 0....127 will remotely move the fader.
The LCD Display and LED segment display can be affected by sending SysEx messages as follows:
- LCD display:
- SysEx (hex) F0 00 20 32 dd 4C 00 cc c1.. c14 F7
- dd: device id (X-Touch: 0x40)
- cc: bits 0-2: backlight color (black, red, green, yellow, blue, magenta, cyan, white)
- cc: bit 4: invert upper half of LCD
- cc: bit 5: invert lower half of LCD
- c1..c14: ascii characters (1..7: upper half, 8..14: lower half)
- Segment Display:
- SysEx (hex) F0 00 20 32 dd 37 s1.. s12 d1 d2 F7
- s1..s12: segment data (bit 0: segment a, .. bit 6: segment g)
- d1: dots for displays 1..7 (bit 0: display 1, .. bit 6: display 7)
- d2: dots for displays 8..12 (bit 0: display 8, .. bit 4: display 12)
X-TOUCH ONE - MC User Mode

In MC User mode, you can assign a function to any of the buttons in this grey area, from the list of available MC functions shown below. Please see the MC USER MODE section of the Getting Started guide in "Getting started" for more details.
MC USER MODE – BUTTON ASSIGNMENT OPTIONS
- Encoder Assignments
- Off
- TRACK
- SEND
- PAN
- PLUG-IN
- EQ
- INSTR
- Master Section
- BANK <
- BANK >
- CHAN <
- CHAN >
- FLIP
- GLOBAL (view)
- NAM/VAL (display mode)
- SMPTE/B (transport display)
- Function Keys F1
- F2
- F3
- F4
- F5
- F6
- F7
- F8
- View Options
- MIDITRK (MIDI Tracks)
- INPUTS (Inputs)
- AUDIOTR (Audio Tracks)
- AUDIOIN (Audio Inst.)
- AUX
- BUSSES
- OUTPUT
- USER
- Modifiers
- SHIFT
- OPTION
- CTRL
- ALT
- Automation
- READOFF
- WRITE
- TRIM
- TOUCH
- LATCH
- GROUP
- Utility
- SAVE
- UNDO
- CANCEL
- ENTER
- Transport
- MARKER
- NUDGE
- CYCLE
- DROP
- REPLACE
- CLICK
- SOLO
- Cursor Section
- UP (Cursor)
- DOWN (Cursor)
- LEFT (Cursor)
- RIGHT (Cursor)
- ZOOM (Cursor)
- Others
- SCRUB
- FOOT 1
- FOOT 2
- [ FDR < ]
- [ FDR > ]
Specifications
Controls
| Rotary/Push control with LED collar | 1 |
| Buttons with LED backlight | 34 |
| Fader | 1 motorized fader, 100 mm, touch-sensitive |
| Wheel | 1 jog/shuttle |
| Foot switch | ¼" TS |
Display
| Time | 7-segment LED x 10 |
| Rotary control position | 13-segment LED |
| Assignment | 7-segment LED x 2 |
| Channel level | 8-segment LED with SIG and CLIP |
| Channel display | Color LCD scribble strip x 1 |
Computer Connection
| USB | USB 2.0, type B |
USB Hub
| Type | Multi-TT USB 2.0 |
| Connectors (x2) | USB 2.0, type A |
| Voltage (USB power to external devices) | 5 V |
Power Supply
| Type | External power supply |
| External power input | 9 V DC |
| Power consumption | 15 W |
Physical
| Standard operating temperature range | 5°C - 40°C (41°F - 104°F) |
| Dimensions (H x W x D) | 65 x 196 x 233 mm (2.6 x 7.7 x 9.2") |
| Weight | 1.5 kg (3.3 lbs) |
Important information
- Register online.
Please register your new Music Tribe equipment right after you purchase it by visiting musictribe.com. Registering your purchase using our simple online form helps us to process your repair claims more quickly and efficiently. Also, read the terms and conditions of our warranty, if applicable. - Malfunction.
Should your Music Tribe Authorized Reseller not be located in your vicinity, you may contact the Music Tribe Authorized Fulfiller for your country listed under "Support" at musictribe.com. Should your country not be listed, please check if your problem can be dealt with by our "Online Support" which may also be found under "Support" at musictribe.com. Alternatively, please submit an online warranty claim at musictribe.com BEFORE returning the product. - Power Connections.
Before plugging the unit into a power socket, please make sure you are using the correct mains voltage for your particular model. Faulty fuses must be replaced with fuses of the same type and rating without exception.
LIMITED WARRANTY
For the applicable warranty terms and conditions and additional information regarding Music Tribe's Limited Warranty, please see complete details online at musictribe.com/warranty.
Important Safety Instructions

RISK OF ELECTRIC SHOCK
DO NOT OPEN
 Terminals marked with this symbol carry electrical current of sufficient magnitude to constitute risk of electric shock. Use only high-quality professional speaker cables with ¼" TS or twist-locking plugs pre-installed. All other installation or modification should be performed only by qualified personnel.
This symbol, wherever it appears, alerts you to the presence of uninsulated dangerous voltage inside the enclosure - voltage that may be sufficient to constitute a risk of shock.
This symbol, wherever it appears, alerts you to important operating and maintenance instructions in the accompanying literature. Please read the manual.
To reduce the risk of electric shock, do not remove the top cover (or the rear section). No user serviceable parts inside. Refer servicing to qualified personnel.
To reduce the risk of fire or electric shock, do not expose this appliance to rain and moisture. The apparatus shall not be exposed to dripping or splashing liquids and no objects filled with liquids, such as vases, shall be placed on the apparatus.

These service instructions are for use by qualified service personnel only. To reduce the risk of electric shock do not perform any servicing other than that contained in the operation instructions. Repairs have to be performed by qualified service personnel.
- Read these instructions.
- Keep these instructions.
- Heed all warnings.
- Follow all instructions.
- Do not use this apparatus near water.
- Clean only with dry cloth.
- Do not block any ventilation openings. Install in accordance with the manufacturer's instructions.
- Do not install near any heat sources such as radiators, heat registers, stoves, or other apparatus (including amplifiers) that produce heat.
- Do not defeat the safety purpose of the polarized or grounding-type plug. A polarized plug has two blades with one wider than the other. A grounding-type plug has two blades and a third grounding prong. The wide blade or the third prong are provided for your safety. If the provided plug does not fit into your outlet, consult an electrician for replacement of the obsolete outlet.
- Protect the power cord from being walked on or pinched particularly at plugs, convenience receptacles, and the point where they exit from the apparatus.
- Use only attachments/accessories specified by the manufacturer.
![]()
Use only with the cart, stand, tripod, bracket, or table specified by the manufacturer, or sold with the apparatus. When a cart is used, use caution when moving the cart/ apparatus combination to avoid injury from tip-over.- Unplug this apparatus during lightning storms or when unused for long periods of time.
- Refer all servicing to qualified service personnel. Servicing is required when the apparatus has been damaged in any way, such as power supply cord or plug is damaged, liquid has been spilled or objects have fallen into the apparatus, the apparatus has been exposed to rain or moisture, does not operate normally, or has been dropped.
- The apparatus shall be connected to a MAINS socket outlet with a protective earthing connection.
- Where the MAINS plug or an appliance coupler is used as the disconnect device, the disconnect device shall remain readily operable.
![]()
Correct disposal of this product: This symbol indicates that this product must not be disposed of with household waste, according to the WEEE Directive (2012/19/EU) and your national law. This product should be taken to a collection center licensed for the recycling of waste electrical and electronic equipment (EEE). The mishandling of this type of waste could have a possible negative impact on the environment and human health due to potentially hazardous substances that are generally associated with EEE. At the same time, your cooperation in the correct disposal of this product will contribute to the efficient use of natural resources. For more information about where you can take your waste equipment for recycling, please contact your local city office, or your household waste collection service.- Do not install in a confined space, such as a book case or similar unit.
- Do not place naked flame sources, such as lighted candles, on the apparatus.
- Please keep the environmental aspects of battery disposal in mind. Batteries must be disposed-of at a battery collection point.
- This apparatus may be used in tropical and moderate climates up to 45°C.


Documents / Resources
References
Download manual
Here you can download full pdf version of manual, it may contain additional safety instructions, warranty information, FCC rules, etc.
Advertisement


Need help?
Do you have a question about the X-TOUCH ONE and is the answer not in the manual?
Questions and answers