Advertisement
- 1 Introduction to the Hasselblad Camera System
- 2 501C, Parts and Components
-
3
Getting started
- 3.1 Opening the Focusing Hood
- 3.2 The Built-In Magnifier
- 3.3 Focusing Screen and Viewfinder Image
- 3.4 Closing the Focusing Hood
- 3.5 The Magazine Slide
- 3.6 Left Hand Grip
- 3.7 Focusing and Exposure Release
- 3.8 Removing the Lens
- 3.9 Attaching the Lens
- 3.10 Removing the Magazine
- 3.11 Attaching the Magazine
- 3.12 The Magazine Status Indicator
- 3.13 Strap and Strap Lugs
- 3.14 Attaching the Strap
- 3.15 Removing the strap
- 4 Operating Details
- 5 Lens and Shutter Functions
- 6 Magazine Operation
- 7 Viewfinder System
- 8 Accessories
- 9 The Hasselblad 501C System Chart
- 10 Technical Specifications and Equipment 501C
- 11 Troubleshooting
- 12 Camera Care, Service and Guarantee
- 13 Documents / Resources
Introduction to the Hasselblad Camera System
As a Hasselblad owner you now have in your possession a camera of exceptional quality, the product of an Internationally renowned tradition of excellence in the world of photography.
Victor HasseJblad, the creator of (he cameras which bear his name, was himself an accomplished photographer. It was to satisfy his own high standards and different requirements that he first envisioned the Hasselblad camera system - a versatile medium format single lens reflex camera with interchangeable lenses, viewfinders andfiim magazines.
A photographer first and businessman second, Victor Hasselblad would never sacrifice quality for ease of production. To this day, Hasselblad cameras are carefully manufactured with this principle in mind
With your Hasselblad you have opened the door to the Hasselblad System, a system that is taken beyond the ends of the earth - into space - to earn its reputation for reliability and absolute fidelity.
The Hasselblad S01C is a medium format single lens reflex camera featuring interchangeability of 16 different lenses, 1,4x and 2x teleconverters, magazines for different image formats and films including Polaroid films, viewfinders with or without exposure metering properties, and a number of focusing screens to fit your special requirement.
The complete range of accessories affords almost limitless flexibility and potential for superior photography in any application. The realisation of this potential is only dependant upon your skill, care and Judgement as a photographer.
Your Hasselblad 501C comes with an Acute-Matte focusing screen of unsurpassed brightness and resolution, complete with the Planar C 2,8/80 mm lens and the A12 film magazine
Lenses
Since the early 1950's Hasselblad lenses have been manufactured by Carl Zeiss in Germany. The Hasselblad501C uses C and CF lenses made by Carl Zeiss.
With the exception of FE-type lenses, all Hasselblad lenses manufactured since 1957 can be used with the 501C. FE-type lenses can only be used with the Hasselblad focal plane shutter cameras.
This Instruction Manual describes in detail how to operate your 501C. Read It carefully! The knowledge gained from reading it will give you full access to the Hasselblad potential. Exploiting that potential is left to your imagination!
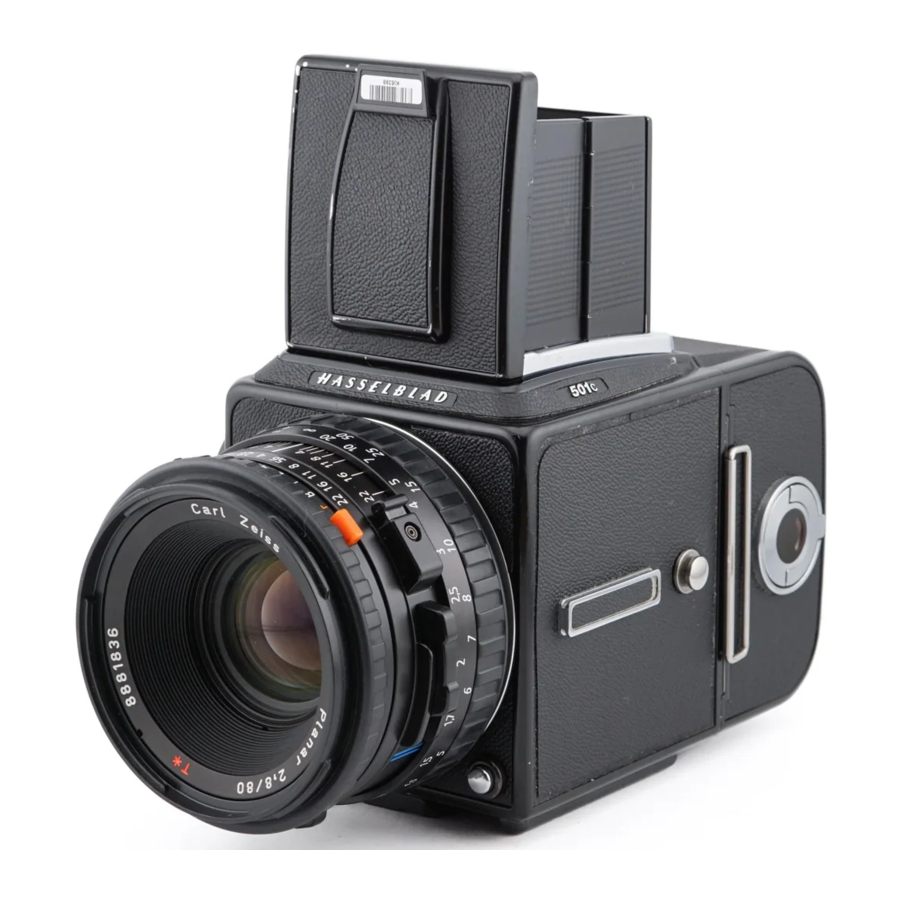
501C, Parts and Components

- Focusing hood
- Acute-Matte* focusing screen
- Screen retaining dip
- Focusing ring and scale
- Depth-of-field scale
- Central lens index
- Aperture ring and scale
- External and internal tens accessory mount
- Shutter speed selector ring
- Exposure value index
- Exposure value scale
- Lens release button
- Drive shaft
- Threaded cable release socket
- Shutter release button
- Viewing mirror
- Winding crank
- Pre-release button
- Winding crank index
- Strap lug
- Magazine status indicator
- Frame counter
- Film plane index
- Film winding crank
- Magazine type sign
- Magazine drive gear
- Camera type sign
- Magazine catch

- Focusing hood magnifier
- Magazine slide
- Film load indicator
- Film holder key
- Film tab holder
- Magazine support slots
- Magazine supports
- Tripod thread 1/4" and 3/8"
- Quick coupling plate
- Camera supports
- Lens drive shaft
- Depth-of-field preview knob
- PC flesh terminal
- Lens locating index
- Accessory rail
- Strap lug
- Auxiliary shutter
- Magazine hook
* Acute-Matte designed by MINOLTA
 NOTE: In the text, the positions of components are described in relation to the camera as you see it when taking a photograph, i.e. the lens is on the front, the viewfinder on the top, and the winding crank is on the right hand side.
Getting started
This section describes how you prepare your 501C for use. Follow the instructions step by step to avoid jamming or damaging the equipment.

When you have unpacked the camera with lens and film magazine, unfold the winding crank and check that it is locked and cannot be turned, This indicates that the mechanism is fully wound. If the crank is not locked, turn it one full clockwise turn until it locks to wind the camera and cock the shutter. Fold the crank back into the crank hub when carrying the camera about to avoid the crank from catching in clothing etc.
Opening the Focusing Hood

Lift the lid with a firm grip on the tab at its rear edge and swing it up to a vertical position. The hood unfolds automatically and looks in open position. Before viewing, remove the lens front cover by turning it counter-clockwise approx. 1/3 turn, and lifting it off the lens.
The Built-In Magnifier

Use the built-in 4.5x magnifier to enlarge the viewfinder image, e.g. for more accurate focusing. To unfold it, push the oval catch inside the lid to the right, as indicated in the illustration. To fold the magnifier down, simply push it back towards the lid until it locks. The magnifier can easily be exchanged for one with a suitable correction lens to match your individual eyesight.
Focusing Screen and Viewfinder Image

The Hasseiblad 501C is equipped with the Acute- Matte focusing screen featuring superior brightness and the highest resolution among the Hasseiblad focusing screens. The center of the screen is indicated by a hairline cross.
Closing the Focusing Hood

"Pinch" the side plates at the hinge points, push it lightly backwards and the hood automatically folds back down.
The Magazine Slide

The camera cannot be released for an exposure as long as the magazine sIide is inserted. To remove the slide, fold out (he wire bow on the left hand side and pull out the slide entirely.
Left Hand Grip

Holding the 501C In your left hand, as shown in the illustration, is the most convenient grip. You can reach the exposure release button with your index finger. Your right hand is free for focusing, setting the aperture, operating the crank or for changing lens or magazine.
Focusing and Exposure Release

Turn the focusing ring until the image Of the subject appears sharp in the viewfinder. Depress the exposure release button to make an exposure. After the exposure, when you have released the exposure button, the winding crank is free to be rotated one full turn until it locks again to rewind the camera, cock the shutter and advance the film one frame,
NOTE: The viewfinder remains dark until you have rewound the camera!
Removing the Lens

Depress the Iens release button and rotate the lens counter-clockwise until it stops and lift It out of the mount.
NOTE: You can only remove the lens when the camera is cocked (fully wound} and not in released or pre-released mode.
Attaching the Lens
You will find that holding the camera in your left hand and the lens in your right hand, as shown in the illustration, is the easiest way of attaching the lens.
Make sure that both camera and lens are fully cooked. The adjacent illustration shows the correct relationship between the drive shaft, the lens drive coupling and their indexes. If the lens is not cocked, you can insert a coin in the coupling slot and rotate it clockwise until it locks (about 4/5 ofatum).

When you have aligned the red index on the lens with the one on the camera as shown in the illustration, the tens will drop easily into the bayonet fitting. You can then rotate it clockwise until It stops with a faint click as the lens catch locks it in place.

Removing the Magazine
It is advisable to have the camera cocked (fully wound} and the magazine indicator displaying white.

Insert the magazine slide into the magazine with the hinge towards the front of the camera. Slide the magazine catch to the right, swing the magazine back and lift it off the lower supports.

NOTE; The magazine cannot be removed without inserting the magazine slide. The slide protects the film from fogging. Note also that the camera cannot be operated when a magazine, with slide inserted, is attached to the camera.
Attaching the Magazine
Ensure that the magazine slide is fully inserted, and that the indicator is white. If the indicator is not white, then refer to the instruction on the next page.

Rest the magazine on the camera's lower support hooks and make sure that it is property located on them. Carefully swing the magazine towards the camera body and check that the camera's upper support hooks fit into the slots In the magazine. Push the magazine gently but firmly against the hooks while sliding the magazine catch button to the right. Release the button when the magazine has made contact with the rear plate of the camera, and push it to the left to ensure that it has reached the locked position. Remove the magazine slide to make the camera ready for use.

The Magazine Status Indicator

The status indicator on the right hand side of the magazine shows white when the magazine is ready to operate and red when the film has not been advanced after the latest exposure. Do not attach a magazine showing white to a camera that is not rewound! Wind the camera first or you will lose one frame. Do not attach a magazine showing red to a fully wound camera! That could result in a double exposure. If the status indicator shows red, release the camera before attaching the magazine. Then, winding the camera advances the film one frame.
Strap and Strap Lugs

The 501C is delivered with a medium wide shoulder strap, which is packed separately. You will find other types of straps in the Hasseiblad Product Catalog. All straps have special clips for easy attaching them to and removing them from the camera body.
Attaching the Strap

Place the main body of the strap dip over the strap lug on the camera (see figure). Press the tip of the clip towards the camera whale pulling the strap to slide the clip over the lug to the locked position.
Removing the strap

Lift the locking plate of the clip high enough to let it pass over the top of the lug. Push the clip in the direction opposite to the strap to slide it off the lug.
Operating Details
Exposure

As a general rule for all shutter speed settings except B, you should keep the exposure button depressed until the lens shutter has opened and dosed fully. This is especially important at shutter speeds from 1 $ to 1/15 s, since the auxiliary shutter remains open only when the button is kept depressed. If you relax the pressure on the button too soon the auxiliary shutter will terminate the exposure prematurely (see 'Warning Mark'). You can see the auxiliary shutter if you remove the magazine. It consists of two blinds which cover the rear opening of the camera body to protect the film from being damaged by unwanted exposure as the lens' shutter normally is open.
Pre-release and Cable Release

Considerable efforts have been made to reduce camera vibrations caused by moving parts in the exposure sequence. However, if you wish to avoid these vibrations completely, you can pre-release the mechanism by pushing the pre-release button upwards. This causes the following sequence:
- the mirror folds up, blinding the focusing screen
- the shutter closes and remains closed,
- the diaphragm changes to the preset aperture
- the auxiliary shutter opens. When you subsequently press the exposure release button, only the shutter then operates at the preset speed.
As shown in the illustration, you can also attach a cable release to further reduce vibrations.
Double Exposure
As the camera has been designed to prevent accidental double exposure you will have to carry out the following procedure in order to make multiple exposures on the same frame:

- Depress the exposure release button and make the initial exposure.
- Insert the magazine slide and remove the magazine,
- Wind the camera with one full revolution of the winding crank.
- Replace the magazine and remove the slide. The unit Is now ready to make a second exposure on the same frame. You can make additional exposures in the same manner.
Lens and Shutter Functions
Shutter Speeds

The shutter speed setting ring is the ring located closest to the front of the lens. The desired shutter speed is set against the central lens index. The scale on the top shows the shutter speeds, and the scale on the lower right hand side shows the exposure values (EV).
Aperture
The aperture setting ring is the second closest ring to the front of the lens. The aperture value is also set against the central lens index. The C Lens has an automatic diaphragm that stops down to the preset working aperture at the start of the exposure sequence.
Warning Mark

On the shutter speed scale you will find a marking above the 1,1/2, and 1/4 s settings. This 3s to warn you of possible exposure errors. The auxiliary shutter remains open only as fong as you maintain pressure on the release button, if you relax the pressure too early the auxiliary shutter will interrupt the running exposure. Listen to the buzzing sound of the delay escapement in the lens' shutter and retain the pressure on the release button until the sound stops!
Exposure Values

The aperture and shutter speed combination set opposite the central lens index determines the exposure. Every combination of shutter speed and aperture has an equivalent exposure value (EV) which you can read and set against the triangular EV index on the lower right hand side of the lens
Focusing and Depth-of-field

The focusing ring is closest to the camera body. It carries the distance scales in feet (slanted numbers) and in meters (upright numbers) and it also has a knurled rubber grip. You focus the lens by rotating the focusing ring until you obtain a sharp image of the subject in the viewfinder. The distance between the subject and the film plane is read off the focusing ring's distance scales opposite the central lens index.
Depth-of-field Scale

Objects closer or further away than the selected distance will be sharp, within certain limits. The limits of this field of sharp focus, i.e. depth of field, vary with the aperture. The depth of field available at any given f/stop oan be read off the depth-of-field scale on both sides of the central index. The rings or the illustration indicate how to read the depth of field scale with an aperture of 11.
Infrared (I\R) Photography
 Photography")
Infrared tight with wavelengths beyond 800 nm are refracted by the lens to an image plane further away from the lens than the image plane for visible light When photographing with infrared (IR) light you have to compensate for this difference by setting the focusing distance opposite the dashed IR index line to the right of the common index line. Follow this procedure:
- Focus as usual on the focusing screen.
- . Mark or memorize the distance on the focusing scale opposite the common index line.
- Rotate the focusing ring to set this distance opposite the IR index.
Depth-of-field Preview

The lens is normally opened to the largest aperture to provide the brightest possible viewfinder image with the most shallow depth-of-field. You can stop down the lens diaphragm to the preset aperture by pushing down the depth-of-field preview knob until it locks. To reopen it, depress the lower end of the knob.
Flash Synchronization

The Hasselblad 5010 uses Hasselbiad type C or CF lenses. These lenses have built-in leaf shutters with speeds from is to 1/500s and B, Flash synchronization occurs at full Shutter opening via the PC flash terminal. Electronic flash units can be used at all shutter speeds 1s -1/500 s and in B setting.
Magazine Operation
Loading the Magazine

You can load the magazine with film when it is either attached to or separated from the camera. In both cases, when the magazine slide is inserted, it Is important that Its flat side is turned towards the rear. Follow the procedure to load the magazine.
(figures 1 - 8)
Follow the procedure below to load a film in the magazine. The paragraph numbers refer to the corresponding figure. cw=clockwise; ccw=counter-clockwise
- Fold out the film holder key.

- Turn the key crew and withdraw the film holder (magazine insert),

- PIace an empty take-up spool under the grooved knob of the spool clamp bar. Insert a roll of film under the other end of the bar. turned as in the picture. Remove all of the paper band surrounding the roll!

- Turn the film holder key cw to open the film damp. Pull 0-10 cm (3-4 in.) of paper backing off the film roll. Slide the side edge under the clamp.

- Insert the tongue of the backing paper into the 1 slot in the take-up spool.

- Turn the grooved knob cw to align the arrow on the paper with the triangular index on the bar, but not any further.

- Turn the film holder key ccw, insert the film holder into the magazine. Ensure that it is correctly positioned. Turn the film holder key cw to lock the film holder in the magazine.

- Fold out the film winding crank. Rotate it cw about ten turns until it stops. Turn it ccw and fold it in.


Number 1 will now be displayed in the frame counter window indicating that the loaded magazine is ready for use.
The film winding crank is blocked at frame 1 only. It can be used to wind up a partially exposed film at any frame after that. The frame counter is automatically reset when the film holder is withdrawn from the magazine.
Magazine Load Status

In the center of the film holder key there is a crescent-shaped indicator window that shows white when the magazine is freshly loaded, it gradually changes to red as the film is wound through. An all red indicator shows that the film is used up or that the magazine is empty.
Removing Rim from the Magazine
When the last frame has been exposed and wound on, the magazine is blocking the camera for further release. Wind off the film by folding out the film winding crank, and rotating it clockwise until you can feel the film leaving the supply spool. You can now withdraw the film holder from the magazine and remove the exposed film.
Film Tab Holder

The end tab of the film pack can be Inserted in the holder on the back of the magazine as a reminder of the kind of film that has been loaded into the magazine.
Film Plane Index

The film plane index on the right hand side of the magazine body indicates the position of the film plane to facilitate accurate determination of the film-to-subject distance which is very important in close-up photography.
Viewfinder System
Changing Focusing Hood or Viewfinder To remove the focusing hood for the purpose of attaching any other viewfinder in the Hasselblad system, follow this procedure:

- Detach the magazine.
- Fold down the focusing hood to protect it from damage and remove it by sliding it to the rear in its guide slots.
- Slide the replacement viewfinder Into the slots and push it forward until it stops.
When fully inserted the viewfinder is retained in positron by a spring-loaded ball latch until you have reattached the magazine.
Changing the Magnifier
The standard 4,5x magnifier normally provides a comfortable viewing of the focusing screen for most users. If necessary, however, the standard magnifier plate with lens can be changed for a plate with a correction lens to compensate for individual eyesight. Correction lenses are available with powers ranging from + 3 to - 4 dioptres. Change the magnifier as follows:

- Remove the focusing hood from the camera body and open it by lifting the lid.
- Release the magnifier by pushing the catch to the left. Push the magnifier halfway down, seize the lens plate from underneath and pull It out of the holder.
- Keep the plate holder halfway down and insert the replacement lens plate with the printed side up. Fold the hood down and put it back on the camera.
Changing the Focusing Screen
Your 501C is equipped with the exceptionally bright and sharp Acute-Matte focusing screen. In the Hass sib I ad Product Catalog you will find the entire range of focusing screens of different design for various applications. If you wish to replace the focusing screen with any of the other focusing screens In the Hasselblad System, follow the procedure below:
- Detach the magazine and the viewfinder.
- Push the two screen latch es to the side Into their recesses.

- Place your hand over the screen and invert the camera. The screen wilt now drop into your hand.
- Insert the replacement screen with the smooth side up and the sharp-edged comers down. Ensure that all four corners of the screen are positively seated on their supports.


You need not return the screen latches. This is done automatically when the viewfinder is replaced.
NOTE: Should the screen refuse to drop out by itself, ensure that the camera is fully wound, remove the Hens and check that the mirror is in the down positron. Put a finger through the lens mount and push gently at the screen from underneath, preferably with a soft doth between the finger and the screen.
Hasselblad Meter Prism Viewfinder Adjustments
The Hasselblad Meter Prism Viewfinders meter the light level on the focusing screen. They are calibrated at the factory to give an accurate reading with one particular type of screen. If that focusing screen is replaced with another type which gives a different light level under the same ambient conditions, the meter has to be adjusted to compensate tor the difference, The PME, PME3, PME5 and PME51 are basically the same design but are differently adjusted from the factory.

The PME3, PME5 and PME51 are adjusted to the brighter Acute-Matte screen in the 501C camera while the previous PME is adjusted to the lower light level of the Ground-glass screen (Cat. No. 42161) and other comparable screens, such as Split image (42186), Microprism & split image (42219), or Grid & microprism (42250). The Plain glass screen (42200) is not suitable for TTL metering.

The viewfinder types are identified by the marks PME 3, PME 5 or PME 51 respectively on the rear of the viewfinder body above the eyepiece. The PME has no marking.
The recommended procedures of compensation for alternative usage of the meter viewfinders are shown in the charts.
- Acute-Matte focusing screen combined with:
| Viewfinder model | Action required to obtain a correct EV |
| RME3/PME5/PME51 | No action required |
| PME | REDUCE the ASA/lSO setting to half the film speed value as indicated on the film package or INCREASE the MAX lens aperture setting one full step or REDUCE the EV reading one full step when setting it on the lens' EV scale |
- Ground-glass or similar focusing screen combined with:
| Viewfinder model | Action required to obtain a correct EV |
| PME3/PME5/PME51 | INCREASE the ASA/1 SO setting to twice the film speed value as indicated on the film package or REDUCE the MAX lens aperture setting one full step or INCREASE the EV reading one full step whan setting it on the lens' EV scale |
| PME | No action required |
Accessories
All accessories included in the present Hasselblad Product Catalog except the FE-type lenses and most discontinued older accessories can be used on the 501C when not specifically noted otherwise.
Accessory Mounts

The quick coupling plate on the bottom of the camera body has both a 1/4* and a 3/8" tripod thread. It also fits the useful and reliable Hasselblad tripod quick coupling. The front of the lenses have external and internal bayonet mounts for filters, close-up lenses and lens shades. Other close-up accessories can be attached between the lens and the camera body. The viewfinder mount on top of the camera body accepts various focusing screens, transparent format masks, and viewfinders. On the left hand side is the accessory rail for the spirit level and the adjustable flash shoe. The rear of the camera body accepts format masks for the 4.5 x 6 cm or the panoramic format (27x55 mm).
The Hasselblad 501C System Chart
The accessory chart on the following pages indicates the wide range of accessories available within the Hasselblad System. Please refer to the Hasselblad Product Catalog for full information on the complete Hasselblad Camera System.
The Hasselblad 501c System


Camera Body Dimensions

Technical Specifications and Equipment 501C
| Camera type: | Single lens reflex camera with 6 x 6 cm (2 1/4x2 1/4 in.) max, image size. Interchangeable lenses, film magazines, viewfinders, and focusing screens. |
| Design: | Mechanical, with an aluminum alloy camera body shell cast in one piece. |
| Viewfinders: | Folding focusing hood with 4,5x magnifier, interchangeable with reflex viewfinder, prism viewfinders with or without built -in light meter, or magnifying hood. |
| Film advance: | Manual advance with simultaneous shutter cocking. |
| Tripod socket: | 1/4" and 3/8" tripod thread and base plate for quick coupling attachment. |
| External dimensions: | Camera body. Camera body with Planar G 80 mm lens and film magazine A12:180 L x 114 W x 110 H (7 x 41/2x4 5/16 in). |
| Weight: | Camera body only: 600g (1 lb 5 oz.). Camera body with Planar C 80 mm lens and film magazine A12:1475g(3lb 4oz.), |
| Focusing screen: | Acute-Matte focusing screen |
| Lens: | Hasselblad Zeiss Planar C 2,8/80mm, interchangeable. |
| Magazine: | Hasselblad A12 interchangeable film magazine. 12 exposures on 120 type film |
| The 501C camera (available in black only, cat no, 11045 comas with focusing hood; focusing screen, standard strap, Planar C 80 mm fens with tans capt and film magazine A12 (black finish cat. no. 30147) |
For comprehensive information on accessories please refer to the Hasselblad Product Catalog
Hasselblad reserve the fight to change the specifications without prior notice
Troubleshooting
Your Hasselblad 501C is built for long and troublefree service, especially when you follow the advices on maintenance and care. Should you encounter any operational difficulties the troubleshooting chart below may help you to resolve them.
| PROBLEM | POSSIBLE CAUSE | REMEDY |
| The exposure release button cannot be p depressed |
|
|
| Thera Is no image on the focusing screen |
|
|
| The lens cannot be attached |
|
|
| The lens cannot be detached | The camera body is released or pre-released | Complete the camera release and rewind the camera |
| The magazine cannot be detached | The magazine slide is not completely inserted | Push the magazine slide in until it positively stops |
Camera Care, Service and Guarantee
Camera Care.
Your Hasselblad camera is designed to withstand the rigours of professional use In most environments. In order to avoid the possibility of damage, however, the camera should be protected from the following.
Extremes of temperature.
High temperatures can have an adverse effect on both the film and the camera. Do not keep your camera in places where it may get hot, such as in direct sunlight or above a radiator, in tropical environments fungus growth can be prevented by keeping your equipment in an area where the air is circulating. Frequent rapid and severe temperature changes can cause problems such as corrosion of electrical contacts, and should be avoided. When in extremely cold temperatures, cameras and especially lenses should be protected as much as possible.
Dust and grit.
Prevent dirt of any kind from getting into your camera. When taking photographs in coastal areas for example, the camera should be protected from sand and salt water spray. You can blow away dust on the lens glass, magnifier of focusing screen, or wipe it off gently with a soft doth if necessary. Smears on the lens glass should be removed with a high quality lens cleaning solution on a soft, clean tissue. Be careful not to scratch the lens or touch any of the glass surfaces with your fingers. The surface of the mirror is coated and should be blown dean but not be wiped. Lens cleaning solvents or other chemicals should not be used on the focusing screen,
Impact.
Your camera can be damaged by severe physical shocks. You should take care not to leave it where it can fall or be knocked to the ground, or roll about.
Service.
Faultless camera performance is essential to the professional photographer. Therefore it is advisable to check that your camera is functioning correctly before an important assignment. You should also return your camera to a "Hasselblad Authorized Service Center" for periodical checking and preventive maintenance, if your camera is used constantly and intensively, exposing hundreds of rolls of film per week, checkups every six months are recommended. Hasselblad Service Centers have the expert staff and specialized equipment necessary to ensure that your camera remains in perfect working order.
Guarantee,
Provided that you bought your camera from an authorised Hasselblad outlet, it is covered by an international guarantee for one year. The guarantee document and a registration card are supplied with the camera. Keep the guarantee document carefully, but fill in the registration card and return it to your Hasselblad distributor.
Documents / ResourcesDownload manual
Here you can download full pdf version of manual, it may contain additional safety instructions, warranty information, FCC rules, etc.
Advertisement


Need help?
Do you have a question about the 501C and is the answer not in the manual?
Questions and answers