Advertisement
- 1 GETTING TO KNOW YOUR ELECTRIC SKILLET
- 2 TEMPERATURE CONTROL PROBE
- 3 BEFORE USING FOR THE FIRST TIME
- 4 USING YOUR ELECTRIC SKILLET
- 5 COOKING METHODS
- 6 USDA COOKING GUIDELINES
- 7 USER MAINTENANCE INSTRUCTIONS
- 8 CARE & CLEANING INSTRUCTIONS
- 9 STEPS FOR STAIN REMOVAL AND PROPER CARE OF YOUR CERAMIC NON-STICK COATING
- 10 STORING INSTRUCTIONS
- 11 IMPORTANT SAFEGUARDS
- 12 Documents / Resources
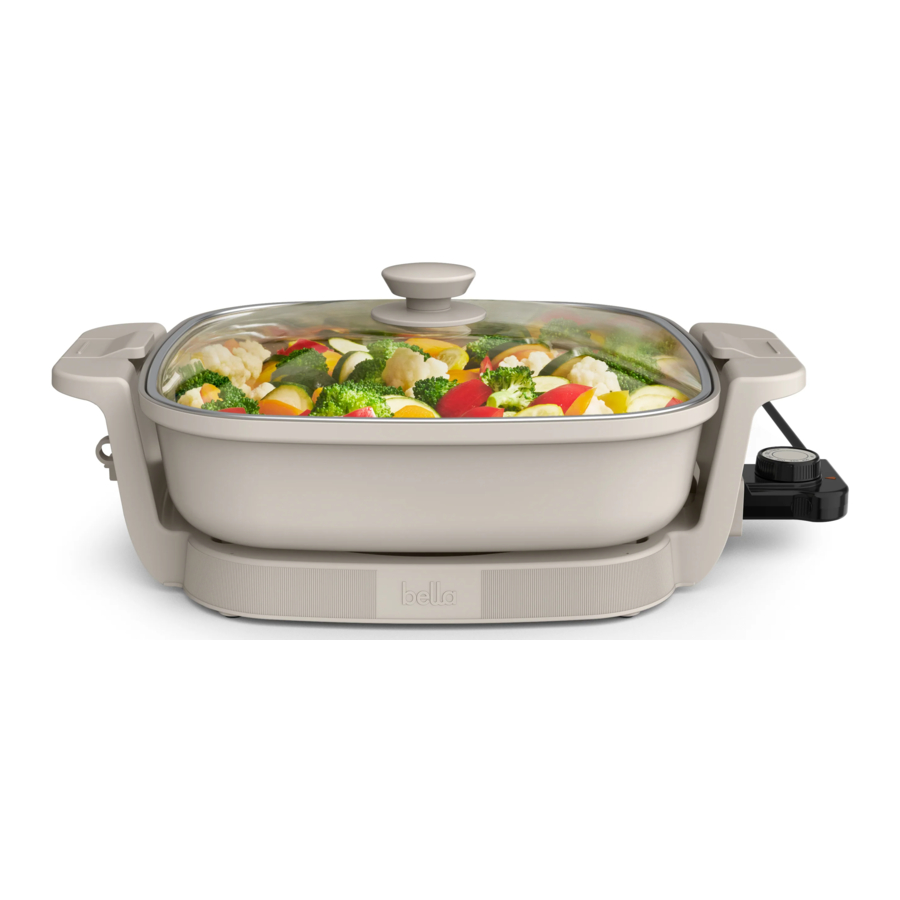
GETTING TO KNOW YOUR ELECTRIC SKILLET
Product may vary slightly from illustration.


- Tempered Glass Lid
- Cool touch Handles
- Removable Temperature probe
- Lid locking Clamps
- Probe Socket
- Cord storage
- Temperature probe storage
TEMPERATURE CONTROL PROBE
- The temperature control probe is the nerve center and brain of the Electric Skillet. Treat it carefully.
Dropping or banging it could change its calibration and make the temperature settings inaccurate. - Rotate the dial to select the temperature as called for in the recipe.
- The indicator light on the temperature control probe will illuminate as soon as the dial is rotated.
The light will go out once the selected temperature has been reached. - Allow the Electric Skillet to cool before removing the temperature control probe.
- To clean the temperature control probe, simply wipe down with a soft, damp cloth.
Make sure you dry it thoroughly before using again.
NOTE: The temperature control probe is not submersible.

Use the temperature control probe supplied with this Electric Skillet only. The use of any other temperature control probe may cause fire, electric shock, or injury.
BEFORE USING FOR THE FIRST TIME
- Carefully unpack the Electric Skillet and remove all packaging materials.
- Before cooking for the first time, wash the Electric Skillet in mild dishwashing soap, wipe and allow to dry.
![]()
Always hold the lid locking clamps in the OPEN position before removing and placing the glass lid onto the electric skillet.
![]()
Do not use lid handle when moving the unit. always use the handles on the base of electric skillet when moving or storing.
NOTE: THE ELECTRIC SKILLET IS NOT DISHWASHER SAFE. - Turn the temperature control to 400°F and heat empty Electric Skillet uncovered for approximately 5 minutes. This will ensure the Ceramic Non-Stick coating is ready for use. You will notice a slight odor; this is normal and should quickly disappear.
- Turn the temperature control to OFF and allow to cool for 15 minutes.
USING YOUR ELECTRIC SKILLET
- Place the Electric Skillet on a level surface such as a countertop or table.
NOTE: Some countertop and table surfaces, such as Corian® and other surfaces, are not designed
to withstand the prolonged heat generated by this electric skillet. We recommend placing a hot pad or trivet under the electric skillet beforehand to avoid possible damage to the surface. - Be sure the sides and back of the electric skillet are at least 4 inches away from any walls, cabinets, or objects on the counter or table.
- Turn temperature control probe to the OFF position.
- Plug the temperature control probe securely into Electric Skillet's control probe socket. Plug cord into any standard 120V AC wall outlet.
![]()
ALWAYS PLUG CORD INTO SKILLET FIRST, THEN INTO WALL OUTLET. - Preheat Electric Skillet for approximately 5 minutes before cooking. To preheat, turn the temperature control to desired temperature. The indicator light on the temperature control probe will illuminate as soon as the dial is rotated. The light will go out once the selected temperature has been reached.
- Add food and cook according to the recipe. Adjust temperature control dial as necessary.
NOTE: During cooking, the light will go on and off indicating that the Electric Skillet is maintaining proper temperature.
![]()
DO NOT USE LID HANDLE WHEN MOVING THE UNIT. ALWAYS USE THE HANDLES ON THE BASE OF ELECTRIC SKILLET WHEN MOVING OR STORING.
![]()
DO NOT USE COOKING SPRAYS. THEY CAN CAUSE A BUILD-UP ON THE COOKING PLATES AND MAY AFFECT THE CERAMIC NON-STICK PERFORMANCE OF THE PRODUCT. - Liquids such as broth, water, etc. may be added to the Electric Skillet during cooking.
- When cooking has been completed, turn the temperature control to the OFF position. The indicator light on the temperature control probe will turn off.
- Unplug cord from wall outlet. Let the Electric Skillet cool completely.
- Remove temperature control probe from Electric Skillet. Follow the Care & Cleaning Instructions described in this Owner's Manual.
![]()
ESCAPING STEAM IS HOT! BE CAREFUL WHEN REMOVING OR LIFTING LID. HOT WATER CONDENSATION MAY BE CREATED ON THE LID, ALWAYS HANDLE WITH CARE.
To prevent personal injury or steam burns due to hot water condensation follow those instruction: When removing lid from skillet, always use oven mitts or hot pads. Tilt the lid away to avoid hot water condensation
(Figure 1)
![]()

COOKING METHODS
NOTE: This appliance is not intended for deep frying foods.

DO NOT USE MORE THAN 1 CUP OF OIL.
FRY/SAUTÉ
Add oil, shortening, butter or margarine to Electric Skillet and preheat to 350°F. The amount of fat used will vary accordingly to recipe and type or amount of food to be prepared. Pan-fry (or sauté) food rapidly in the open Electric Skillet using a small quantity of fat.
NOTE: When heating oil, always remove the lid. If oil smokes, immediately turn the temperature control to OFF and allow to cool.
To pan-fry, do not use more than 1 cup of oil. Select a vegetable oil or peanut oil for frying. Butter and olive oil should only be used to sauté foods on a lower temperature setting.
PAN-BROIL
Select a tender (not too thick) cut of beef such as fillet mignon or top sirloin steak. Pan-broiling is best achieved using high heat in an open skillet with no oil. If a recipe calls for it, use only a small amount of oil or shortening. (Butter must be used with oil to prevent burning.) Preheat to 400°F. Place food in the open, hot Electric Skillet. Brown food, turning often. Remove excess fat as it accumulates.
BRAISE
Add a small quantity of fat to the Electric Skillet and preheat to 400°F. Sear food in hot fat until browned on all sides. Add specified amount of liquid, cover and turn temperature control dial down to 300°F, just until the indicator light goes out (simmer point). Cook as specified in recipe, or until food is tender. Check during cooking and add more liquid as necessary. DO NOT LET SKILLET BOIL DRY.
SIMMER
Add oil, shortening, butter or margarine to Electric Skillet and preheat to desired temperature. If required, brown food on all sides. Add liquid or make a sauce as directed in recipe. With the temperature control set to 300°F - 350°F, bring liquid to a boil. Turn temperature control dial down just until indicator light goes out. This is the simmer point. Cover. Simmer food for the directed length of time or until food is done. Check periodically during cooking and add more liquid as necessary. DO NOT LET SKILLET BOIL DRY.
STEAM
Place a small amount of water in the bottom of Electric Skillet. Add vegetables or other foods and cover. Turn temperature control dial to 300°F and steam food until done. Check often, adding more water as necessary. DO NOT LET SKILLET BOIL DRY.
WARMING
After cooking is completed set temperature control dial down to WARMING. Turn or stir occasionally. When serving previously cooked and cooled food, it may be necessary to heat food first; then turn the temperature control to WARMING.
| Food | Temperature ( °F) | Approximate Cooking Time in Minutes |
| Frying | ||
| Bacon | 325°F - 350°F | 5 min - 8 min |
| Chicken | 325°F - 350°F | 25 min - 40 min |
| Eggs (fried) | 300°F | 3 min - 5 min |
| Eggs (scrambled) | 325°F | 2 min - 3 min |
| Fish | 325°F - 375°F | 5 min - 10 min |
| French Toast | 300°F - 325°F | 4 min - 6 min |
| Ham 1/2' thick | 325°F - 350°F | 10 min - 12 min |
| Ham 3/4' thick | 325°F - 350°F | 14 min - 16 min |
| Hamburgers 1/2' thick | 325°F - 375°F | 8 min - 12 min |
| Liver | 325°F - 350°F | 5 min - 10 min |
| Minute Steak | 375°F - 400°F | 4 min - 5 min |
| Pork Chops 1/2' thick | 325°F - 375°F | 15 min - 20 min |
| Pork Chops 3/4' thick | 325°F - 375°F | 20 min - 25 min |
| Potatoes (cottage fried) | 300°F - 325°F | 10 min - 12 min |
| Link Sausage | 300°F - 325°F | 20 min - 30 min |
| Precooked Sausage | 325°F - 350°F | 10 min - 12 min |
| Grilled Sandwiches | 300°F - 325°F | 5 min - 10 min |
| Beef Steak 1' thick | ||
| RARE | 350°F - 400°F | 6 min - 7 min |
| MEDIUM | 350°F - 400°F | 10 min - 12 min |
| Beef Steak 1 1/2' thick | ||
| RARE | 350°F - 400°F | 8 min -10 min |
| MEDIUM | 350°F - 400°F | 18 min - 20 min |
| Braising And Roasting | ||
| Browning | 325°F - 400°F | 5 min - 10 min |
| Roasting (on rack) | 325°F - 350°F | 60 min - 90 min |
| Stewing | ||
| Browning | 325°F - 400°F | 10 min - 15 min |
| Stewing* | 200°F - 225°F | 30 min - 90 min |
| Casserole Dishes | Warm - 225°F | 30 min - 60 min |
| Baking | ||
| Pancakes | 350°F - 400°F | 2 min - 3 min |
| Holding Temperature | ||
| (after cooking period) | Warm | |
** Add additional liquid during cooking (if necessary), to obtain consistency.
USDA COOKING GUIDELINES
NOTE: The United States Department of Agriculture recommends that meat and poultry be cooked to the following internal temperatures to be sure any harmful bacteria has been killed. Ground turkey and chicken should be cooked to an internal temperature of 165°F/74°C and ground beef, veal, lamb and pork be cooked to an internal temperature 160°F/71°C. Whole chicken and turkey should be cooked to an internal temperature of 180°F/82°C; 170°F/77°C for the breast. Goose and duck should be cooked to an internal temperature of 180°F/82°C. Fresh beef, veal and lamb, etc., should be cooked to an internal temperature of at least 145°F/63°C. Fresh pork should be cooked to an internal temperature of at least 160°F/71°C. When re-heating meat and poultry products, they should also be cooked to an internal temperature of 165°F/74°C.
USER MAINTENANCE INSTRUCTIONS
This appliance requires little maintenance. It contains no user serviceable parts. Do not try to repair it yourself. Any servicing requiring disassembly other than cleaning must be performed by a qualified appliance repair technician.
CARE & CLEANING INSTRUCTIONS
Do not immerse the cord, plug or temperature control probe in water or any other liquid.
To avoid accidental burns, allow your Electric Skillet to cool thoroughly before cleaning.
- When cooking is completed, unplug cord from wall outlet. Allow Electric Skillet to cool.
- Remove temperature control probe from Electric Skillet.
![]()
The probe may become hot after use. Allow to cool before handling. - If necessary, wipe temperature control case and probe with a damp, soft cloth. Dry temperature control probe completely. Set aside.
![]()
The temperature control probe is not immersible. - The Electric skillet base is NOT dishwasher safe. You can wash it with warm soapy water and rinse it dry after each use.
NOTE: Only the TEMPERED GLASS LID is top rack dishwasher safe. - To wash by hand, immerse Electric Skillet and glass lid in hot, sudsy water. Clean thoroughly using a sponge or soft cloth. Rinse in hot water. Dry completely.
- For stubborn food particles, loosen with a plastic cleaning pad. Avoid hard scouring of the Ceramic Non-Stick finish as this may cause surface scratches. Do not use steel wool, scouring pads, or abrasive cleaners on any part of the Electric Skillet.
STEPS FOR STAIN REMOVAL AND PROPER CARE OF YOUR CERAMIC NON-STICK COATING
- Identify stained areas on the cooking surface and sprinkle some baking soda on the stains.
- Moisten the baking soda to get a paste like texture by adding some water.
- Let the paste stand for a few minutes on the stains (not more than an hour)
- Rub with a soft damp cloth or lightly scrub with a plastic scouring pad, wipe clean and dry thoroughly.
NOTE: Do not rub vigorously when using a plastic scouring pad and NEVER use a metal scouring pad as this may damage the Ceramic Non-Stick coating. - Repeat the cycle once again if necessary. The performance and non-stick property of the Ceramic Non-Stick coating will not be affected due to stains.
STORING INSTRUCTIONS
- Turn control dial to OFF. Unplug unit and allow to cool. Never store the Electric Skillet while it is hot or still plugged in.
- Clean the Electric Skillet thoroughly before storing.
- Carefully place the tempered glass lid knob first onto the Electric Skillet's rim. (Figure 2)
![]()
- Use the Clamps on both sides of the cool touch handles and slide to secure lid in place (Figure 3)
![]()
- Carefully secure the temperature control probe to the side of Electric Skillet and wrap cord around the cord storage. (Figure 4)
![]()
Never wrap cord tightly around the unit. Never place any stress on the cord, especially where the cord enters the unit, as this could cause the cord to fray and break.
![]()
Make sure to unroll from the cord storage before next use.
![]()
Do not use the lid handle to lift and store the skillet. Always use the handles on the skillet base.
![]()
- Store horizontally or vertically in a clean, dry place. (Figure 5)
![]()


IMPORTANT SAFEGUARDS
When using electrical appliances, basic safety precautions should always be followed, including the following:
- READ ALL INSTRUCTIONS.
- Do not touch hot surfaces. Use handles or knobs.
- To protect against electrical shock, do not immerse cord, plugs, or appliance in water or other liquid.
- This appliance is not intended for use by persons (including children) with reduced physical, sensory or mental capabilities, or lack of experience and knowledge, unless they have been given supervision or instruction concerning use of the appliance by a person responsible for their safety.
- Close supervision is necessary when any appliance is used by or near children.
- Turn unit Off and unplug from outlet when not in use and before cleaning. Allow to cool before putting on or taking off parts, and before cleaning the appliance.
- Do not operate any appliance with a damaged cord or plug or after the appliance malfunctions, or has been damaged in any manner. Return appliance to the nearest authorized service facility for examination, repair or adjustment.
- The use of accessory attachments not recommended by the appliance manufacturer may cause injuries.
- Do not use outdoors.
- Do not let cord hang over the edge of table or counter, or touch hot surfaces.
- Do not place on or near a hot gas or electric burner, or in a heated oven.
- Extreme caution must be used when moving an appliance containing hot oil or other hot liquids.
- Always attach temperature control probe to appliance first, then plug cord in the wall outlet. To disconnect, turn temperature control probe to OFF, then remove plug from wall outlet. Never yank or pull.
- Do not use appliance for other than intended use.
- Lift and open the cover carefully to avoid scalding and to allow hot condensation to drip back into the unit.
- Do not lift appliance from lid handle. Always use the side handles on the base of the appliance.
FOR HOUSEHOLD USE ONLY SAVE THESE INSTRUCTIONS
ADDITIONAL IMPORTANT SAFEGUARDS
HOT SURFACES: This appliance generates heat and escaping steam during use. Proper precautions must be taken to prevent the risk of burns, fires, or other injury to persons or damage to property.
This appliance is hot during operation and retains heat for some time after turning OFF. Always use oven mitts when handling hot materials and allow metal parts to cool before cleaning. Do not place anything on top of the appliance while it is operating or while it is hot.
- All users of this appliance must read and understand this Instruction Manual before operating or cleaning this appliance.
- The cord to this appliance should be plugged into a 120 V AC electrical outlet only.
- If this appliance begins to malfunction during use, turn unit Off and immediately unplug the cord. Then remove the temperature control probe. Do not use or attempt to repair the malfunctioning appliance.
- Do not leave this appliance unattended during use.
NOTES ON THE PLUG
This appliance has a polarized plug (one blade is wider than the other). To reduce the risk of electric shock, this plug will fit in a polarized outlet only one way. If the plug does not fit fully into the outlet, reverse the plug. If it still does not fit, contact a qualified electrician. Do not modify the plug in any way.
NOTES ON THE CORD
- A short power-supply cord (or detached power-supply cord) is provided to reduce the risk resulting from becoming entangled in or tripping over a long cord.
- Longer detachable power-supply cords or extension cords are available and may be used if care is exercised in their use.
- If a long detachable power-supply cord or extension cord is used:
- T he marked electrical rating of the cord set, or extension cord should be at least as great as the electrical rating of the appliance.
- I f the appliance is of the grounded type, the extension cord should be a grounding-type3-wire cord.
- T he longer cord should be arranged so that it will not drape over the countertop or tabletop where it can be pulled on by children or tripped over.
PLASTICIZER WARNING
To prevent plasticizers from migrating to the finish of the countertop or tabletop or other furniture, place NON-PLASTIC coasters or place mats between the appliance and the finish of the countertop or tabletop. Failure to do so may cause the finish to darken, permanent blemishes may occur, or stains can appear.
ELECTRIC POWER
If the electrical circuit is overloaded with other appliances, your appliance may not operate properly. It should be operated on a separate electrical circuit from other appliances.
Documents / ResourcesDownload manual
Here you can download full pdf version of manual, it may contain additional safety instructions, warranty information, FCC rules, etc.
Advertisement

Need help?
Do you have a question about the Make & Take and is the answer not in the manual?
Questions and answers