McIntosh C1000 Owner's Manual
Controller/preamplifier/tube preamplifier
Hide thumbs
Also See for C1000:
- Service manual (38 pages) ,
- Manual (2 pages) ,
- Owner's manual (56 pages)

Related Manuals for McIntosh C1000


Summary of Contents for McIntosh C1000
- Page 1 Controller/Preamplifier/Tube Preamplifier C1000 Owner’s Manual McIntosh Laboratory, Inc. 2 Chambers Street Binghamton, New York 13903-2699 Phone: 607-723-3512 FAX: 607-724-0549...
- Page 2 The exclamation point within an The lightning flash with arrowhead, within an equilateral triangle, is in- equilateral triangle is intended to alert the user to the presence of im- tended to alert the user to the presence of uninsulated “dangerous voltage” portant operating and maintenance (servicing) instructions in the litera- within the product’s enclosure that may...
-
Page 3: Table Of Contents
Setup: Customer Service How to Operate the Setup Modes ....... 22-33 If it is determined that your McIntosh product is in need of Remote Control: repair, you can return it to your Dealer. You can also return Remote Control Push-buttons .......... 34 it to the McIntosh Laboratory Service Department. -
Page 4: Introduction
Power amplifiers. Control Input on McIntosh and/or non- 7. A McIntosh Power Controller may be added to the C1000 to Ground McIntosh components. provide AC Power Switching to components that do not have Power Control Connections. -
Page 5: Performance Features
• • • • • Glass Front Panel with Fiber Optic Illumination All the C1000 Inputs can be matched in level, so there are The famous McIntosh Illuminated Glass Front Panel, with no abrupt changes in volume levels between the different 1/2 inch thick sections, has a three dimensional look helping inputs. -
Page 6: Dimensions
Dimensions The following dimensions can assist in determining the best location for the C1000 Controller, C1000 Preamplifier and C1000 Tube Preamplifier. There is additional information on page 8 pertaining to installing the C1000 System into cabinets. " 44.45cm Front View "... - Page 7 Dimensions " 44.45cm Front View " 5/16 6" of the 13.49cm 15.24cm C1000P " 31.12cm 17" 43.18cm Rear View of the " 11.75cm C1000P " 33.65cm " 47.63cm " 43.50cm " 3/16 Side View " 13/16 0.48cm of the 12.22cm C1000P "...
-
Page 8: Dimensions
Dimensions, con’t " 44.45cm Front View " 5/16 6" of the 13.49cm 15.24cm C1000T " 31.12cm 17" 43.18cm Rear View of the " 11.75cm C1000T " 33.65cm " 47.63cm " 43.50cm " 3/16 Side View " 13/16 0.48cm of the 12.22cm C1000T "... -
Page 9: Installation
Installation Installation The C1000C, C1000P and C1000T can be placed upright Be sure to cut out a ventilation hole in the mounting shelf on a table or shelf, standing on their four feet. The four feet, according to the dimensions in the drawing. may be removed from the bottom of the C1000C, C1000P and C1000T when they are custom installed as outlined be- Interconnect Cables are supplied with the C1000P... - Page 10 Installation, con’t Enclosed Custom Cabinet Ventilaton Fan Warm Air Output Additional Component in Enclosed Custom Cabinet Cutout Opening for Ventilation C1000C C1000P C1000T Side View in Enclosed Custom Cabinet Cutout Opening for Ventilation Cool Air Chassis Input Spacers Ventilaton Fan...
-
Page 11: C1000 Controller Rear Panel Connections
Rear Panel Connections Rear Panel Connections The identification of Rear Panel Connections for the C1000 Controller, C1000 Preamplifier and C1000 Tube Preampli- fier are located on separate folded sheets contained in the Owner’s Manual Packet. C1000 Controller Refer to folded sheet “Mc1A”... - Page 12 5. Connect a Cable from the McIntosh D/A Converter C1000, remote control operation of the system is possible Power Control Out Jack to the Power Control In of a from another room and/or when the C1000 is located in a McIntosh AM/FM Tuner. cabinet with the doors closed.
- Page 13 MAIN LEFT and RIGHT Balanced OUTPUTS, to one of the Balanced Inputs on the Left and Right McIntosh Power Amplifiers. Note: If the C1000 is part of a Multichannel Audio System, proceed to page 19 at this time. 23. Connect the supplied AC Power Cord between C1000C AC Power Cord Socket and a live AC outlet.
- Page 14 5. Connect a Cable from the McIntosh D/A Converter C1000, remote control operation of the system is possible Power Control Out Jack to the Power Control In of a from another room and/or when the C1000 is located in a McIntosh AM/FM Tuner. cabinet with the doors closed.
-
Page 15: C1000 Tube Preamplifier
Balanced Inputs on the Left and Right McIn- tosh Power Amplifiers. Note: If the C1000 is part of a Multichannel Audio System, proceed to page 19 at this time. 23. Connect the supplied AC Power Cord between C1000C AC Power Cord Socket and a live AC outlet. - Page 16 C1000, remote control operation of the system is possible 5. Connect a Cable from the McIntosh D/A Converter from another room and/or when the C1000 is located in a Power Control Out Jack to the Power Control In of a cabinet with the doors closed.
- Page 17 19. Connect Cables from the External Sound Processor Left SPKR2 from the C1000T. and Right Outputs to the C1000 Tube Preamplifier 3. If the C1000 is part of a Multichannel Audio PROCESSOR FROM LEFT and RIGHT Input Jacks. System, proceed to page 19 at this time.
- Page 18 How to connect the C1000C, C1000P and C1000T, con’t Optional connections when the Power Amplifier used has only one Balanced Input. The Right Channel connection is illustrated below, the Left Chennel would be connected in a similar manner. McIntosh Right Channel Power Amplifier (partial view) Figure 1...
-
Page 19: How To Connect The C1000 With Passthru Mode
How to Connect the C1000 with Passthru Mode The C1000 Preamplifier has a special operating mode known as Passthru, when it is used as part of a McIntosh Multichannel Sound System. The Front Left and Right Channels coming from the McIntosh A/V Control Center... -
Page 20: C1000 Controller Front Panel Controls, Displays, And Push-Buttons
C1000 Controller Front Panel Controls, Displays, and Push-Buttons RECORD Switch selects LISTEN Switch selects the program signals that the program signals are available to record that are listened to and from and is used for setup is used for setup func-... -
Page 21: C1000 Preamplifier And C1000 Tube Preamplifier Front Panel Displays And Jack
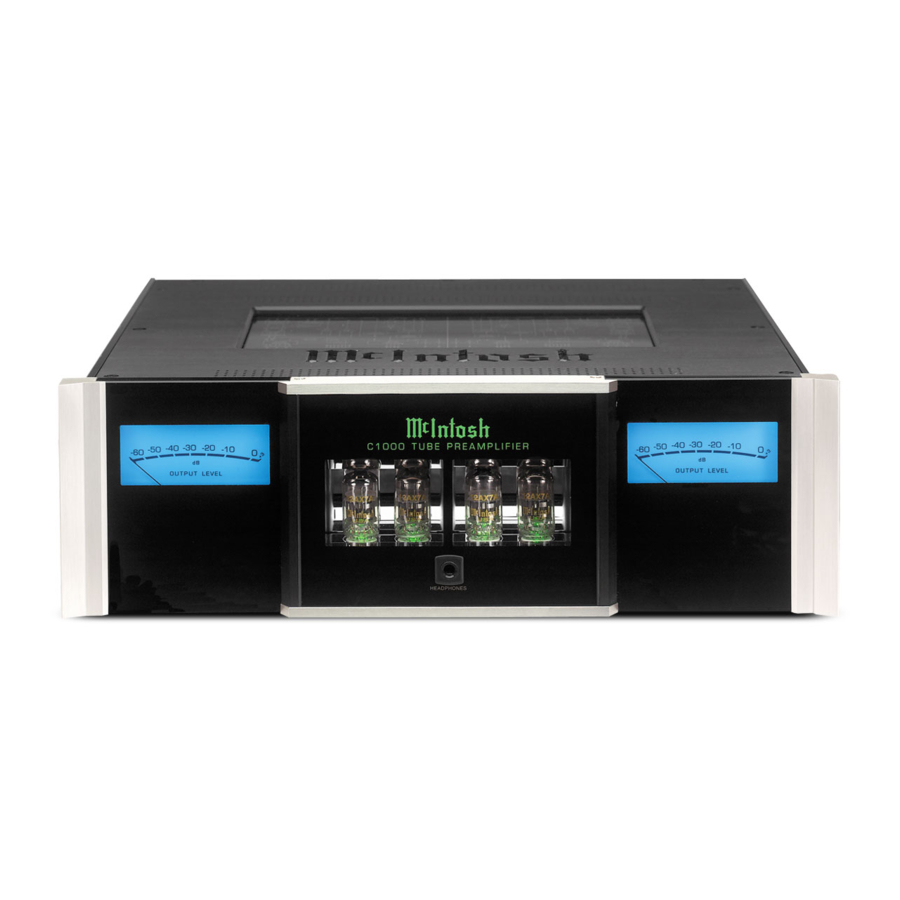
C1000 Preamplifier and C1000 Tube Preamplifier Front Panel Displays and Jack METER indicates the METER indicates the Preamplifier’s Left Preamplifier’s Right Channel relative Channel relative Out- Output Level put Level HEADPHONE jack accepts dynamic headphones METER indicates the METER indicates the Preamplifier’s Left... -
Page 22: How To Operate The Setup Modes
2. The Alphanumeric Display will indicate the last input Title. Refer to figure 3b. The C1000T listened to. If this is the first time the C1000 is switched Preamplifer default Input Title names will have on, the display will indicate “15 TUNER”, refer to fig- a number 2 added to the end of the Title. -
Page 23: Firmware Version
Firmware. The Version of the Firmware in LER Menu, the LED above the SETUP Push-button the C1000 can be identified at any time by utilizing the will extinguish and the Front Panel Display will revert Setup Controller Mode. -
Page 24: Remote Control
(HR061 and HR1000). The setting may be changed to allow maximum volume (0 - 100%) or in Decibels (-92.0dB to the C1000 to work with the legacy HR054 Remote Control +15.0dB). To change the display to Decibels follow the by performing the following steps: steps below: 1. - Page 25 When the McIntosh MDA1000 D/A Converter and 12V”. Refer to figure 17. MCD1000 CD Player are connected to the C1000 Control- ler there are special functions to enhanced operation of the D/A Converter with the C1000. The following steps activate these functions: 1.
- Page 26 C1000 Controller the character “T” will appear to the right of Input reassigned. The following example (with either preamplifier Number. Refer to figure 28a. connected to the C1000 Controller, but not both) will illus-...
- Page 27 “- -” using the LISTEN (Select) Control Data Port Assigment Refer to figure 31. The Data Control Ports on the C1000 Controller by default are assigned to control just one input ( 1 thru 7 ) on one Preamplifier. When both Preamplifiers (C1000P and...
- Page 28 Trigger Selection The Trigger A and B Power Control Outputs on the C1000 Controller are reassignable from their default settings to ac- tivate only when a given Input(s) is selected. To change ei- ther Trigger A or B from the default setting perform the fol-...
- Page 29 Accessory Control When the Trigger A or B Power Control Outputs on the C1000 Controller are used, one of the Triggers may be as- signed to switched On or Off by using the ACCessory Push- button on the supplied HR54 Remote Control. To select ei-...
- Page 30 Figure 44b Figure 40 When there is just one Preamplifier (C1000P or C1000T) connected to the C1000 Controller, proceed to step 3. If Figure 44c both Preamplifiers (C1000P and C1000T) are connected to 11. Rotate the BALANCE (Menu) Control until the Alpha- the C1000 Controller, proceed to step 10.
- Page 31 Figure 45 When there is just one Preamplifier (C1000P or C1000T) Figure 49c connected to the C1000 Controller, proceed to step 3. If 11. Rotate the BALANCE (Menu) Control until the Alpha- both Preamplifiers (C1000P and C1000T) are connected to numeric Display indicates RPROC TUN - -.
- Page 32 Passthru Mode and the Selection of the capacitance appears in the Display, e.g. “MM 150 C1000 Input that will be used for the Right and Left Front PF”. Refer to figure 51. Channels. In the example below, the Right and Left Front Channels from the Multichannel Processor/Decoder will be connected to the CDR Input Jacks on the C1000.
- Page 33 Magnet Coil Magnet Coil Pream p, Tube Pream p, Tube or (PF) (OHMS) (PF) (OHMS) or Both) Both) Settings for the C1000 Controller Display Meter Volum e Trigger A Trigger B Triam p Accessory Brightness Illum ination Display Voltage Voltage...
-
Page 34: Remote Control Push-Buttons
D/A Input Press to listen to the se- lected Record out signal Note: Push-buttons whose function is not indentified above are for use with other McIntosh Products. Requires a Data Cable Connection between the C1000C and the MDA1000... -
Page 35: How To Operate The Remote Control
Down Push-button to select various sound adjustments Acc On and functions. Press ACC ON to turn the power ON to a McIntosh Disc Note: Refer to “How to Operate the C1000” starting on page Player. 38 for additional information. -
Page 36: How To Operate The C1000
Display will indicate the last input listened to. of the Tubes inside the C1000T. If this is the first time the C1000 is switched on, the display will indicate “15 TUNER”, refer to figure 61. If both Balance Control... - Page 37 66. Setup Mode Pressing the SETUP Push-button activates the Setup Mode of the C1000 and allows customizing of the various Operat- Figure 66 ing Modes, Front Panel Alphanumeric Display and indica- Note: When the McIntosh MDA1000 is connected to the tion of the Firmware Version.
- Page 38 Figure 72 3. To listen to the signal at the record outputs going to the Note: The C1000 automatically stores into memory for each recorder, press the REC (Record) MONITOR push- Listen Input, the Selection of the Stereo or Mono Mode.
- Page 39 How to Operate the C1000, con’t Volume Level, Balance Level Adjustments, Stereo or Mono Mode, Speaker 1 On/Off, Speaker 2 On/Off, Display Brightness (1-7) , Meter Illumination On/Off , the Moving Magnet Phono Input Capacitance and Moving Coil Phono Figure 79a Input Resistance .
- Page 40 4. The C1000 System will automatically reset itself and will retain any changes that where previously made in the SETUP Mode. If the change to the C1000 System is a result of changing Figure 84 The C1000C Front Panel Controls, Push-buttons and the...
-
Page 41: Photos
Photos... -
Page 43: Photos
Photos, con’t... -
Page 44: Technical Description
Controller Chassis and the second chassis contains the Preamplifier Circuitry. This prevents the possible introduc- tion of hum and noise into the audio signal. In the C1000, an additional refinement has been added to help assure total channel isolation, dual mono design. There are two indepen-... - Page 45 Electronical Volume Control Circuit is load, but the back- unacceptable for use in the C1000, as it does not match the ground noise level is higher especially at lower settings of classic McIntosh Volume Control Audio Taper. The C1000 the volume control.
- Page 46 Signal to Noise vs. Volume Level of the In the typi- C1000 Preamplifier versus High Performance cal Preampli- Mechanical and Electronic Volume Controls fier, one set of circuits have to amplify the...
- Page 47 In a similar manner the balanced audio signals are C1000T Preamplifiers are connected to the C1000C, at converted to unbalanced signals before they are available to which time the C1000 functions as if it was one Preampli- the unbalanced outputs jacks. fier with 18 Inputs.
-
Page 48: Block Diagrams (Separate Sheet)
Refer to folded sheet “Mc6A” for the C1000 Preamplifier electronic cir- and C1000 Controller Block Diagrams. The Block Diagram cuits the of the C1000 Tube Preamplifier is on folded sheet “Mc6B”. Figure 103 meters are made to respond to short intervals with an accuracy of... - Page 49 Specifications C1000 Preamplifier and C1000 Tube Preamplifier Specifications C1000 Preamplifier Specifications C1000 Tube Preamplifier Frequency Response Frequency Response +0, -0.5dB from 10Hz to 40,000Hz +0, -0.5dB from 10Hz to 20,000Hz Total Harmonic Distortion Total Harmonic Distortion 0.002% from 20Hz to 20,000Hz 0.08% from 20Hz to 20,000Hz...
-
Page 50: General Specifications
230 Volts, 50/60Hz at 120 watts Knobs and Interconnect Cables 240 Volts, 50/60Hz at 120 watts C1000P: Note: Refer to the rear panel of the C1000 Controller for the Width is 17-1/2 inches (44.45cm) correct voltage. Height is 6 inches (15.24cm) including feet Depth is 24 inches (61.0cm) including the Front Panel and... -
Page 51: Packing Instruction
Manual and Accessories sult in shipping damage. Also, to protect the finish of the 034345 Foam Top Pad Diecut for Cables glass and metal surfaces it is advisable to place the C1000 034351 Top Pad Controller, C1000 Preamplifier and C1000 Tube Preampli-... - Page 52 McIntosh Laboratory, Inc. 2 Chambers Street Binghamton, NY 13903 The continuous improvement of its products is the policy of McIntosh Laboratory Incorporated who reserve the right to improve design without notice. Printed in the U.S.A. McIntosh Part No. 04099500...
Need help?
Do you have a question about the C1000 and is the answer not in the manual?
Questions and answers