Advertisement
Introduction
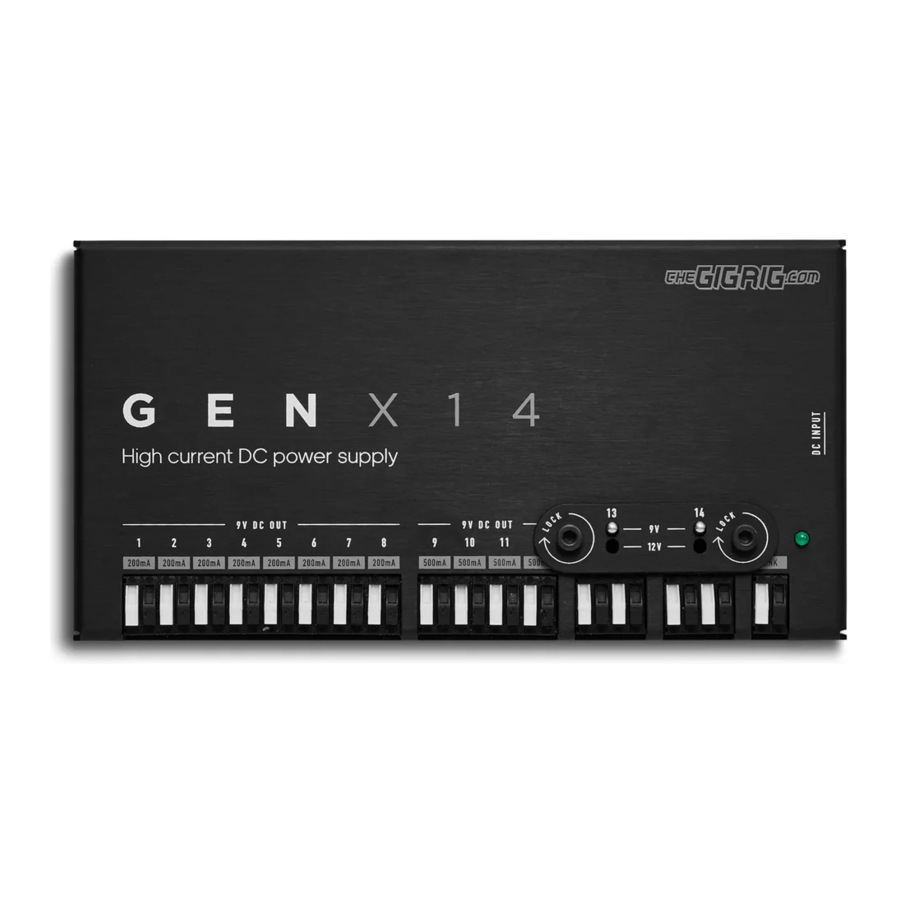
TheGigRig GenX14 is the crowning glory of TheGigRig Modular Power Supply system. It features 14 isolated outputs capable of powering even the most current hungry pedalboards.

DC OUTPUTS
8x9VDC@200mA: 8 individual 9VDC outputs capable of a conservative 200mA each. This is more than enough for most pedals. All your standard overdrives, analog modulation and delay pedals will be able to be powered from one of these outlets.
4x9VDC@500mA: 4 individual 9VDC outputs capable of 500mA each. This is for your current hungry digital pedals from brands like Strymon, Eventide, Line6 etc. Each output will deliver exactly what these pedals need to operate at their best.
2x9/12VDC@1000mA: If you run valve OD's/preamps, or something like a H90, these will need a huge amount of current to keep the pedal operating in the range it needs to be. These two outputs can each deliver a massive 1000mA each at either 9 or 12VDC. For pedals such as Kingsley and Effectrode this amount of current is a must and delivered beautifully by the GENX14. Each of the 1000mA outputs has two sets of connection tabs. It might be that you want to power a high current digital pedal and something else. The two sets of connection tabs for each of the 1000mA outputs gives you this option.
DC Input: Plug your DC power in here. GenX14 is designed to work with the 24V DC power supply provided but it will work on a wide voltage range from 9-34V DC.

Whatever you put into the DC INPUT will appear on the LINK OUT. Using the supplied 24V power supply, you will get 24V on the link out.
CUT-TO LENGTH DC CABLE
One of the features of our Modular Power Supply System is our cut to length DC cables. Measure out exactly how long it needs to be, cut it to length, and pop the end of the cables into the tabs and push flat. Once connected the cable is locked into position. You can of course remove the cable by levering up the tab. If any insulation is left in the tab simply lever the tab all the way out and poke the left over insulation out with a paperclip or something similar

LOCK GUARD

To ensure you don't accidentally send the wrong voltage into any of your expensive pedals we've provided a LOCK GUARD on the switch. If you want to swap the voltage simply undo the two hex screws, remove the lock guard, and flick the switch. Reattach the LOCK GUARD once you've changed the voltage.
SET UP EXAMPLE

Understanding the LINK output

The LINK output links to the DC input. Powering the GENX14 with the 24V power supply provided means the LINK output will be 24V. If you power the GENX14 with a Generator the LINK output will be 9V. For maximum efficiency we recommend using the supplied 24V power supply.
*PLEASE NOTE – High Current Adapters made before 2022 will not have the wide range input feature. HCAs capable of 24V at the input will have a blue dot on the base.
You can also connect a Distributor to the LINK output if you need to run multiple HCA's.
Isolators are 9V input ONLY and will need to be powered by any of the 9V outputs. As the Isolator is providing isolated power it can be run from one of the set of tabs on the 1000mA output alongside whatever else you're powering, as long as you have ample current spare, but ONLY if its set to 9v.
Using Both Sets of Tabs On The 1000mA Outputs
Each of the 1000mA outputs has 2 sets of tabs in parallel for maximum flexibility. 1000mA is a lot of current so you can share the output with another pedal as long as one is isolated via an adapter. If 9V is selected you can use the Low Current Isolator (ISOx4LC) as well as power another 9V 500mA pedal direct from the seconds tab. In this scenario because the ISO is completely isolated the second pedal connects directly to the second set of tabs.

FAQs
Is this ok to use in the USA
You can use GenX14 in any country in the world. The 24V power supply that comes with the GenX14 will adapt to any international input voltage, as will our Generator power supply. Either of these supplies can be used but we'd recommended the supply provided for current hungry pedalboards.
Can I power the Quad Cortex
The Neural Quad Cortex needs 12V@2000mA. If you sum the two 12v@1000mA outputs on GENX14 with a current doubling cable then yes, there's enough there to power the Quad Cortex.
What do I do if I need more outputs
GenX14 is designed to operate as part of TheGigRig Modular Power Supply system so adding things is simple. If you need lower current 9V outputs, add an Isolator ISOx4LC, if you need a different voltage such as 24V for an older Electro-Harmonix pedal you can add an ElectroMan 9-24V High Current Adapter.
What's the best way to attach GenX14 to my pedalboard?
We recommended using pedalboard tape to attach GenX14 to loop Velcro or double-sided tape to attach to a dry flat surface. The supplied 24V power supply can live either on or off the pedalboard. If it is to live on the board attach the same way.
Can I power the unit with my Generator
GENX14 will work with any 2.1mm centre negative supply between 9V-36V. The 9V Generator will work, but it will not run as efficiently as with the supplied 24V power supply. For the vast majority of boards its absolutely fine but if you are using all the GENX14's outputs with everything pushing the limit of GEN14's current draw, then you may be overloading the Generator.
How do I connect a dc cable
To connect a dc cable to GenX14 simply cut the cable to length, and push the wire with the white stripe into the white tab, and the black wire into the black tab
You MUST push the tabs flat to connect. Using the pair of pliers you use to cut the cable works well. Once connected its locked in place.
How do I reuse a dc cable

Lever up the tab then pull the wires out. If the wires are stuck make sure the tabs are all the way up, then pull the wires free. If there is any insulation from the wires left over in the tabs simply lever the tabs all the way out and poke the insulation out of the tab before returning it to its place. Cut the cable the length you want it and reinsert it into the tabs and push the tabs flat.
Power Path Diagram Service
Power can be complicated. With so many pedals operating on different voltages, different current draw demands, different plug sizes and polarities, its east to get confused. We offer a service where we will tell you exactly what is needed to power everything on your board. Click the link, enter the details and we'll respond with a diagram and a link through to get everything you need.
https://shop.thegigrig.com/custom-power-path-diagram-service/
If you need anything please contact us through our support page at thegigrig.com/support and don't forget to check out our YouTube channel for more info.
Technical Specifications
Input Voltage: 9-34Vdc 2.1mm centre negative
Output Voltages: 8x9Vdc@200mA, 4X9Vdc@500mA, 2x9or12Vdc@1000mA
Current Draw Main Unit: 5.6Amps @ 9Vdc
Input is reverse diode protected
Safety: The GigRig UnderLiner & UnderLiner FS are is designed for indoor use only - Don't get them wet
Dimensions
GENX14 – 158Lx82Wx22Dmm (6.22Lx3.22Wx0.87D")
G24V Power Supply – 132Lx57Wx32Dmm (5.2Lx2.24Wx1.26D")
The GigRig Ltd
Unit 15 Whitehill Industrial Pk, Whitehill Lane
Royal Wootton Bassett, Wiltshire. UK
SN4 7DB
Documents / Resources
References
Download manual
Here you can download full pdf version of manual, it may contain additional safety instructions, warranty information, FCC rules, etc.
Advertisement


Need help?
Do you have a question about the GenX14 and is the answer not in the manual?
Questions and answers