Advertisement
- 1 Product Introduction
- 2 First Use
- 3 Basic Use
- 4 Insta360 App
- 5 Apple Watch Control
- 6 Firmware Update
- 7 Documents / Resources
Product Introduction
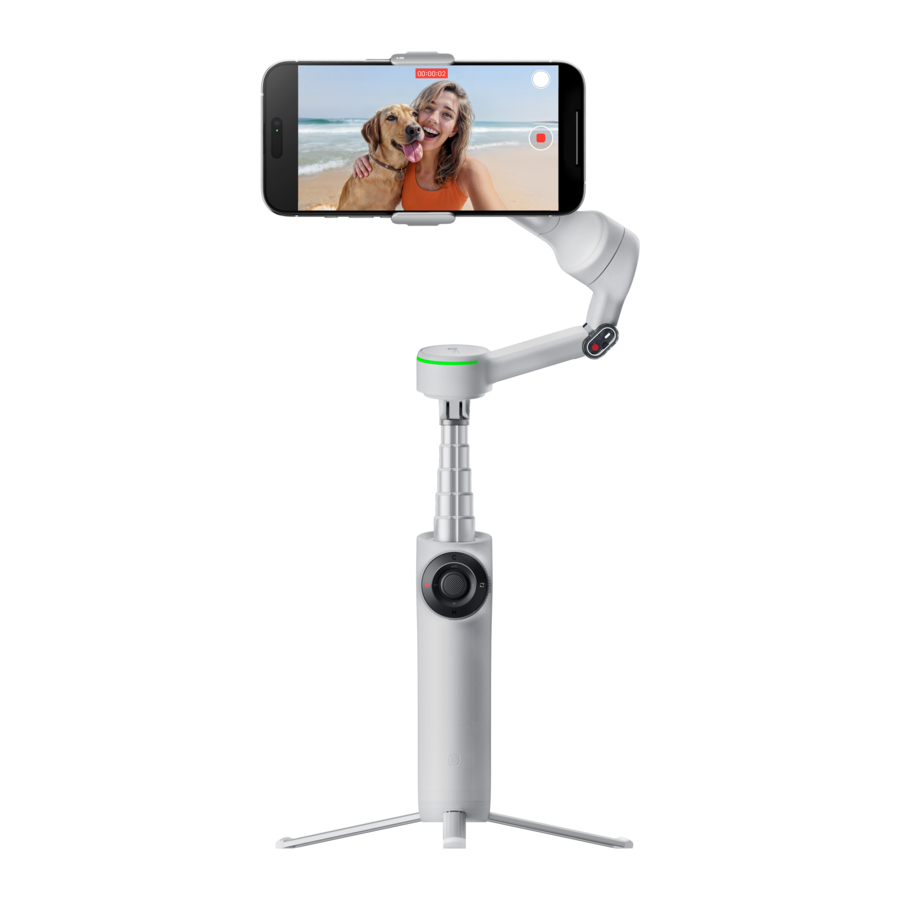
Flow 2 Pro Introduction

- Magnetic Phone Clamp
- Magnetic Alignment
- Battery Level/Gimbal Mode Indicator Lights
- Shutter Button
- Power Button (M Button)
- 1/4" Mounting Point
- Tilt Axis Motor
- C Button
- Touch Panel
- Switch Button
- Joystick
- Power Input Port (Type-C)
- Zoom Wheel
- Roll Axis Motor
- Power Output Port (Type-C)
- Tilt Axis Indicator Light
- NFC Pairing LED
- Tracking Ring Light
- Pan Axis Motor
- Built-In Selfie Stick
- Trigger Button
- Built-In Tripod
- Selfie Mirror
First Use
Charging
Use the included Type-C Cable to connect the "IN" Port on the handle to the charger. The battery level indicator lights will change during charging according to the remaining power level. A solid indicator light means charging is complete.
Flow 2 Pro features two Type-C ports. The "IN" Port on the handle is the charging port, which is used to charge the gimbal. The "OUT" Port located on the arm is the power output port. To use the gimbal as a power bank, connect your phone and when the gimbal is powered off, press the Power/M Button to charge your phone. If the gimbal is already on, it will start charging automatically.

Flow 2 Pro Charging Time:
- 0–80% in 55 minutes
- 0–100% in 80 minutes
*Measured at 77ºF (25℃) using a 10W charger.
Unfolding and Folding
Mounting a Phone
Attach the Phone to the Magnetic Clamp
- Extend the Magnetic Phone Clamp around the middle of your phone, following the icon on the clamp's right side.
- Ensure the phone's camera faces the direction marked on the Magnetic Phone Clamp.
![]()

Attach the Clamp to the Gimbal
- Align the magnetic notch on the back of the clamp with the raised bump on the gimbal's magnetic surface.
- Match the magnetic groove on the clamp with the red dot (Magnetic Alignment) on the gimbal. Securely attach the clamp.
![]()

Unfold and Power On
- Hold the handle with one hand and pull the arm outward with the other to unfold the gimbal.
- The gimbal powers on automatically. Wait for the indicator light to turn on, signaling it's ready for use.


 Note:
Note:
- Ensure the Magnetic Phone Clamp is centered on your phone for an even, secure fit. Attach the clamp to the phone first before mounting it on the gimbal.
- The phone's camera should match the direction marked on the clamp for proper alignment.
- If the light is solid red and the gimbal isn't functioning, double-check the Magnetic Phone Clamp's attachment.
- Use the Magnetic Phone Clamp in handheld scenarios. Avoid high-intensity motion or environments with strong vibrations to prevent accidental detachment.
- When unfolding, adjusting, or folding the gimbal, always hold the handle or arm to prevent detachment. Avoid handling the phone or clamp directly during these actions.
- The gimbal will detect if a phone is mounted within 30 seconds of powering on. If no phone is detected, it automatically enters Standby Mode.
Built-In Selfie Stick and Tripod
Flow 2 Pro comes with a built-in selfie stick and tripod. The selfie stick has five sections and extends to a maximum length of 210mm (8.3in). The angle adjustment range is 0-90°.

Once fully extended and unfolded, use the built-in tripod for hands-free shooting. Avoid windy, unstable environments, including sand.

Notes:
- When pulling out the tripod, pull out all legs together, not individually.
- When storing the tripod, fold the legs first, then slowly push them back in with the palm of your hand.
- If you have the selfie stick extended for a long time, it's recommended to attach an external tripod through the 1/4" screw hole at the bottom of Flow 2 Pro's handle for more support and use in a wider range of scenarios.
Folding and Powering Off
- Long press the Power Button to power off Flow 2 Pro.
![]()
- Follow the direction of the gimbal arm after powering off, hold the phone and fold the arm downward to collapse the gimbal.
![]()
- Detach the phone and the Magnetic Phone Clamp.
![]()


Finding Your Serial Number
Product Box
The serial number is located on the back of the original product box.

Flow 2 Pro Body
You will also find the serial number as shown on the gimbal itself, just below the Tilt Axis Motor.

Insta360 App
After connecting the gimbal to the Insta360 app, you can view the serial number in the general settings on the shooting page.
Activation
You will need to activate Flow 2 Pro in the Insta360 app before using it for the first time.
Steps:
- Download the Insta360 app. Alternatively, search "Insta360" in any major app store or scan the QR code on the box.
- Enable Wi-Fi and Bluetooth on your phone.
- Open the Insta360 app. The pop-up window should automatically display "Discover New Devices". Select your device (the name is "Flow 2 Pro ******" by default, where ****** is the last six digits of the serial number, which can be found on the product box or the app), and then follow the on-screen instructions to connect and activate your gimbal.
- The app will prompt you to update the firmware if a new version is available. Please follow the on-screen prompts to update Flow 2 Pro's firmware. Do not power off Flow 2 Pro or exit the Insta360 app during the update.
- After successful activation, you'll be able to shoot both in the Insta360 app (a pop-up will appear automatically to prompt you to do this) or in your phone's native camera or third-party apps depending on compatibilty.
One-Tap Pairing Via NFC and Tracking (iOS)
One-Tap Pairing Via NFC
Flow 2 Pro supports NFC pairing with NFC-enabled phones to quickly connect and start tracking with DockKit.
Notes:
- To use DockKit tracking, you'll need an Apple device compatible with DockKit, specifically an iPhone 12 or later model, running iOS 17 or higher (we recommend iOS 18 or higher for enhanced features). Ensure NFC is enabled.
- After the initial pairing, there's no need to re-align the phone with the NFC area. Simply turn on the gimbal, check the phone's Bluetooth is on, mount the phone on the gimbal, and it will automatically reconnect.
Steps:
- Power on Flow 2 Pro.
- Turn on Wi-Fi and Bluetooth, keep your phone idling on its home screen.
- Touch your phone's NFC area to the gimbal, wait for the pop-up window, then tap Connect.
- Attach your phone to Flow 2 Pro and wait until the gimbal nods to indicate a successful connection. Do not remove the phone from the gimbal during the pop-up pairing process, as this will result in a pairing failure.
![]()

If you cannot connect via NFC, please check the following:
- Ensure the NFC area on your phone is close to the NFC mark on Flow 2 Pro. If there is no response, move the phone a few millimeters away, wait for around 10 seconds, then try again.
- Ensure your phone has NFC enabled.
- Remove any metal objects in close proximity to Flow 2 Pro's NFC area.
- Ensure only one phone is in contact with Flow 2 Pro at a time.
- Close any other NFC-enabled applications running on your phone.
Native Camera and Third-Party App Tracking
Once connected, you can control the phone's native camera or use it with a number of third-party apps, or connect to the Insta360 app for enhanced functionality.
- Apple DockKit Native Tracking (iPhone's native camera & third-party apps)
- To use Apple DockKit native camera tracking, open the iPhone's Camera app, position your subject in frame, press the Trigger Button, and tracking will turn begin automatically. Note, this does not work in Pano and Time-lapse Modes.
- When Flow 2 Pro is tracking, the Tracking Ring Light will be lit green and flash slowly. To stop tracking, press the Trigger Button again. The Tracking Ring Light will then turn off.
- Third-party apps like TikTok and FaceTime are supported, allowing for easier content creation and video calls.
- You can switch tracking between Apple devices as well, so you can use your iPhone as your webcam for your Macbook or Apple TV and track people during video calls or online meetings.
- Insta360 App Tracking (Deep Track 4.0 & Live Mode)
After connecting to the Insta360 app, you can use Deep Track 4.0 for tracking in third-party apps such as live streaming apps and video calling apps through the Live Mode in the Insta360 app. Head to the shooting page once Flow 2 Pro connects to the Insta360 app.
Notes:
- To use DockKit tracking, you will need an Apple device compatible with DockKit, specifically an iPhone 12 or later model, running iOS 17 or higher (we recommend iOS 18 or higher for enhanced features). Ensure NFC is enabled.
- Use Deep Track 4.0 in the Insta360 app for greater tracking accuracy and subject recovery in more complicated scenarios.
- Some button functions are unavailable when using the phone's native camera or third-party apps. For full details, please refer to the phone compatibility list on the official Insta360 website.
- Flow 2 Pro is designed to be used with DockKit-compatible apps, such as iPhone's Camera app and FaceTime, please refer to the tested compatible applications on the official Insta360 website.
One-Tap Pairing Via NFC and Tracking (Android)
One-Tap Pairing Via NFC
Flow 2 Pro supports NFC pairing with NFC-enabled phones to quickly connect the gimbal. It also automatically launches the Insta360 app for faster shooting.
Notes:
- Ensure that the Insta360 app is downloaded on your phone.
- After the initial pairing, there's no need to re-align the phone with the NFC area. Simply power on the gimbal and your phone's Bluetooth, mount the phone on the gimbal, and it will automatically reconnect and launch the Insta360 app.
Steps:
- NFC pairing can be done with the gimbal either folded or unfolded.
- Turn on NFC, Wi-Fi and Bluetooth, and keep your phone idling on its home screen.
- Place your phone's NFC area close to the gimbal's pairing area. A pop-up will appear on the phone. Tap it, and the Insta360 app will automatically open.
![warning]() Note: The pop-up interface may vary across different phone models. For some models, the app will open automatically without needing to click the pop-up. Please follow the actual display.
Note: The pop-up interface may vary across different phone models. For some models, the app will open automatically without needing to click the pop-up. Please follow the actual display.
- Once the app is opened, attach your phone to the gimbal. After the gimbal is unfolded, the app will automatically open the shooting page, where you can use the tracking functionality within the app.
- After connecting, you can control the native camera for shooting or use the Insta360 app for shooting and tracking. Android phones support the following two tracking modes:
- Deep Track 4.0: Allows tracking of one or more persons within the Insta360 app.
- Live Mode: Tracking in third-party apps such as live streaming apps and video calling apps through Live Mode.
Notes:
- Some button functions are unavailable when controlling or tracking with the phone's native camera or third-party apps. For full details, please refer to the phone compatibility list on the official Insta360 website.
- Native camera control cannot be achieved through NFC pairing, it requires system Bluetooth to connect the device.
If you cannot connect via NFC, please check the following:
- Ensure the NFC area on your phone is close to the NFC mark on Flow 2 Pro. If there is no response, move the phone a few millimeters away, wait for around 10 seconds, then try again.
- Ensure your phone has NFC enabled.
- Remove any metal objects in close proximity to Flow 2 Pro's NFC area.
- Ensure only one phone is in contact with Flow 2 Pro at a time.
- Turn off any other NFC-enabled applications running on your phone.
Basic Use
Button Instructions
*When tracking with the iPhone native camera and third-party iOS apps, some button operations may be temporarily unavailable, with full button functionality available through the Insta360 app.
Power Button/M Button

| Gimbal Status | Operation | Description |
| Powered off | Long Press |
|
| Single Press |
| |
| Powered on | Long Press |
|
| Single Press |
| |
| Double Press |
| |
| Triple Press |
| |
| Single Press Power Button and Trigger Button |
| |
| Viewing footage in preview page (Insta360 app) | Single Press |
|
Switch Button

| Gimbal Status | Operation | Description |
| Powered on | Double Press |
|
| Single Press in Standby Mode |
| |
| Shooting (in the Insta360 app) | Single Press |
|
| Double Press |
| |
| Triple Press |
| |
| Long Press |
| |
| Viewing footage in preview page (Insta360 app) | Single Press |
|
| Apple DockKit Native Tracking | Single Press |
|
Shutter Button

| Gimbal Status | Operation | Description |
| Powered on | Single Press |
|
| Single Press in Standby Mode |
| |
| Shooting (in the Insta360 app) | Single Press |
|
| Long Press |
| |
| Viewing footage in preview page (Insta360 app) | Single Press |
|
| Apple DockKit Native Tracking | Single Press |
|
C Button

| Gimbal Status | Description | Description |
| Insta360 app open on the shooting page | Single Press |
|
| Double Press |
| |
| Long Press |
| |
| Apple DockKit Native Tracking | Single Press |
|
Joystick

| Gimbal Status | Description |
| Powered on |
|
| Insta360 app open on the preview page | After zooming in on a clip, you can adjust the screen position:
|
Touch Panel

| Gimbal Status | Descriptions |
| Connected to Insta360 app |
|
Zoom Wheel

| Gimbal Status | Operation | Description |
| FPV Mode | Turn |
Notes:
|
| Connected to Insta360 app in Auto, F, and PF Mode | Turn | Zoom:
*You can also turn on the "Manual Focus" function in "Settings Zoom Wheel" on the shooting page. Switch Lens:
Preview Page:
|
| Apple DockKit Native Tracking | Turn | Zoom:
|
Trigger Button

| Gimbal Status | Operation | Description |
| Powered on | Double Press | Recenter the gimbal. |
| Triple Press | Change phone between forward-facing and backward-facing. | |
| Long Press | Enter Lock Mode (release to exit). | |
| Single Press in standby mode | Wake up gimbal. | |
| Single Press then Long Press | Enter Active+ Mode (release to exit). | |
| Connected to Insta360 app | Single Press on the Shooting Page | Start/stop tracking. *Supports iOS/Android phones with Deep Track 4.0 in the Insta360 app or Live Mode in third-party apps. |
| Single Press on the Preview Page | Play/pause a video. | |
| Single Press on the Home Page | Enter shooting interface. | |
| Apple DockKit Native Tracking (iOS) | Single Press | Start/stop tracking. *Supported when tracking with iPhone native camera app and third-party iOS apps. |
Combination Reset: To reset Bluetooth, press and hold the Trigger and Shutter Buttons for 3 seconds simultaneously.
Interfaces
| Interface Type | Function |
Power Input Port (Type-C) | Connect the charging cable to charge Flow 2 Pro. Flow 2 Pro can be used while charging. |
Power Output Port (TypeC) | Use Flow 2 Pro as a power bank. Connect the cable to a phone or other device and press the Power/M Button to charge. |
1/4" Mounting Point | Connect to other accessories, such as a tripod. |
Battery Level/Gimbal Mode Indicators

| Gimbal Status | Operation | Descriptions |
| Powered off | Single Press Power Button |
|
| Powered on | Single Press Power Button and the Trigger Button |
|
| / |
|
LED Indicator Lights Status

All four LEDs blink slowly when Flow 2 Pro is in Standby Mode.
All four LEDs blink quickly when an error has occurred. The two most common reasons are:
- Flow 2 Pro is physically prevented from moving or is experiencing a technical error. Remove any obstacles, then press any button.
- The phone is not centered or secure in the phone clamp. This may lead to abnormal motor heating and trigger Flow 2 Pro's overheating protection. Please recenter and secure the phone.
Gimbal Modes
When Flow 2 Pro is turned on, you can choose from five gimbal modes: Auto (on by default), Follow, Pan Follow, FPV and Lock Mode.
- Auto Mode (AUTO):
Beginner-friendly mode that automatically adjusts tilt and pan axis settings based on your movements (e.g., running vs stationary), making it easier to shoot stable videos. - Follow Mode (F):
The tilt and pan axes follow the movement of the handle, and tracking is more sensitive than Auto Mode. Suitable for vertical movements from a view to a subject and tilt and pan movements. - Pan Follow Mode (PF):
The pan axis follows the movement of the handle while the tilt and roll axes are locked. Suitable for shooting horizontally or around a subject with a locked horizon. - FPV Mode (FPV):
The gimbal can rotate freely to follow the movements of the handle in any direction, making it suitable for a wider range of creative shots. Turn the Zoom Wheel to control the roll axis and spin the phone. - Lock Mode (L):
Press and hold the Trigger Button to lock all three axes, great for follow shots and hyperlapses. Release the Trigger Button to exit Lock Mode. The phone screen does not follow the rotation of the gimbal handle and is locked. It is suitable for follow shots, long-distance movements or shots that need to keep a subject centered for a long time.
In this mode, the three-axis motors are locked, and the mobile phone remains unchanged in its movement.
Switch on Active+ Mode for fast-moving scenes. It provides a faster response speed in any of the four gimbal modes on the Touch Panel.
Press the Trigger Button once, then immediately press it again and hold to enable Active+. The indicator lights blink in the current gimbal mode. Release the Trigger Button again to exit.
Gimbal Grips
Flow 2 Pro has the following five grip positions:
- Quick Grip: Unfold the gimbal in one motion for quick, on-the-go shooting.
Do not extend the tripod or selfie stick.
![]()
- Tripod Fixed Mode: Ideal for shooting static scenes and using Deep Track 4.0.
Pull out the tripod legs from the bottom of the gimbal, place it in a steady spot, and use it for fixed position shooting.
![]()
- Low Grip: Provides a more comfortable grip. Suitable for push-through and low-angle shots.
- Pull out the selfie stick.
- Bend the selfie stick connection toward the touch panel to achieve a low-angle shooting position.
![]()
- Free Tilt Mode: Break the tilt axis limitation for 360° shooting, supporting versatile movements like elevating, orbiting, dolly shots, and low-angle transitions.
- With the gimbal powered on, extend the built-in selfie stick.
![]()
- Bend the selfie stick at the connection point 90° toward the touch panel.
![]()
- Check the triangle indicator on the back of the bent joint and rotate from "OFF" to "ON".

- Double-tap the Trigger Button to activate Free Tilt Mode.

- With the gimbal powered on, extend the built-in selfie stick.
- Underslung Grip: Provides a more comfortable grip. Shoot close to the ground for low-angle shots.
- Turn Flow 2 Pro upside down 180°.
![]()
- Turn Flow 2 Pro upside down 180°.


Manual Rotation
- You can manually adjust the direction of the roll axis by moving the gimbal. When the angle of the mobile phone clamp is less than 30º, the gimbal will rotate to the position where it is swung.
- The gimbal can be rotated horizontally or vertically by turning it. When the angle of the mobile phone clamp to the gimbal exceeds 30°, the gimbal will automatically rotate to the next 90° position according to the current rotation direction.
Note: The gimbal cannot rotate in four directions. It can only rotate horizontally or vertically in a fixed direction. If forced to move, the motor might stall and consume more power.

Indicator Lights
| Status | Indicator Light Status |
| Power on | The four indicator lights light up one by one clockwise. |
| Power off | After all four indicator lights are on, they turn off one by one in a counterclockwise direction. |
| Alignment error (Magnetic Phone Clamp) | Gimbal Mode Indicator Lights: Top light solid red. |
| Pairing | NFC Pairing LED: Slow flashing |
| Pairing success | NFC Pairing LED: Solid |
| Pairing failure | NFC Pairing LED: Slow flashing, returns to pairing status. |
| Tracking started | Tracking Ring Light: Solid |
| Tracking stopped | Tracking Ring Light: No light |
| Tracking | Tracking Ring Light: Slow flashing |
| Tracking failed | Tracking Ring Light: Solid |
| Charging | 
|
| Firmware update |
|
| Low battery | Gimbal Mode Indicator Lights: The indicator light at the bottom blinks rapidly when the battery level falls below 6%. |
| Gimbal abnormality | Gimbal Mode Indicator Lights: All 4 lights rapidly flashing at the same time. |
| During photo/video recording | Tilt Axis Indicator Light:
|
Insta360 App
Connect to the Insta360 app
- Power on Flow 2 Pro.
- Turn on your phone's Bluetooth and Wi-Fi.
- Open the Insta360 app and tap the camera icon at the bottom of the page. Follow the onscreen instructions to activate your gimbal.
- The first time you connect to the Insta360 app, you need to authorize the connection and provide information. This requires an internet connection.
- After successful activation, open the Insta360 app to start shooting.
Can't connect to the Insta360 app?
- Ensure the Insta360 app is updated to the latest version, restart Flow 2 Pro and the app and reconnect.
- If you still can't connect, cancel Bluetooth pairing, turn off your phone's Bluetooth, and try again.
- If connection fails, press the Trigger Button and the Shutter Button at the same time and hold for 3 seconds to reset Bluetooth. Once successful, you will hear three beeps. Then, try to connect to the app again.
Shooting Interface

- Home: Return to the home page.
- Shot Lab: Provides AI shooting tutorials and ideas tailored to the environment. There are two ways to access templates:
- Scene Recognition: Enable or disable in General Settings. AI will analyze the current scene in Video Mode and match it to a shooting scenario.
- Voice Control: Enabled by default. Tap the icon and it will provide shooting suggestions based on the keywords you provide. Enable or disable in General Settings.
- Flash: Adjust the flash.
- Filter: Select a photo or video filter.
- Face Filter: Turn the Face Filter function on or off.
- Gesture Control: Display Gesture Control settings and select from Capture, Single-Person Tracking, Multi-Person Tracking. When Gesture Control is enabled, face the camera with your full face visible and use gestures to interact:
![]() triggers shooting,
triggers shooting, ![]() activates single-person tracking, and
activates single-person tracking, and ![]() activates multi-person tracking. To stop recording, repeat the gesture.
activates multi-person tracking. To stop recording, repeat the gesture.
![warning]() Note: Gesture Control works up to 13.1ft (4m) away from Flow 2 Pro. This feature consumes more power and may cause the gimbal to heat up.
Note: Gesture Control works up to 13.1ft (4m) away from Flow 2 Pro. This feature consumes more power and may cause the gimbal to heat up. - Teleprompter: Before recording, you can pre-enter text that will automatically scroll during the recording. Use the gimbal's SmartWheel to adjust the scroll direction up or down.
- Tracking Box: Supports manually selecting a single person or group. Flow 2 Pro can automatically track selected targets so they stay in a frame within the tracking box. The default position is in the center of the screen, but it can be adjusted manually using the Joystick while tracking. In multi-person tracking, the subject outlined in green is the primary tracking target, while other targets are outlined in white. You can switch the primary target by tapping or using the SmartWheel.
- Smartphone Remote Control: Scan the QR code with another phone to preview in real-time or remotely control the gimbal for shooting. Ensure both phones are connected to the internet using one of these methods:
- Both phones use 4G networks: Recommended when both phones have a good signal.
- Connect the secondary phone to the main phone's hotspot: Recommended when there's poor phone signal.
- Connect both phones to the same Wi-Fi network.
![warning]() Note: No additional app is required for secondary screen control. Android and iOS devices are cross-compatible for remote control. This feature currently does not support 4K60fps. Before using the secondary phone in landscape, you will need to lock the secondary phone's screen orientation.
Note: No additional app is required for secondary screen control. Android and iOS devices are cross-compatible for remote control. This feature currently does not support 4K60fps. Before using the secondary phone in landscape, you will need to lock the secondary phone's screen orientation.
- Flow 2 Pro Battery Level: Displays Flow 2 Pro's current battery level.
- Phone Battery Level: Displays the phone's current battery level.
- Resolution and Frame Rate: Set resolution and video frame rate.
- Phone Camera Settings: Adjust settings such as shutter speed, ISO, EV, and WB.
- Flow 2 Pro Settings: Tap to display the gimbal mode and related settings.
- Gimbal Mode: Select from Auto, F, PF and FPV.
- Zoom Wheel: Select from Zoom Control, Manual Focus Control.
- Motor Strength: Select from High, Medium, or Low.
- Follow Speed: Controls how fast the gimbal reacts to movement. Set to fast, medium or slow.
- Joystick Speed: Set to fast, medium or slow.
- Barrel Roll Speed: Long press the C Button to initiate a rotating shot, with options to configure the speed. Set to fast, medium or slow.
- Barrel Roll Direction: Select clockwise or counterclockwise.
- Zoom Speed: Set to linear, fast, medium or slow.
- Horse Tracking: Turn on/off. Once turned on, press the Trigger Button or manually draw a box around the horse you wish to track.
- Front Cam Auto Tracking: When turned on, Flow 2 Pro will track subjects using the front camera instead of the rear camera.
- Always-On Tracking: When turned on, Flow 2 Pro keeps tracking the subject (people only) until they reappear in the shot. Reverse Joystick Horizontally: Turn on to reverse the direction of pan axis movement when using the joystick.
- Reverse Joystick Vertically: Turn on to reverse the direction of tilt axis movement when using the joystick.
- Flow 2 Pro Sound and Vibration: Turn Flow 2 Pro's sound and vibration on or off (Bluetooth reset tone cannot be turned off).
- Auto Calibration: If phone alignment seems off and you've attached your phone correctly, try auto calibration to correct the position. Follow the on-screen prompts to complete the process. Do not touch Flow 2 Pro during calibration.
- Adjust Horizontal Axis: Another option to fix incorrect alignment. Unfold the tripod and place Flow 2 Pro on a flat surface. Attach your phone, then start the adjustment process. The axis can be tuned in units of 0.1° and the maximum adjustable angle is 10°. Do not manually twist the gimbal axis during calibration.
- Camera Quick Start (Android only): Off by default. After connecting a phone to Flow 2 Pro via Bluetooth for the first time, in future, the phone's native camera will automatically open when you power on the gimbal (Bluetooth must be enabled).
![warning]() Note: Some phone models, including Samsung, Pixel, and Nothing, do not currently support this feature. Please refer to the actual display for confirmation.
Note: Some phone models, including Samsung, Pixel, and Nothing, do not currently support this feature. Please refer to the actual display for confirmation. - Tracking Ring Light: Turn on/off. When it is turned on, adjust the brightness to low, medium or high.
- General Settings: Adjust settings such as the Grid, Histogram, Dolby Vision (iOS only), Apple ProRes (iOS only), Scene Recognition and Voice Control, show tutorials and the Button Guide, access product information, and more.
*Apple ProRes Compatibility: Requires iPhone 13–16 Pro Max/Pro models with iOS 15.1 or later. - Tracking+ (iOS only): Recommended only for stationary shooting using the built-in tripod. Once enabled, it significantly improves tracking performance.
*This feature cannot be toggled during recording. - Active Zoom Tracking (iOS only): Before shooting, select the tracking target and turn on Active Zoom Tracking. It enhances tracking for fast-moving subjects during telephoto shots, keeping the subject centered.
*This feature cannot be toggled during recording. - Pro Framing Grid: 9 composition points are available to customize the subject's position in the frame. To use, select the tracking target first, then choose a composition point. The subject will stay in the selected position, rather than being kept in the center.
- Auto Zoom: Automatically adjusts the focal length based on the real-time distance of the tracked target (works only for people, not animals or objects).
- Shooting Parameters: Displays the current exposure, WB, shutter speed, ISO and EV settings.
- Zoom: Displays the current zoom. Long press the icon to show the zoom dial. Zoom can also be adjusted by placing two fingers on the screen and moving them apart or together.
- Switch Front and Rear Cameras: Switch between the front and rear cameras. After switching to the front camera, Flow 2 Pro automatically tracks the subject visible from that camera. This option can be disabled in settings.
- Shooting Modes: Scroll to select a shooting mode:
- Pano Photo: Tap to take a 3x3, 180°, 240°, or 360° panorama photo. Flow 2 Pro automatically takes multiple photos and edits them into one panorama photo.
- Photo: Supports regular photos and photos with a countdown. Long press the Shutter Button to start shooting in Burst Mode.
- Video: Shoot a normal video.
- Timelapse: Shoot a stationary or motion timelapse. Choose from Fixed Angle, Left to Right, Right to Left, and Custom Track modes. Tap the icon to set the interval duration and length.
- TimeShift: Record a hyperlapse (sped up) video while moving.
- Slow Motion: Shoot a slow motion video at 120fps or 240fps.
- Dolly Zoom: The app automatically zooms in or out of the background to keep the subject the same size in the frame throughout, recreating the classic Hollywood effect.
- Widescreen Mode: The phone automatically adjusts to a horizontal position and starts recording in a 2.35:1 widescreen ratio. Filters are turned on by default.
- Live Mode: Use Flow 2 Pro's tracking capabilities in third-party apps with video streams, such as instant messaging apps, camera apps, video conferencing apps, and live streaming apps. Follow the on-screen instructions for correct use. During this mode, only people can be tracked. Hoop Mode: Set Flow 2 Pro down to record a full-court or half-court basketball game. The AI automatically recognizes your best baskets and saves the highlights as individual clips for easy editing.
- Shutter Button: Take a photo or start/stop shooting a video.
- Album: View your previous photos and videos in the album.
Notes:
- Features may vary depending on the shooting mode. Please refer to actual display conditions.
- Flow 2 Pro and the Insta360 app are updated regularly with new features. Please refer to the interface in the latest version of the Insta360 app.
- Settings and supported functions vary depending on the phone model and system. For full details, please refer to the phone compatibility list.
Apple Watch Control
Both the Insta360 app and iOS native camera support real-time preview, remote control of the gimbal, and composition adjustment with Apple Watch.
Notes:
- Currently only Apple Watches are supported.
- iOS phones need to be paired with the gimbal via NFC before using this function.
- If you use your watch to remotely control the native camera, your Apple Watch must be updated to watchOS 11 or later. If you use your watch to remotely control the Insta360 app, your Apple Watch must be updated to watchOS 8 or later.
- During remote control, avoid exiting the app and ensure both devices are within Bluetooth range.
- Interface features may vary depending on the shooting mode. Please refer to the actual display for accuracy.
Native Camera Remote Control
Steps:
- Install the Insta360 app on your Apple Watch.
- Enable Bluetooth on both the watch and phone, and ensure they are paired.
- Mount your phone to Flow 2 Pro, ensuring the gimbal is awake.
- Open the native camera app on both the phone and watch. You can then remotely preview or control the gimbal and camera functions from the watch. Key features include:
- Real-Time Preview: View the camera feed remotely via the watch.
- Gimbal/Camera Control: Control shooting, gimbal centering, switch between front and rear cameras, enable flash, and trigger live photos (in photo mode).
![warning]() Note: Mode switching must be done on the phone. In photo mode, you can enable/disable a 3-second countdown.
Note: Mode switching must be done on the phone. In photo mode, you can enable/disable a 3-second countdown. - Adjust Shooting Angle: After pressing the Trigger Button and the Tracking Ring Light is on, you can use the arrows in the preview to adjust the gimbal angle remotely. Activate "Quick Rotation" by double-tapping the left or right arrow to rotate the gimbal 180°.
Insta360 App Remote Control
Steps:
- Install the Insta360 app on your Apple Watch.
- Enable Bluetooth on both the watch and phone, and ensure they are paired.
- Mount your phone on Flow 2 Pro, ensuring the gimbal is awake.
- Open the Insta360 app on your phone, then launch the app on your watch and select your device. You can now remotely preview or control the gimbal and camera functions. Key features include:
- Real-Time Preview: View the camera feed remotely via the watch.
- Gimbal Control: Control shooting, gimbal centering, switch between portrait and landscape modes, switch between video/photo modes, and activate countdown shooting.
- Adjust Shooting Angle: Drag the preview area to adjust the gimbal angle remotely.
Firmware Update
Firmware updates will be regularly available for Flow 2 Pro to ensure it runs efficiently. Please update to the latest version for optimal results.
- Connect Flow 2 Pro to the Insta360 app. The app will prompt you to update the firmware if a new version is available. Please follow the on-screen prompts to update Flow 2 Pro's firmware.
- If the app does not send a prompt, open the Insta360 app, go to Settings, "Firmware Version," and check for a new version.
- Once the update is complete, Flow 2 Pro will automatically reconnect to the app. You can check if the firmware version is correct by opening the Insta360 app, going to the shooting page and tapping General Settings to view Flow 2 Pro's current firmware version, or going to Settings and checking it in "Firmware Version".
WEB: www.insta360.com
TEL: 400-833-4360
+1 800 6920 360
EMAIL: service@insta360.com
Documents / ResourcesDownload manual
Here you can download full pdf version of manual, it may contain additional safety instructions, warranty information, FCC rules, etc.
Advertisement


Need help?
Do you have a question about the Flow 2 Pro and is the answer not in the manual?
Questions and answers