Dynex DX-WBRDVD1 User Manual
Wireless blu-ray disc player
Hide thumbs
Also See for DX-WBRDVD1:
- Guía del usuario (67 pages) ,
- Manual de l'utilisateur (65 pages) ,
- User manual (59 pages)
Table of Contents
Advertisement
Advertisement
Table of Contents

Related Manuals for Dynex DX-WBRDVD1


Summary of Contents for Dynex DX-WBRDVD1
- Page 1 Wireless Blu-ray Disc Player DX-WBRDVD1/DX-WBRDVD1-CA U S E R G U ID E...
-
Page 2: Table Of Contents
Wireless Blu-ray Disc Player DX-WBRDVD1/DX-WBRDVD1-CA Contents Important safety instructions..............3 Introduction....................5 Features ....................5 Setting up your player................11 Using your player ..................17 Using the Settings menu.................24 Upgrading your player’s firmware ............43 Maintaining ....................45 FAQ (frequently asked questions)............47 Troubleshooting..................47 Specifications..................51 Legal notices ...................53... -
Page 3: Important Safety Instructions
DX-WBRDVD1/DX-WBRDVD1-CA CAUTION RISK OF ELECTRIC SHOCK DO NOT OPEN The lightning flash with arrowhead symbol within an equilateral triangle is intended to alert you to the presence of uninsulated dangerous voltage within your player’s enclosure that may be of sufficient magnitude to constitute a risk of electric shock to persons. - Page 4 DX-WBRDVD1/DX-WBRDVD1-CA 3 Heed all warnings. 4 Follow all instructions. 5 Do not use this apparatus near water. 6 Clean only with a dry cloth. 7 Do not block any ventilation openings. Install in accordance with the manufacturer's instructions. 8 Do not install near any heat sources such as radiators, heat registers, stoves, or other apparatus (including amplifiers) that produce heat.
-
Page 5: Introduction
DX-WBRDVD1/DX-WBRDVD1-CA Introduction Congratulations on your purchase of a high-quality Dynex product. Your Wireless Blu-ray Disc Player represents the state of the art in Blu-ray Disc player design and is designed for reliable and trouble-free performance. Features • Full high-definition video playback at up to 1080p resolution for an amazing viewing experience. -
Page 6: Playable Discs
DX-WBRDVD1/DX-WBRDVD1-CA Playable discs Disc type Logo Disc type Logo Blu-ray Disc DVD+R DVD-video CD-R (DVD-ROM) Audio CDs CD-RW (CDDA) DVD-RAM DVD-RW DVD+RW MPEG4 DVD-R JPEG BD-R BD-RE Notes: • Writeable DVD discs (DVD-RW, DVD-R) must be finalized, VR-mode only. • This Blu-ray disc player supports discs that are compatible with DVD-RAM Standard Version 2.0. - Page 7 DX-WBRDVD1/DX-WBRDVD1-CA About Blu-ray Discs The massive storage capacity of a Blu-ray Disc allows a higher standard of picture and audio quality and a wealth of special effects and enhanced features not available on DVDs. Java Your player features Java support so you can get the most out of the latest Blu-ray Discs.
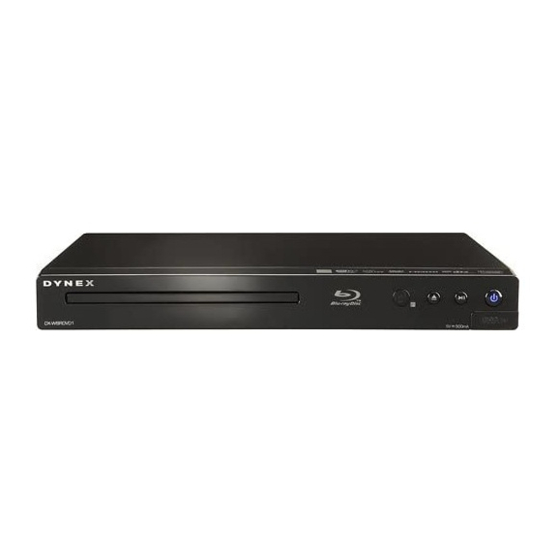
- Page 8 DX-WBRDVD1/DX-WBRDVD1-CA Item Description Press to start or pause playback. (play/pause) Plug a USB flash drive into this port. USB port Press to turn on your player or put your player in standby mode. When your player is in standby mode, power is still entering your player. To (standby/on) disconnect power, unplug the power cord.
-
Page 9: Remote Control
DX-WBRDVD1/DX-WBRDVD1-CA Remote control Item Description Press to turn on your player or put your player in standby mode. When your player is in standby mode, power is still entering your player. To disconnect STANDBY/ON power, unplug the power cord. In playback mode, press SEARCH, then press the number buttons to enter a title, chapter, track, or time. - Page 10 DX-WBRDVD1/DX-WBRDVD1-CA Item Description Press to fast forward. Each time you press this button, the fast-forward speed increases from Fast x 2, Fast x 4, Fast x 8, Fast x 16, Fast x 32, Fast x 64, (fast forward) Fast x 128. Press (play) to resume normal playback.
-
Page 11: Setting Up Your Player
DX-WBRDVD1/DX-WBRDVD1-CA Item Description Press to go to the next title, chapter, or track. (next) Press to go to the previous title, chapter, or track. (previous) Press to begin playback. (play) Press to advance one frame at a time. Press (play) to resume normal (step) playback. - Page 12 DX-WBRDVD1/DX-WBRDVD1-CA 3 Replace the battery compartment cover. Notes: • Make sure that you insert the batteries correctly. • Do not heat, open, or short-circuit batteries. • Do not throw batteries into a fire. • Do not mix different types of batteries or mix old and new batteries.
-
Page 13: Connecting Audio To An Amplifier Or Home Theater System
DX-WBRDVD1/DX-WBRDVD1-CA Connecting a TV using an A/V cable (good) To connect a TV using an AV cable: • Connect an A/V cable to the VIDEO OUT and AUDIO OUT L/R jacks on the back of your player and to the VIDEO IN and AUDIO IN L/R jack on the TV. Jacks and cable connectors are usually color-coded. -
Page 14: Connecting To Your Home Network
DX-WBRDVD1/DX-WBRDVD1-CA Connecting to your home network Note: This player can be connected to your wired network using the Ethernet port on the back of your player or by using a wireless network. Connecting using a wireless network One connection option is to use an access point or a wireless router as shown in the example below. - Page 15 DX-WBRDVD1/DX-WBRDVD1-CA 6 Press or to select the wireless network you want your player to connect to, then press ENTER. A Network Setup screen opens with the following options: • Connect—Connect to this network. • Disconnect—Disconnect from this network. • Delete—Delete the current network.
- Page 16 DX-WBRDVD1/DX-WBRDVD1-CA Using a wired network provides the best performance, because the attached devices connect directly to the network and are not subject to radio frequency interference. Notes: • When plugging or unplugging the LAN cable, hold the plug portion of the cable. When unplugging, do not pull on the LAN cable but unplug while pressing down on the lock.
-
Page 17: Using Your Player
DX-WBRDVD1/DX-WBRDVD1-CA Using your player Note: Unless otherwise noted, all tasks in this section are based on using the remote control. Playing a Blu-ray Disc or DVD To play a Blu-ray Disc or DVD: 1 Press . 2 Turn on the TV, then select the input setting on the TV that matches the connection method you used to connect your player. - Page 18 14. 2. Have a valid account to these services. You should contact the partner company (not Dynex) if you experience an issue using one of these applications. Note: A particular connected service may not be available in the country in which you live.
- Page 19 1 Press or to select Pandora. 2 Select I am new to Pandora from the options. You will receive an activation code. 3 On your PC, go to www.pandora.com/Dynex and enter the activation code from Step 2, then click Activate.
- Page 20 DX-WBRDVD1/DX-WBRDVD1-CA 2 Select Sign In from the options, then sign in with your account information. For new Napster customers: 1 Press or to select Napster, then press ENTER. 2 Select Sign Up from the options. You will receive an activation code.
-
Page 21: Playing Files On A Data Disc Or Usb Memory Stick
DX-WBRDVD1/DX-WBRDVD1-CA - Some BD-Live content could expire and will not play. The user occasionally needs to manually delete the contents in storage in order to free space. This can be done from the BD player’s main setup menu, under the “BD-Live” submenu item. (Select “Erase Blu-ray storage”) -
Page 22: Playing An Audio Cd
DX-WBRDVD1/DX-WBRDVD1-CA To play audio or video files: 1 Press or to select Music or Videos, then press ENTER. A menu opens. 2 Press or to select Play Files, then press ENTER. The files in the current folder will be played. -
Page 23: Creating A Playback Loop On A Dvd Or Audio Cd
DX-WBRDVD1/DX-WBRDVD1-CA Searching for a title, chapter, or elapsed time To search for a title, chapter, or elapsed time: 1 During playback, press SEARCH one or more times to select a search mode. • One press selects Goto Title - - - mode. -
Page 24: Using The Settings Menu
DX-WBRDVD1/DX-WBRDVD1-CA 2 If PIP mode is on, press AUDIO to turn the audio for the video in the PIP window on or off. 3 If PIP mode is on, press SUBTITLE to turn the subtitle for the video in the PIP window on or off. -
Page 25: Changing The Language Settings
DX-WBRDVD1/DX-WBRDVD1-CA 2 Press or to select an option, then press ENTER to open the sub-menu. 3 Press or RETURN to go to the previous menu. Changing the Language settings Selecting the on-screen menu language To select the on-screen menu language: 1 Press ENTER. -
Page 26: Selecting The Audio Language
DX-WBRDVD1/DX-WBRDVD1-CA Selecting the audio language To select the audio language: 1 Press ENTER. The Settings menu opens. 2 Press or to select Language. The Language menu opens. BD-Live Language Display English Audio Menu Auto Audio Auto Settings Language Subtitle None... -
Page 27: Selecting The Video Output Resolution
DX-WBRDVD1/DX-WBRDVD1-CA Changing the Display settings Determining whether an HDMI TV is connected To determine whether an HDMI TV is connected: 1 Press ENTER. The Settings menu opens. System Display Network HDMI Status Connected HDMI preferred Format 1080P BD-Live Resolution HDMI Auto... -
Page 28: Selecting The Tv Aspect Ratio
DX-WBRDVD1/DX-WBRDVD1-CA 3 Press or to select Resolution, then press ENTER. 4 Press or to select the resolution you want, then press ENTER. TV type Resolution If your TV is a high-definition TV (HDTV) connected to the HDMI jack on HDMI Auto... -
Page 29: Turning Film Mode On Or Off
DX-WBRDVD1/DX-WBRDVD1-CA - Setting your player for one of the 16:9 settings when connected to a 4:3 TV may produce a picture that does not correctly fit on the screen. 5 Press to go to the previous menu. Turning film mode on or off Movies are recorded on film at a rate of 24 pictures (frames) per second. -
Page 30: Changing The Audio Settings
DX-WBRDVD1/DX-WBRDVD1-CA 4 Press or to select Auto or Off. If Deep Color is set to Auto, and the player is connected to TV via HDMI cable, the player first tries to set the color depth to 36 bits, if the 36 bits is not supported by the TV, it tries to set the color depth to 30 bits, if the 30 bits is not supported by the TV, the player sets the color depth to 24 bits. -
Page 31: Turning Dynamic Range Control On Or Off
DX-WBRDVD1/DX-WBRDVD1-CA 2 Press or to select Audio. The Audio menu opens. 3 Press , then press to select Digital Output, then press ENTER. 4 Press or to select the digital output mode you want, then press ENTER. You can select: •... -
Page 32: Changing The Parental Control Settings
DX-WBRDVD1/DX-WBRDVD1-CA 3 Press , then press to select Dynamic Range Control, then press ENTER. 4 Press or to select Auto or Off. 5 Press to go to the previous menu. Selecting the stereo downmix To select the stereo downmix: 1 Press ENTER. The Settings menu opens. -
Page 33: Selecting The Parental Control Country
DX-WBRDVD1/DX-WBRDVD1-CA Selecting the parental control country If a Blu-ray Disc has parental rating systems for more than one country, you can select the country you want to use. To set the parental control country: 1 Press ENTER. The Settings menu opens. -
Page 34: Setting The Parental Control Level
DX-WBRDVD1/DX-WBRDVD1-CA Setting the parental control level To set the parental control level: 1 Press ENTER. The Settings menu opens. System Display Network HDMI Status Connected HDMI preferred Format 1080P BD-Live Resolution HDMI Auto Settings Display TV Aspect 16:9 Original Film Mode(1080p24) -
Page 35: Setting Auto Power Down
DX-WBRDVD1/DX-WBRDVD1-CA 3 Press to select Optical Disc Autoplay, then press ENTER. 4 Press or to Enable or Disable. When Enable is selected and you insert a Blu-ray Disc, playback begins automatically. When Disable is selected, playback does not begin automatically. Select the disc from the Settings menu to begin playing it. -
Page 36: Downloading Player Update Software
DX-WBRDVD1/DX-WBRDVD1-CA 2 Press or to select System. The System menu opens. Audio System Language Optical Disc AutoPlay Enable Screen Saver Duration 5 Minutes Parental Auto Power Down 20 Minutes InLink Settings System Update Via Network Restore factory defaults Network BD-Live... - Page 37 DX-WBRDVD1/DX-WBRDVD1-CA 3 Press , then press to select Restore Factory Defaults, then press ENTER. A message appears with a warning. 4 Select OK, then press ENTER to close the message box. The Restore factory defaults dialog box appears, 5 Make a selection, then press ENTER.
- Page 38 DX-WBRDVD1/DX-WBRDVD1-CA Changing BD-Live settings Setting the BD-Live Internet access level You can set the BD-Live Internet access level to control access to BD-Live. To set the BD-Live Internet access level: 1 Press ENTER. The Settings menu opens. 2 Press or to select BD-Live. The BD-Live menu opens.
-
Page 39: Changing The Network Settings
DX-WBRDVD1/DX-WBRDVD1-CA 2 Press or to select BD-Live. The BD-Live menu opens. Parental BD-Live System BD-Live Internet Access Always Allow Access BD-Live Storage USB (225.5MB Free) Network Erase Blu-ray Storage Settings BD-Live Display Audio Language 3 Press , then press select Erase BD-Live Storage, then press ENTER. -
Page 40: Configuring A Wireless Internet Connection
DX-WBRDVD1/DX-WBRDVD1-CA 4 Select IP Mode, then press ENTER. 5 Press or to select an IP mode. You can select: • Dynamic—Uses DHCP to automatically obtain an IP address. • Manual—Lets you manually configure network settings, such as IP address, subnet mask, and gateway settings. If you select Manual, the following screen opens. - Page 41 DX-WBRDVD1/DX-WBRDVD1-CA 6 If your network does not use encryption, press or to select Connect, then press ENTER. If the wireless network is working, you should see a checkmark and a connected message on the TV. If the message does not appear, repeat the steps above.
-
Page 42: Using The Network Test
DX-WBRDVD1/DX-WBRDVD1-CA 2 Press or to select Network, then press ENTER. Language Parental Wireless System Network List Settings Network WiFi Protected Setup(WPS) Manual BD-Live IP Settings Display Audio 3 Press to select Manual, then press ENTER. The following screen opens. Manual... -
Page 43: Upgrading Player Using Network Connection
DX-WBRDVD1/DX-WBRDVD1-CA • Make sure your router is connected to your cable or DSL modem correctly. If you have a wireless connection: • Make sure your router is connected to your cable or DSL modem correctly. • Make sure your player is within the range of your router. -
Page 44: Upgrading The Player Software With A Disc Or Usb Stick
Press CANCEL to exit with no update. Player current version: PKG_DVD_3_3_003_RC_02_BestBuy Update version: PKG_DVD_3_3_003_RC_02_BestBuy Upgrade for DYNEX DX-WBRDVD1 BD Player Cancel • The software begins downloading and a status bar appears on the TV screen, similar to what is shown below: Update in progress, time remaining:... -
Page 45: Maintaining
4 After a short period of time, a screen similar to the one below appears. Below, select Ok to proceed with the update or Cancel to abort, then press the Enter key Player model DYNEX DX-WBRDVD1 BD Player Player current version: PKG_DVD_3_3_003_RC_02_BestBuy... -
Page 46: Storing Discs
DX-WBRDVD1/DX-WBRDVD1-CA Condensation Condensation may form inside your player when: • You move your player from a cold area to a warm area • You use it in a cold room where you have just turned on a heater • Air conditioning is blowing directly on your player •... -
Page 47: Faq (Frequently Asked Questions)
DX-WBRDVD1/DX-WBRDVD1-CA FAQ (frequently asked questions) Question Answer What do I need to play multi-channel Connect the appropriate amplifier/receiver to the HDMI jack, the DIGITAL AUDIO OUT jack surround sound? (COAXIAL). Can I connect headphones or You cannot directly connect headphones to your player. Connect headphones to the speakers directly to my player? connected TV or sound system. - Page 48 DX-WBRDVD1/DX-WBRDVD1-CA Power Problem Solution No power Make sure that the power cord is plugged into a power outlet and that the outlet is supplying power. The player switches to standby After a period of inactivity, your player switches to standby mode automatically. This mode is a power saving feature.
-
Page 49: Tv Screen And Video
DX-WBRDVD1/DX-WBRDVD1-CA Problem Solution The player is on and the • Make sure that the disc is not dirty. For instructions on cleaning a disc, see “Cleaning logo and menu appear, but discs” on page 46. there is no image from the •... -
Page 50: Hdmi Connections
DX-WBRDVD1/DX-WBRDVD1-CA HDMI connections Problem Solution The 4:3 aspect ratio picture • Change the aspect ratio setting to match your TV’s aspect ratio. See “Selecting the expands left and right or the TV aspect ratio” on page 28. picture size is incorrect... -
Page 51: Specifications
• Some discs do not support the resume function. BD-Live technical notes • The Dynex player only supports the connection of USB memory in order to fulfill the Blu-ray Disc Profile 2.0 or “BD-Live” requirement for 1 GB of free, available storage. An externally connected drive will become the default storage for BD-Live content and the internal storage will be ignored. - Page 52 DX-WBRDVD1/DX-WBRDVD1-CA Audio performance (frequency Audio: 20 Hz to 20 kHz response) S/N ratio: 90 dB Dynamic range: 80 dB Total harmonic distortion: 0.004% HDMI output Output format: 480i, 480p, 720p,1080i, 1080p General Power 100V-240V ~ 50/60Hz Power consumption 17 W Dimensions 10.63 ×...
-
Page 53: Legal Notices
DX-WBRDVD1/DX-WBRDVD1-CA • Depending on the size and number of the MP3/WMA files, it may take several minutes to read the contents of the media. • HD WMA movie files contained on a USB 1.0/1.1 flash drive may not play correctly. -
Page 54: About Copyright
DX-WBRDVD1/DX-WBRDVD1-CA Conformément à la réglementation d'Industrie Canada, le présent émetteur radio peut fonctionner avec une antenne d'un type et d'un gain maximal (ou inférieur) approuvé pour l'émetteur par Industrie Canada. Dans le but de réduire les risques de brouillage radioélectrique à l'intention des autres utilisateurs, il faut choisir le type d'antenne et son gain de sorte que la puissance isotrope rayonnée équivalente (p.i.r.e.) ne dépasse pas l'intensité... -
Page 55: Open Source Software
Dynex. Disclaimer This Dynex product may contain content and/or services that belong to a third party. Such third party content and/or service may only be used in compliance with the terms and conditions that govern such use. - Page 56 DX-WBRDVD1/DX-WBRDVD1-CA...
-
Page 57: One-Year Limited Warranty
If service of products and parts are required after the Warranty Period expires, you must pay all labor and parts charges. This warranty lasts as long as you own your Dynex Product during the Warranty Period. - Page 58 7601 Penn Avenue South, Richfield, Minnesota, U.S.A. 55423-3645 © 2011 BBY Solutions, Inc. All rights reserved. DYNEX is a trademark of BBY Solutions, Inc. Registered in some countries. All other products and brand names are trademarks of their respective owners.
- Page 59 7601 Penn Ave. South, Richfield, MN 55423 U.S.A. © 2011 BBY Solutions, Inc. All rights reserved. ENGLISH DYNEX is a trademark of BBY Solutions, Inc. Registered in some countries. All other 11-0366 products and brand names are trademarks of their respective owners.
Need help?
Do you have a question about the DX-WBRDVD1 and is the answer not in the manual?
Questions and answers
Can I simply play a DVD using a DX-WBRDVD1-CA Dynex player without the remote? I try using the play/pause button on the front but I receive a message on the TV screen claiming this is not allowed. I cannot find my remote. Thank you. Rick
Yes, you can play a DVD on a Dynex DX-WBRDVD1-CA player without the remote control, but functionality may be limited. The player supports DVD playback, and basic functions like play, pause, and eject may be available using buttons on the device itself. However, advanced functions such as navigating menus or fast-forwarding may require a remote control.
This answer is automatically generated