Table of Contents
Advertisement
Quick Links
Advertisement
Table of Contents

Related Manuals for Black & Decker SteamMop BDST1


Summary of Contents for Black & Decker SteamMop BDST1
- Page 1 INSTRUCTION MANUAL SCAN THE QR CODE TO ACCESS THE FOLLOWING FEATURES: • Activate your Warranty • Watch the setup video • Visit silverpointtechnologies.com • Get support and more! BDST1 Please read before returning this product for any reason.
-
Page 2: Table Of Contents
TABLE OF CONTENTS 3 - 6 SAFETY PRODUCT OVERVIEW 8 - 9 GETTING STARTED 10 - 11 USING YOUR BDST1 MAINTENANCE TROUBLESHOOTING WARRANTY Please keep this manual for later maintenance of the appliance and for contacting us. Questions? Contact Customer Service Phone: 855-454-8078... -
Page 3: Safety Definitions
SAFETY SAFETY DEFINITIONS This instruction manual uses the following safety alert symbols and words to alert you to hazardous situations and your risk of personal injury or property damage. DANGER: Indicates an imminently hazardous situation which, if not avoided, will result in death or serious injury. -
Page 4: Read And Follow All Instructions
SAFETY SAVE THESE INSTRUCTIONS To reduce the likelihood of circuit overload, do not operate another high wattage appliance on the same circuit. If an extension cord is absolutely necessary, a (ampere rating of the appliance)ampere rated cord should be used. Cords rated for less amperage may overheat. Care should be taken to arrange the cord so that the cord cannot be pulled or tripped over. -
Page 5: Using Your Appliance
SAFETY USING YOUR APPLIANCE • Do not direct steam at people, animals, electrical appliances or electrical outlets. • Do not expose to rain. • Do not immerse the appliance in water. • Do not leave the appliance unattended. Keep children away from unit while in use. •... -
Page 6: Inspection And Repairs
SAFETY INSPECTION AND REPAIRS • Unplug the appliance and allow to cool down before performing any maintenance or repairs. • Before use, check the appliance for damaged or defective parts. Check for breakage of parts, damage to switches and any other conditions that may affect its operation. •... -
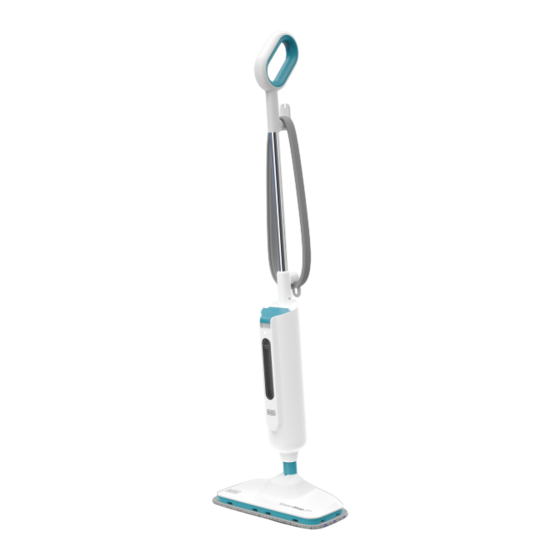
Page 7: Product Overview
PRODUCT OVERVIEW 1: Power Cord Interface 8: Power Cord Hook 2: Steam Status Indicator 9: Power Switch 3: Water Tank Window 10: Power Cord 4: Main Body 11: Water Tank Cover 5: Mop Head 12: Water Cup 6: Power Cord Hook 13: Microfiber Mop Pad 7: Metal Tube 14: Carpet Glider... -
Page 8: Getting Started
GETTING STARTED SCAN THE QR CODE Scan QR for Setup and Maintenance Videos and to purchase spare parts. Scan for BDST1 Instructions and Spare Parts... - Page 9 GETTING STARTED ASSEMBLY Your steam mop assembles quickly and easily. It is packed with the following items: MAIN BODY 2 WASHABLE MOP PADS CARPET GLIDE WATER CUP Slide the Handle with Metal Tube into the circular receptacle at the top of the Main Body as shown.
-
Page 10: Using Your Bdst1
USING YOUR BDST1 NOTE: The water tank is inside the Main Body and it does not need to be installed. Thoroughly sweep or vacuum floor prior to cleaning with the steam mop. Your steam mop is designed to clean hard flooring such as ceramic tile, vinyl, laminate, marble, stone and sealed hard wood floors. -
Page 11: Carpet Glider
USING YOUR BDST1 Steam Indicator Power Button Plug the power cord into a working outlet and Press the Power switch at the back of the main unit. The LED at the front will blink while the water is heating up and will turn solid Green when ready. -
Page 12: Maintenance And Troubleshooting
MAINTENANCE & TROUBLESHOOTING MAINTENANCE Unplug the power cord from the outlet and allow unit to cool. Carefully remove the mop pad from the mop head. The mop pad and lower assembly may be hot. Any water remaining in the water tank should be emptied prior to machine storage. 4. -
Page 13: Warranty
WARRANTY The One (1) Year Limited Warranty applies to purchases made from authorized retailers of Silver Point Innovations LLC. Warranty coverage applies to the original owner and to the original product only and is not transferable. We recommend registering your product online at www.silverpointtechnologies.com SilverPoint warrants this product to be free from defects in workmanship and materials, under normal household use and conditions, one (1) year from the date of original purchase and maintained according to the requirements outlined in this User Manual.
Need help?
Do you have a question about the SteamMop BDST1 and is the answer not in the manual?
Questions and answers