Advertisement
- 1 Introduction
- 2 Supplied Equipment
- 3 Features of the NoizeBarrier Range SA Headset
- 4 Situational Awareness Talk-Through
- 5 Operation
- 6 Using the Headset with Optional NoizeBarrier Helmet Mount Kit
- 7 Maintenance
- 8 Replacement/Spare Parts
- 9 Troubleshooting
- 10 NRR (Noise Reduction Rating)
- 11 SNR (Single Number Rating)
- 12 IMPORTANT SAFETY WARNINGS
- 13 Documents / Resources
Introduction
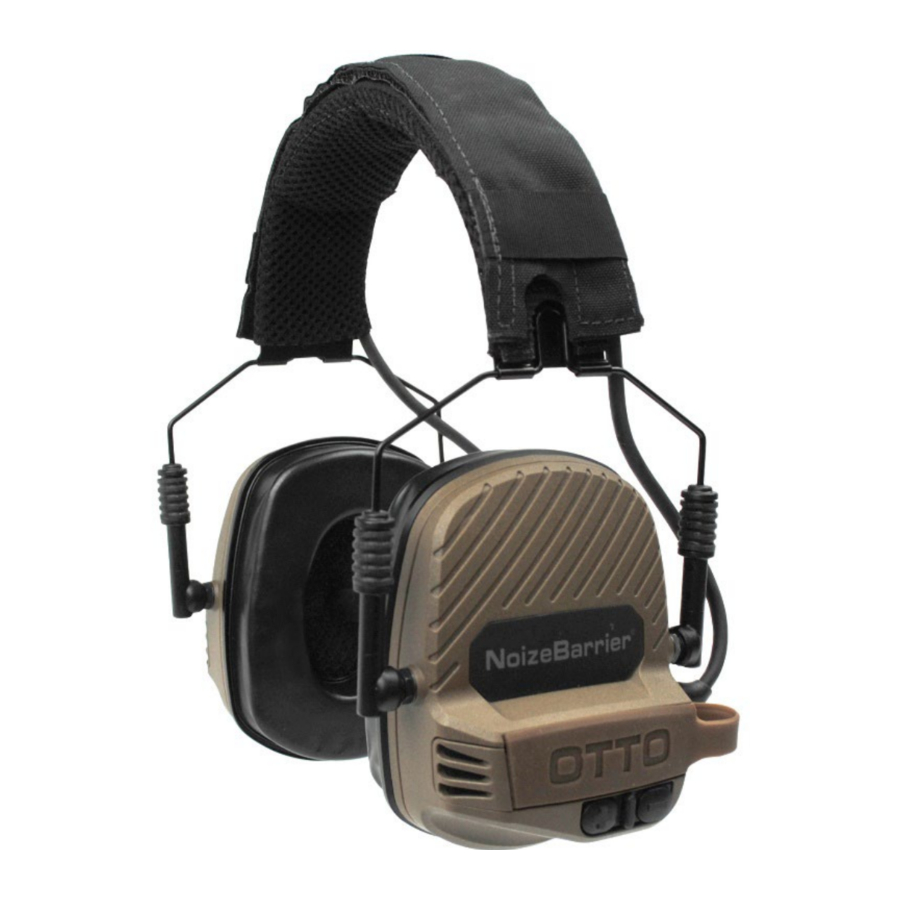
The NoizeBarrier® Range SA headset provides industry-leading hearing protection and excellent situational awareness/talk-through capability for mission-critical operations. Advanced talk-through sound suppression circuitry enhances the ability to hear low-level sounds while protecting hearing.
Situational awareness functions are controlled by buttons on the left ear cup and powered by two AAA batteries that provide approximately up to 100 hours of use if a lithium battery is used.
An optional helmet mount kit is available to change the headset from an over-the head headband configuration to a top or rear rail helmet-mounted configuration while in the field without the use of tools. For convenience, a spare battery for the situational awareness functionality can be stored in each of the two rail-mount assemblies.
Supplied Equipment
NoizeBarrier® Range SA Headset


- Headband
- Adjustment frames
- Audio cross-over cable
- Comply foam ear seals
- Situational awareness (talk-through) microphones
- Battery compartment and cover
- Power/Volume
- MP-101 to 3.5mm Audio Connector
Features of the NoizeBarrier® Range SA Headset
- Circumaural headset compatible with major helmet systems
- Talk-through electronics for situational awareness (SA)
- Limits volume to safe level and lowers sound floor without clipping
- Passive Attenuation: 23 dB NRR
- Amplified hearing of external communications
- Volume + and - buttons on left ear cup control situational awareness circuitry
- 5-step volume control adjusts +/- 12dB
- Wind noise suppression technology
- Automatic shut down after two hours of idle time
- Scalloped front ear cups reduce interference with rifle stock
- Low-profile polyester mesh fabric headband can easily be worn under most helmet systems
- Proprietary Comply thermoplastic polyurethane foam ear seals allow for secure comfortable fit
- Snap-in ear seals are field replaceable
- MIL-STD-810H compliant
- Immersion tested and fully sealed to IP68 standards for 1 meter/31 minutes
- USA country of origin. TAA, BAA, and Berry Amendment compliant
- Optional helmet mount interfaces with the ARC and Team Wendy® rail systems
- Each rail mount includes a battery holder for an extra battery
- Headset weight without batteries: 453.4gm (16oz)
- Size: Medium
Situational Awareness Talk-Through
The NoizeBarrier® Range SA headset's talk-through technology allows users to hear normal sounds around them and maintain complete situational awareness (SA). At the same time, sound suppression circuitry reduces dangerously loud noises over 82dB to safe levels. The NoizeBarrier® Range SA is unique in that it does not shut down situational awareness when loud noises, including impulse noises such as gunfire, are blocked. The headset will continue to transmit sounds at a safe volume.
Talk-through SA feature is NOT required to be active to receive and transmit radio communications. When talk-through is not activated the headset works simply as a passive noise-reducing headset.
Operation
Install the Batteries to Power the Talk-Through Functionality
The NoizeBarrier® Range SA headset uses battery to operate the situational awareness/talk-through functions.
- Identify the rubberized battery covers on the ear cups.
- With finger pressure, pry off the battery cover on one ear cup.
![]()
- Install a AAA battery, aligning the '+' and '-' symbols on the battery with the markings in the battery compartment.
- To close the battery cover, start by inserting one end of the cover into the battery compartment.
![]()
- Slightly bend the cover and insert the other end into the opposite end of the compartment.
![]()
- Press the battery cover securely into place over the chamber by applying pressure from the middle and moving outward to the ends.
![]()
- Repeat the operation with the other ear cup.
- When replacing batteries, be sure headset is off before opening battery compartment.


Wearing the Headset
(Note: If mounting the headset to the helmet with the optional Rail Mounting Kit, please see "Using the Headset with Optional Noise barrier® Helmet Mount Kit".)

- Identify the left and right ear seals. The Power/Volume buttons are on the left ear cup.
- Place the headset over the head.
- Adjust ear cup height by pulling or pushing on the cups until the ear seals are securely positioned over the ears. Adjustment is accomplished by extending and contracting the ear cup frames on either side of the ear cups while holding the headband in place.
- For effective sound protection, be sure that the ear seals are completely sealed around the ear and obstacles such as hair, jewelry, or clothing are out of the way.
Powering Up and Using the Talk-through SA Function

- Place the headset on your head.
- Power up active talk-through by pressing and holding either the + or – button on the left side of the headset until a long tone sounds to indicate that talk-through SA is active.
- Volume + and – buttons adjust the talk through SA audio for five volume levels. A tone will sound when maximum or minimum volumes are reached.
- To power down the unit, press and hold either the + or – button on the headset until a different long tone sounds to indicate that talk-through SA is turned off.
Using the Headset with Optional NoizeBarrier® Helmet Mount Kit
The NoizeBarrier® Range SA headset can easily convert from over-the-head use to mount on helmet rails with the use of the optional helmet mounting kit. The helmet mount kit also includes a compartment for a spare battery on each ear cup. Follow the steps below for Team Wendy® and ARC.
- Remove mesh headband cover by locating the edge of the cover and peeling back the cover to expose the cross-over cable. Pull the cross-over cable out from under the headband until it hangs free.
![]()
- Holding an ear cup with one hand, with the other hand firmly grasp the plastic adjustment frame where it attaches to the ear cup.
![]()
- Repeat the operation on the frame on the other side of the same ear cup.
- Repeat steps 2 and 3 on the other ear cup to fully remove the headband.
- Position the rail mount over the ear cup and snap the rail frames onto the pivot points on the ear cups.

NOTE: The spare battery compartment on the rail mount frames should be positioned at the top of the frame. - Attach the other rail mount to the other ear cup.
- Slide the ear cup into the top or rear rails by inserting the tab on the back side of the swivel base into the rail guide. The crossover cable is routed along the rear and the boom microphone faces the front of the helmet.
![]()
- For Team Wendy ® and ARC, to remove spare battery from the compartment, remove the helmet mount. Holding the mount by its wire form, sharply strike the mount into the palm of the hand with the battery facing the palm. The battery will eject from the holder into the user's hand.
![]()


Positioning the Headset
- The rail system mount has two positions. The first position is outward (Figure 14). In this position the ear seals sit slightly off the head for comfort. The second position is inward to provide contact with the head and a solid seal around the ears when in a noisy environment.
![]()
- To engage the ear cups against the head, press the palms of the hands inward against the wire form adjustment frames until they snap into the inward position against the head (Figure 15). This is best accomplished by pushing against the bend in the wire frames — pushing inward on the ear cups WILL NOT engage the inward detent.
![]()
- To release the headset to the outward position, squeeze the wire forms together (Figure 16). This will release the adjustment frames to swing outward.
![]()


Maintenance
The NoizeBarrier® Range SA headset should be regularly inspected for serviceability.
Low Battery/Replacing Batteries
The NoizeBarrier® Range SA headset uses two AAA batteries to control situational awareness (talk-through). Batteries are not required to receive audio from an external RSM or PTT.
At approximately 30 minutes of battery life remaining, the headset will present an audible tone to the user indicating that there is low battery life. This will repeat every 2 minutes until the batteries are depleted.
Replace the batteries following the Battery Installation Instructions. Be sure the headset is powered off before replacing the batteries.
If you purchased a NoizeBarrier® Helmet Mount Kit for either Team Wendy® or ARC helmets and need to remove the spare battery from the compartment.
Replacing the Ear Seals
The ear seals are mounted in a removable frame for easy replacement.

- Remove the ear seal by sliding fingers under the inside of the frame and pulling it straight out with a firm motion.
- The foam liner inside the ear seal will fall out. Replace it with a new one.
- Position a new ear seal over the ear cup. Align the TOP of the ear seal with the TOP of the ear cup.
- Press firmly to squeeze the ear seal into the cup until it snaps into place.
Cleaning the Headset
- Use a soft cloth to remove dirt and debris from the headset.
- Use a damp soft cloth to disinfect the ear seals.
- Avoid full immersion of the NoizeBarrier® Range SA headset in liquid for cleaning.
- The polyester mesh fabric headband cover may be washed as needed or replaced.
Replacing Mesh Headband Cover
- Attach cover to one end of the metal headband. Firmly pull and wrap the cover over the metal headband.
![]()
- Wrap the cover around the bottom side of the metal headband.
![]()
- Position the crossover cable along the top edge of the metal headband.
![]()
- Wrap the cover over the cable and secure it to the top of the metal headband.
![]()


Storage
When not in use, store the headset in temperatures between -40 and +71 C. Avoid compressing the ear seals against other objects when storing.
Replacement/Spare Parts
| Over-The-Head headband assembly | C102783 |
| Over-The-Head headband cover only | C102796 |
| Soft Comply foam snap-in ear seal, standard size | C102828 |
For a complete list go to www.otto-comm.com/products/headsets-and-earplugs/over-the-ear-headsets/noizebarrier-rangesa
Troubleshooting
| Problem | Possible Causes | Suggested Action |
| Headset will not power on talkthrough/situational awareness | Depleted batteries | Replace batteries |
| Batteries improperly installed | Check polarity of batteries | |
| Situational awareness volume turned all the way down | Press + button to increase volume | |
| Low radio receive volume | Radio volume controlled at radio, not by headset buttons | Check volume settings on the radio |
| Poor passive attenuation performance | Damaged ear seal assembly | Replace ear seal assembly |
| Damage or missing ear seal O-ring | Replace ear seal assembly | |
| Damaged headband assembly | Replace headband assembly |
NRR (Noise Reduction Rating)

Earmuffs
| Frequency (HZ) | 125 | 250 | 500 | 1000 | 2000 | 3150 | 4000 | 6300 | 8000 |
| Mean Attenuation (dB) | 18.8 | 18.8 | 25.0 | 32.5 | 31.9 | 37.0 | 41.7 | 42.8 | 40.0 |
| Standard Deviation (dB) | 2.5 | 2.1 | 2.4 | 3.3 | 2.1 | 3.6 | 2.4 | 2.9 | 3.0 |
| NRR=23 dB; Headband Force=2.4 lbs. | PER ANSI S3.19-1974 | ||||||||
TEST REPORT ID: Q7546A, Michael and Associates, Inc.

NRR is not attenuation, and the labeled NRR for most earmuffs does not represent typical performance. While the labeled NRR is 23 dB, the typical user can expect to obtain a higher level of attenuation across frequencies when the earmuffs are used as directed and the device is off.
SNR (Single Number Rating)
Classification:
EN 352-1: 2020
Testing was conducted by Michael and Associates, Inc. Report Q7640A
| Frequency (HZ) | 125 | 250 | 500 | 1000 | 2000 | 4000 | 8000 | SNR = 30 dB | |||||
| Mean Attenuation (dB) | 17.5 | 21.6 | 26.7 | 32.5 | 31.6 | 44.0 | 40.0 | H = 32 dB | |||||
| Standard Deviation (dB) | 2.8 | 2.9 | 2.3 | 3.0 | 2.2 | 3.2 | 2.9 | M = 27 dB | |||||
| Assumed Protection Value (dB) | 14.7 | 18.6 | 24.4 | 29.5 | 29.3 | 40.8 | 37.1 | L = 21 dB | |||||
SNRm = 31.6
SNRs = 1.7
Hm = 34.2
Hs = 2.0
Mm = 29.2
Ms = 1.8
Lm = 23.4
Ls = 2.1
EN 352-4: 2020
Testing was conducted by Michael and Associates, Inc. Report Q7705A
Criterion levels (dBA)
L-Noise = 100.2
M-Noise = 108.7
H-Noise = 118.3
Sound pressure level of external noise for which sound pressure level under the earmuff first exceeds 85 dBA.
EN 352-6: 2020
Testing was conducted by Michael and Associates, Inc. Report Q7957A
The sound level from the headset speakers can exceed the permitted daily exposure levels. Therefore, the allowable usage time is dependent on the input signal. See table below.
| Input Signal | Level (dBA) | Mean + Std. Dev. | Allowable Duration (hours) | ||
| dBV | mV | Mean | Std. Dev. | ||
| -30 | 31.6 | 70.8 | 2.7 | 73.5 | >8 |
| -25 | 56.2 | 74.9 | 1.3 | 76.3 | >8 |
| -20 | 100.0 | 79.9 | 1.3 | 81.3 | >8 |
| -15 | 177.8 | 84.9 | 1.4 | 86.3 | 3.0 |
| -10 | 316.2 | 89.8 | 1.4 | 91.2 | 0.9 |
| -5 | 562.3 | 94.8 | 1.4 | 96.2 | 0.3 |
| 0 | 1000.0 | 99.7 | 1.4 | 101.1 | 0.1 |
An electrical input level (Mean – One Standard Deviation) of 108.6 mV corresponds to an equivalent sound output level of 82 dBA over 8 hours.
PPE (EU) 2016/425 is met by compliance to EN 352-1:2020, EN 352-4:2020, and EN 352- 6:2020. PPE Regulation 2016/425 on personal protective equipment, as amended to apply in Great Britain.
Notified Body responsible for EU type examination and ongoing conformity: SATRA Technology Europe, Ltd., Bracetown Business Park, Clonee, CO. Meath, D15 YN2P, Ireland (Notified Body No. 2777)
IMPORTANT SAFETY WARNINGS
This NoizeBarrier® Range SA Headset reduces exposure to noise and loud sounds that can damage hearing. Be sure to follow the instructions in this manual carefully. Failure to follow these recommendations may severely reduce the amount of hearing protection provided by the HEADSET.
- The headset must be worn at all times in noisy environments to avoid hearing loss/injury.
- Misuse of or failure to wear hearing protection when exposed to hazardous noise may result in hearing loss and/or injury. If you experience symptoms of hearing injury (ringing in ears, dulled hearing, headaches), contact your supervisor or a medical professional immediately.
- The headset must be fitted, adjusted and maintained in accordance with manufacturer's instructions to achieve the expected attenuation and hearing protection. Failure to do so may result in severely impaired protection, hearing loss and/or injury.
- The NoizeBarrier® Range S A headset provides audio signal sound pressure level limitation to limit the audio signal to 82 dB effective to the ear.
- The situational awareness feature of the NoizeBarrier® Range SA will continue to function if the batteries in the headset are depleted or missing, as long as the headset is connected to the radio using the Multi-Port Hub PTT.
- At approximately 30 minutes of battery life remaining, the headset will present an audible tone to the user indicating that there is low battery life. This will repeat every 2 minutes until the batteries are depleted. Talk-through powered by two AAA batteries.
- The thermoplastic polyurethane foam ear seals on the NoizeBarrier® Range SA may deteriorate with use and should be examined at frequent intervals for damage, such as cracking and leakage. Replace as recommended.
- Using cloth hygiene covers over the foam ear seals may affect the acoustic performance of the headset.
- The audibility of warning signals at a specific workplace may be impaired while using the NoizeBarrier® Range SA headset if the situational awareness functionality is not activated.
- The NoizeBarrier® Range SA headset may be adversely affected by certain chemical substances. Further information should be sought from the manufacturer.
- This earmuff is provided with electrical audio input. The wearer should check correct operation before use. If distortion or failure is detected, the wearer should refer to the manufacturer's advice.
- This headset is provided with level-dependent attenuation. The wearer should check correct operation before use. If distortion or failure is detected, the wearer should refer to the manufacturer's advice for maintenance and replacement of the battery.
- Battery life may last up to 100 hours if lithium batteries are used. Headset performance will not degrade over time as the batteries are depleted.
![]()
The output of the electrical audio circuit of this hearing protector may exceed the daily limit sound level.- This product may not be used for entertainment since the output level is not limited to the necessary innocuousness level.

Product Registration
Register to receive email alerts whenever updates or mission critical information regarding your product becomes available. https://go.otto-comm.com/support
Lifetime of the product from manufacturing to obsolescence is 10 years from the date of manufacture. Date of manufacture can be found inside the battery compartment of either ear cup.
For questions or more information, please contact:
10 West Main Street
Carpentersville, IL U.S.A. 60110
Toll Free Phone: 888-234-OTTO (6886)
Phone: 847-428-7171
Fax: 847-551-1343
E-mail: info@ottoexcellence.com
www.otto-comm.com
Documents / Resources
References
Download manual
Here you can download full pdf version of manual, it may contain additional safety instructions, warranty information, FCC rules, etc.
Advertisement


Need help?
Do you have a question about the NoizeBarrier and is the answer not in the manual?
Questions and answers