Table of Contents
Advertisement
Available languages
Available languages
Quick Links
Advertisement
Chapters
Table of Contents

Related Manuals for Austroflamm Insert Control


Summary of Contents for Austroflamm Insert Control
- Page 1 Montageanleitung / Assembly instructions Instructions de montage Istruzioni di montaggio Insert Control montieren www.austroflamm.com Installing Insert Control Installer l’InsertControl Montaggio di InsertControl...
- Page 2 Druck-, Rechtschreib- und Satzfehler vorbehalten. Die Informationen in diesem Dokument können ohne vorherige Ankündigung geändert werden und stel- len keine Verpflichtung seitens der Austroflamm GmbH dar. Für eventuelle Fehler in diesem Dokument übernimmt die Austroflamm GmbH keine Haftung.
- Page 3 Inhaltsverzeichnis Deutsch........................English ........................Français........................Italiano ........................
-
Page 4: Table Of Contents
Inhaltsverzeichnis InsertControl montieren Inhaltsverzeichnis Allgemeines................................InsertControl montieren ............................. InsertControl einbauen ........................InsertControl Funktionstest ........................ 12 Funktionsweise der automatischen Abbrandsteuerung InsertControl ........13... -
Page 5: Allgemeines
InsertControl montieren 1 | Allgemeines Allgemeines Abb. 1: 363000 Abb. 2: 363011... -
Page 6: Insertcontrol Montieren
1 | Allgemeines InsertControl montieren Abb. 3: 363010 InsertControl montieren InsertControl einbauen Die Steuereinheit besteht aus: Steuerungseinheit (1) Netzteil (2) Temperatur-Sensor (270 – 20 cm) (3) Bowdenzug (100 cm) (4) Abb. 4: Steuerungseinheit... - Page 7 InsertControl montieren 1 | Allgemeines Zu den verschiedenen Kamineinsätzen gibt es jeweils pas- sende Montagesets. Die geeigneten Kamineinsätze und die Artikelnummern der Montagesets sind: 45x, 55x, 65x 75x – 363000 75x II – 363011 45x rund – keine InsertCotrol 45x II – keine InsertControl Abb. 5: Montageset 363000 Abb. 6: Montageset 363011 1) Stellen sie den Kamineinsatz so auf, dass er für die...
- Page 8 1 | Allgemeines InsertControl montieren Bei allen Klapp flach + II Kamineinsätzen, die eine Insert- Control haben, sind die Bohrungen für den Bowdenzug be- reits vorgebohrt. Abb. 9: Bohrung für Bowdenzug...
- Page 9 InsertControl montieren 1 | Allgemeines Hier sehen Sie die Einbausituationen: Bei einigen Kamineinsätzen kann die Einbausituation ent- weder links oder rechts gewählt werden. Bei einigen Mo- deln ist nur einseitige Einbausituation möglich. 45x, 55x, 65x, 75x (1) – Einbau links 45x (2) –...
- Page 10 1 | Allgemeines InsertControl montieren Bei 45x, 55x, 65x, 7x K 6) Mittelsteinauflage (1) entfernen. 7) Die beiden Sechskantschrauben M6x12 (2) entfernen. 8) Primärluftabdeckung (3) entfernen. ð Jetzt kann InsertControl eingebaut werden. Abb. 11: Teile entfernen Bei 75x II 9) Die beiden Sechskantschrauben M6x12 (1) entfernen. 10) Primärluftabdeckung (2) entfernen.
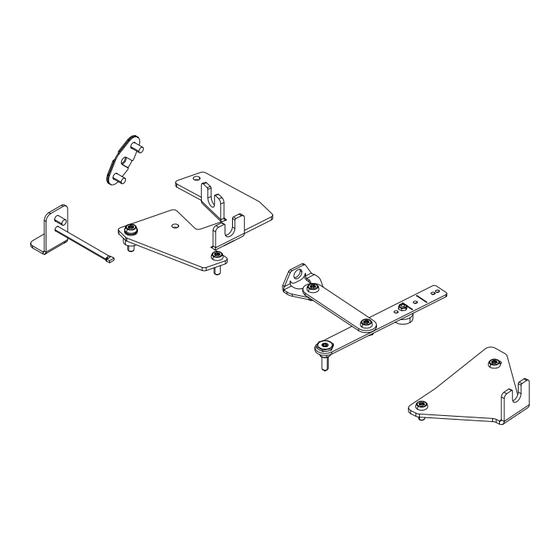
- Page 11 InsertControl montieren 1 | Allgemeines 13) Die beiden M10x1 Flachmuttern (1) sowie die M5 Mutter mit Flansch (2) und das Distanz-Verbindungs- blech (3) entfernen. Für die Verbindung zwischen Steuereinheit und Montages- et benötigen Sie folgende Teile aus dem Montageset: • 2 x Taptite ISR-LKS M5x10 •...
-
Page 12: Insertcontrol Funktionstest
1 | Allgemeines InsertControl montieren 17) Flansch Bowdenzug (1) je einmal von links und von rechts, über den Bowdenzug schieben. 18) Anschließend die beiden Flansche (1) mit dem Taptite Schrauben (2) auf den Kamineinsatz verschrauben. 19) Kontrollieren Sie nach dem Verschrauben, ob der Gummiverschluss festsitzt und rundherum richtig auf- liegt. -
Page 13: Funktionsweise Der Automatischen Abbrandsteuerung Insertcontrol
InsertControl montieren 1 | Allgemeines Funktionsweise der automatischen Abbrandsteuerung InsertControl InsertControl reagiert nur auf Differenzen in der Rauchgastemperatur, die in gewissen Zeiträumen stattfinden. Diese Informationen werden vom Temperatur-Sensor an die Steuerung übermittelt. Sollte der Temperatur-Sensor defekt sein oder eine Störung aufweisen, geht die Steuerung automatisch in den Störungsmodus mit 60% Schieberöffnung und ändert diese Position nicht mehr. - Page 14 1 | Allgemeines InsertControl montieren Auf der Platine befindet sich ein Wahlschalter (1), der stan- dardmäßig auf Position „0“ eingestellt ist. 3) Programm auswählen, indem Sie den Pfeil des Wahl- schalters auf Position 1, 2, 3 oder 4 stellen (siehe Ta- belle „Programm Übersicht“).
- Page 15 InsertControl montieren Contents Contents General.................................. 16 Assembling InsertControl........................... 17 Installing InsertControl........................17 InsertControl function test ........................23 How the InsertControl automatic combustion control works ............24...
-
Page 16: General
1 | General InsertControl montieren General Fig. 1: 363000 Fig. 2: 363011... -
Page 17: Assembling Insertcontrol
InsertControl montieren 1 | General Fig. 3: 363010 Assembling InsertControl Installing InsertControl The control unit consists of: Control unit (1) Power unit (2) Temperature sensor (270 - 20 cm) (3) Bowden cable (100 cm) (4) Fig. 4: Control unit... - Page 18 1 | General InsertControl montieren There are matching installation kits for the various fireplace inserts. The applicable fireplace inserts and the item num- bers of the installation kits are: 45x, 55x, 65x 75x – 363000 75X II - 363011 45x round – no InsertControl 45x II –...
- Page 19 InsertControl montieren 1 | General The holes for the Bowden cable have already been drilled beforehand for all Klapp flach + II fireplace inserts which have an InsertControl. Fig. 9: Hole for Bowden cable...
- Page 20 1 | General InsertControl montieren Here you can see the assembly situations: On some fireplace inserts the assembly situation can be se- lected on either the left- or right-hand side. On some mod- els, assembly situation is only possible on one side. 45x, 55x, 65x, 75x (1) –...
- Page 21 InsertControl montieren 1 | General For 45x, 55x, 65x, 7x K 6) Remove centre stone tension support (1). 7) Remove the two M6x12 hexagon head screws (2). 8) Remove primary air cover (3). ð Now InsertControl can be installed. Fig. 11: Removing the parts For 75x II 9) Remove the two M6x12 hexagon head screws (1).
- Page 22 1 | General InsertControl montieren 13) Remove the two M10x1 (1) and the M5 nut with flange (2) and the spacer connecting plate (3). For the connection between control unit and installation kit you will require the following part from the installation kit: •...
-
Page 23: Insertcontrol Function Test
InsertControl montieren 1 | General 17) Slide the Bowden cable flange (1) over the Bowden cable once each from left and right. 18) Then use the Taptite screws (2) to screw the two flanges (1) on to the fireplace insert. 19) After screwing in, check whether the rubber plug is firmly seated and correctly positioned all round. -
Page 24: How The Insertcontrol Automatic Combustion Control Works
1 | General InsertControl montieren How the InsertControl automatic combustion control works InsertControl reacts only to differences in the flue gas temperature that take pace within certain peri- ods. This information is transmitted by the temperature sensor to the controls. Should the temperature sensor be defective or display a fault, the controls will automatically go into fault mode with 60% shut- ter opening and no longer changes this position. - Page 25 InsertControl montieren 1 | General On the circuit board is a selector switch (1) that by default is set to position “0”. 3) Select program by setting the arrow of the selector switch to position 1, 2, 3 or 4 (see “Program Overview” table.
- Page 26 Sommaire InsertControl montieren Sommaire Généralités ................................27 Installer l’InsertControl ............................28 Mettre en place l’InsertControl ......................28 Test fonctionnel de l’InsertControl ....................34 Fonctionnement du système automatique de contrôle de la combustion InsertControl..35...
-
Page 27: Généralités
InsertControl montieren 1 | Généralités Généralités Fig. 1: 363000 Fig. 2: 363011... -
Page 28: Installer L'insertcontrol
1 | Généralités InsertControl montieren Fig. 3: 363010 Installer l’InsertControl Mettre en place l’InsertControl L’unité de commande comprend : Unité de commande (1) Bloc d'alimentation (2) Sonde de température (270 – 20 cm) (3) Câble Bowden (100 cm) (4) Fig. 4: Unité de contrôle... - Page 29 InsertControl montieren 1 | Généralités Chaque type de foyers possède son propre kit de montage. Les kits de montage des foyers appropriés portent les nu- méros d’article suivants : 45x, 55x, 65x 75x – 363000 75x II – 363011 45x rond – pas d’InsertControl 45x II –...
- Page 30 1 | Généralités InsertControl montieren Pour tous les foyers à ouverture latérale plane + II possé- dant un InsertControl, les trous pour le câble Bowden sont déjà prépercés. Fig. 9: Perçage pour câble Bowden...
- Page 31 InsertControl montieren 1 | Généralités Les différentes situations d'installation sont représentées ci- contre : Pour certains foyers, il est possible de choisir une installa- tion à gauche ou à droite. Pour certains modèles, l’installa- tion n’est possible que d’un côté. 45x, 55x, 65x, 75x (1) – installation à gauche 45x (2 ) –...
- Page 32 1 | Généralités InsertControl montieren Pour 45x, 55x, 65x, 7x K 6) Enlever l’appui pour pierre centrale (1). 7) Enlever les deux vis à tête hexagonale M6x12 (2). 8) Enlever le recouvrement de l’air primaire (3). ð Il est maintenant possible d’installer l’InsertControl. Fig. 11: Retirer les pièces Pour 75x II 9) Enlever les deux vis à...
- Page 33 InsertControl montieren 1 | Généralités 13) Enlever les deux écrous plats M10x1 (1) et l’écrou à bride M5 (2), ainsi que la pièce intercalaire (3). Pour le raccordement de l’unité de commande avec le kit de montage, vous aurez besoin des pièces du kit de mon- tage suivantes : •...
-
Page 34: Test Fonctionnel De L'insertcontrol
1 | Généralités InsertControl montieren 17) Enfiler chacune des brides pour câble Bowden (1) sur le câble Bowden, l’une par la gauche et l’autre par la droite. 18) Visser ensuite les deux brides (1) au foyer avec les vis Taptite (2). 19) Après le vissage, contrôlez si le bouchon en caou- tchouc est solidement fixé... -
Page 35: Fonctionnement Du Système Automatique De Contrôle De La Combustion Insertcontrol
InsertControl montieren 1 | Généralités Fonctionnement du système automatique de contrôle de la combustion InsertControl L’InsertControl réagit uniquement aux différences de température des fumées qui se produisent à dif- férents stades de la combustion. Ces informations sont transmises par le capteur de température à la commande. - Page 36 1 | Généralités InsertControl montieren Sur la platine se trouve un sélecteur (1) qui se trouve en po- sition « 0 » par défaut. 3) Sélectionner un programme en mettant la flèche du sélecteur sur la position 1, 2, 3 ou 4 (voir le tableau « Vue d’ensemble des programmes »).
- Page 37 InsertControl montieren Indice Indice Generalità ................................38 Montaggio di InsertControl ..........................39 Integrazione di InsertControl ......................39 Test funzionale InsertControl ......................45 Funzionamento del comando di combustione automatico InsertControl........46...
-
Page 38: Generalità
1 | Generalità InsertControl montieren Generalità Fig. 1: 363000 Fig. 2: 363011... -
Page 39: Montaggio Di Insertcontrol
InsertControl montieren 1 | Generalità Fig. 3: 363010 Montaggio di InsertControl Integrazione di InsertControl L'unità di comando è composta da: Unità di controllo (1) Alimentatore (2) Sensore di temperatura (270 - 20 cm) (3) Cavo Bowden (100 cm) (4) Fig. 4: Unità di controllo... - Page 40 1 | Generalità InsertControl montieren Esistono kit di montaggio idonei ai diversi inserti per cami- netto. Gli inserti per caminetto idonei e i numeri degli arti- coli dei kit di montaggio sono: 45x, 55x, 65x 75x – 363000 75x II - 363011 45x rotondo –...
- Page 41 InsertControl montieren 1 | Generalità Per tutti gli inserti per caminetti battenti piatti + II, che di- spongono dell’InsertControl, i fori per il cavo Bowden sono già preforati. Fig. 9: Foro per cavo Bowden...
- Page 42 1 | Generalità InsertControl montieren Qui è possibile vedere le varie possibilità di installazione: Per alcuni inserti del camino, l’installazione può essere effet- tuata a sinistra o a destra. In alcuni modelli, l’installazione è predisposta su un solo lato. 45x, 55x, 65x, 75x (1) – montaggio a sinistra 45x (2) –...
- Page 43 InsertControl montieren 1 | Generalità Con 45x, 55x, 65x, 7x K 6) Rimuovere il rivestimento della pietra centrale (1). 7) Rimuovere le due viti esagonali M6x12 (2). 8) Rimuovere la copertura dell’aria primaria (3). ð Ora è possibile montare l’InsertControl. Fig. 11: Rimozione dei pezzi Con 75x II 9) Rimuovere le due viti esagonali M6x12 (1).
- Page 44 1 | Generalità InsertControl montieren 13) Rimuovere i due dadi piatti M10x1 (1), il dado M5 con flangia (2) e la piastra distanziale di collegamento (3). Per il collegamento tra l'unità di controllo e il kit di montag- gio sono necessari i seguenti componenti del kit: •...
-
Page 45: Test Funzionale Insertcontrol
InsertControl montieren 1 | Generalità 17) Far scorrere la flangia del cavo Bowden (1) sul cavo stesso una volta da sinistra e da destra. 18) Avvitare quindi le due flange (1) all'inserto per cami- netto con le viti Taptite (2). 19) Dopo l'avvitamento, verificare che la chiusura in gom- ma sia ben salda e che sia posizionata correttamente su tutto il perimetro. -
Page 46: Funzionamento Del Comando Di Combustione Automatico Insertcontrol
1 | Generalità InsertControl montieren Funzionamento del comando di combustione automatico InsertControl InsertControl reagisce solo alle differenze di temperatura dei fumi che si verificano in determinati pe- riodi di tempo. Queste informazioni vengono trasmesse al comando dal sensore di temperatura. Se il sensore di temperatura è... - Page 47 InsertControl montieren 1 | Generalità Sulla scheda di circuito è presente un selettore (1) che, per impostazione predefinita, è regolato sulla posizione "0". 3) Selezionare il programma impostando la freccia del selettore sulla posizione 1, 2, 3 o 4 (vedi tabella "Pano- ramica dei programmi").
- Page 48 AUSTROFLAMM GMBH Austroflamm-Platz 1 A- 4631 Krenglbach Tel: +43 (0) 7249 / 46 443 www.austroflamm.com info@austroflamm.com 363000, 363011, 363010 - 945256...
Need help?
Do you have a question about the Insert Control and is the answer not in the manual?
Questions and answers