Advertisement
- 1 INTRODUCTION
- 2 FEATURES
- 3 INSTRUMENT CONNECTION AND POWERING UP
- 4 BLOCKS
- 5 AMPLIFIER MODELS
- 6 EFFECTS MODELS
- 7 BUTTON AND DISPLAY ACTIONS
- 8 PRESET
- 9 SAVE
- 10 SAVED PRESET
- 11 EQ
- 12 MODIFY
- 13 TAP TEMPO
- 14 TUNER
- 15 BLUETOOTH
- 16 RECORDING
- 17 CHARGING
- 18 FIRMWARE UPDATE
- 19 FACTORY RESET
- 20 PRESETS RESET
- 21 SPECIFICATIONS
- 22 Documents / Resources
INTRODUCTION
This manual is a guide to the features and functions of Mustang Micro Plus—a plug-and-play headphone amplifier and interface that connects directly to your guitar and bass to deliver amp models, effects models, Bluetooth streaming and more. With fantastic Fender Mustang amplifier sound and yet no larger than a deck of cards, Mustang Micro Plus is easily portable and provides up to six hours of battery-operated playing time.
Mustang Micro Plus is simple and intuitive. Connect it to any popular instrument model using the 1/4" rotating input plug. With 25 great-sounding Mustang amplifier models, 25 effect models in moveable blocks and remote editing using the Fender TONE™ app, players can choose among 100 onboard presets (70 factory presets and 30 empty presets ready for personalized customization) and access cloud presets. Turn Bluetooth on and stream music to play along with, or play to online sources with synced audio and video. The display conveniently shows the preset in use, onboard tuner and other functions, and the USB-C port enables easy audio recording and firmware updates. With remarkably compact sound, style and versatility, Mustang Micro Plus delivers it all straight to your earbuds, headphones or digital recording software.
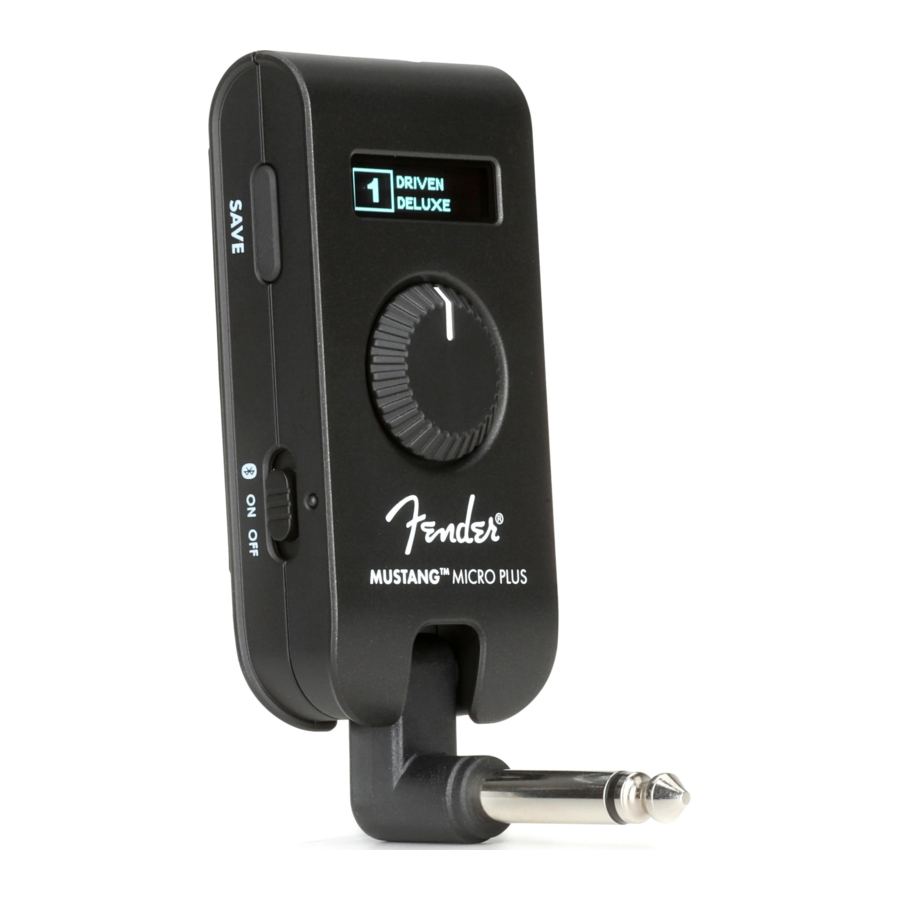
FEATURES


- DISPLAY: Black display with white text shows preset name and number in use. Also displays EQ, MODIFY, SAVE and TUNER functions. To conserve battery life, the display will time out 10 seconds after the last button press; press any button to wake the display.
- MASTER VOLUME: Adjusts overall volume level of instrument signal and Bluetooth audio.
- ROTATING INPUT PLUG: Standard mono 1/4" plug rotates up to 270 degrees for easy compatibility with all popular instrument models.
- TAP TEMPO/TUNER BUTTON: Tap button twice or more to set tempos for delay effects; press and hold for two seconds to activate onboard tuner.
- MODIFY BUTTONS: Buttons (-/+) adjust a single parameter of assigned modulation, reverb or delay effect; display indicates parameter control.
- EQ BUTTONS: Buttons (-/+) adjust overall instrument signal tone. Select among nine EQ presets including flat; display indicates EQ preset in use.
- PRESET BUTTONS: Buttons (-/+) select preset from 100 options; display indicates preset in use.
- SAVE: Press and hold to initiate preset save prompt on the display.
- POWER/BLUETOOTH SWITCH/LED: Three-position slider switch turns Mustang Micro Plus on and off and activates Bluetooth audio pairing. LED indicates power/Bluetooth/charging status.
- HEADPHONE OUTPUT: 1/8" stereo headphone jack.
- USB-C PORT: For charging, recording output and firmware updates.
INSTRUMENT CONNECTION AND POWERING UP
Connecting Mustang Micro Plus to your guitar couldn't be easier— simply rotate the 1/4" input plug out from the unit and plug it into the guitar's input jack. Slide the power switch to the center ON position; the power LED will illuminate green and then extinguish, indicating that Mustang Micro Plus is on and charged (different LED colors indicate different charging status). You're now ready to choose a preset, adjust volume and EQ, tune up and start playing.


Connecting Mustang Micro Plus to your instrument, disconnecting it or touching the end of the device's plug may cause a loud noise. To avoid hearing damage when wearing heaphones/earbuds, follow these steps to ensure safe operation of your device:
- When connecting/disconnecting Mustang Micro Plus, remove headphones/earbuds, ensure that the device is turned off, or ensure that the device's MASTER VOLUME control is set to zero.
- Turn the device on with MASTER VOLUME set to zero, then gradually adjust volume to reach a comfortable listening level.
When wearing headphones/earbuds, connecting/disconnecting Mustang Micro Plus or touching its exposed plug while unit is on and MASTER VOLUME is up is similar to plugging an instrument cable into a live amplifier with volume up or to touching the exposed end of a live instrument cable.
BLOCKS
All Mustang Micro Plus presets contain five moveable "blocks" for creating an entire signal path from input to output— one amplifier block and four effects blocks. There are 25 amplifier models and 25 effect models organized into four categories: stompbox, modulation, delay and reverb.
Amp and effect parameters including the modify control can be adjusted using the Fender TONE app.
AMPLIFIER MODELS
| '57 CHAMP | '65 DELUXE | '80S BRITISH | BB15 HIGH GAIN | '60S THRIFT |
| '57 DELUXE | '65 TWIN | '90S AMERICAN | SUPER-SONIC | EXCELSIOR |
| '57 TWIN | '60S BRITISH | BRITISH COLOUR | FBE-100 | STUDIO PREAMP |
| '59 BASSMAN | BRITISH WATTS | BB15 LOW GAIN | METAL 2000 | TUBE PREAMP |
| '65 PRINCETON | '70S BRITISH | BB15 MID GAIN | UBER | ACOUSTIC SIM |
EFFECTS MODELS
| STOMPBOX | MODULATION | DELAY | REVERB |
| OVERDRIVE | SINE CHORUS | MONO DELAY | LARGE HALL |
| GREENBOX | TRIANGLE FLANGER | TAPE DELAY | SMALL ROOM |
| MYTHIC DRIVE | PHASER | 2290 DELAY | SPRING REVERB |
| BLACKBOX | VIBRATONE | REVERSE DELAY | MOD. LARGE HALL |
| FUZZ | SINE TREMOLO | ||
| BIG FUZZ | HARMONIC TREMOLO | ||
| OCTOBOT | |||
| COMPRESSOR | |||
| SUSTAIN | |||
| 5-BAND EQ | |||
| ENVELOPE FILTER |
BUTTON AND DISPLAY ACTIONS
POWER/BLUETOOTH SWITCH/LED
Power Mustang Micro Plus on and off. The POWER switch is also used to initiate Bluetooth use; see the BLUETOOTH section for details. The POWER LED also indicates different charging status conditions; see the CHARGING section for details. On power-down, Mustang Micro Plus keeps the last used/saved preset and EQ settings and returns to them on the next power-up.

PRESET
Mustang Micro Plus has 70 factory presets and 30 empty slots for user-created presets. Pressing the PRESET BUTTONS will wake the display screen and show the current preset name and number. Subsequently, a single press to either button will move up or down to the next preset; pressing and holding either button will scroll up or down.

SAVE
When a preset has been edited from the saved state, the preset number inverts from white text on black to black text in a white box. Only changes made to modify control parameters and tap BPM are saved on Mustang Micro Plus; preset name, location and other preset parameters are editable using the Fender TONE app.
To save a preset edit, press and hold the SAVE BUTTON for two seconds to initiate the save prompt.

Press the SAVE BUTTON to confirm and save. "PRESET SAVED" will appear in the display for two seconds; the saved preset name and number will then appear. The display will subsequently time out if no other buttons are pressed:

SAVED PRESET
Press any other button to exit without saving. The unsaved preset name and number will appear in the display, which will subsequently time out if no other buttons are pressed.
In the unsaved preset at right, the preset number in the display appears as black text in a white box.

EQ
To fine-tune instrument tone, tap the EQ BUTTONS to select one of nine different preset EQ profiles. The EQ preset name and number will appear in the display:

EQ profiles are:
| EQ1 FLAT | EQ3 BRIGHT CUT 2 | EQ5 LOW CUT 2 | EQ7 BRIGHT BOOST 2 | EQ9 BASS BOOST 2 |
| EQ2 BRIGHT CUT 1 | EQ4 LOW CUT 1 | EQ6 BRIGHT BOOST 1 | EQ8 BASS BOOST 1 |
MODIFY
Tap the MODIFY BUTTONS to adjust a single parameter of an assigned modulation, reverb or delay effect (i.e., delay level, reverb level, modulation rate, et. al). The block category, parameter name and parameter value will appear in the display. Note that the minimum and maximum control limits of the MODIFY buttons will vary according to the effect parameter assiged, and will default to the saved preset value. The MODIFY parameter is assignable per preset using the Fender TONE app.

TAP TEMPO
Press the TAP BUTTON twice or more to set a tempo (in BPM) for a delay effect. The BPM designation and a flashing circle will appear in the display during adjustment. The TAP BUTTON displays the current tempo on the first button press, which counts towards the two-tap minimum to change the tempo:

TUNER
Press and hold the TAP BUTTON for two seconds to activate the TUNER; the target note and indicator needle will appear in the DISPLAY WINDOW. The indicator needle shows degrees of sharpness and flatness until the correct pitch is attained, indicated by illumination of the target pitch in a white box. Instrument and Bluetooth audio signals are muted while the TUNER is engaged. Press any button to exit the TUNER:

BLUETOOTH
Mustang Micro Plus easily streams Bluetooth audio, so you can play along in your headphones or earbuds. The device is discoverable as "Mustang Micro Plus" on smart phones and other Bluetooth devices.
To activate Bluetooth pairing mode, push the POWER switch to the far left and hold it there for two seconds. The POWER switch Bluetooth position is spring-loaded for momentary contact only, and will return to the center "ON" position when released. In pairing mode, the POWER LED will flash blue for two minutes or until a connection is established.

On successful connection, the POWER LED will turn solid blue for 10 seconds and then extinguish.
To disconnect a Bluetooth device from Mustang Micro Plus, hold the POWER switch in the Bluetooth position for two seconds and then release it (as when pairing). This will end the Bluetooth connection and return Mustang Micro Plus to pairing mode with a flashing blue LED; pairing mode will expire within two minutes if no other Bluetooth connection is made, and the blue LED will extinguish. Alternately, disconnect using the external device.
Mustang Micro Plus automatically pairs with the last connected Bluetooth device if that device is available. Note that MASTER VOLUME controls instrument and overall volume only; the mix between an instrument and a Bluetooth audio source is determined using the volume control on the external device.
RECORDING
Mustang Micro Plus can be used as a bidirectional input device for digital recording software by using a USB cable to connect the USB-C jack on the bottom of the unit to the USB port on a Mac or PC.
No external driver is needed to connect to an Apple computer. For assistance with Windows USB recording, visit the "Connected Amps" section at https://support.fender.com.
CHARGING
Mustang Micro Plus provides up to six hours of battery-powered operation. Recharge Mustang Micro Plus using the USB-C jack (H) on the bottom of the unit and the included USB cable. POWER LED color indicates charging status:
| POWER SWITCH LED COLOR | BATTERY STATUS |
| YELLOW (solid) | USB is connected and unit is charging whether power is on or off. |
| GREEN (solid) | Power is on, USB is connected and battery is fully charged. |
| GREEN (flashing) | Battery is at greater than 50 percent and USB is not connected. LED flashes green for one second every five seconds. |
| YELLOW (flashing) | Battery is at 20 percent-50 percent and USB is not connected. LED flashes yellow for one second every five seconds. |
| RED (flashing) | Battery is at less than 20 percent and USB is not connected. LED flashes red for one second every five seconds. |
| RED (flashing rapidly) | LED flashing red rapidly while unit is on and USB is plugged in indicates a battery charge error possibly due to extremes of temperature. Unplug USB, turn unit off, allow unit to reach room temperature, restart unit. |
FIRMWARE UPDATE
Firmware updates for Mustang Micro Plus require use of the Fender Mustang Micro Plus Updater application, downloadable at www.fender.com/mmfirmware. The installer will guide the update process using three steps:
- With Mustang Micro Plus off, connect a USB cable to the USB-C jack and connect the other end to a Mac or PC.
- While pressing and holding the PRESET minus button (-), turn Mustang Micro Plus on while continuing to hold the PRESET minus button (-) button for two seconds.
- Start the updater application and follow the onscreen instructions. The POWER LED will flash green to indicate that firmware update mode is in process. When complete, the POWER LED will turn off and the updater application will indicate a successful update (or unsuccesful, in which case repeat firmware update steps).
When done, disconnect the USB cable and restart Mustang Micro Plus.
FACTORY RESET
A factory reset returns Mustang Micro Plus to its original factory settings and clears the Bluetooth paired device list. Initiate factory reset by turning Mustang Micro Plus on while simultaneously holding the MODIFY minus (-) and SAVE buttons for two seconds. The display will then show FACTORY RESET PLEASE WAIT while in process, with successful completion indicated by resumption of normal operation. Should factory reset fail, turn unit off and repeat reset steps.
PRESETS RESET
In a "presets reset", presets 1-70 are reset to their original state, overwriting any user modifications to them (presets 71-100 will be unaffected). Initiate a presets reset by turning Mustang Micro Plus on while simultaneously holding the SAVE and TAP buttons for two seconds. The display will then show PRESETS RESET PLEASE WAIT while in process, with successful completion indicated by resumption of normal operation. Should presets reset fail, turn unit off and repeat reset steps.
For questions and troubleshooting, contact a Fender specialist at:
1-800-856-9801 (U.S. toll free)
1-480-596-7195 (International)
SPECIFICATIONS
| TYPE | PR 6171 |
| INPUT | 1/4" plug |
| INPUT IMPEDANCE | 1MΩ |
| OUTPUT | 1/8" stereo |
| OUTPUT POWER | 30mW/channel |
| HEADPHONE IMPEDANCE WORKING RANGE | 16Ω or greater |
| BATTERY TYPE | Lithium-ion rechargeable |
| USB CURRENT | 600 mA (max) |
| BATTERY LIFE | 4 hours (high volume) Up to 6 hours (low volume) |
| BLUETOOTH | V5.1 with A2DP v1.3.1 protocol |
| DIMENSIONS (INPUT PLUG IN STORED POSITION) | Width: 1.5" (3.81 cm) Height: 3.15" (8 cm) Depth: 1.21" (3.07 cm) |
| WEIGHT | 1.9 oz. (54 g) |
Documents / Resources
References

Download manual
Here you can download full pdf version of manual, it may contain additional safety instructions, warranty information, FCC rules, etc.
Advertisement


Need help?
Do you have a question about the MUSTANG MICRO PLUS and is the answer not in the manual?
Questions and answers