Advertisement
- 1 Welcome
- 2 General Notice
- 3 What's included in the box
- 4 Product Features
- 5 Specifications
- 6 Smart Camera Introduction
- 7 Smart Camera Components
- 8 Installation of Smart Wi-Fi Camera
- 9 Download and Install the Xodo Smart App
- 10 Open the App
- 11 Adding Devices
- 12 Detecting Device
- 13 Connect to a Wi-Fi Network
- 14 Scan with Camera
- 15 Connecting
- 16 Confirmation Screen
- 17 Home Screen
- 18 Camera Home Screen
- 19 Configure The Camera Settings
- 20 Link Xodo Smart Account to Google Home Screen
- 21 Control your smart devices through Google Home
- 22 Link Xodo Smart Account to Alexa
- 23 Customer Service and Tech Support
- 24 Documents / Resources
Welcome
Your new E15 camera is a Solar Pan-Tilt Security Camera that can monitor and record in low lighting conditions, detect movement and audio, and be monitored from a smartphone with the free app.
General Notice
- Do not use products if they have become damaged.
- Follow instructions and only operate products in a safe environment.
- Do not operate electronics in wet conditions. Doing so may cause property damage, bodily harm or electrocution.
- Do not disassemble or alter the product. Doing so will void the warranty.
What's included in the box
You will find the following contents included to help you get started:

Product Features
Your E15 Solar Pan-Tilt Security Camera has the following features:
- Wi-Fi Connectivity (Required)
- 3MP HD Camera
- Mobile Remote Viewing
- Two-Way Audio
- Full Color Night Vision
- PIR Detection
- Adjustable Light
- Siren
- Shared User Access with Xodo App
Specifications
Product Name: Xodo Smart Pan-Tilt Security Camera
Model: E15
Power Input: 5V 1A(Min)
Total Power Consumption: 2.5W(Max)
Support System: Android or iOS
Resolution: 2304 x 1296
Video Compression: H.264 High Profile
Wi-Fi: IEEE 802.11 b/g/n 2.4GHz
Audio: Two-Way Talk, Noise Cancellation
Memory Type: MicroSD Card (Not Included)
Storage Support: 128 GB
Monitoring: PIR Detection, Remote Wake Up
Power Source: Solar & USB Connection
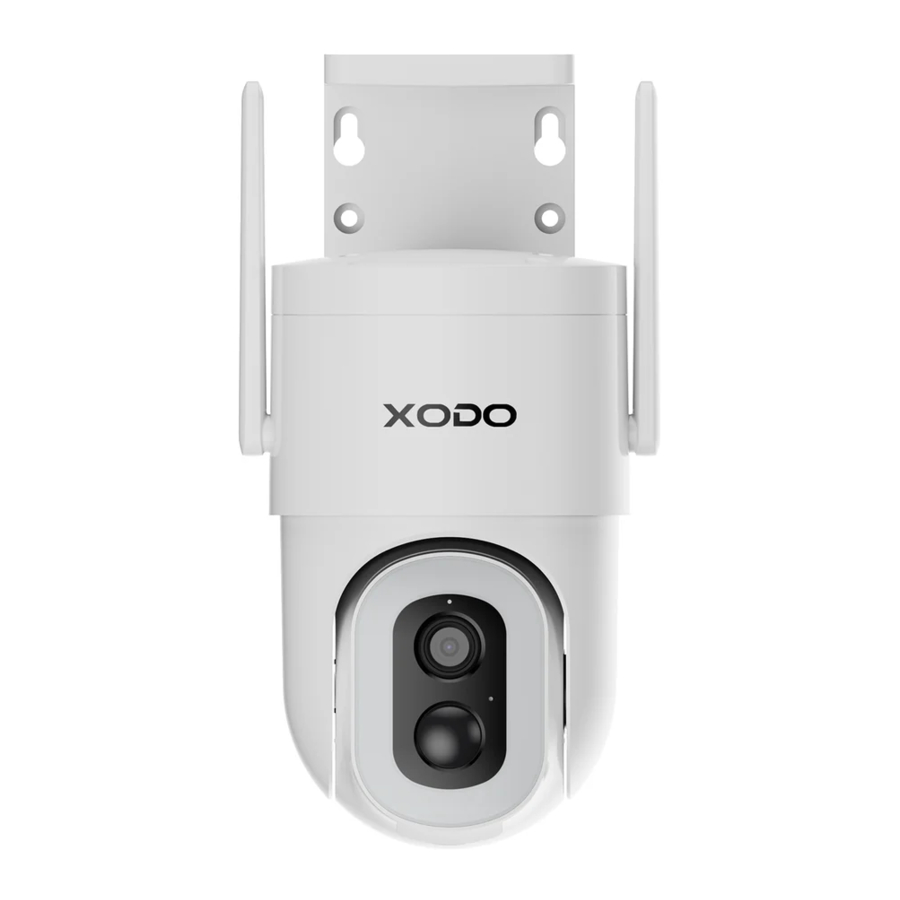
Smart Camera Introduction

Smart Camera Components
IR LED — Measures ambient light to brighten video playback.
MIC — Capture audio input.
Lens — Capture video image.
Power Switch — Hold 3 seconds to power on/off the device.
Reset Button — Setup and configuration button.
Type-C Port — Power Source.
MicroSD Card Port — Memory for storage of saved photos and video clips.
Installation of Smart Wi-Fi Camera
- Install the base where you want to install the camera by using the provided mounting screws.
- The camera will mount onto the mounting base with a clockwise motion.


- Connect the solar charging panel and external memory card.

- Download the Xodo Smart App. Create or log in to an existing account.
Follow app instructions.

Download and Install the Xodo Smart App
Download and install the app.

It can also be found by searching "XODO Smart" by Contixo Inc. in the App Store for iOS


or the Google Play Store for Android.


Open the App
The welcome screen will appear. You will be asked to log in or create a profile. Register an account by entering your email address and setting up a profile, or log in with an existing account.

Adding Devices
You will be able to manually add a device. Select Solar Security Camera E15 to continue.

Detecting Device
To detect the device manually, power on the device and hold the reset button until you hear the confirmation sound. Once you confirm the smart device is ready, press the "next step" button then click the "Next" button. Continue on to the next step. Pressing the "Resetting Devices" button will offer some troubleshooting guidelines to follow.

Connect to a Wi-Fi Network
Now you want to connect the smart device to a local Wi-Fi network. If the proper network is not listed on this page, click the " " button to see a list of available networks.
Your router may broadcast both 2.4GHz & 5.0GHz broadband frequency. Ensure you select a compatible 2.4GHz Wi-Fi access point. Enter your password and connect to the network.
This step will create the login credentials for your camera to find and access the local network, and will store the info in the QR code in the next step.

Scan with Camera
The pairing process will ask you to use the camera to scan the QR barcode on the screen. Hold the QR barcode in front of the camera until you hear a prompt. Press the "I Heard a Prompt" button to continue. Pressing the "No Prompts" link will redirect you to troubleshoot the camera connection.

Connecting
After you hear the prompt and continue, the "Connection" screen will appear. It will usually register within 30 seconds. After the connection process has been completed you'll be redirected to the next screen.

Confirmation Screen
The smart device is added once they are communicating on the same network.
You can rename the smart device by clicking on the pencil icon. You can specify the location. Press the "Done" button at the bottom of the screen to continue to the next step.

Home Screen
Updated Now that your device has been added, it will appear on the home screen along with all other paired Xodo Smart products. Now you are all set.

Camera Home Screen
The home screen will show the live camera feed along with camera controls.

 Switch Image Quality
 Mute/Listen To The Camera
 Adjust The Screen Size
 Full-Screen Display
 Photograph
 Hold To Speak
 Video
Video
 Hide The Menu Bar
 Access Stored Video From The Memory Card
 Album
Album
 Adjust The Background Color

 Set Night Mode
 Turn On/Off PIR Detection
 Turn On/Off Siren
 Turn On/Off Light or Adjust the Brightness
 Edit Menu Bar
 View Alarm Records
 Adjust The Angle Of The Camera
 View Files In Cloud Storage (This Feature Requires An Additional Account)
 Set the Tap to Run and Automation
 Features
Configure The Camera Settings
Different features can be adjusted from the menu button in the upper right hand corner " " of the app.

- Device Name: Can change the icon, name of the camera, and location group.
- Device Information: Will show the account owner, IP address, device ID, and time zone configurations.
- Tap to Run, and Automation: Can allow certain features to run at the tap of a button or automatically.
- Set a series of preset functions from "Basic Function Settings" including: Flip Screen, Time Watermark, turn on/off the Status Indicator.
- Nightvision Mode: Allows you to switch the device to Auto Mode or IR Mode.
- Detection Alarm Settings: Allows you to switch the Human Body Filtering on/off.
- Having the Human Body Filtering on will alert the smart device each time there is humanoid movement.
- PIR Set: Allows you to turn on/off the PIR Detection and adjust the PIR sensitivity.
- Power Management Settings: Allows you to view the battery power, current power supply mode of the device and set the low battery alarm threshold.
- Storage Settings: Allows you to view the storage and format the TF card.
- Purchase VAS: Allows you to purchase cloud storage.
- Offline Notification: Allows you to set reminders when the device is offline.
- FAQ & Feedback: Allows users to report issues and get help.
- Share Device: Allows sharing the device with others.
- Add to Home Screen: Allows you to add the camera to the home screen of your smartphone.
- Device Update: Allows you to check for the latest software and install updates to the device.
- Remove Device: Will remove the camera from the Xodo Smart App, disconnect, and remove saved pairing settings. This is necessary if pairing with a new device.
![]()

 Note:
Note:
This camera does not support 7* 24 hours all day recording, it is an event recording camera. It is only triggered when body motion is detected.
Here are system's reactions:
- Alarm notifications with sounds from App.
- Pictures/videos automatically stored in Micro SD Cardor Cloud.
Link Xodo Smart Account to Google Home Screen
- Open Google Play Store or Apple App Store and download Google Home
- Open the Google Home App. Select "Get Started".
- Log in with a Google account or create a new account.
![]()
- Use Location access to find devices on the same Wi-Fi network.
- You will need to set permissions so Google Home can access the device.
- The app will then search for compatible devices.
![]()


- After setup, if no devices can be found, select "No."
- An online video is available to help you set up your smart devices.
- The next screen will allow you to add devices, setup routines, and adjust settings. Select the "Connect SmartLife App."
![]()
- If the devices are already installed and set up through the Xodo App, you can select the "Works with Google" setup option to continue.
- Configure the home settings by adding an address and a name to a "Home" group.
![]()


Control your smart devices through Google Home
Now you can control your smart devices through Google Home. Take bedroom light as an example. The supported voice commands are listed below:
- Ok Google, turn on/off bedroom light.
- Ok Google, set bedroom light to 50 percent.
- Ok Google, brighten bedroom light.
- Ok Google, dim bedroom light.
- Ok Google, set bedroom light to red.
Link Xodo Smart Account to Alexa
- Download the free Alexa App from the Amazon Appstore, Google Play, or the Apple App Store.
- Open the Alexa App's home screen.
- In upper left hand corner select the menu icon.
- Next select "Skills & Games".
- At the top of the app you can now search for "Smart Life".
- The Smart Life App will appear in search.
![]()

- Select the SmartLife App to add this skill.
- Select Settings.
- Select: "Manage Smart Home Devices" to verify Smart Life has been added.
![]()
- You will be redirected to the account link page. Type in your Xodo Smart account and password. Don't forget to select the country/region associated with your account. Then tap "Link Now" to link your Xodo Smart Account.
![]()


Customer Service and Tech Support
Your satisfaction is important to us. We are here to help!
Contact us at support@contixo.com
Include your order number and product description.
Visit our website for more Xodo products: www.contixo.com
We enjoy your feedback!
Documents / Resources
References
Download manual
Here you can download full pdf version of manual, it may contain additional safety instructions, warranty information, FCC rules, etc.
Advertisement


Need help?
Do you have a question about the E15 and is the answer not in the manual?
Questions and answers