Advertisement
Available languages
Available languages
Quick Links
Advertisement

Related Manuals for CSL Narrow Box Black N100


Summary of Contents for CSL Narrow Box Black N100
- Page 1 User Manual Narrow Box Black N100 Mod.-Nr.: 92141/CSL24078...
- Page 2 Inhaltsverzeichnis 1. Deutsch........................3 2. English........................20 3. Français......................38...
- Page 3 Vielen Dank, dass Sie sich für ein Produkt von CSL Computer entschieden haben. Dieses Gerät wurde nach modernsten technischen Standards gefertigt und wird Ihnen hoffentlich lange Freude bereiten. Bitte lesen Sie die Hinweise in dieser Anleitung sorgfältig durch. 1 Lieferumfang •...
- Page 4 4 Kundensupport Wenn Sie Fragen zur Inbetriebnahme des Computers haben, kontaktieren Sie bitte unsere telefonische Hotline oder schreiben Sie uns eine E-Mail an: shop@csl-computer.com 5 Sicherheitshinweise Bitte beachten Sie die nachfolgenden Vorsichtsmaßnahmen, um Ihre eigene Sicherheit und die Betriebssicherheit des PCs zu gewährleisten: •...
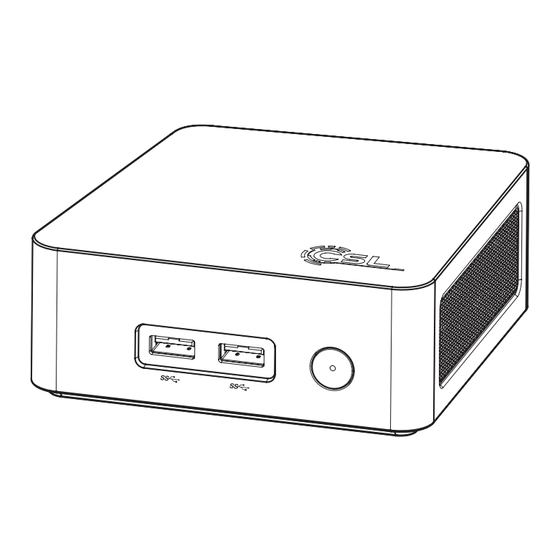
- Page 5 6 Pfl egehinweise Bitt e wischen Sie Ihren PC gelegentlich mit einem weichen, trockenem und fusselfreien Tuch ab. 7 Anschlüsse und Funkti onen Vorderseite: Rückseite: Deutsch...
- Page 6 1 USB 3.2 Gen1 An diesem USB-Port können Sie vorzugsweise Typ-A Port Geräte mit hohen Übertragungsraten (5Gbit/s), wie externe Speichermedien - z.B. USB-Sticks oder externe Festplatten anschließen. 2 Ein/Aus-Taste An- und Ausschalter für die Narrow Box. Für die Reset-Funktion diese Taste 10 Sekunden lang ge- drückt halten.
- Page 7 • Intel® N100, 4x 3400 MHz Intel Burst Frequenz • 1 × DDR4 SO-DIMM, max. 3200 MHz, max. 32 GB RAM (Grundausstattung ist abhängig vom Modell) Festplatten • 1 × M.2 PCIe 3.0 NVMe 2280 • 1 × M.2 SATA SSD Slot 2242 (Grundausstattung ist abhängig vom Modell) Grafik •...
- Page 8 9 Aufrüstmöglichkeiten Der Mini PC CSL Narrow Box Black bietet Ihnen Aufrüstmöglichkeiten für eine M.2 NVMe PCIe (abwärtskompati bel) SSD im Format 2280 und einer M.2 SATA SSD im Format 2242. Die M.2-Anschlüsse befi ndet sich im Inneren des Gehäuses.
- Page 9 Drücken Sie die SSD leicht runter und fi xieren Sie die SSD mit der Arreti erungs- schraube. Schließen Sie die Unterseite des Mini-PCs und schrauben Sie die Abdeckung fest. 9.2 M.2 SATA SSD 2242 Austauschen Um eine SATA M.2 (2242 Format) aufzurüsten öff nen Sie zuerst die Unterseite des Gehäuses (Kapitel 9).
- Page 10 9.3 SO DIMM RAM tauschen Um den SO DIMM RAM auszutauschen öff nen Sie zuerst die Unterseite des Ge- häuses (Kapitel 9). Um den vormonti erten RAM zu entf ernen, drücken Sie die Metallhalterungen an der linken und rechten Seite leicht nach außen. Richten Sie das neu zu monti erende Speichermodul an der Kerbe des SO- DIMM-Steckplatzes aus und stecken...
- Page 11 12 Installation des Mini PC an einem VESA-kompatiblen Gerät • Montieren Sie die VESA-Halterung („mounting plate“) mit den beiliegen- den Schrauben an den dafür vorgesehen Platz Ihres VESA-kompatiblen Gerätes. • Legen Sie den Mini-PC auf eine flache und stabile Oberfläche. Verwen- den Sie die mitgelieferten Schrauben, um sie in die Schraubenlöcher an der Unterseite des Mini-PCs einzubauen.
- Page 12 13.3 Wiederherstellen des Auslieferungszustands Windows 11 Aus dem laufenden Betriebssystem heraus: • Öffnen sie die „Windows-Einstellungen” • Klicken Sie auf „System” und anschließend auf “Wiederherstellung” • Klicken Sie unter dem Punkt „Diesen PC zurücksetzen” auf „Los geht’s” • Wählen Sie im darauffolgenden Fenster zwischen „Eigene Dateien beibehal- ten“...
- Page 13 Deutsch...
- Page 14 Falls ein eigenständiger Start von Windows 11 nicht mehr möglich ist, wird automatisch eine Systemreparatur durchgeführt. Schlägt der Systemstart wieder- holt fehl, öffnet sich das Wiederherstellungsmenü: • Wählen Sie „Erweiterte Optionen“ • Klicken Sie unter „Option auswählen“ auf „Problembehandlung“ • Wählen Sie anschließend „Diesen PC zurücksetzen“ Das System wird neu installiert.
- Page 15 14 Bluetooth-Verbindung herstellen Um eine Bluetooth-Verbindung mit Ihrem gewünschten Gerät herzustellen, gehen Sie bitte wie folgt vor: Öffnen Sie die Bluetooth-Einstellungen an Ihrem Computer, indem Sie auf das Bluetooth-Symbol in der Taskleiste rechtsklicken und anschließend auf “Blue- tooth-Gerät hinzufügen” drücken. Im Anschluss öffnen sich die Bluetooth-Einstellungen.
- Page 16 Deutsch...
- Page 17 15 Sicherheitshinweise und Haftungsausschluss Versuchen Sie nie das Gerät zu öffnen, um Reparaturen oder Umbauten vorzu neh - men. Vermeiden Sie Kontakt zu den Netzspannungen. Schließen Sie das Produkt nicht kurz. Das Gerät ist nicht für den Betrieb im Freien zugelassen, verwenden Sie es nur im Trockenen.
- Page 18 16 Entsorgungshinweise Elektrische und elektronische Geräte dürfen nach der europäischen WEEE Richt- linie nicht mit dem Hausmüll entsorgt werden. Deren Bestandteile müssen ge- trennt der Wiederverwertung oder Entsorgung zugeführt werden, weil giftige und gefährliche Bestandteile bei unsachgemäßer Entsorgung die Umwelt nachhal tig schädigen können.
- Page 19 WEEE Richtlinie: 2012/19/EU WEEE Register-Nr: DE 94495668 Hiermit erklärt die Firma CSL Computer GmbH, dass sich das Gerät 92141 in Übereinstimmung mit den grundlegenden Anforderungen und den übrigen einschlägigen Bestimmungen der Richtlinien 2014/30/EU (EMV), 2014/35/EU (Niederspannung) und 2014/53/EU (RED) befindet.
- Page 20 Thank you for choosing a product from CSL Computer. This device has been manufactured to the latest technical standards and will hopefully give you many years of pleasure. Please read the instructions in this manual carefully. 1 Scope of delivery •...
- Page 21 4 Customer support If you have any questions about commissioning the computer, please contact our telephone hotline or send us an e-mail to shop@csl-computer.com 5 Safety instructions Please observe the following precautionary measures to ensure your own safety and the operational safety of the PC: •...
- Page 22 6 Care instructi ons Please wipe your PC occasionally with a soft , dry and lint-free cloth. 7 Connecti ons and functi ons Frontside: Backside: English...
- Page 23 1 USB 3.2 Gen1 You can connect devices with high transfer rates Type-A (5Gbit/s), such as external storage media - e.g. USB sticks or external hard disks - to this USB port. 2 On/off button On/off switch for the narrow box. Press and hold this button for 10 seconds for the reset function.
- Page 24 • Intel® N100, 4x 3400 MHz Intel Burst frequency • 1 × DDR4 SO-DIMM, max. 3200 MHz, max. 32 GB RAM (basic configuration depends on the model) Hard disks • 1 × M.2 PCIe 3.0 NVMe 2280 • 1 × M.2 SATA SSD Slot 2242 (basic configuration depends on the model) Graphic •...
- Page 25 9 Upgrade opti ons The CSL Narrow Box Black Mini PC off ers you upgrade opti ons for an M.2 NVMe PCIe (backwards compati ble) SSD in 2280 format and an M.2 SATA SSD in 2242 format. The M.2 connecti ons are located inside the housing.
- Page 26 Press the SSD down slightly and secure the SSD with the locking screw. Close the underside of the Mini PC and screw the cover ti ght. 9.2 Replace M.2 SATA SSD 2242 To upgrade a SATA M.2 (2242 format), fi rst open the underside of the housing (chapter 9).
- Page 27 9.3 Replace SO DIMM RAM To replace the SO DIMM RAM, fi rst open the underside of the housing (chapter 9). To remove the pre-assembled RAM, press the metal holders on the left and right side slightly outwards. Align the new memory module to be in- stalled with the notch in the SO-DIMM slot and insert it at a slight angle.
- Page 28 12 Installing the Mini PC on a VESA-compatible device • Mount the VESA mount (“mounting plate”) with the enclosed screws in the space provided on your VESA-compatible device. • Place the Mini PC on a flat and stable surface. Use the screws provided to fit them into the screw holes on the underside of the Mini PC.
- Page 29 13.3 Restoring the delivery state Windows 11 From the existing operating system: • Open the “Windows Settings” • Click on “System” and subsequently on “Recovery”. • Click under the point “Reset this PC” on “Reset PC”. • Select between “Keep my files” or “Remove everything” in the following window and follow the further instructions.
- Page 30 English...
- Page 31 If it is no longer possible to start Windows 11 independently, a system repair is car- ried out automatically. If the system boot fails repeatedly, the recovery menu opens: • Select “Advanced options” • Under “Select option”, click on “Troubleshoot” •...
- Page 32 14 Establishing a Bluetooth connection To establish a Bluetooth connection with your desired device, please proceed as follows: Open the Bluetooth settings on your computer by right-clicking on the Bluetooth icon in the taskbar and then clicking on “Manage Bluetooth device”. The Bluetooth settings will then open.
- Page 33 English...
- Page 34 15 Safety instructions and disclaimer Never attempt to open the appliance to carry out repairs or modifications. Avoid contact with the mains voltage. Do not short-circuit the product. The device is not approved for outdoor use; only use it in dry conditions. Protect it from high humidity, water and snow.
- Page 35 16 Disposal instructions According to the European WEEE Directive, electrical and electronic devices may not be disposed of with household waste. Their components must be recycled or disposed of separately, as toxic and hazardous components can cause lasting damage to the environment if disposed of improperly. As a consumer, you are obliged under the Electrical and Electronic Equipment Act (ElektroG) to return electrical and electronic equipment free of charge to the ma- nufacturer, the point of sale or to public collection points set up for this purpose...
- Page 36 WEEE Richtlinie: 2012/19/EU WEEE Register-Nr: DE 94495668 Hereby, CSL Computer GmbH declares that the device 92141 is in compliance with the essential requirements and other relevant provisions of Directives 2014/30/EU (EMC), 2014/35/EU (Low Voltage) and 2014/53/EU (RED). A complete declaration of conformity can be found at CSL Computer GmbH, Hanseatenstr.
- Page 37 Nous vous remercions d‘avoir choisi un produit de CSL Computer. Cet appareil a été fabriqué selon les normes techniques les plus modernes et nous espérons qu‘il vous donnera satisfaction pendant longtemps. Veuillez lire attentivement les instructions de ce manuel. 1 Contenu de la livraison •...
- Page 38 Si vous avez des questions sur la mise en service de l‘ordinateur, veuillez contacter notre hotline téléphonique ou nous envoyer un e-mail à l‘adresse suivante : shop@csl-computer.com 5 Consignes de sécurité Veuillez prendre les précautions suivantes pour votre propre sécurité.
- Page 39 6 Conseils d‘entreti en Veuillez essuyer votre ordinateur de temps en temps avec un chiff on doux, sec et un chiff on non pelucheux. 7 Connexions et foncti ons Face avant: Face arrière: Français...
- Page 40 1 USB 3.2 Gen1 Sur ce port USB, vous pouvez de préférence Port de Type-A connecter des appareils avec des taux de transfert élevés (5Gbit/s), comme des supports de stockage externes - par exemple des clés USB ou des disques durs externes.
- Page 41 • Intel® N100, 4x 3400 MHz Fréquence Intel Burst • 1 × DDR4 SO-DIMM, max. 3200 MHz, max. 32 Go de RAM (l‘équipement de base dépend du modèle) Disques durs • 1 × M.2 PCIe 3.0 NVMe 2280 • 1 × M.2 SATA SSD Slot 2242 (l‘équipement de base dépend du modèle) Graphique •...
- Page 42 9 Possibilités de mise à niveau Le mini PC CSL Narrow Box Black vous off re des possibilités de mise à niveau pour un SSD M.2 NVMe PCIe (rétrocompati ble) au format 2280 et un SSD M.2 SATA au format 2242. Les connecteurs M.2 se trouvent à l‘intérieur du boîti er.
- Page 43 Appuyez légèrement sur le SSD et fi xez- le avec la vis de blocage. Fermez la parti e inférieure du mini-PC et vissez le couvercle. 9.2 Remplacer le disque SSD SATA M.2 2242 Pour mett re à niveau un SATA M.2 (format 2242), ouvrez d‘abord la parti e infé- rieure du boîti er (chapitre 9).
- Page 44 9.3 Remplacer la RAM SO DIMM Pour remplacer la RAM SO DIMM, ouvrez d‘abord la parti e inférieure du boîti er (chapitre 9). Pour reti rer la RAM prémontée, poussez légèrement vers l‘extérieur les supports métalliques situés sur les côtés gauche et droit. Alignez le nouveau module de mémoire à...
- Page 45 12 Installation du Mini PC sur un appareil compatible VESA • Montez le support VESA (« mounting plate ») à l‘aide des vis fournies à l‘emplacement prévu de votre appareil compatible VESA. • Posez le mini-PC sur une surface plane et stable. Utilisez les vis fournies pour les installer dans les trous de vis situés sur la partie inférieure du mini-PC.
- Page 46 13.3 Rétablissement de l‘état de livraison Windows 11 A partir du système d‘exploitation en cours: • Ouvrez les « Paramètres Windows » • Cliquez sur „Système“ et ensuite sur „Récupération“. • Cliquez sous le point „Réinitialiser ce PC“ sur „Réinitialiser le PC“. •...
- Page 47 Français...
- Page 48 Si un démarrage autonome de Windows 11 n‘est plus possible, une réparation du système est automatiquement effectuée. Si le démarrage du système échoue à plusieurs reprises, le menu de restauration s‘ouvre : • Sélectionnez « Options avancées ». • Sous « Choisir une option », cliquez sur « Dépannage ». •...
- Page 49 14 Établir une connexion Bluetooth Pour établir une connexion Bluetooth avec votre appareil de choix, veuillez procéder comme suit: Ouvrez les paramètres de Bluetooth sur votre ordinateur en cliquant avec le bouton droit sur le symbole Bluetooth sur la barre de tâches et en appuyant ensuite sur «...
- Page 50 Français...
- Page 51 15 Consignes de sécurité et clause de non-responsabilité N‘essayez jamais d‘ouvrir l‘appareil pour effectuer des réparations ou des trans- formations. Évitez tout contact avec les tensions du réseau. Ne court-circuitez pas le produit. L‘appareil n‘est pas autorisé à fonctionner à l‘extérieur, utilisez-le uniquement dans un endroit sec.
- Page 52 16 Instructions pour l‘élimination Selon la directive européenne DEEE, les appareils électriques et électroniques ne doivent pas être jetés avec les ordures ménagères. Leurs composants doivent être séparés pour être recyclés ou éliminés, car les composants toxiques et dangereux peuvent nuire durablement à l‘environnement s‘ils ne sont pas éliminés correc- tement.
- Page 53 WEEE Richtlinie: 2012/19/EU WEEE Register-Nr: DE 94495668 Par la présente, la société CSL Computer GmbH déclare que l‘appareil 92141 est conforme aux exigences essentielles et aux autres dispositions pertinentes des directives 2014/30/UE (CEM), 2014/35/UE (basse tension) et 2014/53/UE (RED). Une déclaration de conformité complète est disponible à l‘adresse suivante : CSL Computer GmbH, Hanseatenstr.
- Page 56 CSL Computer GmbH • Hanseatenstr. 34 • 30853 Langenhagen www.csl-computer.com...
Need help?
Do you have a question about the Narrow Box Black N100 and is the answer not in the manual?
Questions and answers