Advertisement
Available languages
Available languages
Quick Links
Advertisement

Subscribe to Our Youtube Channel
Related Manuals for CSL VenomBox HS


Summary of Contents for CSL VenomBox HS
- Page 1 User Manual Mini PC VenomBox HS Mod.-Nr.: 91317/CSL24015...
- Page 2 Inhaltsverzeichnis 1. Deutsch........................3 2. English........................20 3. Français........................38...
- Page 3 Vielen Dank, dass Sie sich für ein Produkt von CSL Computer entschieden haben. Dieses Gerät wurde nach modernsten technischen Standards gefertigt und wird Ihnen hoffentlich lange Freude bereiten. Bitte lesen Sie die Hinweise in dieser Anleitung sorgfältig durch. 1 Lieferumfang •...
- Page 4 4 Kundensupport Wenn Sie Fragen zur Inbetriebnahme des Computers haben, kontaktieren Sie bitte unsere telefonische Hotline oder schreiben Sie uns eine E-Mail an: shop@csl-computer.com 5 Sicherheitshinweise Bitte beachten Sie die nachfolgenden Vorsichtsmaßnahmen, um Ihre eigene Sicherheit und die Betriebssicherheit des PCs zu gewährleisten: •...
- Page 5 • Statische Elektrizität kann die empfindlichen Komponenten des PCs beschädigen. Um dies zu vermeiden, muss die statische Elektrizität aus Ihrem Körper abgeleitet werden. Berühren Sie dazu einfach eine Metalloberfläche, bevor Sie Bauteile im System anfassen. 6 Pflegehinweise Bitte wischen Sie Ihren PC gelegentlich mit einem weichen, trockenem und fusselfreien Tuch ab.
- Page 6 Ein/Aus-Taste Hiermit können Sie den Computer hoch- und herunterfahren. Halten Sie die Ein/Aus-Taste für 10 Sekunden gedrückt, um das Ausschalten des Mini PC zu erzwingen. Einmaliges Drücken während des Betriebes versetzt den Mini PC in den Stromspar- modus. An diesem USB-Port können Sie vorzugsweise USB 4 Geräte mit hohen Übertragungsraten, wie externe Typ-C Anschlüsse...
- Page 7 8 Technische Daten • AMD Ryzen™ 7 8845HS, 8× 3800 MHz, Boost bis 5100 MHz • 2× DDR5 SO-DIMM (5600MHz), max. 64 GB (Grundausstattung ist abhängig vom Modell) Festplatten • 2× M.2 2280 NVMe PCIe Gen4 SSD (Grundausstattung ist abhängig vom Modell) Grafik •...
- Page 8 9 Einbau der M.2 NVMe PCIe SSD Der Mini PC VenomBox HS bietet Ihnen Aufrüstmöglichkeiten für eine M.2 NVMe PCIe 4.0 (abwärtskompatibel) SSD im Format 2280. Der M.2-Anschluss befindet sich im Inneren des Gehäuses. Um eine Aufrüstung durchzufüh- ren, entfernen Sie die vier Gehäu-...
- Page 9 10 Einbau einer 2,5“ SATA SSD/HDD Um eine Aufrüstung durchzuführen, öffnen Sie das Gehäuse wie in Punkt 9 (Abb. 1 & 2) beschrieben. Lösen Sie die Befestigungs- schrauben mit einem passen- den Schraubendreher und nehmen die Festplatten- halte- rung heraus 11 Einbau des Arbeitsspeichers Öffnen Sie das Gehäuse wie in Punkt 9 (Abb.
- Page 10 Richten Sie das Speichermodul an der Kerbe des SO DIMM-Steckplatzes aus und stecken Sie es leicht schräg ein, um es zu befestigen. Anschließend setzen Sie das Mainboard wieder an seine ursprüngliche Position zurück und befestigen die Festplattenhalterung. (Abb. 6) Schließen Sie die Unterseite des Mini-PCs und schrauben die Abdeckung fest. Deutsch...
- Page 11 12 Installation des Mini PC an einem VESA-kompatiblen Gerät • Montieren Sie die VESA-Halterung („mounting plate“) mit den beiliegenden Schrauben an den dafür vorgesehen Platz Ihres VESA-kompatiblen Gerätes.(A) • Legen Sie den Mini-PC auf eine flache und stabile Oberfläche. Verwenden Sie die mitgelieferten Schrauben, um sie in die Schraubenlöcher an der Unterseite des Mini-PCs einzubauen.
- Page 12 13 Hinweise für die Installation und Wiederherstellung von Windows® 13.1 Allgemeine Hinweise für die Installation von Windows® Betriebssystemen Bitte installieren Sie ausschließlich Vollversionen von Windows 10/Windows 11. Recovery-Versionen von anderen PC-Systemen funktionieren nicht. 13.2 Aktivierung von Microsoft Windows® Um Ihr Betriebssystem uneingeschränkt nutzen zu können, muss eine Aktivie- rung bei Microsoft®...
- Page 13 13.4 Wiederherstellen des Auslieferungszustands Windows 11 Aus dem laufenden Betriebssystem heraus: • Öffnen sie die „Windows-Einstellungen” • Klicken Sie auf „System” und anschließend auf “Wiederherstellung” • Klicken Sie unter dem Punkt „Diesen PC zurücksetzen” auf „Los geht’s” • Wählen Sie im darauffolgenden Fenster zwischen „Eigene Dateien beibehalten“...
- Page 14 Deutsch...
- Page 15 Falls ein eigenständiger Start von Windows 11 nicht mehr möglich ist, wird automatisch eine Systemreparatur durchgeführt. Schlägt der Systemstart wieder- holt fehl, öffnet sich das Wiederherstellungsmenü: • Wählen Sie „Erweiterte Optionen“ • Klicken Sie unter „Option auswählen“ auf „Problembehandlung“ • Wählen Sie anschließend „Diesen PC zurücksetzen“ Deutsch...
- Page 16 Das System wird neu installiert. Sie haben die Wahl zwischen einer lokalen Neu- installation und einer Installation per Cloud-Download. Danach befindet sich das System wieder im ursprünglichen Auslieferungszustand. Nach der Installation haben Sie die Möglichkeit, eine zuvor erstellte Datensicherung wieder auf das System einzuspielen.
- Page 17 Deutsch...
- Page 18 15 Sicherheitshinweise und Haftungsausschluss Versuchen Sie nie das Gerät zu öffnen, um Reparaturen oder Umbauten vorzu neh - men. Vermeiden Sie Kontakt zu den Netzspannungen. Schließen Sie das Produkt nicht kurz. Das Gerät ist nicht für den Betrieb im Freien zugelassen, verwenden Sie es nur im Trockenen.
- Page 19 16 Entsorgungshinweise Elektrische und elektronische Geräte dürfen nach der europäischen WEEE Richt- linie nicht mit dem Hausmüll entsorgt werden. Deren Bestandteile müssen ge- trennt der Wiederverwertung oder Entsorgung zugeführt werden, weil giftige und gefährliche Bestandteile bei unsachgemäßer Entsorgung die Umwelt nachhal tig schädigen können.
- Page 20 WEEE Richtlinie: 2012/19/EU WEEE Register-Nr: DE 94495668 Hiermit erklärt die Firma CSL Computer GmbH, dass sich das Gerät 91317 in Übereinstimmung mit den grundlegenden Anforderungen und den übrigen einschlägigen Bestimmungen der Richtlinien 2014/30/EU (EMV) 2014/35/EU (Niederspannung) und 2014/53/EU (RED) befindet.
- Page 21 English...
- Page 22 Thank you for choosing a product from CSL Computer. This device has been manu- factured according to the latest technical standards and we hope it will bring you long-lasting enjoyment. Please read the instructions in this manual carefully. 1 Scope of delivery •...
- Page 23 4 Customer Support If you have questions regarding the setup of the computer, please contact our telephone hotline or write us an email at: shop@csl-computer.com 5 Sicherheitshinweise Bitte beachten Sie die nachfolgenden Vorsichtsmaßnahmen, um Ihre eigene Sicherheit und die Betriebssicherheit des PCs zu gewährleisten: •...
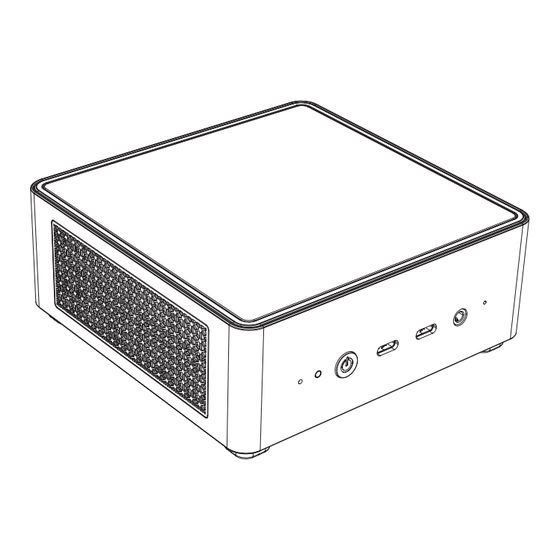
- Page 24 • Static electricity can damage the sensitive components of the PC. To avoid this, static electricity must be discharged from your body. Simply touch a metal surface before handling components in the system. 6 Care Instructions Please occasionally wipe your PC with a soft, dry, and lint-free cloth. 7 Ports and Functions Front: Bottom:...
- Page 25 Power Button This button allows you to power the computer on and off. Hold the Power button for 10 seconds to force shutdown the mini PC. Pressing it once during operation will put the mini PC into power- saving mode. USB 4 Preferably, you can connect devices with high Type-C Ports...
- Page 26 8 Technical data • AMD Ryzen™ 7 8845HS, 8× 3800 MHz, Boost up to 5100 MHz • 2× DDR5 SO-DIMM (5600MHz), max. 64 GB (Base configuration depends on the model) Hard disc • 2× M.2 2280 NVMe PCIe Gen4 SSD (Base configuration depends on the model) •...
- Page 27 9 Installation of the M.2 NVMe PCIe SSD The Mini PC VenomBox HS offers you upgrade options for an M.2 NVMe PCIe 4.0 (backward compatible) SSD in the 2280 format. The M.2 connector is located inside the case. To perform an upgrade, remove...
- Page 28 10 Installation of a 2.5“ SATA SSD/HDD Um eine Aufrüstung durchzuführen, öffnen Sie das Gehäuse wie in Punkt 9 (Abb. 1 & 2) beschrieben. Loosen the fixing screws with a suitable screwdriver and remo- ve the hard disk holder. 11 Installation of the RAM Open the case as described in point 9 (fig.
- Page 29 Align the memory module with the notch of the SO DIMM slot and insert it at a slight angle to secure it. Then, return the motherboard to its original position and attach the hard drive bracket. (Fig. 6) Close the bottom of the Mini-PC and screw the cover tight. English...
- Page 30 12 Installing the Mini PC on a VESA-compatible device • Mount the VESA mount („mounting plate“) to the designated place of your VESA-compatible device using the enclosed screws.(A) • Place the Mini-PC on a flat and stable surface. Use the included screws to in stall them into the screw holes on the bottom of the Mini-PC.
- Page 31 13 Notes for the installation and recovery of Windows® 13.1 General notes for the installation of Windows® operating systems Please install full versions of Windows 10/Windows 11 only. Recovery versions from other PC systems will not work. 13.2 Activation of Microsoft Windows® In order to be able to use your operating system without restrictions, an activa- tion must be carried out at Microsoft®.
- Page 32 13.4 Restoring the delivery state Windows 11 From the running operating system: • Open the „Windows settings“. • Click on „System“ and then on „Recovery“ • Under the item „Reset this PC“, click on „Reset PC“. • In the following window, choose between „Keep my own files“...
- Page 33 English...
- Page 34 If a standalone start of Windows 11 is no longer possible, a system repair is automatically performed. If the system startup fails repeatedly, the recovery menu opens: • Select „Advanced Options“ • Under „Select option“, click „Troubleshoot“. • Then select „Reset this PC“ English...
- Page 35 The system will be reinstalled. You have the choice between a local reinstallation and an installation via cloud download. Afterwards, the system is back in the original delivery state. After the installation, you have the option to restore a previously created data backup to the system. 14 Establishing a Bluetooth connection To establish a Bluetooth connection with your desired device, please proceed as follows:...
- Page 36 English...
- Page 37 15 Safety instructions and exclusion of liability Never attempt to open the device to carry out repairs or modifications. Avoid contact with the mains voltages. Do not short-circuit the product. The device is not approved for outdoor use, use it only in dry conditions. Protect it from high humidity, water and snow.
- Page 38 16 Disposal instructions According to the European WEEE Directive, electrical and electronic devices must not be disposed of with household waste. Their components must be recycled or disposed of separately, because toxic and hazardous components can cause lasting damage to the environment if disposed of improperly. SAs a consumer, you are obliged under the Electrical and Electronic Equipment Act (ElektroG) to return electrical and electronic equipment free of charge at the end of its service life to the manufacturer, the point of sale or to public collection...
- Page 39 WEEE Guideline: 2012/19/EU WEEE Register-No: DE 94495668 The company CSL Computer GmbH hereby certifies that the device 91317 complies with the fundamental requirements and the other relevant stipulati- ons of the guideline 2014/30/EU (EMC), 2014/35/EU (low voltage), 2014/53/ EU (RED) and RoHS 2011/65/EU.
- Page 40 English...
- Page 41 Veuillez conserver ce manuel à portée de main près de votre PC. Même si vous vendez le PC, le manuel doit être remis au nouveau propriétaire. Vous pouvez télécharger les pilotes pour votre PC acheté dans la section service de CSL Compu- ter GmbH sur www.csl-computer.com.
- Page 42 4 Support client If you have questions regarding the setup of the computer, please contact our telephone hotline or write us an email at: shop@csl-computer.com 5 Consignes de sécurité Veuillez observer les précautions suivantes pour garantir votre sécurité personnel- le et la sécurité opérationnelle du PC : •...
- Page 43 • L‘électricité statique peut endommager les composants sensibles du PC. Pour éviter cela, l‘électricité statique doit être dis sipée de votre corps. Touchez simplement une surface métalli que avant de manipuler les composants du système. 6 Instructions d‘entretien Veuillez essuyer occasionnellement votre PC avec un chiffon doux, sec et sans peluches.
- Page 44 Bouton d‘alimen- Ce bouton vous permet d‘allumer et d‘éteindre tation l‘ordinateur. Maintenez le bouton d‘alimentation enfoncé pendant 10 secondes pour forcer l‘arrêt du mini PC. En le pressant une fois pendant le fonctionnement, le mini PC passera en mode d‘économie d‘énergie. Ports USB 4 De préférence, vous pouvez connecter des de Type-C...
- Page 45 8 Données techniques • AMD Ryzen™ 7 8845HS, 8× 3800 MHz, Boost jusqu‘à 5100 MHz • 2× DDR5 SO-DIMM (5600MHz), max. 64 Go (La configuration de base dépend du modèle) Disques Durs • 2× M.2 2280 NVMe PCIe Gen4 SSD (La configuration de base dépend du modèle) •...
- Page 46 9 Installation du SSD M.2 NVMe PCIe Le Mini PC VenomBox HS vous offre des options de mise à niveau pour un SSD M.2 NVMe PCIe 4.0 (rétrocompatible) au format 2280. Le connecteur M.2 est situé à l‘intérieur du boîtier.
- Page 47 10 Installation d‘un SSD/HDD 2,5“ SATA Pour effectuer une mise à niveau, ouvrez le boîtier comme décrit au point 9 (illustrations 1 & 2). Desserrez les vis de fixation à l‘aide d‘un tournevis approprié et retirez le support de disque dur. 11 Installation de la RAM Ouvrez le boîtier comme décrit au point 9 (ill.
- Page 48 Alignez le module de mémoire sur l‘encoche du slot SO DIMM et insérez-le légère- ment en biais pour le fixer. Remettez ensuite la carte mère dans sa position initiale et fixez le support de disque dur. (fig. 6) Fermez la partie inférieure du mini-PC et vissez le couvercle. Français...
- Page 49 12 Installation du Mini PC sur un appareil compatible VESA • Montez le support VESA („mounting plate“) à l‘aide des vis fournies à l‘emplacement prévu de votre appareil compatible VESA.(A) • Placez le mini-PC sur une surface plane et stable. Utilisez les vis fournies pour les insérer dans les trous de vis situés sur la partie inférieure du mini-PC.
- Page 50 13 Instructions pour l‘installation et la restauration de Windows® 13.1 Remarques générales pour l‘installation de systèmes d‘exploitation Windows® Veuillez installer uniquement des versions complètes de Windows 10/Windows 11. Les versions de récupération d‘autres systèmes PC ne fonctionnent pas. 13.2 Activation de Microsoft Windows® Pour pouvoir utiliser votre système d‘exploitation sans restriction, une activation doit être effectuée auprès de Microsoft®.
- Page 51 13.4 Restauration de l‘état de livraison Windows 11 A partir du système d‘exploitation en cours : • Ouvrez les „Paramètres Windows“. • Cliquez sur „Système“, puis sur „Rècupération“. • Sous le point „Réinitialiser ce PC“, cliquez sur „C‘est parti“. • Dans la fenêtre qui s‘ouvre, choisissez entre „Conserver mes fichiers“...
- Page 52 Français...
- Page 53 Si un démarrage autonome de Windows 11 n‘est plus possible, une réparation du système est automatiquement effectuée. Si le démarrage du système échoue à plusieurs reprises, le menu de restauration s‘ouvre : • Sélectionnez „Options avancées“. • Sous „Sélectionner une option“, cliquez sur „Dépannage“. •...
- Page 54 Le système est réinstallé. Vous avez le choix entre une réinstallation locale et une installation par téléchargement dans le nuage. Le système se trouve ensuite à nouveau dans son état de livraison d‘origine. Après l‘installation, vous avez la possibilité de réinstaller sur le système une sauvegarde de données que vous avez effectuée auparavant.
- Page 55 Français...
- Page 56 15 Consignes de sécurité et exclusion de responsabilité N‘essayez jamais d‘ouvrir l‘appareil pour effectuer des réparations ou des trans- formations. Évitez tout contact avec les tensions du réseau. Ne court-circuitez pas le produit. L‘appareil n‘est pas autorisé à fonctionner à l‘extérieur, utilisez-le uniquement dans un endroit sec.
- Page 57 16 Instructions de mise au rebut Conformément à la directive européenne DEEE, les appareils électriques et électroniques ne doivent pas être jetés avec les ordures ménagères. Leurs com- posants doivent être séparés pour être recyclés ou éliminés, car les composants toxiques et dangereux peuvent nuire durablement à...
- Page 58 Numéro de registre DEEE : DE 94495668 La société CSL Computer GmbH déclare que l’appareil 91317 est en conformité avec les exigences essentielles et des autres dispositions pertinentes des directives 2014/30/CE (EMV), 2014/35/CE (basse tension), 2014/53/CE (RED) et RoHS 2011/65/CE.
- Page 59 Français...
- Page 60 CSL Computer GmbH • Hanseatenstr. 34 • 30853 Langenhagen www.csl-computer.com...
Need help?
Do you have a question about the VenomBox HS and is the answer not in the manual?
Questions and answers