Table of Contents
Advertisement
Quick Links
Advertisement
Table of Contents

Related Manuals for Seak LUMiCHARGER WS

Summary of Contents for Seak LUMiCHARGER WS
- Page 1 Installation Guide LUMiCHARGER WS...
-
Page 2: Table Of Contents
Contents 1 Safety instructions 2 Included Mounting Parts And Required Tools 3 Installation steps 4 Configuration 5 Charging operation 6 LCD Display 7 Troubleshooting 8 Maintenance... -
Page 3: Safety Instructions
1 Safety instructions Please read carefully to understand the correct use of the device before installation, maintenance and operation! Please follow the safety notes; otherwise, it may lead to a danger of death, injury and damage to the device, supplier cannot accept any liability for claims resulting from this. -
Page 4: Included Mounting Parts And Required Tools
2 Included Mounting Parts And Required Tools... -
Page 5: Installation Steps
3 Installation steps Cut the drilling template from the carton, place the drilling template on the wall, drill holes where the three fixing points, insert the Wall plugs into the fixing holes. To open the cover, press the 2 prongs on the charging station and lift the first cover. - Page 6 Then loosen the six screws and lift the second cover. Fix the device on the wall by inserting the screws and waterproof gaskets.
- Page 7 Connect the wires according to the following picture: Screw back the cover screws. Buckle the upper cover.
-
Page 8: Configuration
4 Configuration First you need to install the CP Tool app from Google Play or the App Store Open CP Tool, find the Bluetooth device corresponding to the Charger SN, and click. - Page 9 If the connection is successful, enter the password (default password: 12345678) in the password input box and click Confirm. Select Charge Mode, APP, RFID Only, Plug and Charge. If you choose App mode, select the communication type (Wifi, 4G, LAN) and set the parameters.
- Page 10 Configure the parameters related to the OCPP connection. For all verification modes, you must set a limit for the charging current. If you have activated the load balancing function, you also need to set the parameters: After the parameters are modified, click SET, then return to the previous page, click Disconnect, and APP will disconnect the Bluetooth connection.
-
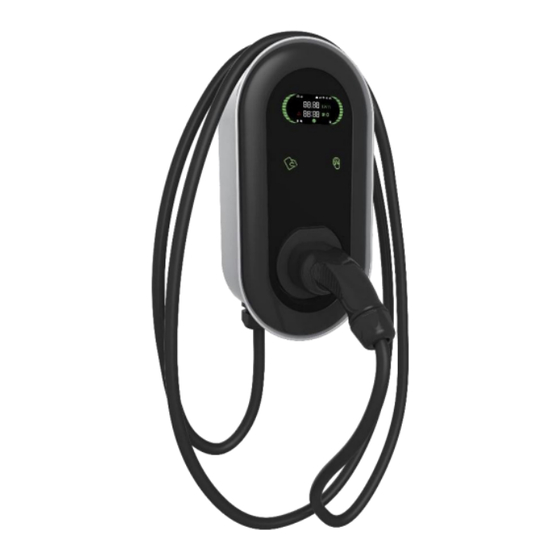
Page 11: Charging Operation
5 Charging operation 1 LCD display 2 RFID reader 3 On/Off button 4 Connector When charging via the app, you must install the charging app and follow the instructions. When charging using RFID authentication, you need to place the RFID card on the reader to start charging. -
Page 12: Lcd Display
6 LCD Display 1 EV connection 2 LAN 3 4G 4 WiFi 5 Bluetooth 6 CMS 7 Left status bar 8 Right status bar 9 Energy, power, or rated current 10 Power Unit 11 Fault indicator 12 Time or fault code 13 Mobile APP control 14 RFID authentication 15 Available indicator... - Page 13 Available display (Not connected to EV) The value of the available rated current is displayed. One left and right status bar indicates a single-phase charger; Three left and right status bars indicate a three-phase charger Display - preparing of charging Display - charging...
- Page 14 Display - Charging suspend Display -Charging finish Displej - nabíjanie rezervované...
-
Page 15: Troubleshooting
Display fault code, for the meaning of the fault, see Troubleshooting 7 Troubleshooting Fault Fault code description Leakage Check whether the charging connector and its cable are damaged or wet. Over Current Check whether the charging connector is correctly connected. Check whether the OBC is normal Ground Charging station is not grounded;... -
Page 16: Maintenance
8 Maintenance To ensure the long-term stable operation of the equipment, please maintain the equipment regularly (usually every month) according to the operating environment. a) The equipment is maintained by professionals. b) Check whether the equipment is well grounded and safe. c) Check whether there are potential safety hazards around the charging pile, such as whether there are high temperature, corrosion or inflammable and explosive articles close to the charging station.
Need help?
Do you have a question about the LUMiCHARGER WS and is the answer not in the manual?
Questions and answers