Advertisement
PROJECTOR DIAGRAM
BACK

- Power Input Jack
- HDMI Input Port
- USB Input Port
- 3.5mm Audio Jack
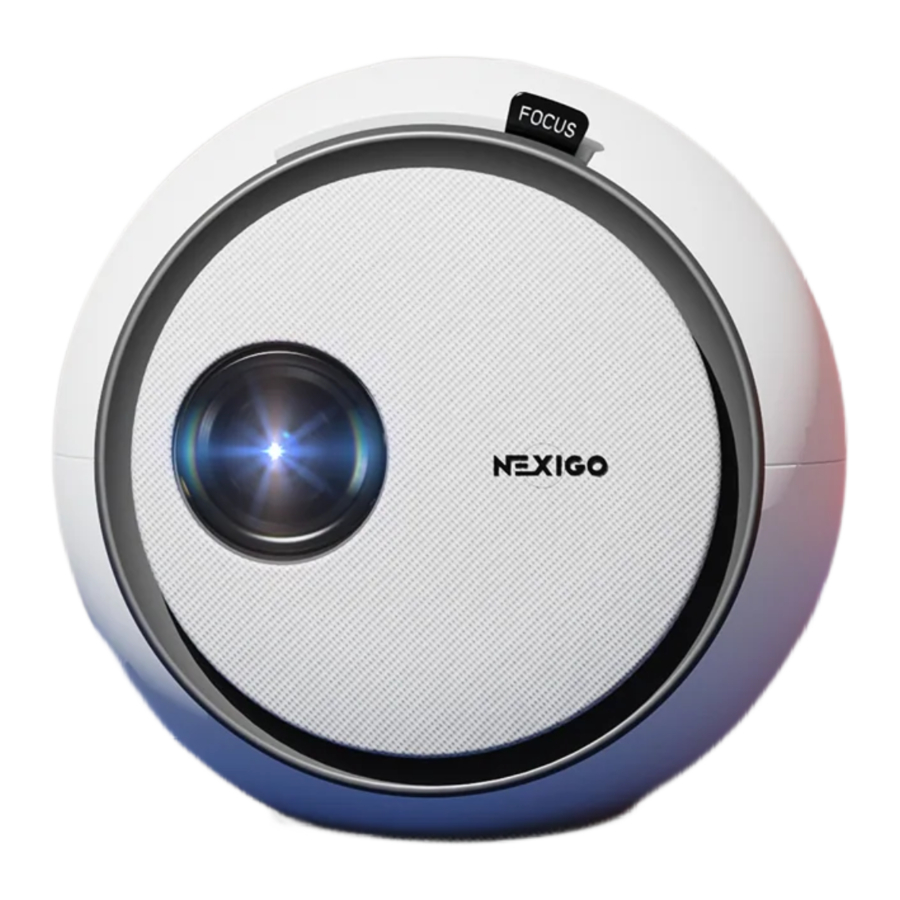
TOP

- Lens
- Focus Adjustment Knob
- Right
- OK (Press once)/ Power Switch (Press and hold)
- Down
- Left
- Return
WHAT'S IN THE BOX?
1 x Mini LCD Projector
1 x User Manual
1 x Power Adapter
1 x Cleaning Kit
1 x Remote (Requires 2 AAA batteries, not included)
REMOTE CONTROL DIAGRAM AND FUNCTIONS

- Power Switch: Toggles power on and off
- Mute: Toggles audio on and off
- Rewind: Go backward in the video/audio
- Play/Pause: Toggles video pause and play
- Fast Forward: Skips forward or moves quickly through video/audio
- Left/Right/Up/Down: Navigates through the onscreen display
- OK: Selects the current option
- Menu: Displays the menu
- Return: Returns to the previous screen
- Signal Source: Displays the source selection menu
- Vol +: Increases the volume level
- Vol -: Decreases the volume level
CONNECTION INTRODUCTION

- HDMI input for a TV box, TV stick, or computer.
- USB input for a Hard Drive, USB Drive, or charging a USB device.
- 3.5mm output for Audio Devices such as headphones and speakers.
SPECIFICATIONS
| Imaging technology | LCD |
| Light Source | LED |
| Native Resolution | 1280 x 720 |
| Projection Distance | 2.62-11.48 ft |
| Projection Size | 24-118 inches |
| Aspect Ratio | 4:3, 16:9 |
| Projection Ratio | 1.4:1 |
| Power Input | DC 19V  2.5A 2.5A |
| Integrated Watt Use | 48W |
| Input Port | HDMI x 1, USB x 1 |
| Output Port | 3.5mm audio jack x 1 |
| Speaker | 3W x 1 |
QUICK START
CHOOSING A LOCATION
The room's size and layout will be the most important factors in choosing where to place the projector. Consider the following when selecting a location:
- The size, shape, and position of your screen.
- Location of a suitable power outlet.
- Ensure the projector has sufficient space around it for airflow.
The projector is designed to be installed in one of four layouts. You can either hang the projector from the ceiling via a standard 1/4" mounting bracket (sold separately) or simply place it on a stable surface. You may need to change the projection mode so the images display correctly. Select Projection Mode under Setting> Picture Setting, then choose your preferred projection mode (see below).
 Note: A specific rear projection screen is required to use the rear projection function.
- Ceilling mount (front projection)
![]()
- Desktop mount (front projection)
![]()
- Ceilling mount (rear projection)
![]()
- Desktop mount (rear projection)
![]()


POWER ON/OFF
- Plug the power adapter into a power outlet.


- Press and hold the Power Switch to turn on the projector. Press the Power Switch to turn off the projector. Alternatively, press the Power Switch on the remote to turn the projector on or off.


PROJECTOR DISTANCE & SIZE

Note: Due to manufacturing tolerances, there may be variances of up to 3% from unit to unit. The above data is for reference only. Please use actual measurements when installing this device.
FOCUS ADJUSTMENT
Please use the Focus Adjustment Knob to adjust the focus, rotating it left or right until the image becomes clear and sharp. If the image appears blurry, rotate the knob in the opposite direction until the image clears up.

MULTI-MEDIA CONNECTIONS
This section shows you how to connect the projector to other equipment.
USB CONNECTIONS
Insert your USB drive into the USB port shown in the diagram below. In the on-screen menu, choose the type of content you want to open: Movie, Music, Photo, or Text.

| Multi-media Supported Format | Audio Format | MP3/AAC/WAV/LOAS/PCM/OGG/ FLAC/AC3 |
| Photo Format | JPEG/BMP/PNG | |
| Video Format | DIVX/RM/3GP/AVI/MKV/FLV/MOV/ MP4/MPG/VOB/MPG/RMVB/RM | |
| Text Format | TXT |
HDMI CONNECTIONS
Plug an HDMI cable into the device you want to connect to the projector and then insert the other end of the HDMI cable into the HDMI port as shown in the diagram below. Open the on-screen menu and select the HDMI source in the Input Source tab. This will allow you to display the screen of whatever device has been plugged in.

3.5MM AUDIO CONNECTION
To play sound from the source, plug either headphones or speakers into the 3.5mm audio port as shown below.

SETTING MENU
PICTURE SETTING

Projection Mode: Shift the mode of the projector. The options are: Standard, Mirrored, Flipped, and Flipped and Mirrored.
Image Scaling: Change the size of the objects shown on the screen.
Color Range: Adjust the color range of the projector.
Aspect Ratio: The aspect ratio is a figure that identifies the size of an image by its width and height. Common aspect ratios are 4:3 and 16:9.
Picture Mode: Select one of four modes: Standard, Dynamic, Mild, or User. User mode enables custom settings for contrast, brightness, color, and sharpness.
SYSTEM SETTING

OSD Language: Choose the language used in the projector menus.
Software Update (USB): Update the software version on the projector.
- Please check nexigo.com/support periodically for new firmware downloads.
- Download the latest firmware to a USB flash drive, then insert the flash drive into a USB port on the projector.
- In the menu screen, select: Setting>System Setting>Software Update (USB).
- The software will update automatically. Do not try to use or turn off the projector until the update is complete. Interfering with the update process may damage the projector.
![warning]() Note: Updating firmware typically is not required and will only be necessary if instructed to do so by the NexiGo technical support team. The projector will reset after the software updates and all saved settings will be erased.
Note: Updating firmware typically is not required and will only be necessary if instructed to do so by the NexiGo technical support team. The projector will reset after the software updates and all saved settings will be erased.
Restore Factory Default: Reset the projector to factory default settings.
Sleep Timer: Set the time duration for the projector to shut down automatically.
OTHER SETTING

OSD Timer: Set the time duration for the OSD menu to switch to the home page automatically.
CONTACT INFORMATION
Tel: +1(458) 215-6088
Website: www.nexigo.com
If you have any problems, please contact us any time at cs@nexigo.com for further assistance.
WARNINGS
- Read the manual carefully before you use the projector.
- Unplug immediately if you notice any issues or problems with your projector.
If your projector begins to smoke, make unusual noises, or any strange odor is noticed, immediately unplug your projector. Ensure that it is placed in an open area with ventilation, away from any objects that may be a fire hazard. Contact Customer Support for further details. - Do not remove the projector cover.
This projector contains high voltage circuitry. Inadvertent contact may result in a severe electric shock and could result in death. Do not attempt to service this product yourself. Please contact the manufacturer directly if you have any issues to exercise your warranty. - Do not modify this equipment.
- Avoid dropping or throwing the projector.
- Do not face the projector lens to the sun.
- Use only the provided power cable.
- Do not place the projector on an uneven or unstable surface, or one that is subject to vibration.
- Do not place this device near another device that produces a strong magnetic field or one with a heavy electrical load.
- Do not look into the lens when the projector is operational. It may causes permanent eye damage.
- Do not turn off the main power abruptly or unplug the projector during operation. Wait until the fan has turned off before powering off fully.
- Do not attempt to use the projector in a vertical orientation.
- Place the projector within a slope of ±15°. Any greater slope presents dangers of the unit sliding and falling.
- Avoid obstructions around the projector air vent as this may cause damage to the unit or create a fire hazard.
- This unit may be damaged by liquids. Keep liquids away from the unit to prevent damage. Liquid damages are not covered by the warranty.
- If the projector is unused for a prolonged period of time unplug it from the power source.
- If there are any mechanical issues with the projector, please contact NexiGo Support to exercise the warranty; Do not attempt to repair the item yourself.
- Safe Operational Parameters
- Operating temperature: between +41°F (+5°C) and +95°F (+35°C).
- Operating humidity: between 30 and 90%.
Documents / Resources
References
Download manual
Here you can download full pdf version of manual, it may contain additional safety instructions, warranty information, FCC rules, etc.
Advertisement


Need help?
Do you have a question about the PJ06 and is the answer not in the manual?
Questions and answers