Table of Contents
Advertisement
Quick Links
Advertisement
Table of Contents

Related Manuals for SUNSEEKER elite CBC7611P


Summary of Contents for SUNSEEKER elite CBC7611P
- Page 1 60V Lithium-Ion Cordless Commercial Series Brush Cutter & Grass Trimmer OPERATOR'S MANUAL Model number: CBC7611P CBC7611U WARNING: To reduce the risk of injury, the user must read and understand the Operator’s Manual before using this product. Save these instructions for future reference.
-
Page 2: Safety Symbols
READ ALL INSTRUCTIONS! READ & UNDERSTAND OPERATOR'S MANUAL WARNING: Some dust created by power sanding, sawing, grinding, drilling and other construction activities contains chemicals known to the state of California to cause cancer, birth defects or other reproductive harm. Some examples of these chemicals are: ◾... -
Page 3: Safety Instructions
SAFETY INSTRUCTIONS This page depicts and describes safety symbols that may appear on this product. Read, understand, and follow all instructions on the machine before attempting to assemble and operate it. The product complies with the applicable European directives and an evaluation method of conformity for this directives was done. - Page 4 Forbidden saw blade Saw blade is forbidden Safe distance Keep other people out of working area during operation. The distance between the machine and bystanders should be at least 15 meters. Take the replaceable battery from the appliance before any extension, cleaning and servicing works Danger of injury! Pay attention to objects being bounced back.
-
Page 5: Work Area Safety
GENERAL BATTERY-OPERATED POWER TOOL SAFETY WARNINGS WARNING! Read all safety warnings, instructions, illustrations and specifications provided with this power tool. Failure to follow all instructions listed below may result in electric shock, fire and/or serious injury. Save all warnings and instructions for future reference. WORK AREA SAFETY ◾... - Page 6 ◾ Do not let familiarity gained from frequent use of tools allow you to become complacent and ignore tool safety principles. A careless action can cause severe injury within a fraction of a second. POWER TOOL USE AND CARE Do not force the power tool. Use the correct power tool for your application. The correct power tool will do the job better and safer at the rate for which it was designed.
-
Page 7: Important Safety Instructions
When battery pack is not in use, keep it away from other metal objects, like paper clips, coins, keys, nails, screws or other small metal objects, that can make a connection from one terminal to another. Shorting the battery terminals together may cause burns or a fire. Under abusive conditions, liquid may be ejected from the battery;... -
Page 8: Specifications
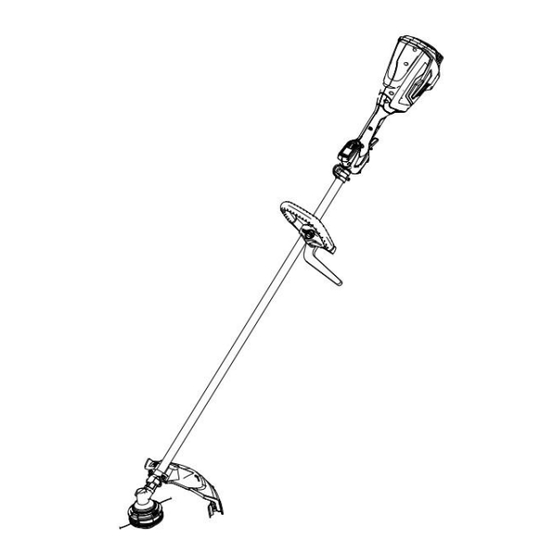
◾ If situations occur that are not covered in this manual, use care and good judgment. Contact the Customer Service Center for assistance. ◾ SAVE THESE INSTRUCTIONS. Refer to them frequently a n d use them to instruct others who may use this tool. - Page 9 DESCRIPTION KNOW YOUR BRUSH CUTTER & GRASS TRIMMER (Fig. 1) The safe use of this product requires an understanding of the information on the tool and in this operator’s manual, as well as knowledge of the project you are attempting. Before using this product, familiarize yourself with all operating features and safety rules.
- Page 10 GUARD Reduces the risk of injury from foreign objects flung backwards toward the operator and from contact with the cutting attachment. TRIMMER HEAD Steel blade on the guard that maintains the cutting line at the proper length. 3T BLADE Check the blades, pins and cutter for visible damage or wear before each use. Replace worn or damaged blades and screws in pairs to ensure balance.during operation.
-
Page 11: Mounting The Guard
satisfactorily operated the tool. If any part is damaged or missing, please return the product to the place of purchase. MOUNTING THE Trimmer head WARNING: Always wear gloves when mounting or replacing the guard. Be careful of the blade on the guard and protect your hands from being injured by the blade. -
Page 12: Mounting The Blade
Fig.6 MOUNTING THE BLADE 1. Disassemble the nut(clockwise), spool retainer, and support plate from gear case (Fig.7&8) Fig.7 Fig.8 2. Align the blade onto the support plate, insert the #1 Allen key inside the hole, and put the blade on the support plate, align the flange, dust cover, and screw the nut with provided socket wrench by anti-clockwise direction until it is tight enough (Fig.9&10&11) Fig.9... -
Page 13: Operation
MOUNTING AND ADJUSTING THE LOOP HANDLE 1. Push the loop handle onto the shaft, push the upper and lower parts together, tight the handle by rotating the loop handle knob in clockwise direction (Fig. 12&13). Fig.12 Fig.13 Loose the knob on handle so that you can easily move/rotate the loop handle to where you feel comfortable. - Page 14 WARNING: Always wear eye protection that is marked to comply with ANSI Z87.1. or EN 166. Failure to do so could result in objects being thrown into your eyes and other possible serious injuries. WARNING: Do not use any attachments or accessories not recommended by the manufacturer of this product.
- Page 15 away. Clear the area to be cut before each use. Remove all objects, such as rocks, broken glass, nails, wire, or string that can be thrown or become entangled in the cutting attachment. Check that you have eye protection, proper clothing and balanced footing. There still may be risk to bystanders from thrown objects. Bystanders should be encouraged to wear eye protection.
-
Page 16: Line Replacement
injury. ADJUSTING THE CUTTING LINE LENGTH The trimmer head allows the operator to release more cutting line without stopping the motor. As line becomes frayed or worn, additional line can be released by lightly tapping the trimmer head on the ground while operating the trimmer (Fig.19). - Page 17 cover, and then pull out the spool retainer, double the line and hang it and rotate it on the spool retainer, (Fig. 21&22). Fig.21 Fig.22 2. Place the trimmer line end through the metal position part, align the upper cover to spool retainer, and push them hard until you hear a clear “click”...
-
Page 18: Maintenance
MAINTENANCE Avoid using solvents when cleaning plastic parts. Most plastics are susceptible to damage from various types of commercial solvents and may be damaged by their use. Use a clean cloth to remove dirt, dust, oil, grease, etc. WARNING: Do not at any time let brake fluids, gasoline, petroleum-based products, penetrating oils, etc., come in contact with plastic parts. -
Page 19: Transporting And Storing
LUBRICATING THE DRIVE GEAR For best operation and longer lifetime, lubricate the tool drive gear with a special grease as described below after every 50 hours operation. Remove the sealing screw on the gear case with the provided Allen key and apply the grease into the oil hole up to 0.011lb (5g) (Fig. -
Page 20: Troubleshooting
TROUBLESHOOTING PROBLEM CAUSE SOLUTION ◾ ◾ Stop the grass trimmer/ brush cutter, disconnect the power cord The drive shaft or trimmer and then clean the drive shaft or the trimmer head thoroughly. head is bound with grass. ◾ ◾ There is not enough line on Disconnect the power cord and replace with new cutting line;... - Page 21 blocked •the controller temperature •release the switch,wait the machine temperature cool down protection to normal •the battery temperature •restart the tool till the temperature protection •stop the machine ,restart the machine, •voltage problem •charge the battery pack with the specified charger •check if the right voltage battery pack is used.
Need help?
Do you have a question about the elite CBC7611P and is the answer not in the manual?
Questions and answers