Advertisement
- 1 Getting to Know Your 6.0QT Air Fryer
- 2 Control Panel
- 3 Before Using for the First Time
- 4 Operating Instructions
- 5 Air Frying Technique
- 6 A Note on Air Frying Pre-Packaged Frozen Foods
- 7 For Best Results
- 8 User Maintenance Instructions
- 9 Care & Cleaning Instructions
- 10 Storing Instructions
- 11 IMPORTANT SAFEGUARDS
- 12 Documents / Resources
Getting to Know Your 6.0QT Air Fryer
Product may vary slightly from illustration

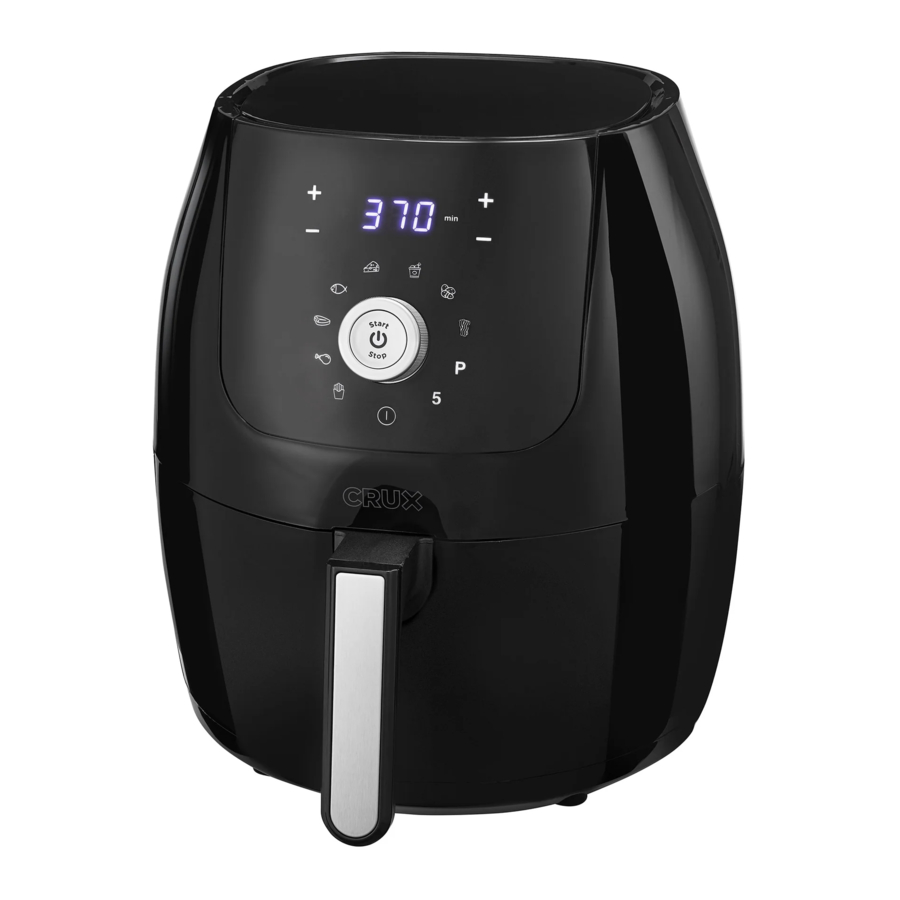
Control Panel

- There are 8 menus options, each with a preset time and temperature.
- Once the frying basket is properly placed in the main unit housing, the red Power icon will be illuminated. Pressing the red Power icon, will illuminate the digital display.
Selector Dial
Turn the selector dial to:
- Scroll through 10 menu options.
- Press the selector dial to pause at any time, press again to resume air frying.
TIME and TEMP control buttons
- Press the PLUS and MINUS buttons on the right side to adjust TIME.
- Press the PLUS and MINUS buttons on the left side to adjust the TEMPERATURE.
Time and Temperature Display
This display will keep track of the temperature and remaining cook time.
White Fan Icon
The flashing, White Fan Icon will appear when the Unit is turned on and for up to 20 seconds after it is turned off.
Selector Dial 10-Option Chart
Turn the selector dial to choose from 8 pre-programmed food menu options, plus 2 easy assist functions: PREHEAT (P) And QUICK 5 (5)
- Each option has a preset TIME and TEMP.
- As the Digital Air Fryer cooks, both the TEMP and remaining cook TIME will alternate on the display
NOTE: You can override the preset menu settings at any time by pressing the PLUS and MINUS buttons on the right side to adjust the TIME and on the left side to adjust the TEMPERATURE.
| Food | Default Temp | Default Air Fry Time | Time/Temp range/mins | Recommend turn over time | Action | |
| Default | 370°F | 15 mins | 1-60 mins/180-400°F | No turn over | ||
 | French Fries, Idaho Potatoes, 2-3 cups (fresh, hand cut), 1/4 to 1/3-in. thick | 400°F | 22 mins | 1-60 mins/180-400°F | Turn over 1 time for each 11 mins | Spray with oil, shake 3x |
 | Chicken (Bone-in Breast and Legs) | 400°F | 20 mins | 1-60 mins/180-400°F | Turn over 1 time for each 10 mins | Rub or spray with oil, turn over, test for doneness |
 | Steak, 1 lb., room temp., medium rare | 400°F | 12 mins | 1-60 mins/180-400°F | Recommend to turn over 1 time for each 6 mins | Rub or spray with oil, turn over, test for doneness |
 | Fish Filet, 1 lb., fresh, thawed, battered | 400°F | 10 mins | 1-60 mins/180-400°F | Recommend to turn over 1 time for each 5 mins | Spray with oil, turn over, test for doneness |
 | Cheese Melt | 340°F | 3 mins | 1-60 mins/180-400°F | No turn over | Test for doneness |
 | Chicken wings, (thawed, battered), 1 lb. | 400°F | 16 mins | 1-60 mins/180-400°F | Turn over 1 time for 8 mins | Spray with oil, turn over, shake |
 | Potato Chips, 1 layer, 7-inch | 300°F | 16 mins | 1-60 mins/180-400°F | Turn over 1 time for 8 mins | Test for doneness |
 | Bacon | 400°F | 8 mins | 1-60 mins/180-400°F | Recommend to turn over 1 time for each 4 mins | Test for doneness |
 | Preheat | 400°F | 3 mins | 3 mins/400°F | Program Air Fryer for recipe | |
 | Quick 5 | 370°F | 5-10-15-20-2530 mins | 5-30 mins/370°F | Test for doneness |
*Notice:

When using the PREHEAT (P) function, reduce final cooking TIME by 3 minutes.
Depending on the thickness and/or density of foods, it may be necessary to use a meat thermometer to check cooking progress after preset TIME has expired. If additional air frying is needed, press QUICK 5 (5) to extend cook TIME for 5 minutes at 370ºF. Check at 1 minute intervals until food tests done.
Before Using for the First Time
- Remove all packing material and labels from the inside and outside of the air fryer. Check that there is no packaging underneath and around the frying basket.
- Your air fryer is shipped with the frying basket locked inside the air fryer body. Firmly grasp the frying basket handle to open frying basket and place on a flat, clean work area.
- Wash frying basket and crisping tray in hot, soapy water.
- DO NOT IMMERSE THE AIR FRYER BODY IN WATER. Wipe the air fryer body with a damp cloth. Dry all parts thoroughly.
- To ensure the crisping tray fits snugly into the frying basket drawer, there are 4 rubber tips attached to the sides of the tray. Before using, check to make sure all 4 rubber tips are in place. If they become separated from the tray, simply slide onto the tabs as shown.
![]()

Operating Instructions

This air fryer should not be used to boil water.
NOTE: During first use, the air fryer may emit a slight odor. This is normal.
- Place the Air Fryer on a flat, heat-resistant work area, close to an electrical outlet.
- Firmly grasp the frying basket handle to open frying basket; then remove from the machine and place on a flat, clean surface.
- Place the crisping tray into the base of the frying basket.
- Arrange food on top of the crisping tray. Do not overfill frying basket with food. To ensure proper cooking and air circulation, NEVER fill any frying basket more than 2/3 full. When air frying fresh vegetables, we do not recommend adding more than 1-1/2 cups of food to the frying basket.
- Fully insert the frying basket into the front of the Air Fryer.
- Plug cord in the wall outlet. A lone red POWER (
![]() ) will appear on a black background.
) will appear on a black background. - To begin, press the red POWER (
![]() ).
). - The control panel will appear, POWER (
![]() ) turns white.
) turns white.
![]()
- The default TIME and TEMPERATURE: 15 minutes and 370˚F will alternate on the display.

Manual Operation
- To adjust the air frying TIME, press the (+) or (–) on the right side of the control panel to advance or decrease time in 1 minute increments, from 1 to 60 minutes.
- Press the (+) or (–) on the left side of the control panel to adjust TEMPERATURE from 180°F to 400°F in 10 degree increments.
![]()
- When the desired TIME and TEMPERATURE appear on the display, press the selector dial to begin air frying. The white convection fan (
![]() ) will twirl when the air fryer is in operation. The preset temperature and time will alternate on the display until the time has expired.
) will twirl when the air fryer is in operation. The preset temperature and time will alternate on the display until the time has expired.
![]()
If no buttons are pressed, the air fryer will remain in standby mode - To turn the air fryer OFF at any time, simply press the white POWER (
![]() ). The white convection fan (
). The white convection fan (![]() ) will continue to twirl for 20 seconds and the lone red POWER (
) will continue to twirl for 20 seconds and the lone red POWER (![]() ) will appear on a black background. 5 beeps will sound.
) will appear on a black background. 5 beeps will sound.

Preset Menu
(French Fries, Chops, Steak, Fish, Cake, Nuggets, Potatoes, Bacon)
- To use preset menu options, simply turn the dial to the desired preset function. Each time the dial is turned, the next menu option will illuminate.
- When the desired menu option icon is illuminated, press the selector dial to start air frying.
- The white convection fan (
![]() ) will twirl when the air fryer is in operation. The preset temperature and time will alternate on the display until the air fry time has expired.
) will twirl when the air fryer is in operation. The preset temperature and time will alternate on the display until the air fry time has expired. - The quantity, density, weight of food will alter the total cooking time necessary. Remember, frying smaller batches will result in shorter cooking times and higher food quality.
![]()
Always check food halfway though cooking time to determine final cook time and temperature. - To adjust the air frying TIME, press (+) or (–) on the left side of the control panel to advance or decrease time in 1 minute increments, from 1 to 60 minutes.
- Press the (+) or (–) on the right side of the control panel to adjust TEMPERATURE from 180°F to 400°F in 10 degree increments.
![]()
ALWAYS USE A MEAT THERMOMETER TO ENSURE THAT MEAT AND FISH ARE COOKED THOROUGHLY BEFORE EATING.
Air Frying Technique
- Please consult the Air Frying Chart and/or follow package instructions for suggested TIME and TEMPERATURE.
- To assure even cooking/browning, ALWAYS open the frying basket halfway through the cooking time and check, turn or shake foods in the frying basket. Adjust TIME or TEMPERATURE if needed.
![]()
Extreme caution must be used when handling the hot frying basket and crisping tray. Avoid escaping steam from the frying basket and the food.
![]()
Always use oven mitts when handling the hot air fryer basket.
![]()
Hot oil can collect at the base of the drawer. To avoid risk of burns or personal injury, or to avoid oil from contaminating air fried foods, always unlock and remove the frying basket from the drawer before emptying. NEVER turn the drawer upside down with the frying basket attached. - If additional air frying is needed, adjust TEMPERATURE if desired, and set TIME for 2 to 5 minute intervals until fully cooked.
- When the air frying TIME expires, the white convection fan (
![]() ) will continue to twirl for 20 seconds until the lone red POWER (
) will continue to twirl for 20 seconds until the lone red POWER ( ![]() ) appears on a black background. 5 beeps sound as the Air fryer turns OFF automatically.
) appears on a black background. 5 beeps sound as the Air fryer turns OFF automatically. - To turn the Air fryer OFF at any time, simply press the white POWER (
![]() ). The white convection fan (
). The white convection fan (![]() ) will continue to twirl for 20 seconds and the lone red POWER (
) will continue to twirl for 20 seconds and the lone red POWER ( ![]() ) will appear on a black background. 5 beeps sound as the air fryer turns OFF automatically.
) will appear on a black background. 5 beeps sound as the air fryer turns OFF automatically.
![]()
ALWAYS USE A MEAT THERMOMETER TO ENSURE THAT MEAT, POULTRY AND FISH ARE COOKED THOROUGHLY BEFORE EATING. - If recipe instructions instruct, allow cooked foods to rest for 5 to 10 minutes.
Remove the frying basket from the machine and place on a flat, heat resistant surface. - Use tongs or a long fork to remove air fried foods onto a serving plate.
Promptly replace the frying basket into the front of the air Fryer.
Continue with subsequent batches, if any. - Unplug the Air fryer when not in use.
A Note on Air Frying Pre-Packaged Frozen Foods
- The air fryer is powered with 1750W high performance technology that circulates heat for fast air fry and recovery.
- As a general rule, reduce the package cooking time by 30% to 50% depending on the food and amount to be cooked.
- Always check food halfway though cooking time to determine final cook time and temperature.
- Always check cooking progress after TIME has expired. If more time is needed, cook at short time intervals until food tests done.
For Best Results
- Use your air fryer to cook pre-packaged foods with a fraction of the oil, in a fraction of the time!
- Always check food halfway though cooking time to determine final cook time and temperature.
- Always pat food dry before cooking to encourage browning and avoid excess smoke.
- To avoid excess smoke, when cooking naturally high fat foods, such as chicken wings or sausages, it may be necessary to empty fat from the frying basket drawer between batches.
- For crispier results, air fry small batches of freshly breaded foods. Create more surface area by cutting food into smaller pieces. Press breading onto food to help it adhere. Refrigerate breaded foods for at least 30 minutes before frying.
- Arrange breaded food in frying basket so that food is not touching to allow air flow on all surfaces.
- Spray olive oil or vegetable oil work best as oil is distributed evenly and less oil is needed.
- Do not overfill frying basket with food. NEVER fill any frying basket more than 2/3 full. When air frying fresh vegetables, we do not recommend adding more than 3 cups of food to the frying basket.
- Some foods need to be shaken vigorously or turned over during the air fry time. Consult the Air Frying Chart for a general guide.
Air Frying Chart
(Includes Preset Menu Items)
ALWAYS USE A MEAT THERMOMETER TO ENSURE THAT MEAT, POULTRY AND FISH ARE COOKED THOROUGHLY BEFORE EATING.
For your convenience, your air fryer has 8 preset menu options: French Fries, Chops, Steak, Fish, Cake, Nuggets, Potatoes, Bacon.
The following chart is intended as a general guide only. The quantity of food air fried at one time, the thickness or density of the food, and whether the food is fresh, thawed, or frozen will alter the total cooking time necessary.
- To assure even cooking/browning, open the frying basket drawer halfway through the cooking time. Check, turn or vigorously shake foods in the frying basket. This chart lists cooking temperature, average total air frying time, and what action is to be taken for best results.
- Frying smaller batches will result in shorter cooking times and higher food quality. Adjust air frying temperatures and times as necessary to suit your taste.
![]()
Unless food is pre-packaged and pre-oiled, for browned and crispy results, all foods should be lightly oiled before air frying.
| FOOD | TEMP | AIR FRY TIME | ACTION |
| Root Vegetables, fresh, roasted, 3 - 4 cups | 370°F | 15-20 minutes | toss with oil shake 3x |
| Asparagus, fresh thin stems, 3 - 4 cups | 370°F | 7-9 minutes | spray with oil, shake 2x |
| Green Beans, Sugar Snap Peas, fresh, 3 - 4 cups | 370°F | 7-9 minutes | spray with oil, shake 1x |
| Brocoli, fresh (roasted), 3 - 4 cups | 370°F | 5-7 minutes | spray with oil, shake 3x |
| Brussels Sprouts, fresh, halved, 3-4 cups | 370°F | 8-10 minutes | spray with oil, shake 2x |
| Butternut Squash, seeded, 1/2-in. chunks, 3 - 4 cups fresh | 370°F | 15 minutes | spray with oil, shake 3x |
| Fennel, fresh, chopped, 3 - 4 cups | 370°F | 7-9 minutes | spray with oil, shake 2x |
| Kale Chips, 2-3 cups stemmed, chopped | 370°F | 3 minutes | spray with oil, shake 1x |
| Fried Sweet Potato Fries, 3-4 cups (fresh, hand cut, 1/8 to 1/4-in. thick) | 400°F | 13-15 minutes | spray with oil, shake 3x |
| French Fries, Idaho Potatoes, 3-4 cups (fresh, hand cut, 1/4 to 1/3-in. thick), (frozen, 1/4 to 1/3-in. thick) | 400°F 400°F | 12 minutes 12 minutes | spray with oil, shake 3x |
| Ribeye Steaks, (2) 1.25 lb., 1-1/2-in. thick, room temp. medium rare medium well done | 400°F 400°F 400°F | Preheat + 6 min Preheat + 10 min Preheat + 14 min | rub or spray with oil, add seasoning, turn over test for doneness, rest 15 minutes - check at 12 minutes, rest 15 minutes |
| Hamburgers, 1/3 lb. (up to 4), rare-well | 350°F | Preheat + 3 – 6 min | spray with oil, add seasoning, turn over test for doneness |
| Chicken Wings, 2-3 lb. (fresh/ thawed) | 360°F | 20 minutes | spray with oil, shake 2x, test for doneness |
| Chicken Tenders/Fingers, boneless | 360°F | 18 - 20 min | spray with oil, shake 1x |
| Chicken Pieces, bone in | 360°F | 20-30 minutes | spray with oil, turn over, test for doneness |
| Fish Filet (fresh, thawed, battered) | 400°F | 10 minutes | spray with oil, turn over, test for doneness |
| Shrimp (thawed, battered), 1- 2 lb. | 320°F | 8 minutes | spray with oil, turn over, shake |
PLEASE NOTE: The USDA recommends that meats such as beef and lamb, etc. should be cooked to an internal temperature of 145°F/63°C. Pork should be cooked to an internal temperature of 160°F/71°C and poultry products should be cooked to an internal temperature of 170°F/77°C - 180°F/82°C to be sure any harmful bacteria has been killed. When reheating meat/poultry products, they should also be cooked to an internal temperature of 165°F/74°C.
User Maintenance Instructions
This appliance requires little maintenance. It contains no user-serviceable parts. Any servicing requiring disassembly other than cleaning must be performed by a qualified appliance repair technician.
Care & Cleaning Instructions
Allow the Air fryer to cool fully before cleaning.
- Unplug the Air Fryer. Remove frying basket. Make sure the frying basket and crisping tray have cooled completely before cleaning. Use the center hole of the crisping tray to lift crisping tray up and out of the frying basket.
- Wash the frying basket and crisping tray in hot soapy water. Do not use metal kitchen utensils or abrasive cleansers or cleaning products as this may damage the nonstick coating.
- The frying basket and crisping tray are dishwasher-safe. For best results, place in the top rack of your dishwasher to clean.
- Wipe the air fryer body with a soft, non-abrasive damp cloth to clean.
Storing Instructions
- Make sure the air fryer is unplugged and all parts are clean and dry before storing.
- Never store the air fryer while it is hot or wet.
- Store the air fryer in its box or in a clean, dry place.
IMPORTANT SAFEGUARDS
When using electrical appliances, basic safety precautions should always be followed, including the following:
- READ ALL INSTRUCTIONS.
- Do not touch hot surfaces. Use handles or knobs. Use oven mitts or potholders.
- To protect against electric shock do not immerse cord, plugs, or appliance in water or other liquid.
- This appliance is not intended for use by persons (including children) with reduced physical, sensory or mental capabilities, or lack of experience and knowledge, unless they have been given supervision or instruction concerning use of the appliance by a person responsible for their safety.
- Children should be supervised to ensure that they do not play with the appliance.
- Unplug from outlet when not in use and before cleaning. Allow to cool before putting on or taking off parts, and before cleaning the appliance.
- Do not operate any appliance with a damaged cord or plug or after the appliance malfunctions, or has been damaged in any manner. Bring it to a qualified technician for examination, repair or electrical or mechanical adjustment.
- The use of accessory attachments not recommended by the appliance manufacturer may cause injuries.
- Do not use outdoors.
- Do not let cord hang over edge of table or counter, or touch hot surfaces.
- Do not place on or near a hot gas or electric burner, or in a heated oven.
- Extreme caution must be used when moving an appliance containing hot oil or other hot liquids.
- Always attach plug to appliance first, then plug cord into the wall outlet. To disconnect, turn any control to "off", then remove plug from wall outlet.
- Do not use appliance for other than intended use.
- Make sure the crisping tray is in place before adding food to be air fried.
- Make sure the frying basket is locked securely into the front of the Air Fryer, while the Air Fryer is in operation.
![]()
The Air Fryer will not operate unless frying basket is fully closed.
![]()
After hot air frying, extreme caution must be used when handling the hot frying basket, crisping tray, and cooked foods.
ADDITIONAL IMPORTANT SAFEGUARDS

CAUTION HOT SURFACES: This appliance generates heat and escaping steam during use. Proper precautions must be taken to prevent the risk of burns, fires, or other injury to persons or damage to property.
This appliance is hot during operation and retains heat for some time after turning OFF. Always use oven mitts when handling hot materials and allow metal parts to cool before cleaning. Do not place anything on top of the appliance while it is operating or while it is hot.
- All users of this appliance must read and understand this instruction manual before operating or cleaning this appliance.
- The cord to this appliance should be plugged into a 120V AC electrical outlet only.
- If this appliance begins to malfunction during use, pull the frying basket drawer out of the body. Then remove plug from wall outlet. Do not use or attempt to repair the malfunctioning appliance.
- Do not leave this appliance unattended during use.
- Do not immerse power cord in any liquid. If the power cord to this appliance is damaged, it must be replaced by contacting Consumer Service.
- Keep the cord out of reach from children and infants to avoid the risk of electric shock and choking.
- Place the Air Fryer on a flat, heat-resistant work area.
- Do not obstruct the air outlet or air inlets on the back and sides of the Air Fryer, with any objects. Avoid escaping steam from the air outlet during air frying.
- Keep appliance at least 4 inches away from walls or other objects during operation.
- Always use the frying basket handle to open frying basket drawer.
![]()
After air frying, make sure to place the frying basket drawer on a flat, heat-resistant surface.
![]()
Over-filling the frying basket may damage the Air Fryer and could result in serious personal injury.- Never move a hot Air Fryer or an Air Fryer containing hot food. Allow to cool before moving.
- Do not clean with metal scouring pads. Pieces can break off the pad and touch electrical parts, creating a risk of electric shock.
NOTES ON THE PLUG
This appliance has a polarized plug (one blade is wider than the other). To reduce the risk of electric shock, this plug will fit in a polarized outlet only one way. If the plug does not fit fully into the outlet, reverse the plug. If it still does not fit, contact a qualified electrician. Do not modify the plug in any way.
NOTES ON THE CORD
- A short power-supply cord (or detachable power-supply cord) is to be provided to reduce the risk resulting from becoming entangled in or tripping over a longer cord.
- Longer detachable power-supply cords or extension cords are available and may be used if care is exercised in their use.
- If a long detachable power-supply cord or extension cord is used:
- The marked electrical rating of the cord or extension cord should be at least as great as the electrical rating of the appliance;
- If the appliance is of the grounded type, the extension cord should be a grounding-type3-wire cord.
- The longer cord should be arranged so that it does not drape over the countertop or table top where it can be pulled on by children or tripped over unintentionally.
PLASTICIZER WARNING
To prevent Plasticizers from migrating to the finish of the counter top or table top or other furniture, place NON-PLASTIC coasters or place mats between the appliance and the finish of the counter top or table top. Failure to do so may cause the finish to darken; permanent blemishes may occur or stains can appear.
ELECTRIC POWER
If the electrical circuit is overloaded with other appliances, your appliance may not operate properly. It should be operated on a separate electrical circuit from other appliances.
For customer service questions or comments
1-866-832-4843
For Recipes and Cooking tips
cruxkitchen.com
 crux.kitchen
 cruxkitchen
 cruxkitchen
 cruxkitchen
 CRUX kitchen
Documents / Resources
References
Download manual
Here you can download full pdf version of manual, it may contain additional safety instructions, warranty information, FCC rules, etc.
Advertisement


Need help?
Do you have a question about the 6.0 QT Digital Air Fryer and is the answer not in the manual?
Questions and answers