Advertisement
Quick Links
INTRODUCTION
3xSlew is a beginner friendly build. You will need to know how to solder through hole components,
but there is nothing tricky involved. It's a good idea to read through this entire document before starting to
build. The assembly should take 1 to 2 hours to complete. The following tools are required:
- Soldering Iron
- Solder
- Flush Cutters
- Needle Nose Pliers or Tweezers
- Multimeter
- Small Screwdriver for M3 screws
This module has two PCBs. The kit comes with all components sorted into bags according to which
board they go to. Download the BOM for the complete and detailed list of parts.
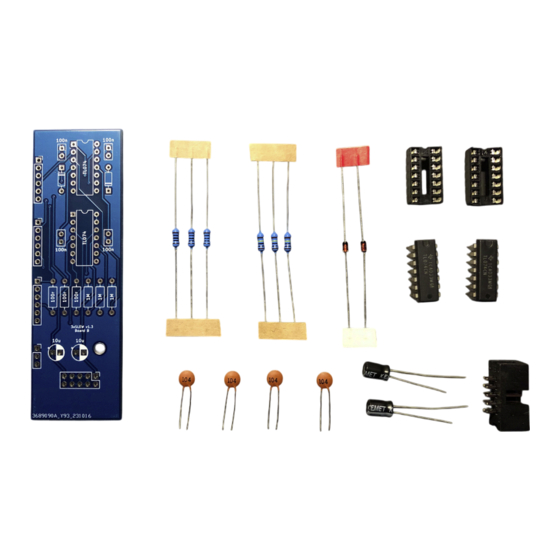
BAG 1 / BOARD B
3xSLEW
v1.3 Build Guide
1
Advertisement

Related Manuals for MidCentury Modular 3xSlew


Summary of Contents for MidCentury Modular 3xSlew
- Page 1 Build Guide INTRODUCTION 3xSlew is a beginner friendly build. You will need to know how to solder through hole components, but there is nothing tricky involved. It’s a good idea to read through this entire document before starting to build.
- Page 2 BAG 1 / BOARD B Part Value Body Marking Resistor 100r Brown-Black-Black-Black-Brown Resistor Brown-Black-Black-Yellow-Brown Diode 1N4148 IC Socket DIP 14 Capacitor 100n Electrolytic Capacitor 10u Shrouded Header TL074 Grab Board B, open Bag 1, and organize the components. It’s a good idea to double check all resistor values with a multimeter.
- Page 3 BAG 1 / BOARD B Next, solder the two diodes. Diodes are polarized, the correct orientation is indicated on the PCB. The dark stripe on one end of the diode must be on the same side as the stripe on the PCB silkscreen. Now move on to the IC sockets.
- Page 4 BAG 1 / BOARD B Next up are the ceramic disk capacitors. These are the small orange ones, and there are four 100n caps. These are not polarized, their orientation does not matter. Now solder the two electrolytic capacitors. These are the tall black ones with a white stripe. These are polarized, the long lead goes into the hole marked with a “+”.
- Page 5 BAG 1 / BOARD B Place the 10 pin shrouded header on the back of the board. Before you solder any pins, make sure the orientation is correct. The header’s notch should match the notch drawn on the silkscreen. If it is soldered in the wrong position, the module won’t power on, and it will be a real pain to fix if all ten pins are soldered.
- Page 6 BAG 2 / BOARD A Get Board A out, opent Bag 2, and organize the components. Once again, it’s a good idea to check the resistor values with your multimeter. From both the male and female pin header strips, cut three 1x6 seg- ments and one 1x3 segment.
- Page 7 BAG 2 / BOARD A Begin Board A by soldering the resistors. There are just three 10 ohm resistors. Next, solder the ceramic capacitors. There are three 100n caps and three 4.7u caps. Next, place the male pin headers on the back of Board A, and solder just one pin on each segment. Make sure each header is flush against the PCB.
- Page 8 BAG 2 / BOARD A Now is a good time to attach the 11mm spacer to board A. Place it over the mounting hole and secure it to the board with one of the M3 screws. Make sure it is on the back of the board, like the pin headers. Place all the panel mount components on the board, but do not solder them yet.
- Page 9 Congratulations! You have completed assembly of your MidCentury Modular 3xSlew. As with all fresh builds, you should test the power rails for continuity and test the module from a bench power supply before plugging it into your modular synth.
Need help?
Do you have a question about the 3xSlew and is the answer not in the manual?
Questions and answers