Advertisement
- 1 Bike Specification
- 2 Protective Clothing
- 3 Vehicle structure
- 4 Accessories
- 5 Bike Assembly
- 6 Charging
- 7 Bike Controls
- 8 Battery Removal and Fitting
- 9 Brake Lever Adjustment
- 10 Seat Height Adjustment
- 11 Handlebar Height
- 12 Kickstand
- 13 Motor Overload
- 14 Front / Rear Wheel Assembly
- 15 Rear Shock Pump
- 16 Front fork adjustment
- 17 Maintenance Schedule
- 18 Cautions
- 19 Documents / Resources
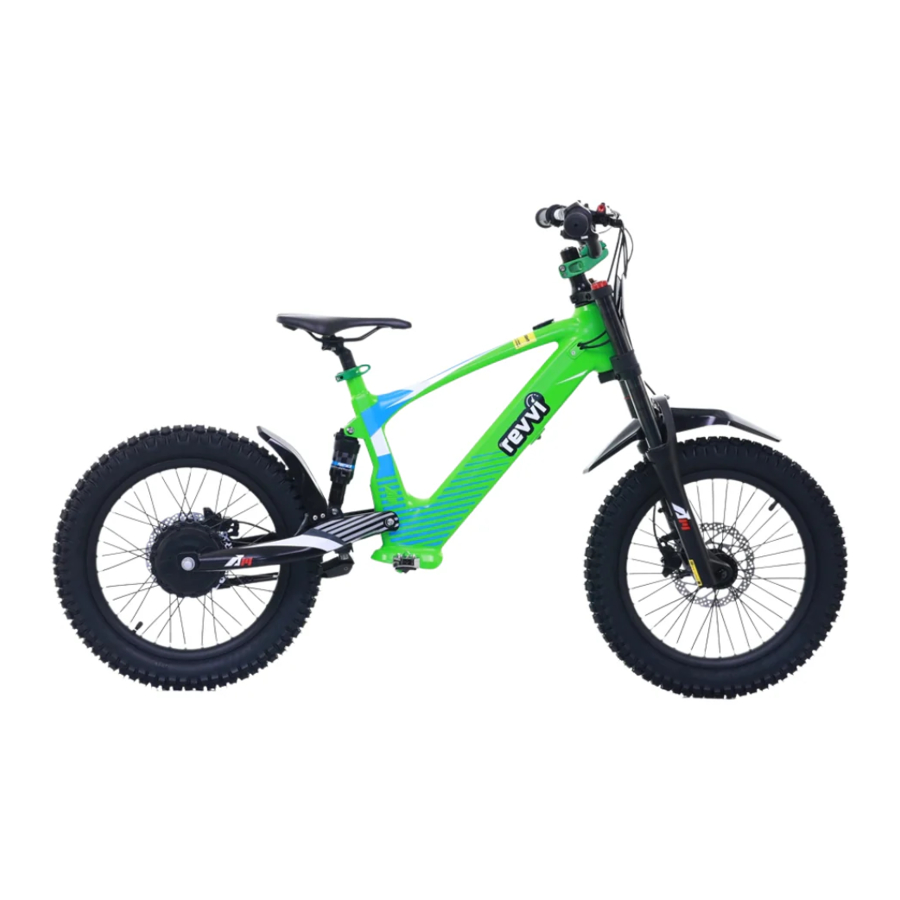
Bike Specification

Rider Age Guideline: Only suitable for riders of 8 years +. It is always at the discretion of parent or person supervising as to the age of the rider. CHILDREN MUST BE ACCOMPANIED BY AN ADULT. Start riding using the slow speed setting!
Maximum rider weight: 50kgs Bike Specification
| Motor: | 36V500W brushless hub motor |
| Battery: | 36V5AH Removable |
| Frame | Aluminium alloy frame with swingarm |
| Front Forks / Travel: | Suspension forks – 80mm travel |
| Rear Shock / Travel: | Air rear shock 140psi – 30mm travel |
| Brake: | Hydraulic front and rear disc brakes |
| Handle bar: | Alloy |
| Stem | Alloy |
| Grip: | Rubber |
| Tire: | Aggressive knobbly 18" |
| Rim: | Spoked rim 18" |
| Transmission: | Hub Motor |
| Battery range: | Slow speed: Approx 1h 20mins Medium speed: 45min Fast speed: 25 mins |
| Battery charge time | 1hr 50mins |
| Max speed: | 9.5MPH / 13.5MPH / 20MPH approx |
| N.W. | 20 kg |
| Max Load: | 50 kgs |
| Carton size: | 123*67*27cm |
Protective Clothing
Advice on the first ride
- Wear protective gear before riding: helmet, riding clothes, riding boots, gloves, knee pads, elbow pads, goggles
- On your first ride, you should adjust the speed mode and select one according to the road conditions and your riding ability
- This bike is not allowed to carry passengers,
- The load of this bike is not allowed to exceed the specified load 50kgs;
Safety suggestion
This product should be checked for potential safety risks before riding:
- Whether the fasteners of the whole bike has any loosening.
- Whether the tires have scratch, puncture or crack.
- Whether the tire pressure meets the riding requirement.
- Wear protective gear before riding: helmet, riding clothes, riding boots, gloves, knee pads, elbow pads, goggles;
Tampering warning
It is forbidden to modify the bike without permission, otherwise it cannot guarantee the safe operation. For examples:
- Replace batteries or motors without permission
- Replace fasteners without permission
- Unauthorized replacement of frame structure
Safe operation
- Children should not be out of sight of adults while riding
- When the motor is overheated, wait for the motor to cool down before riding
Protective clothing

Vehicle structure

Accessories

Bike Assembly

Assembly/Maintenance/Parts replacement should be carried out by a qualified mechanic!
- Please take the bike out of it's box and remove the packaging,
- Fix the handlebars to the stem with the allan key and bolts supplied. Please see pictures below.

- The handlebars need to be symmetrical

- Set the horizontal angle of the brake lever to about 45°


- Check that the four allen key bolts for the handlebars are tight. Straighten the bikes handlebars and then tighten the two allen key bolts on the handlebar clamp as shown below.
- Plug in the throttle connector and the front and rear brake cut off connectors, Make sure you line up the two arrows on the connectors before connecting.
![]()
- Fit the front number board to the forks using the M6 bolt supplied. Numbers and letters are also supplied with the bike so you can apply your race number and name.

- Now fit the front wheel to the forks with tools and fixings supplied. The washer locates into the hole in the forks on each side then the nut can be tightened as shown below
- Set the front forks to your prefered height and tighten the four clamp bolts.
Please note: Make sure both forks are set to the exact same height.

- Fit the front mudguard to the forks using the nut and bolt supplied. Please see images below for reference:
(Note: Please keep your bikes box and packing for the duration of your bikes warranty)
![]()


Charging
- Charge the battery fully before use, First slide the charging port cover on the front of the frame, so the charging port is visible, insert the output terminal plug into the battery charging port, connect the input terminal/plug to the power supply and turn it on to charge the battery. The light on the charger will be green if the battery is fully charged or if the battery is not detected. It will be red when the battery is detected and charging. The charging time is approx 1h 10 mins.
There are two options to charge your battery:
Option 1: Charge the battery when it is fitted to the bike.
Option 2: Remove the battery from the bike and charge the battery.
Please Note: After using the bike/battery re- charge it before storing to avoid damaged/poor performance. If you do not use the battery/bike for 1 month charge the battery to keep the it in good condition. Failure to do this will damage the battery and result In poor performance.


Charging battery out of the bike:

Charging battery when fitted to the bike:

- Never use the bike without the charging port cover closed. The charging port will get mud and water inside. This will result in damage/failure of the battery or charger.
- Only use the Revvi charger that is supplied with this bike/model to charge the battery. Using the wrong/aftermarket charger can damage the battery and cause a thermal incident. The battery should only be charged by adults and should not be left unattended.
Charger safety information
| Input: 100- 240Vac, 50/60Hz, 2.5A. | |
| Output: 42.0Vdc, 3.0A |
- Keep the charger dry at all times.
- For your own safety never use this device with wet or damp hands due to the possibility of electrocution.
- Only use a soft clean dry cloth to clean the surface of this plug. Do not use water or chemicals to clean.
- Do not drop or knock the charger, this may result in damage. Rough handling can break the internal circuit boards and mechanics. - Keep away from dust, extreme humidity and direct sunlight.
- Keep away from fire.
- Never attempt to dismantle parts of this device.
- Never leave chargers unattended when charging.
- Dispose of this product safely!
- All products are tested comprehensively to ensure quality. If heat discoloration or transformation are found during usage or storage stop use immediately and contact dealer.
- Children should be supervised to ensure that they do not play with this product.
- Only use the genuine Revvi charger that has been supplied with the bike! Never use a different charger! If you need a replacement charger please contact Revvi ltd or an authorized dealer.
Thermal Incident danger
Lithium-ion batteries have a high thermal incident risk
Lithium-ion batteries are safe under normal conditions, but if the battery is exposed to overcharge, extrusion, collision, flooding water and other condition. Battery expansion, deformation and cracking, will lead to battery short circuiting and over heating.
Cut off the power firstly. Secondly, the battery should be immediately cooling treatment, water rescue is the best solution. If the fire grow stronger, use an ABC dry powder extinguisher or a CO2 extinguisher to extinguish the fire, and then cool the damaged battery with water until completely cooled. Finally, move the damaged battery to safe area and quickly evacuate the surroundings. If possible, Remove the combustibles around the damaged battery.
 Attention
- Do not use ice to cool lithium batteries. Because it prevents internal heat from escaping, the internal temperature will rise rapidly and electrolyte gases will accumulate, potentially causing the battery to explode.
- Even if there is an open flame, do not use foam fire extinguisher. The foam is attached to the periphery of the battery to form a thermal insulator, which increases the chemical reaction and produces more heat.
Bike Controls

Front brake
The front disc brakes are used to brake the front wheels and use oil pressure to brake
Rear brake
The rear disc brakes are used to brake the rear wheels and use oil pressure to brake.
Turning the bike on
Use the on/off switch on the throttle to turn the bike on/off as shown in the image.
Speed mode
Change the speed mode by removing the plastic cap covering the speed switch on the top of the bikes frame as shown in the attached image, You can select your desired speed mode using the speed switch.
L = SLOW SPEED (9.5MPH)
M = MEDIUM SPEED (13.5MPH)
H= FAST SPEED (20MPH)
PLEASE NOTE: The bike will remain in the speed setting you last used!
Twist Throttle
Twist the throttle tube gradually to apply the power. Return the throttle to recuce the power.

Battery indicator display:
The battery display has 3 bars to display the battery power.
Please note: The battery indicator display on the throttle only displays when the bike is being ridden under load. If the bike is sat still the throttle will give an inaccurate indication.

Battery Removal and Fitting

Battery Removal:
- Turn off the power. Rest the bike on its side gently.
- Remove the protection plate. It his held on with two hand bolt fixings.
- Ensure the charger is not connected to the battery.
- Unlatch the battery lock mechanism and pull the battery out from the frame.
Battery fitting:
- Gently push the battery into the frame until it locks in place.
- Fit the protection plate using the two hand bolt fixings.
NOTE: Never use the bike with out the protection plate fitted. It is important to protect the battery from damage when riding and to ensure the battery does not come out of the bike.

Brake Lever Adjustment
Adjust the position of the brake lever to and from the handlebars using the adjustment screw on the brake lever (see below)
Please double check the brake function before riding!

Seat Height Adjustment
Adjusting the seat height: Use the quick release clamp to tighten or release the seat. Move the seat up and down to the desired height. Use the adjuster to increase or reduce the strength of the clamp. The seat post should not be set higher then the security line. Failure to obey the security line can damage the frame.

Handlebar Height
You can adjust the handlebar height on your bike by moving the 10mm headstock spacers below and above the handlebar clamp. This model has 3 x 10mm headstock spacers.
Please note: Tighten the handlebar clamp bolts before riding.

Kickstand

The kick stand is supplied in the box not fitted to the bike! It can easily be fitted if you would like to use it.
DO NOT FIT THIS KICK STAND TO THE BIKE IF YOU PLAN TO JUMP THE BIKE! IT COULD FOLD DOWN WHEN JUMPING!
Motor Overload
The Revvi eighteen bike has heat protection overload. If you overload the bike/motor due to one of the following reasons the motor will cut off and stop working to prevent damage:

- The rider is too heavy. Over 50kg.
- The ground is to soft.
- You are riding up to many hills/inclines.
If the motor overloads and cuts off, allow the bike/motor to cool down before riding again.
When the motor overload kicks in the lights on the throttle will stay on indicating power, but the motor will not engage when the throttle is turned!
Front / Rear Wheel Assembly
Maintenance/parts replacement should be carried out by a qualified mechanic!

Front wheel disassembling
First use an wrench to loosen the fixing nuts on the left and right sides of the front wheel, then hold the handlebar and lift the front fork, and the front wheel can be removed, This is a 2 person operation.
Front wheel assembling
Lift the front fork of the bike, align the axle on both sides of the front wheel hub with the holes on the lower part of the front forks, install the front wheel into the front fork, and tighten the fixing nuts on the left and right sides of the front wheel with an open-ended spanner to install the front wheel. This is a 2 person operation.

Rear wheel disassembling
First, unplug the connector between the rear hub motor and the controller, then feed the wire out from the swing arm. Use a spanner to loosen the nuts on each side of the rear wheel. Lift the rear swing arm to remove the rear wheel. This is a 2 person operation.
Rear wheel assembling
First, align the axle on both sides of the rear hub motor with the axle holes at the lower part of the swing arm, install the axle of the rear hub motor into the swing arm, insert the anti-drop washers into the countersunk platforms of the swing arm on the right and left side.
Feed the wire of the rear hub motor through the ring in the swing arm, connect the motor wire of the rear hub with the controller wire, and then Tighten the fastening nuts, This is a 2 person operation.
Check the condition of front and rear tires
- Check whether there are cuts or sharp objects in the front and rear tyres, if you find an issue replace the tyre.
- Check whether the tread depth of front and rear tires meets the tread depth required for the riding conditions. If it does not please replace the tyre.
- Check the service life of tires. It is suggested that tires need to be replaced after 3 years of service, regardless of tire wear.
Check front and rear tire pressure
Remove the valve cap and measure whether the tire pressure is suitable for the riding conditions. We recommend 20 - 25psi for most conditions. If the pressure is incorrect please adjust using a pump. Once the pressure is correct re-fit the valve cap.
Check front and rear wheel spoke tension
Before each time riding the bike check if the spokes are loose, the tension of the spokes should be tested. If the spokes are loose, a qualified mechanic should tighten them.
Rear Shock Pump
The rear shock can be pumped up to a maximum of 140psi. To check/pump the rear shock you will need an MTB shock pump as shown below. Check the rear shock pressure at least once per month. To make the shock softer you can reduce the pressure using the bleed valve. This will make the shock softer and the rebound slower. If you reduce the pressure too much the shock will not rebound, and the travel will be reduced.

Maintenance/parts replacement should be carried out by a qualified mechanic!
When your brake pad material is low you need to replace the brake pads following the steps shown below:

Loosen the two allen key bolts holding the caliper to the forks/swing arm. Remove the caliper.

Remove the split pin from the caliper using needle nose pliers.

Remove the brake pads from the caliper, then remove the pads from the pad tensioner.

Fit the new pads into the pad tensioner. Now fit the pads and pad tensioner into the caliper.

Feed the split pin through the caliper, pads and pad tensioner. Bend the end of the split pin so the pads are secure and will not fall out. Attach and tighten the caliper to the forks/swing arm using the orginal allen key bolts.
Front fork adjustment
You can adjust the pre- load and compression of the front using the adjusters on the forks as shown below:

Maintenance Schedule
Please follow the maintenance schedule shown below:
| Maintenance Item | Maintenance cycle | Tools and Remark |
| Head set parts/bearings | One year | Grease |
| Front and rear axles | One year | Grease |
| Rear shock | One month | Clean and check air pressure 140psi max |
| Battery | One month | Recharge the battery after each use and once per month if the bike is not used. Do not drain the battery completely every time, Please charge the battery when the display shows a red light, this can increase the life of the battery. |
| Tyre pressure / Tyre Tread | Check every time before riding. | The tires should be inflated if the air pressure is low. 20psi minimum. Check tyre for damage, cuts or sharp objects. |
| Front forks | One month | Clean and re- grease forks stancions. |
| Brake / Brake pads | Check every time before riding. | Clean, check function, replace pads when the friction material is low. |
| AXLE/WHEEL NUTS | Check every time before riding. | Check that the axle nuts are tight. |
| ALL NUTS AND BOLTS | One month | Check that every nut and bolt on the bike is tight. |
Cautions
- Note: the product pictures are for illustration purpose only. These pictures may not reflect the exact product.
Specifications may change.
Before using the bike, please read the manual carefully and inspect whether the parts are in good condition to ensure riding safety. If there is any problem, please contact the dealer immediately. Also check the bike is set on the correct speed setting for the rider before allowing them to ride. (SLOW SPEED – 9.5MPH / MEDIUM SPEED – 13.5MPH / FAST SPEED - 20MPH) - Children are required to use the bike under the supervision of parents or adults. Children should wear protective equipment (e.g. helmet, gloves, knee pads, elbow pads, etc.) when riding. Note that the bike is not intended for transportation.
- The bike should be parked in a dry and ventilated place. Do not rinse/clean the bike with water. It is recommended to wipe it clean with a cloth using E- Bike foam supplied by Revvi.
- Please comply with local laws or regulations. Avoid public roads, pavements and pathways.
![]()
It is illegal to ride electric scooters on public roads, pavements, or cycle paths. They are intended only for use on private land with the owner's permission. Children must be accompanied by an adult at all times. Slow down and increase the braking distance when braking to ensure safety in rainy, snowy day and slippery areas. ![]()
Assembly/Maintenance/Parts replacement should be carried out by a qualified mechanic!- Do not allow children to work on the bike.
- Before riding, check whether the nut/bolts/fixings and all parts of the vehicle are tightened, Check the tire pressures are correct and the brake is functioning as it should.
- The bike is forbidden to do stunt riding.
- The bike is not designed to ride up steep inclines!
- When the bike cannot drive due to a hill or soft ground, please turn off the power off to prevent electric component damage.
- Please turn off the power when you get off the bike or you are pushing it in case the rider applies the throttle unintentionally.
- Do not allow hands, feet, body, clothing or other similar items to come into contact with any rotating or moving parts.
- Pleases charge the bike using the supplied Revvi charger only! Other chargers will damage the battery.
- When you get off or push the bike, please turn the power off to prevent accidental application of the throttle.
- Do not allow hands, feet, body parts, clothing, or similar objects to come into contact with any rotating or moving parts. (e.g., wheel, motor, disc brake, etc.)
![]()
Only use the Revvi charger that is supplied with this bike/model to charge the battery. Using the wrong/aftermarket charger can damage the battery and cause a thermal incident. The battery should only be charged by adults and should not be left unattended.![]()
Users are reminded to be careful during the riding, as skills are needed to avoid falling or colliding which may cause injury to users or third parties.- Riding is prohibited on rivers/any mass of water, highways, places with heavy traffic, crowded places and other dangerous environments.
- The max load of this bike is 50k, overloading the bike will damage it.
- Rider Age Guideline: Only suitable for riders of 8 years +. It is always at the discretion of parent or person supervising as to the age of the rider. CHILDREN MUST BE ACCOMPANIED BY AN ADULT. Start riding using the slow speed setting!
![]()
Parents or guardians should ensure that children have received proper instruction/tuition before riding, especially regarding the safe use of brake systems.- When disposing of batteries, they should be separated from ordinary household garbage, Handle according to local laws and regulations. If you are not sure how to dispose of a battery please contact us to organize returning it.
Documents / ResourcesDownload manual
Here you can download full pdf version of manual, it may contain additional safety instructions, warranty information, FCC rules, etc.
Advertisement


Need help?
Do you have a question about the 18 and is the answer not in the manual?
Questions and answers