Advertisement
Quick Links
Advertisement

Related Manuals for LXNAV SxHAWK


Summary of Contents for LXNAV SxHAWK
- Page 1 USER MANUAL SxHAWK Digital speed-to-fly HAWK variometer Version 9 January 2025 www.lxnav.com...
- Page 3 Rev #1 Version I9.33/S9.34 January 2025 Important Notices Limited Warranty Revision History Packing Lists SxHAWK (57mm) Variometer Unit SxHAWK (80mm) Variometer Unit Basics LXNAV SxHAWK at a Glance LXNAV SxHAWK Features 3.2.1 Interfaces 3.2.2 Options 3.2.3 Technical Data 3.2.3.1 Power Consumption 3.2.3.2...
- Page 4 Rev #1 Version I9.33/S9.34 January 2025 5.5.4 Quick Access Menu Setup Mode 5.6.1 5.6.2 Flight Recorder 5.6.2.1 Recording Interval 5.6.2.2 Auto Finish 5.6.2.3 Finish Before OFF 5.6.2.4 Pilot 5.6.2.5 Co-Pilot 5.6.2.6 Competition Number 5.6.2.7 Registration Number 5.6.2.8 Task edit 5.6.3 Vario Parameters 5.6.3.1 Vario Needle Filter...
- Page 5 Relative Vario (Super netto) 7.6.4 Levelling AHRS 7.6.5 HAWK Parameters 7.6.6 Graphical display 7.6.7 Audio source Flying with the LXNAV SxHAWK On the Ground 8.1.1 Power on Procedure 8.1.2 Set Elevation and QNH 8.1.3 Pre-Flight Check Installation Installing the LXNAV SxHAWK...
- Page 6 SxHAWK– Flarm UNI/MOP UNI –(LX80xx/90xx) 9.7.8 SxHAWK Vario Connection to a LXxxxx Data Transfer 9.8.1 SxHAWK 9.8.2 Other Data Transfers Firmware Update 10.1 Updating LXNAV SxHAWK Firmware Using a Micro SD Card 10.2 Incomplete Update Message Page 6 of 91...
- Page 7 January 2025 1 Important Notices The LXNAV SxHAWK system is designed for VFR use only as an aid to prudent navigation. All information is presented for reference only. Terrain, airports and airspace data are provided only as an aid to situation awareness.
- Page 8 Rev #1 Version I9.33/S9.34 January 2025 1 Revision History Date Revision Revised by Description December 2024 Initial release of this manual Page 8 of 91...
- Page 9 Rev #1 Version I9.33/S9.34 January 2025 2 Packing Lists LXNAV SxHAWK main unit Main power cable for SxHAWK + CAN terminator Speaker Flarm cable (optional) PDA cable (optional) 2x6 mm screw Bluetooth antenna ...
- Page 10 Rev #1 Version I9.33/S9.34 January 2025 2.2 SxHAWK (80mm) Variometer Unit Bluetooth antenna NOT IN USE P Total GPS Antenna P Static GPS/Flarm Port PDA Port Main Power Audio Jack Page 10 of 91...
- Page 11 The LXNAV SxHAWK can be expanded with one or more repeaters via the CAN bus. This allows both pilots in a two-seat glider to have independent control of all functions of each unit in the front or the rear seat.
- Page 12 Max charge current (mA) SxHAWK 170 at (12V) 340 at (12V) Additionally, up to 220mA SxHAWK 80m 190 at (12V) 320 at (12V) Additionally, up to 220mA Newer models using brighter displays and consumption might be higher up to 3W.
- Page 13 Rev #1 Version I9.33/S9.34 January 2025 3.2.3.4 Environmental limitations Operating temperature: -20°C to +70°C Storage temperature: -30°C to +85°C Relative humidity: 0%-95% Page 13 of 91...
- Page 14 The system is powered up by pressing any of the push buttons or a press of either of the rotary knobs. A long press of the upper rotary knob will turn the SxHAWK off. Use this instead of the avionics master switch.
- Page 15 4.4 Switching on the Unit Pressing any of the buttons or rotary knobs will turn on the SxHAWK. The first LXNAV welcome screen will appear with the system information (Device name, Version, Serial number...) When the boot procedure is completed the setup elevation dialogue will be displayed.
- Page 16 Rev #1 Version I9.33/S9.34 January 2025 Text editor Spin controls (Selection control) Checkboxes Slider control To move the function from one control to another, rotate the lower rotary knob as follows: Clockwise rotation will select the next control. ...
- Page 17 4.6 Switching Off You will lose your settings if you power down the SxHAWK via the panel master-power switch. The SxHAWK will shut down properly when switching off via the master–power switch.
- Page 18 Rev #1 Version I9.33/S9.34 January 2025 All settings are saved during the power off procedure. We strongly recommend switching off the unit by using a long-press of the (top) knob. Page 18 of 91...
- Page 19 The LXNAV SxHAWK has five operating modes. The middle (Menu) push button toggles through the 5 display modes in a circular way. The diagram below shows the mode structure of the LXNAV SxHAWK. With the upper and lower buttons, it is also possible to move between subpages.
- Page 20 Rev #1 Version I9.33/S9.34 January 2025 To change the McCready value, press the bottom rotary knob and press on MC/BAL. A short press of the lower rotary knob moves from McCready to the Ballast box and pressing the lower rotary knob again will open the Bugs box. If no action is performed within 3 seconds, the box will close, or you can also press CLOSE anytime (lower push button).
- Page 21 Rev #1 Version I9.33/S9.34 January 2025 List of available navboxes: Type Navbox Description title Altitude (m) Altitude in Meters Altitude (ft) Altitude in Feet Flight level Flight level Hgt.above tkoff. Height is the vertical distance above takeoff. Total Altitude Alt T Altitude which considers also the kinetic energy Standard altitude AltS...
- Page 22 Rev #1 Version I9.33/S9.34 January 2025 Average wind Wind Wind direction and speed Wind comp. cWnd Wind component (first number is component calculated from GS-TAS / second number is a component from a Wind vector) Flap Current Current flap position Flap Requested Requested flap position To configure navboxes in SC mode on the ground you must first turn Auto SC off,...
- Page 23 Rev #1 Version I9.33/S9.34 January 2025 5.2 Info Mode The Info Mode gives you a snapshot of the GPS position, date and time along with the Flight level, altitude, Battery status and FLARM status. The Flight Level equivalent is also available in meters or feet as is the Altitude navbox.
- Page 24 January 2025 5.3 FLARM Mode If the SxHAWK is connected to a FLARM source via the FLARM port then the FLARM Mode will display a map of the relative positions of FLARM targets that are within range. By rotating the lower rotary knob you can change the range of the display from 0.5 km to 150 km.
- Page 25 Rev #1 Version I9.33/S9.34 January 2025 5.3.1 Quick Access Menu A short press of the lower rotary button activates the Quick Access menu. 5.3.1.1 Edit Target The user can edit the following FLARM objects data: FLARM ID Competition sign ...
- Page 26 Rev #1 Version I9.33/S9.34 January 2025 5.4 Thermal Assistant Mode The Thermal Assistant mode displays a graphical representation of your location within the thermal. If you are thermaling to the left, there will be an aircraft symbol on the right of the ring of bubbles and the bubbles will appear to rotate clockwise (towards the symbol of the glider).
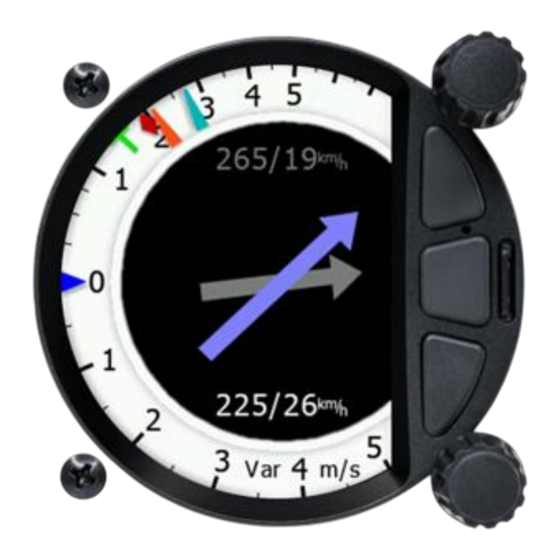
- Page 27 Rev #1 Version I9.33/S9.34 January 2025 selected by pressing the lower push button once. You can return to the Waypoint navigation mode by pressing the upper push button (top button of the three). HAWK needle Upper numbers Vario indicator needle Flarm status Last thermal average Climb/cruise simbol...
- Page 28 Rev #1 Version I9.33/S9.34 January 2025 The GPS symbol is green when the GPS status ID is OK, and red when GPS status is bad. If GPS data is not detected, the symbol will disappear. The numerical navboxes can be changed using the Quick Access menu with a short press of the lower rotary knob followed by selecting navbox from the menu and a further short press of the lower rotary knob.
- Page 29 A short press of the (lower) rotary button activates the Quick Access menu. 5.6 Setup Mode The setup mode allows you to change the configuration and base settings for the SxHAWK vario. Following items are listed in the setup menu: ...
- Page 30 5.6.2 Flight Recorder The SxHAWK vario system has a built-in IGC-approved flight recorder. In this menu the user can set flight recorder parameters and the pilot’s data.
- Page 31 Rev #1 Version I9.33/S9.34 January 2025 5.6.2.8 Task edit Selecting the edit task via a short press of the lower rotary knob will enter the task editing screen. The first time you edit a task it will be blank. A short press of the lower rotary knob will open another menu with the option to: ...
- Page 32 It is just a needle mode. OFF: Switching exclusively by means of an external switch connected to the SxHAWK. With new versions of Remote sticks there is no longer a "physical" switch connection between the Remote stick and the Vario unit –...
- Page 33 When done, change the input back to the default and enable SC switch to GPS mode. 5.6.3.9 TE Compensation The LXNAV SxHAWK offers two methods of vario Total Energy Compensation: Pneumatic TE Pitot tube ...
- Page 34 If this item is enabled the average vario (integrator) will be reset to 0 when switching from SC to Vario mode. 5.6.3.12 Temperature Offset The LXNAV SxHAWK is supplied with an external outside air temperature (OAT) sensor. With the offset setting it will correct static errors of temperature measurement. 5.6.3.13 Airspeed Offset The user has the possibility to make an airspeed offset if the measurement is not correct.
- Page 35 Rev #1 Version I9.33/S9.34 January 2025 5.6.4 Display 5.6.4.1 Automatic Brightness If the Automatic Brightness is checked the brightness will be automatically adjusted between the minimum and maximum parameters set. If the Automatic Brightness is unchecked the brightness is controlled by the brightness setting. 5.6.4.2 Minimum Brightness Use this slider to adjust the minimum brightness for the Automatic Brightness option.
- Page 36 Rev #1 Version I9.33/S9.34 January 2025 5.6.5.1 Waypoints and Tasks Selecting the Waypoints and Tasks menu opens a list of .cup files available in the internal memory. Pressing add new lists the files present on the SD card. Selected files are automatically loaded into internal memory.
- Page 37 Rev #1 Version I9.33/S9.34 January 2025 5.6.6 Logbook The logbook page lists all the flights sorted by date. If GPS data is present the logbook will show the date and time of departure. Manual navigation (without GPS) will show the duration and will be marked with "—" marks. The user can download a flight by a short press on the lower rotary button.
- Page 38 Rev #1 Version I9.33/S9.34 January 2025 5.6.7.1 Indicator Setup Vario indicator graphics and preferences can be adjusted in this menu. 5.6.7.1.1 Needles When HAWK option is installed, user can define, if he wants to see only HAWK (blue) needle, TEK vario (red) needle or both needles. 5.6.7.1.2 Vario Needle Vario needle means, when your vario is in vario mode.
- Page 39 5.6.7.2.1 Switch to Thermal Assistant Mode When in circling is selected the SxHAWK will change to the Thermal Assistant mode when the glider starts turning in a climb. It can change to the Thermal mode also if SC mode is switched to Vario mode, if setting SC-VAR.
- Page 40 Rev #1 Version I9.33/S9.34 January 2025 5.6.7.3 FLARM In this menu you can choose to show FLARM traffic on the map, select target on map only, change glider colours and adjust the FLARM object timeout and graphical settings. 5.6.7.3.1 Traffic on Map Check the dialogue box to display FLARM objects on the screen.
- Page 41 Rev #1 Version I9.33/S9.34 January 2025 5.6.7.4 Modes Thermal and FLARM modes can be disabled via this menu. 5.6.8 Sounds The sounds option has a sub menu for Equalizer, Vario and FLARM. 5.6.8.1 Equalizer Option With the lower rotary knob, you can adjust the volume for each frequency. The settings are stored when you exit the screen (via the middle button).
- Page 42 Rev #1 Version I9.33/S9.34 January 2025 The volume for Vario, FLARM and Speech can also be adjusted directly via the upper rotary knob whilst in the FLARM, Waypoint and Task Modes. 5.6.8.2.1 Vario Volume The user can set the default vario volume. 5.6.8.2.2 Sound shape In this menu, you can choose between following shapes: Sinus, Triangular and Harmonic.
- Page 43 (19-25 seconds before possible collision). 5.6.8.3.3 FLARM Important Alarm For close FLARM targets the SXHAWK can give a short or long message, just a beep or be turned off (14-18 seconds before possible collision). 5.6.8.3.4 FLARM Urgent Alarm: For very close FLARM targets the SxHAWK gives a short or long message, just a beep or be turned off (6-8 seconds before possible collision).
- Page 44 Rev #1 Version I9.33/S9.34 January 2025 5.6.9 Warnings There are FLARM, Altitude and Airspace warnings. 5.6.9.1 FLARM 5.6.9.1.1 Enable FLARM Warnings Warnings can be enabled or disabled in this section. The warning dismiss time can be set from 0 to 120 seconds. 5.6.9.1.2 Display PCAS Alarms Check this item to see non-directional traffic on the FLARM screen.
- Page 45 Rev #1 Version I9.33/S9.34 January 2025 5.6.9.2 Visual Messages/Warnings The SxHAWK will provide the following visual messages/warnings: Digital signature failed (it will appear immediately after initial setup) Freezing temperature (it is related to the OAT measurement) Outside zone ...
- Page 46 Rev #1 Version I9.33/S9.34 January 2025 UTC Offset: in half or whole hours plus or minus Zulu. System of units: Metric, English, US. Distance: Units available; statute miles, nautical miles, kilometres. Altitude: Units available feet, meters. ...
- Page 47 SC and Vario (mandatory setting for LX Remote, which provides a push button for SC). 5.6.11.1.3 Digital Inputs 1,2,3,4 The LXNAV SxHAWK has 4 external digital inputs which can be set to indicate the state of the landing gear, airbrakes, canopy switch, tail dolly switch and event input. The wiring is described in Chapter 9.6.1.5.
- Page 48 Input is active when it is shortened to ground. 5.6.11.2 Communication Setup This is used to configure the two ports on the back of the SxHAWK for connecting to a GPS/FLARM source and to a PDA. Each port can be configured separately. 5.6.11.2.1 Direct link: PDA-FLARM link If your PDA device does not support an automatic switch to DIRECT LINK between the GPS and PDA ports, there is a manual DIRECT LINK menu.
- Page 49 This Bluetooth is compatible with iOS and Android. 5.6.11.2.8 Beeps Controlled by PDA If a PDA is connected to the SxHAWK, the PDA can send a beep command to the SxHAWK. If this feature is enabled the SxHAWK will beep on request from the PDA.
- Page 50 Voltage if your battery type is not listed. Those settings will influence the battery level icon and low battery warning. 5.6.11.3.2 Internal Battery SxHAWK units have also a built-in internal battery where you can check the health and settings of this battery. Page 50 of 91...
- Page 51 75% and will charge to full or 90%, depends on setting. The internal battery will not supply power to any peripheral devices such as remote stick, FLARM, PDA… SxHAWK will charge internal battery only when external power is present and the unit is powered on. 5.6.11.3.5 Battery Calibration Sometimes internal battery needs to be self-calibrated.
- Page 52 5.6.11.4 Remote Stick The remote stick is also connected to the CAN bus which is the main wiring of the SxHAWK. The device must be registered in case of a two-seat device as it is possible to have two remote sticks;...
- Page 53 Rev #1 Version I9.33/S9.34 January 2025 5.6.11.6 AHRS Use this menu to calibrate AHRS for installation errors. Place your glider in levelled position and select Level, it will set system pitch offset and current pitch will be set to 0°. You can also modify User pitch offset.
- Page 54 The Radio Bridge is used to operate a radio through the main display unit. First the type of connected radio must be selected. For the list of supported devices please refer to CAN Bridge installation manual found on www.lxnav.com. Due to Becker AR6201 not supporting RS-232 connections it is not yet supported.
- Page 55 The XPDR Bridge can operate the transponder via the main unit. You can set the ICAO Identity in the XPDR Setup menu which is opened by clicking Config XPDR. It can also show target warnings from the transponder. For the list of supported devices please refer to CAN Bridge installation manual found on www.lxnav.com. 5.6.11.8 FLARM If a FLARM or PowerFLARM is connected to the system its information, configuration and aircraft configuration can be seen or configured in this menu.
- Page 56 The FLARM’s flight recorder settings can be modified in this menu. 5.6.11.8.5 Flarm error codes Error codes are displayed on SxHAWK screen, flarm displays or you can read it on flarm generated files on flarm’s SD card. 11 = Firmware expired (requires valid GPS information, i.e. will not be available in...
- Page 57 Rev #1 Version I9.33/S9.34 January 2025 B1 = Invalid obstacle database license (e.g. wrong serial number) B2 = Invalid IGC feature license B3 = Invalid AUD feature license B4 = Invalid ENL feature license B5 = Invalid RFB feature license B6 = Invalid TIS feature license 100 = Generic error 101 = Flash File System error...
- Page 58 Version I9.33/S9.34 January 2025 130 km/h, and 150 km/h). The program will calculate the values of a, b and c, which should be noted and entered into the LXNAV SxHAWK. Class: Options for Touring, Ultralight, World, Twin-seater, Club, 18-meter, 15-meter, Open, Standard and Unknown are available.
- Page 59 Rev #1 Version I9.33/S9.34 January 2025 5.6.13.1 List of Password Functions DELETE WHOLE LOGBOOK 99999 RESET TO FACTORY DEFAULT 00666 OPTION ACTIVATION / DEACTIVATION 30000 AHRS REACTIVATE 23519 AUTO ZERO 01043 REPORT TO SD CARD 00111 UPDATE FIRMWARE 89891 DELETE AHRS PASSWORD 23519 START CAN LOGGER 43001...
- Page 60 Electronic TE Compensation Compensation with TE probe 6.1 Altimeter The altimeter of the LXNAV SxHAWK is temperature compensated from -20ºC up to + 60ºC. The altimeter is calibrated up to 20000 m. 6.2 Speed Command Speed command flying based on the MacCready theory is a very useful tool to optimize cross- country speed.
- Page 61 HAWK system was developed by Prof. Heinrich Meyr and Peng Huang in cooperation with LXNAV. It features a completely new approach towards measuring the three-dimensional wind vector. A conventional vario measures the vertical movement of the glider (vario) based on an energy conservation principle.
- Page 62 Rev #1 Version I9.33/S9.34 January 2025 Wind field estimated by HAWK. spatial coordinates (x, y, z) and the time t. The wind field is described by very complex mathematical equations. For our purposes, it is sufficient to use a greatly simplified model. We assume that the wind vector comprises two elements: a slowly varying component and a rapidly varying random disturbance.
- Page 63 Rev #1 Version I9.33/S9.34 January 2025 In picture above, the variometer shows a value of 3m/s. This value corresponds to the slowly changing part of the model. The rapidly changing, random part corresponds to the fluctuations of the pointer around the mean. The pointer fluctuations are Gauss distributed, see right picture above.
- Page 64 Rev #1 Version I9.33/S9.34 January 2025 Let us choose a value wind variance = 0.1, which looks plausible. Qualitatively, if we select a very small value of wind variance = 0.001 the algorithm will average the estimate since it considers large deviations ∆d as highly unlikely and suppresses them. We next consider the opposite case and select a much larger value wind variance = 0.5.
- Page 65 Rev #1 Version I9.33/S9.34 January 2025 glider, not the air mass movement. If we fly with a large side slip, the glider‘s climb rate is smaller than flying with zero sideslip in the same thermal. The Netto TEK and the Relative TEK vario are derived quantities by adding fixed constants to Vario TEK.
- Page 66 Rev #1 Version I9.33/S9.34 January 2025 Segment A: Sideslip angle and Netto difference. In a nutshell: The agreement between TEK and HAWK vario during stationary circling of the glider is particularly good. This changes completely when we analyse segment B and C. Picture below shows two segments B and C of the same flight of the ASG 32.
- Page 67 Rev #1 Version I9.33/S9.34 January 2025 In segment C the sideslip angle is decreased to 6.2 degrees. The string is slightly pointing outside, as usual. We first analyse segment B where the sideslip angle is 12 degrees. The glider climbs with 1.8 m/s (2nd row in Table 1).
- Page 68 Rev #1 Version I9.33/S9.34 January 2025 TEK and HAWK vario during one circle 7.5 Dynamic behaviour Dynamic behaviour of the TEK vario and the HAWK vario is different. The vario HAWK and TEK are shown in the first figure above. The average climb rate of the two varios is shown in the bottom right.
- Page 69 Rev #1 Version I9.33/S9.34 January 2025 HAWK algorithm can compensate ±10° of the pitch offset. If the unit is installed in the glider with more offset, HAWK algorithm might not work properly. If installed device is not perfectly aligned with glider longitudinal axis it is essential to do a pitch alignment, which can be done in Setup>Hardware>AHRS menu.
- Page 70 January 2025 8 Flying with the LXNAV SxHAWK To get the best out of the LXNAV SxHAWK it is important that some preparation is made prior to take-off. Trying to configure the instrument while flying is very hazardous especially in a competition.
- Page 71 Rev #1 Version I9.33/S9.34 January 2025 Rotate the lower knob to modify any setting. Next check the safety altitude (height above destination, arrival altitude) setting. Page 71 of 91...
- Page 72 Rev #1 Version I9.33/S9.34 January 2025 9 Installation The LXNAV SxHAWK requires a standard 57 or 80mm cut-out. Three pressure connectors are fitted to the back of the SxHAWK. A label shows their functions: means static pressure connector. static ...
- Page 73 9.2 Connecting the LXNAV SxHAWK The LXNAV SxHAWK is connected to the 12V DC power supply. The red wire goes to + positive and blue wire goes to – ground. If you don’t use the (second seat unit) or other CAN...
- Page 74 CAN connector should be left terminated with a CAN terminator. The SC cable is used for the external switch intended for switching between climb and cruise mode. 9.3 Cut-outs 9.3.1 Cut-Out for SxHAWK 9.3.2 Cut-Out for SxHAWK 80MM 4,5mm 6,3mm The length of the screw is limited to max 4mm!
- Page 75 The PDA and FLARM ports are not designed in accordance with the IGC standard. They can be used only with a dedicated cable. Do not plug an unknown cable into them as it may damage the LXNAV SxHAWK unit. Page 75 of 91...
- Page 76 Universal flap sensor has two independent interfaces, which can simultaneously communicate via can and RS485 bus. That means, it can be connected to SxHAWK and Lx9xxx at same time. To do that you need to order UNI splitter, which will split the signal on two networks (RS485 and CAN).
- Page 77 9.5.4 Remote Stick (Remote-CAN) The remote stick is also connected to the CAN bus. On the SxHAWK a special menu is provided to register the remote stick. The device must be registered in case of two-seat device; it is possible to have two remote sticks, one registered on the front and another on the rear device.
- Page 78 Ground (output) Transmit from LXNAV SxHAWK-RS232 (e.g. Computer, IPAQ38/39xx) (input) Receive to LXNAV SxHAWK-RS232 (e.g. Computer, IPAQ38/39xx) (output) Transmit from LXNAV SxHAWK LV-TTL (3.3V) (e.g. Oudie, HP302, HP31x) (input) Receive to LXNAV SxHAWK LV-TTL (3.3V) (e.g. Oudie, HP302, HP31x) 5V OUTPUT (maximum 1A) RS232 pins and TTL pins are using same serial port, therefore they cannot be used for two different devices at the same time..
- Page 79 (output) Transmit from LXNAV SxHAWK-RS232 (e.g. NANO power 232) Ground 9.6.1.3 Main Port The main port is used to connect the SXHAWK to the main wiring loom. 9.6.1.4 Audio Port The supplied speaker is connected with a standard 3mm phono jack. The audio amplifier is class D amplifier.
- Page 80 January 2025 Wirings 9.6.1.5 LXNAV SxHAWK Wiring If a CAN BUS cable is not connected to an LXNAV SxHAWKD, the CAN connector must be terminated with a CAN TERMINATOR! 9.6.1.6 LXNAV S10xD Wiring The rear seat device is powered from the first seat device.
- Page 81 Oudie Remote stick SxHAWK FlarmMouse PowerMouse Classic Flarm Remote CAN cable CC-NP-OUDIE Terminator CAN Y cable 9.7.3 FlarmMouse – SxHAWK – Oudie – Flaps Sensor Oudie SxHAWK Flap Sensor FlarmMouse PowerMouse Classic Flarm cable CC-NP-OUDIE Terminator CAN Y cable Page 81 of 91...
- Page 82 Rev #1 Version I9.33/S9.34 January 2025 9.7.4 FlarmMouse – SxHAWK – Oudie – Mop Sensor Oudie SxHAWK MOP Sensor FlarmMouse PowerMouse Classic Flarm cable CC-NP-OUDIE Terminator CAN Y cable 9.7.5 FlarmMouse - Nano3 - SxHAWK - Oudie Remote stick Oudie...
- Page 83 Rev #1 Version I9.33/S9.34 January 2025 PowerMouse + (Nano3) - SxHAWK - Oudie Remote stick Oudie Nano3 PowerMouse Port1 Port2 Nano Power PF* Remote CAN gets power from S8x/S10x V7-GPS-PF cable CC-NP-OUDIE Terminator CAN Y cable 9.7.6 SxHAWK– S10xD S10xD...
- Page 84 CAN Y cable 9.7.8 SxHAWK Vario Connection to a LXxxxx All LXNAV standalone varios with a PDA port can be connected to a LXxxxx system. The biggest advantage of connecting them is the ability to declare tasks from the LXxxxx to the stand-alone vario.
- Page 85 Version I9.33/S9.34 January 2025 SxHAWK CC-NP-OUDIE LX5-SVAR Option 3: From SxHAWK PDA to LXxxxx on 5pin connector (to the GPS port can be connected external flarm) LXxxxx SxHAWK LX5-PDA This configuration is used for example when using your Sxx vario together with LXxxxx and Flarm device (e.g.
- Page 86 LXxxxx -> Sxx. If you edit this setting on your Sxx device, they will not be transfer to the LXxxxx unit. SC/VARIO mode can be also transferred from LXxxxx to SxHAWK. To enable SC/VAR switching on SxHAWK side, you must set it under setup/vario/Auto SC to NMEA input Page 86 of 91...
- Page 87 Rev #1 Version I9.33/S9.34 January 2025 9.8 Data Transfer 9.8.1 SxHAWK Data Transfer/Action Remark SxHAWK LXxxxx MC/Ballast/Bugs; ALT; TSK ← declaration; Pilot declaration, SC switching SxHAWK ↔ Oudie / Oudie BT MC/Ballast/Bugs; ALT; TSK declaration; Pilot declaration SxHAWK → FLARM...
- Page 88 10.1 Updating LXNAV SxHAWK Firmware Using a Micro SD Card Copy the firmware ZFW file type to the SD card and insert into the device. The SxHAWK will ask you to update. After confirmation the firmware update will be performed automatically.
- Page 89 Rev #1 Version I9.33/S9.34 January 2025 Page 89 of 91...
- Page 90 Rev #1 Version I9.33/S9.34 January 2025 11 FAQ 1. How can I save the IGC file? Go to the logbook page, select the flight of interest, short press on the lower rotary button and download the flight to the micro-SD card. 2.
- Page 91 Rev #1 Version I9.33/S9.34 January 2025 Page 91 of 91...
Need help?
Do you have a question about the SxHAWK and is the answer not in the manual?
Questions and answers