Advertisement
Quick Links
Advertisement

Related Manuals for Radcal Accu-Gold T3


Summary of Contents for Radcal Accu-Gold T3
- Page 1 ACCU-GOLD T3 USER GUIDE ...
- Page 2 Accu-Gold T3 is easy to use and understand, making it the perfect tool for anyone working with radiation. The Radcal Accu-Gold T3 is the next generation x-ray measurement system that combines a portable standalone measurement system with software that has the ability to provide accurate and reliable dose measurements in real-time. This is achieved through the use of advanced algorithms and sophisticated sensors that are specifically designed to detect and measure radiation.
- Page 3 AG3 Wireless Connection needs. Sensor Options The Accu-Gold T3 provides the ability to save all of your measurements. AGMS-D+ The Accu-Gold T3 system consists of a AGMS-M+ built-in digitizer module whose function is AGMS-DM+ to transform the analog signals generated Ion Chambers...
- Page 4 60° 35° The T3 will auto-switch between two different viewing angles USB Flash drive connector (used for measurement export and firmware or profile updates) Touch screen Power and Status LED (see legend on unit for meaning of colors). See chart for additional details.
- Page 5 (Model 8154), is placed on top of the sensor. Making a Measurement with multiple sensors connected The Accu-Gold T3 allows you to connect up to five sensors (depending on model – see System Configuration Options and Capabilities) simultaneously and collect data from all of the connected sensors.
- Page 6 Quick Start Plug in your sensors, start the T3 - you are ready to make measurements … Session title Takes you to the Home screen Touch play when the Play sensors are in place. Touch pause before Pause moving sensors or cables. Indicates system is Ready to make a measurement.
- Page 7 Make your first measurement… After the exposure the values are updated by the post-exposure results and the waveform is displayed. Data shown is the real-time data as the exposure is happening Measurement has been triggered...
- Page 8 The Main Menu If you attach the sensor before you start, the software will go straight to measuring* (see previous page). Otherwise, click on Quick-Start to start. *This can be overridden in the Settings menu: “Auto-Start Measurement” If the choices made by Quick-Start are not appropriate** for the measurements you are making, choose Manual Mode or select a profile from the Profile Library.
- Page 9 The Manual Mode Choose the sensor to use for triggering the measurement Before making an exposure, make sure to choose the Anode/Filter combination that matches the The Accu-Gold machine being Digitizer Module measured. (AGDM) allows you to simultaneously collect data from multiple sensors.
- Page 10 8 seconds. Min allows one to make successive measurements quickly. In between measurements, zeroing is skipped and therefore use Min with large signals only where zeroing in between *https://radcal.com/download-application-notes/ measurements is not important – use with “High Trigger Level”.
- Page 11 The Profile Library When you don’t get the desired result using Manual Mode, a suitable profile might be available based on Modality or Manufacturer.
- Page 12 The Profile Library (cont) Returns to previous screen Profile selection Use this if a custom Describes the profile has been suggested usage supplied to you. conditions for the profile Profile information...
- Page 13 The Measure Screen This will open the Sessions management screen. Opens mini-menu A new session is started automatically. Use this if you want to start a new one. Information about the sensors and what measurement configuration is being used. Allows you to name Returns to the current session Profile selection...
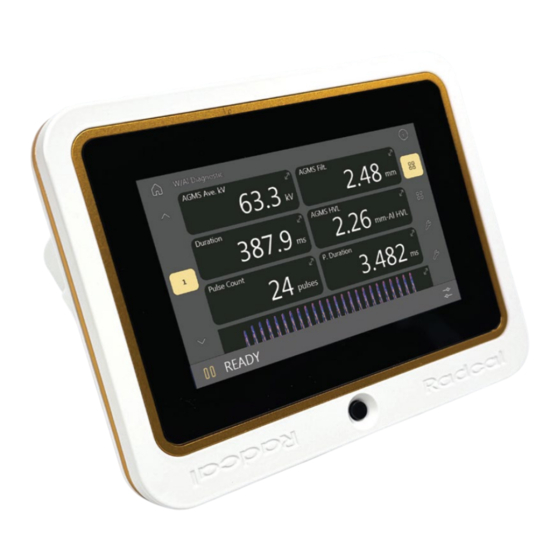
- Page 14 The Measure Screen While making the measurement, the screen will expand* to make it easier to see the data from a distance. The screen will revert back to the original size after 5 seconds. Touching a cell will zoom that one cell out to the size of the screen in order to see the values even further across a room.
- Page 15 The Measure Screen (cont) If an ion chamber is used, on the first measurement it Touch the waveform anywhere will require that you wait 60 seconds while the bias to expand it (see next page) supply stabilizes. Touching “Skip” terminates the recommended stabilizing time.
- Page 16 The Measure Screen (cont) Returns to Measure screen Touching the small waveform on the measurement screen will fill the screen with the waveform in order to see more detail. Touch the ‘X’ to return.
- Page 17 The Measure Screen (cont) Touch the comment Returns to icon to open the Measure Details View. screen Touch the pencil and you can add comments to the Checking the box will measurement using the copy the Comment to built-in keyboard. the next measurement.
- Page 18 Customizing the Screen The screen can be customized to display different result values. There are two Standard display profile pages and two Custom pages that can be modified. The Standard pages will update based on the sensors being measured. The Custom pages will always show the values you have chosen.
- Page 19 Customizing the Screen (cont) The default kV measurement is Average kV. See AN1016 for more information on the different types.
- Page 20 Sessions * = Current session Data on the T3 is segregated into sessions. Every time the T3 is turned on, a new session is automatically created and automatically saved when turned off. Use “Start New” to create additional session groups without turning off the unit. Adding data to a previous session is possible by touching the ‘>’...
- Page 21 The Sessions screen (cont) The flash drive will contain .agx files that correspond to the session files from the T3. Insert a USB flash drive Measurement data can be into the unit first. All of viewed using AG3 and then the T3 data will be exported to Excel if desired.
- Page 22 The Settings Menu - System Turns on/off the sounds generated during measurements The unit will dim the display after 30 seconds and power off after 30 minutes of no activity unless turned off here. The unit will go into Quick-Start when turned on unless turned off here.
- Page 23 The Settings Menu – Wi-Fi mode The T3 Pro can work in sync with AG3 wirelessly using a Wi-Fi connection as an access point. Make sure Wi-Fi is ‘On’ You will need to tell your PC how to In AG3, at the Main menu, choose on your computer then connect to the T3: Connection then “WiFi Sync...
- Page 24 The Settings Menu – USB mode The T3 Pro version can work in sync with AG3 also by using a USB cable, thru a USB connection. Connect your computer USB connection to In AG3, choose Connection the T3 USB using a USB cable with a then “USB AGDM+”...
- Page 25 The Settings Menu - Units Dose Area Product (DAPCHK or 10X6-60DAP) measurements can be displayed in cm or m units of area Dose Length Product (CTDI chamber) measurements can be displayed in cm or m units...
- Page 26 The Settings Menu - About Firmware Version – when an update is available compare this number against the version listed on the update page: https://radcal.com/download-accu-gold-software/...
- Page 27 So what happens when there is no profile for what you need? Contact Radcal to discuss your needs and we will Select Yes assess your situation. We will make a profile that is suited for your specific needs. If this is a general need, we will incorporate the profile in our profile library and release it in the next version of the software.
- Page 28 Differences between T3 and AG3 T3 is a portable/wireless version of AG3 with a few exceptions. As T3 development continues, future releases will provide enhancements to minimize them. The major differences are: - With AG3, it is possible to reanalyze a session recorded recently. Since the T3 does not yet save raw data, it does not have the ability to reanalyze.
- Page 29 Specifications Declaration of Conformity https://radcal.com/downloads-conformity/ Specifications Making Low Level Measurements Using Ion Chambers Ion Chambers When making low dose measurements using an ion chamber (in the range 10X6-6 of 10 times the minimum rated range), it is important to eliminate all sources...
- Page 30 Operating temperature: 15 °C to 35 °C for Declaration or Conformity) Pressure: 60 to 105 kPa The Accu-Gold T3 Basic and Pro models conform to Humidity: Up to 80% RH or 20 g/m ISO/IEC/UKCA requirements: Electromagnetic Compatibility Storage: Temperature 0 °C to +60 °C...
- Page 31 T3 Wireless Radio Regulatory Information Wireless Radio Information – WiFi Module ESP32-C3-WROOM-02 Espressif Systems Operating at 2.4GHz FCC: Industry Canada Statement: Contains FCC ID: 2AC7Z-ESP32C3WROOM Contains: IC: 21098-ESPC3WROOM This device complies with part 15 of the FCC This device complies with RSS-210 of the Rules.
- Page 32 Warranty for the Accu-Gold Measurement System Non-Warranty Repairs Radcal warrants that, in the event that any defects in material The calibration of this instrument was correct within specified or workmanship should develop within one year of the date of limits when the instrument left our factory. Radcal cannot be...
- Page 33 Software Limitations Maximum disk / flash space reserved for raw data recordings • AG3: 512MB (oldest ones will be deleted when reaching • limit) T3: 128MB (currently disabled-future feature) • Maximum measurement length, due to configuration • measurement profiles: AG3: 120s •...
- Page 34 426 West Duarte Road Monrovia, CA 91016-4591 USA USA (626) 357-7921 Fax USA (626) 357-8863 email sales@radcal.com www.radcal.com Customer Support - (626) 357-7921 x123 cust_sup@radcal.com Radcal Part # MNL/T3 4094518 Rev: - Firmware V3.4 & on Printed: Aug 2024...
Need help?
Do you have a question about the Accu-Gold T3 and is the answer not in the manual?
Questions and answers