
Nacon REVOLUTION 5 PRO Manual
- Start manual (260 pages) ,
- Manual (22 pages) ,
- Faq (5 pages)
Advertisement
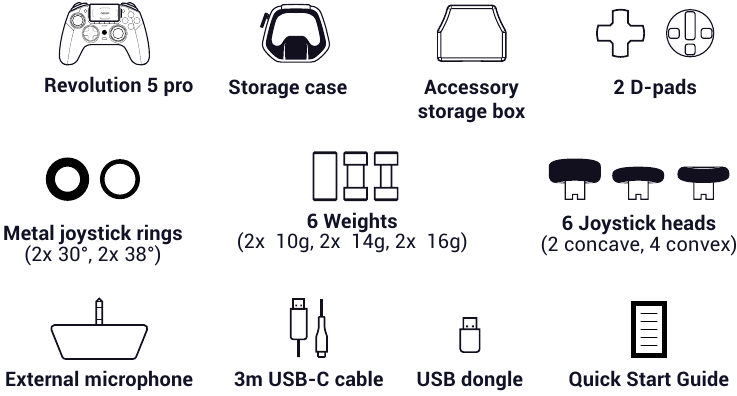
- 1 Contents
- 2 Additional information
- 3 Controller elements
- 4 Joysticks, D-Pad, joystick shaft and Hand grips
- 5 Using your controller on a PC*
- 6 Using your controller on a PlayStation5 console
- 7 Using your controller on a PlayStation4 console
- 8 Trigger Stopper
- 9 Reduced trigger data range
- 10 Information about wireless communication
- 11 Hall effect technology
- 12 Vibration
- 13 Classic & Advanced modes
- 14 Mapping the rear shortcuts
- 15 Advanced mode settings via the dedicated PC application (APP)
- 16 Audio functions
- 17 Technical support
- 18 Documents / Resources
Contents
This product has been designed to enhance your gaming experience. Please keep this user manual in a safe place for future reference.
Additional information
Dimensions: 190 x 189 x 89 mm
Weight: 308g approx.
Consumption: 5V 500mA
 Please note: As we aim to continually improve your gaming experience, we are likely to publish firmware updates (also called micro-software) via the Revolution 5 Pro application.
Regularly check the application for the latest updates.
Controller elements

- USB-C connector
- Touch pad
- 4x Profile LEDs (active in Advanced mode only)
- Options button
- Action buttons
- Right joystick
- Microphone Mute button
- 3.5mm Jack socket
- D-pad
- PS home button
- PS4™ LED player status indicator
- PS5® LED player status indicators + battery level indication
- Left joystick
- Share button
- Format selector (PS5 ®, PS4™, PC*)
- Classic & Advanced setting selector
- L2 trigger
- L2 trigger stopper
- S2 shortcut button
- S4 shortcut button
- Volume down button
- Bluetooth ® button
- Volume up button
- S3 shortcut button
- S1 shortcut button
- R2 trigger stopper
- R2 trigger
- Profile button

- Wired, wireless mode button
- USB-C input
- Multi-function button
- USB dongle
- Pairing LED
- Pairing button
*PC compatibility (Windows 10/11) not tested nor endorsed by Sony Interactive Entertainment.
Joysticks, D-Pad, joystick shaft and Hand grips
Customize your controller with a range of accessories:
- Remove the joystick head or directional cross (as shown below):
Grasp the directional cross joystick head with two fingers and pull.

- Install a new joystick head or directional cross: Position the head or cross on its dedicated slot and press until the part engages and you hear a "click".

- Change the joystick shaft:
Changing the shaft on your left or right joystick allows you to get a more reactive or precise response on certain games. To change the joystick shaft, you must:- Remove the joystick head by pulling on it gently;
- Remove the joystick shaft by pulling it;
- Put the desired joystick shaft in place;
- Fit the underside of the joystick head and match the shape with the shape in the top of the shaft. Press gently until you feel the joystick head 'click' in to position.

- Change the hand grip weights: To replace the weights, push and slide down the hand grip covers to remove them. Insert the desired weight and slide the cover back in position until you hear a "click".

Use this external microphone to communicate with your teammates efficiently. This simple plug-in Jack microphone is ideal to communicate in combination with your Bluetooth headset for example.

The controller uses Bluetooth 5.2 technology to connect with in-ear audio devices or other wireless headsets. In this situation the Bluetooth, and RF communication to the USB dongle, operate simultaneously without interference. Audio from the PlayStation 5 console, will be heard through your Bluetooth connected device. When you want to chat please attach the External MIC to the 3.5mm audio socket of the controller.


Note that when a wired headset is connected to the 3.5mm audio socket, of the controller, the Bluetooth function will be disabled.
Using your controller on a PC*
Make sure that the format selector button is set to PC*.

If you are playing in Wired Mode:

Make sure that the Wired/Wireless mode button is in the Wired icon position (as shown above).
Using the USB-A to USB-C cable provided, connect your controller to your PC. Your controller will be auto-detected and is ready to use.
If you are playing in Wireless Mode:

Make sure that the Wired/Wireless mode button is in the Wireless icon position (as shown above).
Make sure your USB dongle is properly connected to the PC*. Press the PS home button and your controller is ready to play.
*PC compatibility (Windows 10/11) is not tested nor endorsed by Sony Interactive Entertainment.
Using your controller on a PlayStation®5 console
Make sure that the format selector button is set to PS5®.

If you are playing in Wired Mode:

Make sure that the Wired/Wireless mode button is in the Wired icon position (as shown above).
Using the USB-A to USB-C cable provided, connect your controller to your console. Press the PS home button and your controller is ready to use.
If you are playing in Wireless Mode:

Make sure that the Wired/Wireless mode button is in the Wireless icon position (as shown above).
Make sure that your USB dongle is properly connected to the console.
Press the PS home button and your controller is ready to use.
Using your controller on a PlayStation®4 console
Make sure that the format selector button is set to PS4™.

If you are playing in Wired Mode:

Make sure that the Wired/Wireless mode button is in the Wired icon position (as shown above).
Using the USB-A to USB-C cable provided, connect your controller to your console. Press the PS home button and your controller is ready to use.
If you are playing in Wireless Mode:

Make sure that the Wired/Wireless mode button is in the Wireless icon position (as shown above).
Make sure that your USB dongle is properly connected to the console.
Press the PS home button and your controller is ready to use.
Trigger Stopper
To activate or deactivate the trigger stopper, follow these steps:
- Press down the button to unlock it.
- Press and hold the button, and then slide up or down to activate/deactivate the stopper.


Reduced trigger data range
The trigger stopper is a completely mechanical function. You can increase the reactivity of your triggers in two ways:

- IN CLASSIC MODE: Press and hold the Profile button, then fully press on the trigger. The controller will vibrate once to indicate that the short range travel is selected, and will vibrate twice to indicate that the long range travel is selected. You can then release the trigger and Profile button.
- IN ADVANCED MODE: Use the application and save this setting in one of your profiles.
Information about wireless communication
This controller uses 2.4GHz radio frequency range, so you may notice some issues if other products use the same radio frequency range.
Nacon validated operability between the PlayStation®5 console (CFI-1000 series) and this controller.
It is recommended to insert the USB dongle into the USB port at the front of your PlayStation®5 console (CFI-1000 series).
The controller uses Bluetooth 5.2 technology to communicate with Bluetooth® in-ear audio devices or other wireless headsets. In this situation, Bluetooth and RF communication operate simultaneously without interference. It is also possible to connect the external microphone to the 3.5mm jack port for data transmission from the microphone. If headphones are connected to the jack, audio and microphone data will only be transmitted via the audio jack and Bluetooth will be disabled.
If a wired headset is connected to the 3.5mm jack port, it is not possible to connect or pair a Bluetooth® headset or in-ear headphones to the controller. If you try, the light ring around the Right joystick, will flash Red for 5 seconds to indicate that this action is not recognized.
If in-ear audio devices are connected to the jack port, it will not be possible to pair or connect in-ear headphones or wireless headphones.

Hall effect technology
By using Hall effect technology, which is based on the use of magnetic sensors and magnets, it will prevent friction and mechanical wear on key components. Consequently, the lifespan is greatly increased compared to traditional mechanisms.
Vibration
The controller is equipped with a vibration engine which is only compatible with PC* and PS4™ games. In PS5® mode on PS5® games played on the PS5® console, the controller will not vibrate.
Classic & Advanced modes
Classic mode: your controller will act as a classic DualSense® wireless controller, DUALSHOCK®4 wireless controller, or PC controller.
You can access the following customization options "on the fly" without the need for any App:
- Mapping of the 4 rear shortcut buttons.
- Trigger travel data range, via the trigger stopper position.
- Audio control, via the touch pad.
Advanced mode: access using the Revolution 5 Pro App for the full customization experience.
Download the App at https://nacongaming.com/revolution-5-pro and follow the tutorial. Enjoy!
Your controller is pre-loaded with 4 profiles so you can experience the range of features.
Profile 1: Racing - Sports - adapted for racing and sports games
Profile 2: FPS – adapted with a reactive curve on your Left joystick for quick movement and a progressive curve on the Right joystick for precision aiming.
Profile 3: Arcade - Fighting – adapted with an instant curve on the Left and Right joysticks for a quicker reaction time.
Profile 4: Infiltration – adapted with an ultra reactive curve on the Left joystick for quick movement and a delayed one on the Right joystick for precision actions.
Using the App, you can create and share your profiles with your friends and the gaming community.
Mapping the rear shortcuts
IN CLASSIC MODE
- Press and hold the Multi-function button for 3 seconds. The light ring around the Right joystick will start to flash;
- Now, press the rear shortcut button that you want to program. The Profile LED, which is linked to the selected rear shortcut, will light up (see image below);
- Then, press the button that you want to associate with the shortcut. The profile LED will flash 3 times to indicate that the mapping was applied to the selected shortcut;
- Repeat these steps for each shortcut or if you want to change an existing setting;
- The profile LED will flash 3 times to indicate that the mapping was applied to the selected shortcut;
- Repeat these steps for each shortcut or if you want to change an existing setting.
- Apply a short press on the Multi-function button to leave this mode and save your settings. The light ring will stop flashing.
Profile LED 3

S1 is being mapped
Profile LED 3 is in:
White (PS5 mode) or
Blue (PS4 mode) or
Purple (PC mode), the other LEDs are OFF.
Profile LED 1

S2 is being mapped
Profile LED 1 is in:
White (PS5 mode) or
Blue (PS4 mode) or
Purple (PC mode), the other LEDs are OFF.
Profile LED 4

S3 is being mapped
Profile LED 4 is in:
White (PS5 mode) or
Blue (PS4 mode) or
Purple (PC mode), the other LEDs are OFF.
Profile LED 2

S4 is being mapped
Profile LED 2 is in:
White (PS5 mode) or
Blue (PS4 mode) or
Purple (PC mode), the other LEDs are OFF.
Advanced mode settings via the dedicated PC application (APP)
Up to 4 fully customizable profiles via the dedicated PC application available on the nacongaming.com website. The application (APP) is compatible with Windows 10, 11 and macOS.
Once you've installed the application, you can customize your controller and have fun testing and optimizing your settings for your favorite games.
Please note: Up to 4 custom profiles can be saved.
Features of the Application
- Customize the amplitude of the Left and Right joysticks and their dead zones.
- Reassign functions to the controller buttons (with the exception of the Share, Options and PS buttons).
- Modify the dead zones on the Left and Right triggers.
- Customize the intensity of the joystick vibrations.
- Choose between the different D-pads available: 8 directions or 4 directions.
- Customize shortcuts.
- Controller firmware updates.
Launching the application (APP)
Once you have downloaded the application make sure that the controller is connected to your PC before opening the application. Also make sure that:
- The Mode selection button is in Wired mode.
- The format button is in PS5® or PS4™.
- The Classic/Advanced mode switch is in Advanced mode.
Now you are ready, you can start the application and follow the on-screen instructions to personalize your profile.
Once you have personalized your profile and closed the application, you can switch from one mode to the other by pushing the switch to the "C" marking for Classic mode or to the "A" marking for Advanced mode. You can switch from one profile to another by pressing the profile button.
Indicator LEDs
 - Indicator LEDs - Step 1")
- Profile number + Audio/Microphone settings + Mute status
- PS5® player number + Battery level on demand (PS4™/PC*) + Battery charging in OFF mode.
- System Mode (PS5®/PS4™/PC*) + Multifunction + Bluetooth® pairing.
- In PS5® Mode:
- Classic Mode: LEDs on = microphone muted, either volume up/down or microphone gain, profile number indicator, mapping of the shortcuts.
- Advanced Mode: Muted microphone, Profile number indicator.
 - Indicator LEDs - Step 2")
![]() The RGB LED on the USB dongle indicates that pairing is in progress and displays connection status with the controller.
The RGB LED on the USB dongle indicates that pairing is in progress and displays connection status with the controller.
- In PS4™ Mode:
- Classic Mode: LEDs on = microphone muted, either volume up/down or microphone gain, profile number indicator, mapping of the shortcuts.
- Advanced Mode: Muted microphone, Profile number indicator.
 - Indicator LEDs - Step 3")
![]() The RGB LED on the USB dongle indicates that pairing is in progress and displays connection status with the controller.
The RGB LED on the USB dongle indicates that pairing is in progress and displays connection status with the controller.
- In PC* Mode:
- Classic Mode: The LEDs stay off except during the mapping of shortcuts.
- Advanced Mode: These 4 LEDs are used to indicate the profile.
 - Indicator LEDs - Step 4")
![]() The RGB LED on the USB dongle indicates that pairing is in progress and displays connection status with the controller.
The RGB LED on the USB dongle indicates that pairing is in progress and displays connection status with the controller.
- In PS5® Mode:
 - Indicator LEDs - Step 2")
 The RGB LED on the USB dongle indicates that pairing is in progress and displays connection status with the controller.
 - Indicator LEDs - Step 3")
 - Indicator LEDs - Step 4")
Audio control via the touch pad
The sound equalizer (also called an "EQ") is an audio filter that isolates certain frequencies and either boosts them, lowers them, or leaves them unchanged.
With the multi-function button, you can use your touch pad to adjust your audio settings.
While in this mode, the light-ring around the Right joystick will flash continuously in White - Blue - Purple - White - Blue - Purple until you have finished using these microphone gain and equalizer functions.
CLASSIC MODE
Increase or decrease headset microphone gain:
To adjust the microphone gain, short press on the multi-function button and use the touch pad by pressing up/down on it.
Press up to increase the gain, press down to decrease it.

Equalizer:
To select an equalizer profile, short press on the multi-function button and use the touch pad to scroll through the Sound equalizer by pressing left/right on it. You can now navigate between the 4 different profiles of audio equalizers as illustrated below:

 |  |  |  |  |
| No EQ | EQ 1 Racing - Sports | EQ 2 FPS | EQ 3 Arcade - Fighting | EQ 4 Chat |
| All the LEDs are OFF. | The LED 1 is in White, the other LEDs are OFF. | The LED 1 and LED 2 are in White, the other LEDs are OFF. | The LED 1, LED 2 and LED 3 are in White, the other LEDs are OFF. | All the LEDs are in White. |
ADVANCED MODE
Activate/deactivate sound equalizer:
To activate/deactivate the equalizer, short press on the multi-function button and use the touch pad by pressing left/right on it.
To customize your own equalizer, use the Revolution 5 Pro App.

Audio functions
Volume control
When an audio device is connected to the controller, press the Volume up button to increase the volume. Press the Volume down button to decrease it.

Bluetooth® pairing
To pair the controller to Bluetooth® true wireless earbuds or headset, follow these steps:
- Put the controller and true wireless earbuds/headset next to each other.
- Put the Bluetooth® true wireless earbuds/headset in to pairing mode.
- Press and hold the Bluetooth® button on the controller for 6 seconds.
- The controller will go in to pairing mode and light ring around the Right joystick will flash alternatively in blue and white.
- When the controller is paired, the halo ring will stop flashing.
- Future connections of the same true wireless earbuds/ headset will pair automatically. Make sure that the Bluetooth® is turned on, on the controller, by pressing and holding the Bluetooth button for 3 seconds.
![]()

NOTE: The controller cannot connect to the console via Bluetooth®.
How to charge your Revolution 5 pro controller
- The Revolution 5 pro controller contains a Lithium Ion battery.
- To charge the battery connect the USB-A to USB-C cable to your PS5® console, PS4TM console or PC and then to the controller. For the fastest charge time, make sure your controller is powered OFF. If you wish to use the controller and charge at the same time, then the battery will 'trickle' charge and the charge time will be extended.
- To check the battery level in PS5® mode when you are connected via the cable, tap the back of the controller twice. The White LEDs below the touch pad will light up. There are 5x LEDs and they indicate the level as follows:
5x LEDs = 100–80%
4x LEDs = 80–60%
3x LEDs = 60–40%
2x LEDs = 40–20%
1 x LED = 20–10%
![warning]() NOTE: When the battery level is below 10%, the 1x LED will start to flash. You need to immediately charge the battery.
NOTE: When the battery level is below 10%, the 1x LED will start to flash. You need to immediately charge the battery.
To check the battery level in PS5® mode when you are connected via the USB dongle, then go to the PS5® on-screen menu and you will see the battery level in the bottom left of your TV/Monitor screen.
To check the battery level, in PS4 mode or PC mode, tap the back of the controller twice. The White LEDs below the touch pad, will light up. There are 5x LEDs and they indicate the capacity as follows:
5x LEDs = 100–80%
4x LEDs = 80–60%
3x LEDs = 60–40%
2x LEDs = 40–20%
1x LED = 20–10%
NOTE: When the battery level is below 10%, the 1x LED will start to flash. You need to immediately charge the battery.
REMARK: Battery life is influenced by the features you have activated and the games you are playing. The more features you have activated, the quicker your battery life will be used.
To optimize play time, you can use the Revolution 5 Pro App to disable certain features such as LEDs and vibration.
*PC compatibility (Windows 10/11) neither tested nor approved by Sony Interactive Entertainment.
Important precautions
- This product is designed for indoor use only. Do not expose it to direct sunlight or bad weather.
- Do not expose the product to splashes, rain, drips or moisture. Do not immerse it in a liquid.
- Do not expose to dust, high levels of humidity, extreme temperatures or mechanical shocks.
- Do not use and do not open if the equipment is damaged. Do not attempt to repair it.
- When cleaning the outside, only use a soft, clean and damp cloth. Detergents can damage the finish and get inside the product.
- Do not carry the product while holding it by the cable.
- This product is not designed for people (including children) suffering from a physical, sensory or mental disability, or for users without the necessary and relevant experience or knowledge (unless they have been given advice and instructions on how to use the device from a person responsible for the user). Do not leave the product unattended, do not leave this product within the reach of children. Not suitable for children under 7 (the cable can get wrapped around the neck). This product shall not be connected to power supply source exceeding 15W. rated 5VDC 500mA.
Ergonomics
Keeping your hand in the same position for a prolonged period of time can result in pain. If this happens repeatedly, please consult your doctor.
As a precaution, take a 15-minute break every hour.
Technical support
For any information you can contact a hotline. Before calling, make sure you have gathered as much information as possible about the problem and the product.
UK
Email: support@nacongaming.com
Tel. : (+44)08081010970
Europe
Email: support@nacongaming.com
US/Canada email
(English/French)
Email: support.us@nacongaming.com
US/Canada Phone Support (English/French/Spanish)
Tel. : 1-833-622-6687
![]() @NaconGaming
@NaconGaming
![]() Nacongaming
Nacongaming
![]() Nacon International
Nacon International
Documents / Resources
References
![nacongaming.com]() Manette PS5 noire REVOLUTION 5 PRO - Nacon
Manette PS5 noire REVOLUTION 5 PRO - Nacon![nacongaming.com]() Manettes, Jeux vidéo, RIG, Equipements gaming - Nacon
Manettes, Jeux vidéo, RIG, Equipements gaming - Nacon![www.nacongaming.com]() Manettes, Jeux vidéo, RIG, Equipements gaming - Nacon
Manettes, Jeux vidéo, RIG, Equipements gaming - Nacon
Download manual
Here you can download full pdf version of manual, it may contain additional safety instructions, warranty information, FCC rules, etc.
Advertisement


Need help?
Do you have a question about the REVOLUTION 5 PRO and is the answer not in the manual?
Questions and answers