Table of Contents
Advertisement
Advertisement
Table of Contents

Subscribe to Our Youtube Channel
Related Manuals for Singer 30215


Summary of Contents for Singer 30215
- Page 1 2 & 5 Stitch Pattern Machines Instruction Manual...
-
Page 2: Table Of Contents
2 & 5 Stitch Pattern Machines TABLE OF CONTENTS IMPORTANT SAFETY INSTRUCTIONS KEEPING SEAMS STRAIGHT PRINCIPAL PARTS TURNING SQUARE CORNERS STANDARD ACCESSORIES ADJUSTING NEEDLE POSITION INCLUDED WITH MACHINE ADJUSTING THREAD TENSION CONNECTING MACHINE RECOMMENDED SETTINGS RUNNING MACHINE AND APPLICATIONS CHOOSING AND CHANGING NEEDLES ADJUSTING STITCH WIDTH FREE ARM SEWING ADJUSTING STITCH LENGTH... - Page 3 SINGER® is a Registered Trademark of The Singer Company Limited SINGER CUSTOMER ASSISTANCE IN THE U.S.A. TOLL-FREE NUMBER: 1-800-877-7762...
- Page 4 * Use this machine only for its intended use as described in this Operator's Guide. Use only attachments recommended by the manufacturer as * For double insulated machines, when servicing, use only identical Singer replacement parts. See contained in the Operator's Guide. instructions for Servicing of Double-lnsulated Appliances.
- Page 5 2 & 5 Stitch Pattern Machines IMPORTANT SAFETY INSTRUCTIONS continued... FOR EUROPEAN AND SIMILAR TERRITORIES: * Never operate the machine with any air openings This product is suppressed for radio and television blocked. Keep ventilation openings of the machine interference with the International Electrotechnical and foot controller free from the accumulation of lint, Commission requirements of the CISPR.
-
Page 6: Principal Parts
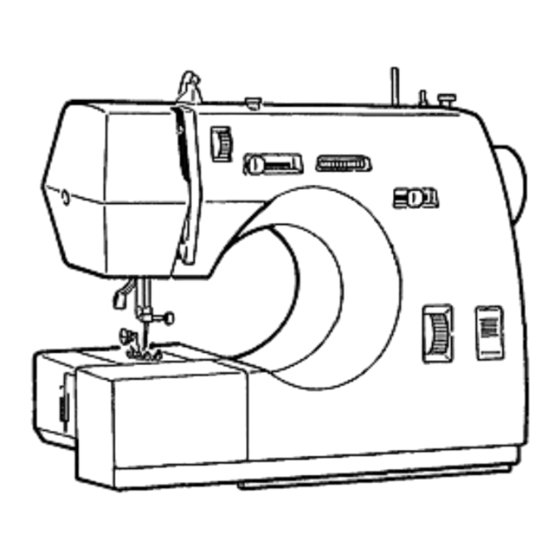
2 & 5 Stitch Pattern Machines PRINCIPAL PARTS 1. Spool pin 5. Stitch length dial 9. Presser foot 14. Tension dial 2. Bobbin winder 6. Needle position 15. Bobbin winder 10. Needle 3. Handwheel selector tension disc 11. Presser foot lifter 4. - Page 7 2 & 5 Stitch Pattern Machines STANDARD ACCESSORIES INCLUDED WITH MACHINE Note: Accessories are stored inside Extension table.
-
Page 8: Connecting Machine
2 & 5 Stitch Pattern Machines CONNECTING MACHINE Before plugging in your machine, be sure that the voltage and number of cycles indicated on the electrical data table (1), conform to your electrical power supply. Plug the controller (2), into the receptacle, at the right end of the machine. - Page 9 Machines CHOOSING AND CHANGING NEEDLES IMPORTANT: For best sewing results, use only Singer needles. Loosen needle clamp screw and remove needle. With flat side of needle to the back, insert new needle up into clamp as far as it will go. Tighten needle clamp screw securely.
- Page 10 2 & 5 Stitch Pattern Machines CHANGING PRESSER FOOT To remove presser foot, press lever on back of foot holder. To install presser foot, center new foot under holder. Lower presser foot lifter. REPLACING PRESSER FOOT WITH SHANK Remove presser foot. Loosen presser foot screw and remove shank.
- Page 11 2 & 5 Stitch Pattern Machines WINDING A BOBBIN Push indent. Raise spool pin. Place felt and thread onto spool pin. Lead thread from spool to back side of thread guide. Pull thread up to top of slot.
- Page 12 2 & 5 Stitch Pattern Machines Winding Bobbin Continued... Bring thread up and over thread guide to right side. Pull thread down into indent on right side. Wind thread clockwise around bobbin winder tension disc. Thread bobbin and place on spindle. Push bobbin to the right.
-
Page 13: Threading Bobbin Case
2 & 5 Stitch Pattern Machines THREADING BOBBIN CASE Open hook cover. Take out bobbin case by holding latch. Place bobbin into bobbin case. Pull thread into bobbin case slot. - Page 14 2 & 5 Stitch Pattern Machines Draw thread under tension spring and into delivery position. (as illustrated) INSERTING THREADED BOBBIN CASE Pull 10 cm of thread from bobbin case. While holding latch replace bobbin case.
-
Page 15: Threading Machine
2 & 5 Stitch Pattern Machines THREADING MACHINE 1. Turn power off. 2. Raise needle. 3. Raise presser foot. 4. Raise spool pin and Place felt and thread onto spool pin. 5. Pull thread into thread guide. 6. Follow arrows, guide thread into threading channel and up to take-up lever (1). - Page 16 2 & 5 Stitch Pattern Machines RAISING BOBBIN THREAD Open hook cover (1). Hold needle thread. Turn hand wheel towards you lowering, then raising needle. Gently pull needle thread to raise bobbin thread. Open loop. Pull both threads back. Open hook cover (1).
- Page 17 2 & 5 Stitch Pattern Machines SELECTING A PATTERN Note: To make selecting pattern easier move stitch width to "image" position. Turn pattern selector dial to select patterns. STRAIGHT STITCHING Preparation: Refer to "Recommended settings and applications". Place fabric under presser foot and lower foot. Begin sewing.
- Page 18 2 & 5 Stitch Pattern Machines Straight Stiitching continued... Guide fabric. STITCHING IN REVERSE Secure beginning and end of seam as shown. Press reverse button for steps 1 and 3.
-
Page 19: Keeping Seams Straight
2 & 5 Stitch Pattern Machines KEEPING SEAMS STRAIGHT Line up fabric with guideline (1) on needle plate. TURNING SQUARE CORNERS When stitching reaches desired pivot point, stop stitching. Lower needle into fabric. Turn fabric. Continue stitching seam. -
Page 20: Adjusting Needle Position
2 & 5 Stitch Pattern Machines ADJUSTING NEEDLE POSITION Center needle position. Left needle position. Right needle position. ADJUSTING THREAD TENSION Proper tension will produce identical stitches on both the front and back of your fabric (1). Too much tension - move tension dial to lower number. - Page 21 2 & 5 Stitch Pattern Machines RECOMMENDED SETTINGS AND APPLICATIONS STITCH STITCH PRESSER PATTERN APPLICATIONS LENGTH WIDTH FOOT Seaming, basting, darning and 1.5 to 4 Straight stitch topstitching. Overcasting, appliqueing, 0.5 to 4 monogramming and Zig-Zag button sewing. Hemming and 2 to 4 attaching lace.
-
Page 22: Recommended Settings
2 & 5 Stitch Pattern Machines ADJUSTING STITCH WIDTH Move lever to widen or narrow stitch. ADJUSTING STITCH LENGTH For more density (shorten stitch) move dial toward down. For less density (longer stitch) move dial toward up. FREE MOTION EMBROIDERY RECOMMENDED SETTINGS Stitch Selection: Straight or Zig-Zag Stitch Width:... -
Page 23: Inserting A Zipper
2 & 5 Stitch Pattern Machines INSERTING A ZIPPER RECOMMENDED SETTINGS Stitch Selection: Straight Stitch Stitch Width: Stitch Length: 1.5-4 Foot: Zipper Needle Plate: General Purpose Loosen screw (1) on zipper foot and slide it to ieft. The needle will enter right notch of foot. Stitch zipper to seam allowance. -
Page 24: Sewing Buttonholes
2 & 5 Stitch Pattern Machines SEWING BUTTONHOLES SETTINGS: Pattern: Zig-Zag Presser foot: Special Purpose presser foot Needle position: Left needle position Stitch length: Step 1 Mark buttonhole length on fabric. Set stitch width to leg graphic. Stitch down to point (A) and leave needle in fabric. -
Page 25: Caring For Your Machine
2 & 5 Stitch Pattern Machines CARING FOR YOUR MACHINE TO REMOVE SHUTTLE HOOK Open hook cover. Take bobbin case out of machine. Turn latch as illustrated. Remove shuttle race cover. Take shuttle hook out of machine. Clean shuttle race area with lint brush. - Page 26 2 & 5 Stitch Pattern Machines TO REPLACE SHUTTLE HOOK Hold shuttle by center pin and fit back into hook race. Insert shuttle raise cover indexing bottom pin into notch (1). Lock shuttle cover by turning latches back into position. Insert bobbin case.
-
Page 27: Removing And Replacing Light Bulb
2 & 5 Stitch Pattern Machines REMOVING AND REPLACING LIGHT BULB This machine is designed to use a 15 watt maximum light bulb. Loosen and remove screw (1). Insert zipper foot into top slot to open face plate (as illustrated). TO REMOVE LIGHT BULB Push bulb up into socket and turn to the left to unlock bulb pins. -
Page 28: Cleaning Your Machine
2 & 5 Stitch Pattern Machines CLEANING MACHINE To ensure reliability, take a few minutes to keep the machine clean. * Using the lint brush, remove lint or dust from: - presser bar - needle bar - shuttle hook (if there is a lot of lint in this area, remove the shuttle hook for cleaning) - machine surface (if necessary, dampen a soft cloth and use a mild soap to clean the surface) -
Page 29: Oiling Machine
2 & 5 Stitch Pattern Machines OILING MACHINE Take face plate away from machine. (refer to page Apply one drop of sewing machine oil on illustrated areas. Open hook cover. Take bobbin case out of machine. Apply a drop of sewing machine oil on the bottom of shuttle race. -
Page 30: Fabric, Thread And Needle Table
* The table below is a practical guide to needle and thread selections for most situations. * Refer to it before starting to sew. Be sure to use the same size and type of thread in both needle and bobbin. For best results, use only genuine Singer® needles. NEEDLES... -
Page 31: Performance Checklist
2 & 5 Stitch Pattern Machines UPPER THREAD BREAKS PERFORMANCE CHECKLIST Is machine properly threaded? When sewing difficulties occur look back through this Is thread freely unwinding from spool? Is needle manual to make sure you are correctly following the correct size for thread? instructions.
Need help?
Do you have a question about the 30215 and is the answer not in the manual?
Questions and answers
Para coser **** una puntada normal en que número tiene que estar el dial de puntada
The stitch length dial should be set between 1.5 and 4 for a normal stitch on a Singer sewing machine with part number 30215.
This answer is automatically generated
How do you correctly put bobbin in machine?
To correctly insert the bobbin in the Singer 30215 sewing machine:
1. Ensure the machine is disconnected from the electrical supply.
2. Remove the bobbin case carefully.
3. Check that the bobbin is correctly wound.
4. Insert the bobbin into the bobbin case, ensuring it is placed properly.
5. Make sure the bobbin case is correctly threaded.
6. Insert the bobbin case into the shuttle race properly.
7. Confirm that the bobbin rim is free of nicks to prevent thread breakage.
Following these steps ensures proper bobbin installation and smooth sewing operation.
This answer is automatically generated
How to put cover plate back on to machine