Advertisement
PREPARE THE OVEN BEFORE USE
 STOP! READ BEFORE PROCEEDING
Refer to diagrams and information in this guide for operation details.
HEATING ELEMENT PREPARATION
- Make sure the Oven is situated in a well- ventilated area and plugged in.
- Remove all original packaging, as well as accessories, from the appliance.
- Set the oven to 180°C (356°F) using the rear heating element for 15 minutes and press start.
- Allow the oven to cool. Open the door to allow air to ventilate out.
- Set the oven to 180°C (356°F) using the top and bottom heating elements for 15 minutes and press start.
- Clean the appliance and the accessories before first use. Refer to "Care and Cleaning" section for details.
NOTE: The heating elements may create some vapours and odours as their coatings burn off.
ATTACH PARTS
Install the Water Tank by sliding it from front to back along the right side of the Oven. Fill with distilled water. Do not fill beyond the max water line.
Attach the included Drip Tray by sliding it under the Oven door with the open reservoir side facing up.

NOTE: Distilled water is recommended to minimise scale build-up and maintain correct operating function.
YOUR OVEN

- Handle / Display Controls
- Drip Tray
- Water Tank
- Water Tank Lid
- Steam Exhaust Outlet
- Ventilation
INSIDE YOUR OVEN

- Food Probe Port
- Upper Heating Element
- Rear Heating Element / Convection Fan
- Lower Heating Element
- Wet Bulb Sensor
- Upper Temperature Sensor
- Lower Temperature Sensor
- Descale Drain Outlet
- Tray Positions (5)
- Light
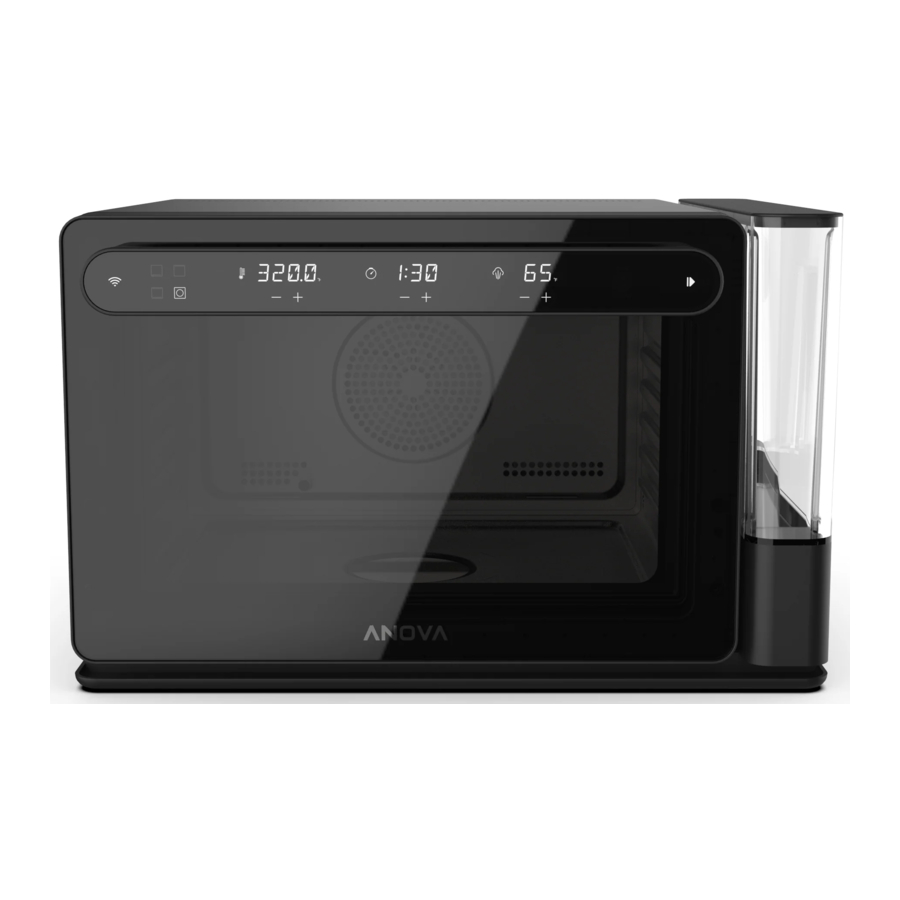
DISPLAY CONTROLS

The handle of the door on the Anova Precision® Oven is also the touchscreen display.
Oven settings can be controlled manually from the display or the Anova Precision® Oven App.
- Wi-Fi Connection Indicator
- Heating Element Selector
- Bottom
- Both
- Top
- Rear
- Temperature Mode
- Temperature Display
- Temperature Controls

- Cook Target Selector
- Cook Target Display
- Cook Target Controls
- Steam Display
- Steam Controls
- Fill Water Tank Indicator
- Descale Indicator
- Start/Stop
NOTE: The Start/Stop button will turn from white to red if there is an error.
HEATING ELEMENTS
The Anova Precision® Oven has three heating elements and a fan. Choosing your heating elements is separate from setting temperature targets.
![]() Rear element 2000 W, max 250°C (482°F)
Rear element 2000 W, max 250°C (482°F)
The Rear Heating Element is located behind the back wall of the oven cavity. It wraps around the Convection Fan, which helps to circulate heat throughout the oven.
Best for:
- air-frying
- bread baking
- browning roasts or poultry
- Sous Vide Mode
NOTE: The convection fan will always run at high speed while the rear element is in use.
 Top element 1900 W, max 250°C (482°F)
The Top Heating Element is located inside the oven ceiling. This element is the best choice when you want intense, direct, heat.
Best for:
- searing
- toasting
 Bottom element 700 W, max 180°C (356°F)
The Bottom Heating Element is under the floor of the oven. This element is lower power than the others, and the best choice when you want low, gentle, indirect heating.
Best for:
- proofing
- fermentation
- dehydrating
NOTE: Using both Top and Bottom Elements together is best for recipes based on traditional baking.
INCLUDED ACCESSORIES

- Wire Rack (2)
- Solid Pan
- Food Probe
NOTE: The stainless steel pan and wire rack included with the Anova Precision® Oven are designed to work with the Anova Precision® Oven. Do not use the pans with other ovens or appliances, as it may result in damage to the pans, which will cause them to no longer work with the Anova Precision® Oven as designed.
SETTINGS
These pages refer to the Display diagram.
TEMPERATURE AND COOK TARGET
![]()
Press temperature mode to turn Sous Vide Mode on or off.
Hold for 5 seconds to change unit of temperature (°C/°F).
Press or hold the + and - temperature
Controls to adjust temperature.
![]()
Press cook target to switch between timer or probe. The display will change depending on the target you have selected.
Press or hold the + and - cook target controls to adjust the timer (HH:MM) or probe target temperature.
![]()
Press start/stop to start cooking after choosing settings, or to stop cooking at any time.
NOTE: You can cook a recipe based on meeting a temperature, instead of completing an amount of time. A timer is not required to begin cooking.
TEMPERATURE RANGE
sous vide mode ON: 25–100°C (77–212°F)
sous vide mode OFF: 25–250°C (77–482°F)
SOUS VIDE MODE
Sous vide mode is an innovative method of cooking with the Anova Precision® Oven. It enables you to cook foods similar to traditional sous vide, where your food gently reaches precise, edge-to-edge doneness, without overcooking. You can use the same cooking times and temperatures you're used to from sous vide, but with the added benefit of no longer needing to seal your food or fill a tub of water.
When Sous Vide Mode is on, the Oven continuously measures the temperature your food experiences using the state-of-the-art wet bulb sensor. This sensor measures the temperature of water evaporation throughout your cook, and the Oven regulates that temperature so that your food never cooks past your setting.
Just as in sous vide, foods will not brown or crisp using Sous Vide Mode. In order to finish your food with searing, browning, or a crispy texture, add a separate Cooking Stage with high heat and Sous Vide Mode turned off. You can program Cooking Stages for your recipe in the Anova Precision® Oven App, or manually input new settings on the Display.
USING THE FOOD PROBE
Use the food probe to measure the core temperature of your food as it cooks. Insert the probe into the thickest part, or the centre, of your food. As you slide your pan into the Oven, connect the opposite end of the probe cable into the Food Probe Port, located in the upper left corner inside the Oven. Both the Oven display and the Anova Precision® Oven App will show you the core temperature of the food while the probe is in use, and allow you to input your desired core temperature while cooking. The Food Probe can be used with Sous Vide Mode on or off.
NOTE: The Food Probe measures core food temperature up to 100°C (212°F).
This page refers to the Display diagram.
USING STEAM
![]()
Press the + OR - STEAM CONTROLS to adjust Steam percentage.
To stop using steam, press the - STEAM CONTROL until the percentage reaches 0 and the display says "OFF".

If the Water Tank is empty during or before cooking with Steam, the FILL INDICATOR will blink. Fill the Water Tank, then press the Fill Indicator to continue the flow of Steam.
NOTE: The Oven can't dehumidify the air beyond the humidity in your own kitchen. If you are cooking in a humid environment, the Oven may not be able to reach low Relative Humidity inputs.
STEAM GENERATION
You can add steam to the cooking process by specifying a Steam Percentage (0–100%) on the Display or in the App. This will activate the boiler to add humidity inside the Oven.
When cooking at 100°C (212°F) or lower, the Steam Percentage you set is interpreted as a Relative Humidity percentage. In this temperature range, the Oven only activates the boiler when necessary to maintain humidity levels, which may be infrequent.
However, when used at temperatures above 100°C (212°F), Steam is generated constantly throughout the cooking process. In this mode, the Oven does not measure or react to the amount of humidity inside.
CONNECT TO WI-FI
Connecting your Oven to the Anova Precision® Oven App with Wi-Fi gives you the ultimate cooking experience.
- Download the Anova Precision® Oven App on your smartphone or tablet.
![www.apple.com]()
![play.google.com]()
- Connect to your preferred Wi-Fi network.
- Open the app and follow the on-screen instructions to connect.


ON THE OVEN DISPLAY
The Wi-Fi icon on the Oven Display will show your connection status.
Pulsing light: searching/connecting
Solid light: connected
BENEFITS OF USING THE APP
- Set your Oven remotely, and monitor the cooking process from anywhere.
- Browse and cook from a collection of easy-to-follow recipes made exclusively for Anova.
- Make and share your own recipes, with ingredients, steps, and photos.
- Save all your favourite recipes.
NOTE: Wi-Fi connection and the App are not required to use the Oven. However, some functions may not be available with manual use.
CARE AND CLEANING
GENERAL CLEANING
- Clean the front of the appliance with a soft cloth with warm water and a cleaning agent.
- To clean metal surfaces, use a stainless steel cleaner.
- In case of mineral build-up on the bottom of the interior, use some drops of distilled vinegar with warm water and a soft sponge.
- Clean the appliance interior after each use. Fat accumulation or other food remains may result in a fire.
- Clean stubborn dirt with an oven cleaner.
- Do not use abrasive scrubbers or cleaning agents. These can cause damage to the Oven finishes and parts.
ACCESSORIES
- For the Food Probe, clean with warm water and washing up liquid. Do not submerge the probe in water or put in the dishwasher.
- Included pans and wire rack are dishwasher safe, or can be hand washed. Do not clean them using abrasive agents or scrubbers or sharp-edged objects. These can cause damage to the stainless steel.
- Clean all accessories after each use and let them dry completely.
- Check and empty the Drip Tray before and after each cook to ensure it does not overflow.
CLEANING THE WATER TANK
- Remove the water tank by sliding outwards as shown in fig.1.

figure 1: removing the Water Tank - Remove the lid of the water tank.
- Gently wash the tank and lid with a soft cloth or non-abrasive sponge with warm water and washing up liquid.
- Carefully dry the Water Tank with a microfibre cloth, then slide it back into position on the side of the oven.
- Fill the Water Tank with fresh distilled water and replace the lid on the tank.

NOTE: Tank and lid are not dishwasher safe.
DESCALE CYCLE
When the steam generator operates, there is an accumulation of limestone inside because of calcium content in the water. Periodic descaling of residual build-up can increase the life span of your Oven and prevent any decline in performance.
Descaling is recommended after 30 hours of steam usage. The automated Descale cycle takes about 40 minutes to complete.
You will need a descaling solution and water to perform this cycle.
NOTE: Distilled water is recommended to help maintain correct operating function.
DESCALING STEPS
- Remove all accessories. Put the solid pan on the bottom of the cavity so that the Descale drain outlet is protruding out over the edge of the tray to catch liquids. See fig. 2.

figure 2: pan placement during descaling - Remove and empty the water tank, then reattach to the oven.
- Mix 3/4 Cup (about 200 mL) descaling solution with 1 L (1 Quart) water, and pour into the Water Tank.
- Activate the Descale cycle by pressing the descale indicator on the Display or in the App. The first phase is about 30 minutes.
- After the end of the first stage, make sure there is no remaining cleaning solution inside the Water Tank. If there is, remove the tank, empty the solution, rinse the tank with water, and reattach.
- Add 1 L (1 Quart) distilled water to the Water Tank.
- Activate the second phase of the cycle by pressing the descale indicator on the Display or in the App. The second phase is about 10 minutes.
- When the cycle is complete, remove the solid pan and clean the pan.
- Wipe away any moisture inside the Oven with a dry cloth. Let it dry fully with the door open.

REPLACE LIGHT BULB
The Anova Precision® Oven uses a high temperature G9 Halogen Lamp, 220-240 V, 25 W inside the cavity. If the light requires replacement, follow these steps:
- Unplug the oven from the power supply
- Ensure the oven is cool before attempting.
- Open the door and look to the upper surface of the cavity.
- Carefully remove all four screws that hold the light cover in place. See fig. 3.

figure 3: light cover and screws - While removing the fourth and final screw, place a hand over the cover to stop it falling off.
- Set the cover aside.
- Carefully grasp the bulb and pull it straight out of the socket (towards the front of the oven).
- Insert a new bulb and follow these steps in reverse to reassemble.

NOTE: Do not over-tighten the screws as this could damage the glass.
SAFETY STANDARDS
When using electrical appliances, basic safety precautions should always be followed, including the following:
- Read all instructions.
- Do not touch hot surfaces. Use handles or knobs.
- To protect against electric shock, do not place cord, plugs, or appliance in water or other liquid.
- Close supervision is necessary when any appliance is used by or near children.
- Unplug from outlet when not in use and before cleaning. Allow to cool before putting on or taking off parts.
- Do not operate any appliance with a damaged cord or plug. If the appliance malfunctions, or has been damaged in any manner, contact Anova immediately.
www.support.anovaculinary.com - Do not use outdoors.
- Do not let cord touch hot surfaces or hang over edge of table or counter where it can be pulled on by children or tripped over unintentionally.
- Do not place on or near a hot gas or electric hob, or in a heated oven or microwave.
- Do not use appliance for other than intended use.
- Do not clean with metal scouring pads. Pieces can break off the pad and touch electrical parts involving a risk of electric shock.
- The use of accessory attachments not recommended by the appliance manufacturer may cause serious injuries.
- When operating the oven keep at least 4 inches of space on all sides of the oven to allow for adequate air circulation.
- The oven should only be placed on granite, stainless steel, concrete, marble, stone or other material verified to meet the temperature requirements of 194°F (90°C). No butcher blocks, laminated/coated wood, laminate composite or other material should be used that is not verified to meet temperature requirements.
- To disconnect, press the Start/Stop button during operation, and then remove the cord by grasping and pulling out the plug. Never unplug by pulling on the cord.
- Extreme caution must be used when moving an appliance containing hot oil, or other hot liquids.
- Do not cover any part of the Oven with metal foil. This may cause overheating of the Oven.
- Use extreme caution when removing tray or disposing of hot grease or other hot liquids.
- Oversized foods or metal utensils must not be inserted into the Oven, as they may create a fire or a risk of electric shock.
- While in operation, a fire may occur if the oven is covered or touching flammable material, including curtains, draperies, walls, and the like. Do not store, or lay any item on the oven during operation.
- Extreme caution should be exercised when using containers constructed of anything other than metal or glass.
- Do not place any of the following materials in the Oven: cardboard, plastic, paper, or other flammable materials.
- Do not store any materials, other than manufacturers recommended accessories, in this Oven when not in use.
- Always wear protective, insulated oven gloves when inserting or removing items from the hot Oven.
- This appliance has a tempered, safety glass door. The glass is stronger than ordinary glass and more resistant to breakage. Tempered glass can break, but the pieces will not have sharp edges. Avoid scratching door surface or nicking edges. If the door has a scratch or nick, contact Anova immediately.
www.support.anovaculinary.com - To turn the Oven off, press and briefly hold the Start/ Stop button during operation. Some lights and buttons will still be visible on the display when the unit is turned off.
INITIAL SET-UP
- Remove all the packaging and labels.
- Do not install or use a damaged appliance.
- Always take care when moving the appliance, as it is heavy. Wear closed toe footwear to protect your feet.
- Do not pull or lift the oven by the handle.
- Keep a minimum distance of 4 inches from other appliances and units, walls or cabinets.
ELECTRICAL CONNECTION
- The appliance must be plugged into a grounded outlet.
- Plug directly into a wall outlet.
- Do not use multi-plug adapters and extension cables.
USAGE
- This is a cooking appliance. Parts and accessories will be hot when in use. Use oven gloves and trivets to protect hands and surfaces from burns. Handle hot items carefully.
- This appliance is for household use only.
- Do not change the specification of this appliance.
- Do not leave children alone or unattended in the area where the Oven is in use.
- Make sure that the ventilation openings are not blocked. The area around the vent will be hot during and after use.
- Stand to the side and be careful when you open the door while the appliance is in operation. Hot air and steam can release.
- Do not apply pressure or rest items on the open door.
- Do not use the appliance as a work surface or as a storage surface.
- Do not use Anova accessories with other ovens or appliances. This can cause damage to the accessories.
- Open the Oven door carefully. The use of ingredients with alcohol can cause a mixture of alcohol and air.
- Do not let sparks or open flames to come in contact with the appliance when you open the door.
- Do not put flammable products or items that are wet with flammable products in, near or on the appliance.
- To prevent damage or discolouration to the steel:
- do not put ovenware or other objects directly on the bottom of the Oven.
- do not put aluminium foil directly on the bottom of the Oven.
- do not keep moist dishes and food in the appliance after you finish cooking.
- be careful when you remove or install the accessories.
- Discolouration of the steel has no effect on the performance of the appliance.
- Use a deep pan for moist cakes. Fruit juices cause stains that can be permanent.
- This appliance is for cooking purposes only. It must not be used for other purposes, for example room heating.
- Always cook with the oven door closed.
- Do not position oven behind a furniture panel (e.g. a door) as heat and moisture can build up during operation that could cause subsequent damage to the appliance, the housing unit or the floor.
STEAM COOKING
- Even when cooking without steam, steam may escape from the the Steam Exhaust Outlet below the Water Tank. Keep body parts and objects away from this area.
- Released steam can cause burns. Stand to the side and be careful when you open the door when the steam function is activated or after steam cooking. Keep bare hands and face away.
- Do not use the Oven close to cabinetry. Excessive steam use can cause damage to furniture and cabinetry.
MAINTENANCE
- Before maintenance, switch off the appliance and disconnect the plug from the power outlet.
- Make sure the appliance is cold. There is a risk that the glass panels may break.
- If the door glass panels become damaged or break, contact support immediately.
- Clean the appliance regularly to prevent deterioration of the surface material.
- Do not clean with any abrasive cleaning materials or agents, or metal objects.
- If you use an oven spray, follow the safety instructions on the packaging.
SERVICE
Contact customer service:
support@anovaculinary.com
www.support.anovaculinary.com
Documents / Resources
References
Download manual
Here you can download full pdf version of manual, it may contain additional safety instructions, warranty information, FCC rules, etc.
Advertisement


Need help?
Do you have a question about the PRECISION OVEN and is the answer not in the manual?
Questions and answers