
Subscribe to Our Youtube Channel
Related Manuals for Tycon Power Systems TS-SC24-30N-MPPT


Summary of Contents for Tycon Power Systems TS-SC24-30N-MPPT
- Page 1 User manual INTELLIGENT PHOTOVOLTAIC MPPT CONTROLLER Please read this user manual carefully before use and keep it properly. Please refer to the actual product, the picture is for reference only. V3.2...
- Page 3 CONTENT 1.0 Important safety instructions 1.1 Acknowledgements .......................1 1.2 Notice to Operation .......................1 1.3 Safety warning note ......................1 2.0 Product introduction 2.1 Product overview ......................2 2.2 Product characteristics ....................2 2.3 Product list ........................2 2.4 Product size ........................3 2.5 Structure specification ....................3 2.6 Specification parameter ....................4 3.0 Install 3.1 Precautions before installation..................
- Page 4 Important safety instructions 1.1 Acknowledgements Thank you for buying our products and for your trust and support. In this product manual, we are committed to providing you with accurate and clear usage guidelines and relevant information to help you better understand and use our products. 1.2 Notice to Operation Before using this product, please read this manual thoroughly to understand the correct and safe operation methods.
- Page 5 2.0 Product introduction 2.1 Product overview This product can detect the power generation of solar panels in real time, and track the maximum voltage current value (VI), so that the system can charge the battery at the maximum power output. It is used in off-grid photovoltaic system to coordinate the work of solar panels, batteries and loads, and is the core control component of off-grid photovoltaic system.
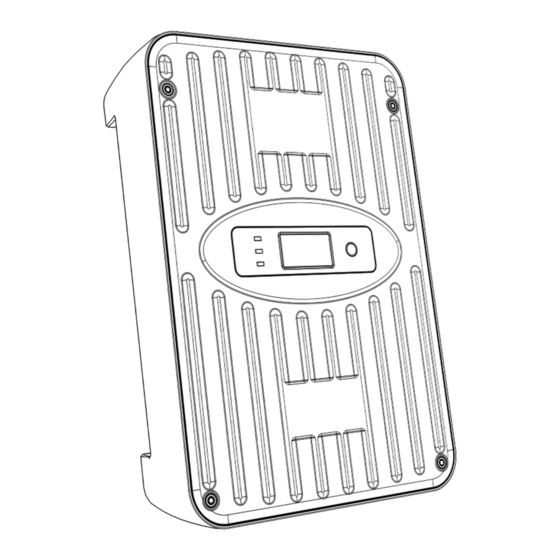
- Page 6 2.4 Product size Type TS-SC24-30N-MPPT 5.83 8.66 2.52 TS-SC24-40N-MPPT 5.83 8.66 2.52 TS-SC24-50N-MPPT 6.69 9.64 2.68 TS-SC24-60N-MPPT 6.69 9.64 2.68 2.5 Structure specification Status light Input and output power line interfaces Operation button Ground cable connection position Digital OLED display...
- Page 7 2.6 Specification parameter TS-SC24- TS-SC24- TS-SC24- TS-SC24- TS-SC48- TS-SC48- Model 30N-MPPT 40N-MPPT 50N-MPPT 60N-MPPT 20N-MPPT 30N-MPPT MPPT efficiency 99.5% Standby power 1.6W~1.8W Heat-Dissipating method All aluminum alloy shell self-heating Settable lithium-ion battery system 8VDC~30VDC Max.PV input voltage(Voc)* 100VDC 150VDC Min.Vmpp Voltage Battery voltage + 2V Start-up charging voltage Battery voltage + 3V...
- Page 8 *The voltage of the PV array cannot exceed this limit. **These power limits refer to the maximum power that the MPPT controller can handle. High power arrays can be used without damaging the controller. 3.0 Install 3.1 Precautions before installation Installation position •...
- Page 9 1-Way Wire Distance (meters), 12 Volt System Wire Size (mm2) 10.2 11.7 13.7 16.4 20.5 10.8 13.0 16.2 10.2 2% Voltage Drop Charts for 75°C Solid Copper Wire 1-Way Wire Distance (feet), 12 Volt System Wire Size(AWG) 2/0* 22.4 24.4 26.9 29.9 33.6...
- Page 10 3.3 Installation procedure Step 1: Unpack and check Check the controller for transport damage and bumps; Check whether the specifications are consistent with the order. Step 2: Check the controller parameter limits Ensure that the solar array open circuit voltage (Voc) under the maximum temperature compensation state does not exceed the MPPT rated voltage value of the model.
- Page 11 Step 5: Secure the controller Measure and mark the distance on the wall, drill four holes with a diameter of 6mm, fill the four holes with plastic expansion particles, fix the controller to the mounting wall using M4 self-tapping screws and tighten the screws. Step 6: Power on the device Ensure that all cables are securely connected before powering on the device.
- Page 12 Warning: Grounding according to local codes and regulations. 3.4 Power off ③ ② Please disconnect serial number circuit breaker, then disconnect serial number circuit ① breaker, and finally disconnect serial number circuit breaker connection; Note: If possible, disconnect the battery from the controller after the solar input is disconnected.
- Page 13 4.3 Display and operation This controller has a 1.3-inch OLED display and function buttons. The user can only set the battery type using the preset parameters. See the following figure for specific operation and display logic. 4.4 Set options Set item Optional items/parameters introduce Lead-Acid_GET(Lead acid colloidal battery)...
- Page 14 Note: If you need to customize additional parameters, you can do so by connecting to the APP or other optional attachments. 4.5 Charging status and parameters 4.5.1 The controller charges the lead-acid battery The MPPT controller has a 4-stage battery charging algorithm for fast, efficient and safe charging of lead-acid batteries.
- Page 15 Note: These Settings are a general guide for user use. MPPT can be set to meet a variety of charging parameters. Consult the battery manufacturer for the best battery charging Settings. 4.6 Load Control The main purpose of the load control function is to disconnect the system load when the battery is discharged to a low voltage state and reconnect the system load when the battery is charged back to a certain level.
- Page 16 Attention: Only the normal ON/normal OFF mode can be set on the controller panel. Other modes need to be set through other optional accessories. 4.7 Communication 4.7.1 Apply All operations of this series of controllers can be done via Bluetooth /wifi modules. Users can search for "SolarMate"...
- Page 17 5.0 Common faults and handling 5.1 Common Failures Unable to charge troubleshooting: Check that the solar panels are good contacted and that the array is not shaded or damaged; Check that the controller input voltage is normal and ensure that the controller is wired correctly;...
- Page 18 6.0 Product protection function and system maintenance 6.1 Protection function description Waterproof and dustproof protection:IP42 Waterproof grade: 4, dust grade: 2 Battery reverse protection After the positive and negative terminals of the battery are reversed, the system does not work and will not burn out the controller.
Need help?
Do you have a question about the TS-SC24-30N-MPPT and is the answer not in the manual?
Questions and answers