Advertisement
Quick Links
Date or Purchase ____ / ____ / ____
Lot Number:
THIS INSTRUCTION BOOKLET CONTAINS
IMPORTANT SAFETY INFORMATION. PLEASE
READ AND KEEP FOR FUTURE REFERENCE.
Please Recycle
Recicle Por Favor
9871333W COM
0
29986 98712
9
DO NOT RETURN PRODUCT TO THE STORE
STOP
Individual stores do not stock parts.
If a part is missing or damaged, visit our website or call our toll-free
customer service line. We will gladly ship your replacement parts
FREE of charge.
Need Parts or Assistance?
WWW.AMERIWOOD.COM/PARTS
For prompt, reliable service please have your assembly manual ready.
Recommended # of people needed for assembly: 2
Estimated assembly time is 2 hours.
Spanish translations are located in the center of this manual.
Se localizan las traducciones españolas en el centro de este
manual.
or call toll free:
1-800-489-3351
B349871333WCOC 0
Advertisement

Related Manuals for Ameriwood HOME 9871333WCOM


Summary of Contents for Ameriwood HOME 9871333WCOM
- Page 1 9871333W COM 29986 98712 Date or Purchase ____ / ____ / ____ Lot Number: DO NOT RETURN PRODUCT TO THE STORE STOP Individual stores do not stock parts. If a part is missing or damaged, visit our website or call our toll-free customer service line.
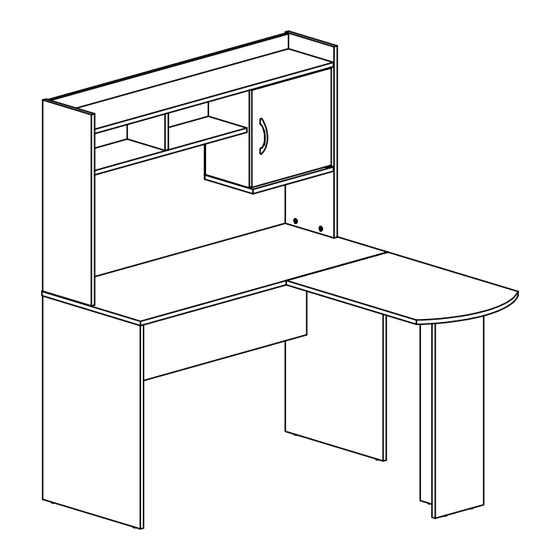
- Page 3 PARTS return back modesty panel 39871333040 39871333050 return panel right panel 39871333030 left panel 39871333020 39871333010 hutch divider 39871333130 hutch partition right hutch panel return top left hutch panel 39871333120 39871333110 39871333080 39871333100 desk top 39871333070 hutch shelf hutch top rail hutch top shelf fixed shelf back panel...
- Page 4 PARTS cam lock 1/2" screw 7/8" screw #A22620 tack glide #A12210 #A12700 (x 39) #A43200 (x 12) (x 2) (x 7) nail connector bolt #A22910 #A21110 (x 20) (x 2) cam bolt #A22610 wood dowel (x 39) #A21660 connector hinge kit (x 15) housing #A62000...
- Page 5 PARTS This illustration shows how the cam fastening system works. Esta ilustración muestra el sistema de fijación de leva y como funciona. handle connecting plate #A50690 #A54270 (x 1) (x 2) Tighten to fully seat. Do not over Proper orientation of cam. tighten.
- Page 6 - Insert four CAM LOCKS (17) and two WOOD DOWELS (10) into the HUTCH TOP SHELF (P). Screw six CAM BOLTS (18) into the HUTCH TOP SHELF (P). - Attach the HUTCH TOP RAIL (O) to the HUTCH TOP SHELF (P) using three SCREWS (15). proper orientation of cam lock posición correcta de la cerradura de leva.
- Page 7 - Insert one CAM LOCK (17) into the HUTCH DIVIDER (M). - Tap one WOOD DOWEL (10) into the HUTCH DIVIDER (M). - Insert six CAM LOCKS (17) into the holes in the HUTCH BACK (N). proper orientation of cam lock posición correcta de la cerradura de leva.
- Page 8 - Attach the HUTCH BACK (N) and HUTCH DIVIDER (M) to the HUTCH TOP SHELF (P) and tighten the CAMS. - Insert four CAM LOCKS (17) and two WOOD DOWELS (10) and screw three CAM BOLTS (18) into the holes in the FIXED SHELF (Q). LOCK APRETAR UNLOCK...
- Page 9 - Screw two CAM BOLTS (18) into the HUTCH PARTITION (L). - Fasten the CATCH (16a) to the HUTCH PARTITION (L) using two SCREWS (3). - Insert two CAMS (17)and WOOD DOWEL (10) into the holes in the HUTCH PARTITION (L). - Attach the HUTCH PARTITION (L) to the FIXED SHELF (Q) and tighten the cams.
- Page 10 - Attach parts (L) and (Q) to (M), (N), and (P) using two SCREWS (15) and tighten the cams. LOCK APRETAR UNLOCK DESAPRETAR B349871333WCOC 0 10 /23 www.ameriwood.com...
- Page 11 - Turn assembly over. - Screw four CAM BOLTS (18), two CAM LOCKS (17) and a WOOD DOWEL (10) into the holes in the LEFT HUTCH PANEL (J). - Attach the LEFT HUTCH PANEL (J) to the HUTCH TOP SHELF (P) and FIXED SHELF (Q) and tighten the cams. - Attach the HUTCH SHELF (R) to the HUTCH PARTITION (L) with two SCREWS (15).
- Page 12 - Screw four CAM BOLTS (18)and insert two CAM LOCKS (17) and a WOOD DOWEL (10) into the holes in the RIGHT HUTCH PANEL (K). - Attach the RIGHT HUTCH PANEL (K) to the HUTCH TOP SHELF (P) and HUTCH SHELF (R) and tighten the cams. LOCK APRETAR UNLOCK...
- Page 13 9871333WCOM No regrese el producto a esta tienda, tiendas individuales no almacenan partes. Si le falta una parte o esta danada, llame al numbero gratis a la lineas de servicio al cliente. Nosotros con gusto le mandaremos la parte sin ningun costo adicional.
- Page 14 LISTA DE PARTES ITEM DESCRIPCION CANTIDAD ITEM DESCRIPCION CANTIDAD panel izquierdo tapa de la leva tornillo ½” panel derecho tornillo 7/8” panel de retorno trasero de retorno tapa del tapón de la tuerca panel de modestia clavo escritorio perno para conectar cima de retorno juego de la bisagra panel izquierdo de la cabina...
- Page 15 PASO 5 PASO 10 Conecte las partes (L) y (Q) a (M), (N) y (P) usando dos Inserte dos CERRADURAS DE LEVA (17) y dos CLAVOS DE TORNILLOS (15) y apriete las levas. MADERA (10) en el PANEL IZQUIERDO (A) y el PANEL DERECHO (B).
- Page 16 PASO 15 PASO 17 Una el PANEL DE RETORNO (C) y REGRESE DE NUEVO (D) Presione todas las CUBIERTAS PARA EL CERRADURA DE al TOP DE RETORNO (H) y apriete las levas. LA LEVA (1) en todos los CERRADURAS DE LA LEVA (17). Toque dos TACK GLIDES (14) en el borde inferior del RETURN Presione las cuatro TAPAS DE TORNILLOS (5) en los cuatro PANEL (C) y otro en el borde inferior de RETURN BACK (D).
- Page 17 - Turn the HUTCH COMPONENT from step 7 over on its front. Position the BACK PANEL onto the unit so that it is flush on the bottom edge with the HUTCH SHELF (R) and equally spaced side to side, then use twelve NAILS (6) to fasten it to the rear of the hutch cabinet. WARNING Please make sure that the Back Panel is attached securely.
- Page 18 - Attach two CONNECTING PLATES (21) to the DESK TOP (G) using four SCREWS (3). - Screw six CAM BOLTS (18) into the designated holes in the DESK TOP (G). proper orientation of cam lock posición correcta de la cerradura de leva. B349871333WCOC 0 14 /23 www.ameriwood.com...
- Page 19 - Insert two CAM LOCKS (17) and two WOOD DOWELS (10) into the LEFT PANEL (A) and RIGHT PANEL (B). - Screw three CAM BOLTS (18) into the LEFT PANEL (A) and RIGHT PANEL (B). proper orientation of cam lock posición correcta de la cerradura de leva.
- Page 20 - Insert six CAM LOCKS (17) and two WOOD DOWELS (10) into the holes in the MODESTY PANEL (E). - Attach the LEFT PANEL (A), MODESTY PANEL (E), and RIGHT PANEL (B) together and lock the cams. - Use a hammer to tap two TACK GLIDES (14) into the edge of the LEFT and RIGHT PANELS. LOCK APRETAR UNLOCK...
- Page 21 - With the help of another person, fasten the LEFT PANEL (A), RIGHT PANEL (B) and MODESTY PANEL (E) (component from previous page) onto the TOP (G) as shown. LOCK APRETAR UNLOCK DESAPRETAR B349871333WCOC 0 17 /23 www.ameriwood.com...
- Page 22 - With the help of another person, stand the lower component (from previous step) upright. - Screw four CAM BOLTS (18) into the TOP (G). - Fasten the HUTCH onto the TOP (G) as shown. LOCK APRETAR UNLOCK DESAPRETAR Since this desk is awkward to move once the return is attached, position the desk into its final location after you have attached the...
- Page 23 - Screw two CONNECTOR BOLTS (8) into the designated holes in the RETURN PANEL (C). - Insert four CAM LOCKS (17) into the RETURN PANEL (C) and two into the RETURN BACK (D). - Insert two CONNECTOR HOUSINGS (12) into the holes in the RETURN BACK (D). See detail. - Fasten the RETURN PANEL (C) and RETURN BACK (D) together and tighten the CONNECTOR HOUSINGS (12).
- Page 24 - Attach the RETURN PANEL (C) and RETURN BACK (D) to the RETURN TOP (H) and tighten the cams. - Tap two TACK GLIDES (14) into the bottom edge of the RETURN PANEL (C) and one into the bottom edge of the RETURN BACK (D). - With assistance of another person, attach the RETURN TOP (H) to the DESK TOP (G) using four SCREWS (3).
- Page 25 - Attach the HANDLE (20) to the DOOR (S) with two SCREWS (4). - Attach the CATCH (16b) to the DOOR (S) with two SCREWS (3). - Fasten one DOOR HINGE (9a) to the top of the DOOR (S) using a SCREW (9c). - Insert one BUSHING (9b) into the hole in the HUTCH SHELF (R) and place the other HINGE (9a) onto the BUSHING.
- Page 26 - Press all the CAM COVERS (1) onto all the CAM LOCKS (17). - Press the four SCREW CAP COVERS (5) onto the four exposed SCREWS (15). MAXIMUM LOADS 5 lbs 10 lbs 2.26 kg 4.53 kg 10 lbs 4.53 kg This unit has been designed to support the maximum loads shown.
- Page 27 Call our toll free number for any assistance you should need or visit our website: 1-800-489-3351 www.Ameriwood.com/parts Clean the product with your favorite furniture polish and a soft cloth. DO NOT USE harsh chemicals or abrasive cleaners. Move your new furniture carefully with two people. Lift and carry the unit. Never push or drag the unit. Do not allow children to climb or play on the unit.
Need help?
Do you have a question about the 9871333WCOM and is the answer not in the manual?
Questions and answers