Advertisement
Quick Links
Advertisement

Related Manuals for Luxen Home Modern Boho WHIF1981


Summary of Contents for Luxen Home Modern Boho WHIF1981
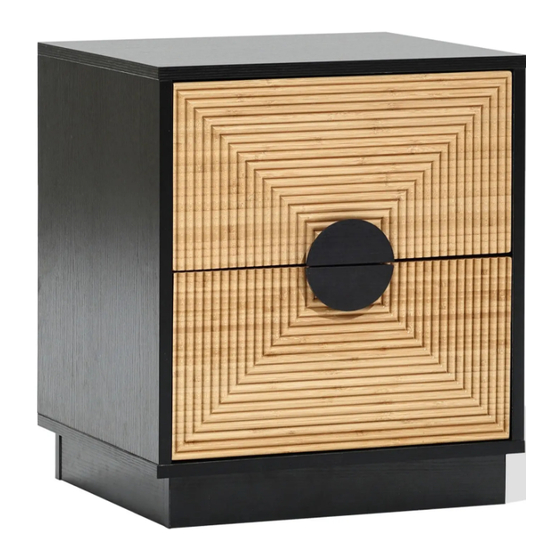
- Page 1 Modern Boho Side Table WHIF1981...
- Page 2 Hey, there Un pack all parts from the packaging inside the carton to ensure there are no missing or damaged parts. Lay out all the parts on a clean,flat, and soft surface to prevent scratches. Refer to the steps provided asassembling guide.
- Page 3 Left side panel Right side panel Top panel Bottom panel Bottom Drawer front panel Drawer bottom Left drawer Right drawer Drawer back Back panel panel side panel panel side panel Above drawer Bottom left and Bottom front Back brace Drawer support bar right support and back front panel...
- Page 5 Insert quickfit screws (A) into parts 5 and 11, as shown. Fix handles (K) to parts 5 and 11 using screws (Q), as shown. M6 x 36mm M4 x 30mm Fix parts 6 and 7 to part 8 using screws (H), as shown. Slide part 9 into grooves between parts 6, 8 and 7, as shown.
- Page 6 Insert cam locks (B) into parts 6 and 7, as shown. Fit parts 11 and 5 to parts 6 and 7, as shown. Turn cam locks clockwise to tighten. M15 x 9mm Step 4 Pull inner and outer drawer runners apart before fixing them to panels. Slide drawer runners apart until the dwer lock can be seen, as shown.
- Page 7 Step 5 Fix inner drawer runners (I) to parts 6 and 7 using screws (G), as shown. Gx12 M3.5 x 12mm BACK FRONT BACK FRONT FRONT BACK...
- Page 8 Step 6 Fix outer drawer runners (J) to parts 1 and 2 using screws (G), as shown. Gx12 M3.5 x 12mm back back front front back front Step 7 Insert quickfit screws (A) into part 3, as shown. M6 x 36mm Warning : To avoid scratches, place the panels on a clean and soft surface.
- Page 9 Step 8 Insert cam locks (B) and wooden dowels (C) into 15, as shown. Fit part 15 to parts 1 and 2. M15 x 9mm Turn cam locks clockwise to tighten. M5.8 x 30mm Step 9 Insert cam locks (B) and wooden dowels (C) into parts 1 and 2, as shown. Fit part 3 to parts 1 and 2.
- Page 10 Step 10 Insert parts 10 into grooves of part 14, as shown. Insert parts 10 into grooves between parts 1, 3 and 2, as shown. Step 11 Insert wooden dowels (C) into parts 1 and 2, as shown. Fix part 4 to parts 1 and 2 with screws (D), M4 x 35mm as shown.
- Page 11 Step 12 A x4 Insert qucikfit screws (A) and wooden dowels (C) into parts 13, as shown. Insert cam locks (B) into parts 12, as shown. M6 x 36mm Fit parts 12 to parts 13. Turn cam locks clockwise to tighten. M15 x 9mm M5.8 x 30mm Step 13...
- Page 12 Step 14 Secure backing panel 10 by fixing wedges (E) using screws (F), as shown. A TTENTION PLEASE Please ensure the structure is straight and level and all panels are at right angles before installing hardware (E). MUST install hardware (E) to strengthen product stability.
- Page 13 Step 16 For extra stability, it is recommended that you fix your side table to the wall using hardwares (D, L and O), as shown. Screw (D) is fixed through washer (O) and wall strap and into the wall plug (L). Should you choose not to affix the product to the wall, serious injury may be caused if the product tips over.
- Page 14 VOILA! DO NOT sit or stand on the End table as this may damage the product and cause serious bodily injury.
- Page 15 Something not right Things to do to expedite the process...
Need help?
Do you have a question about the Modern Boho WHIF1981 and is the answer not in the manual?
Questions and answers