Table of Contents
Advertisement
Quick Links
0
USER MANUAL
SmartCon
HEATPORT H2S / H2000 / H4S / H55 / W5S / W90 / SH1 / SH2
HEATPORT is a family-owned company based in New Zealand. Our design, development, testing, assembly, quality
check, installation, and service facility is located in Rangiora, Canterbury.
Our mission is to offer the ultimate premium quality diesel heating system that everyone can afford. We pay attention
to every single detail of our product. Though many of these details are hidden from view, we believe that continuous
improvement of all components, with no compromise on parts and quality, is the only way to deliver a long-lasting,
easy-to-use product, provide the best customer experience, and earn our customers' trust.
Advertisement
Table of Contents

Related Manuals for Heatport SmartCon HEATPORT H2S


Summary of Contents for Heatport SmartCon HEATPORT H2S
- Page 1 USER MANUAL SmartCon HEATPORT H2S / H2000 / H4S / H55 / W5S / W90 / SH1 / SH2 HEATPORT is a family-owned company based in New Zealand. Our design, development, testing, assembly, quality check, installation, and service facility is located in Rangiora, Canterbury.
-
Page 2: Table Of Contents
Version 1.01 CONTENT SETTINGS MENU INTRODUCTION ➔ 7.1 Language ➔ 7.2 Bluetooth INSTALLATION ➔ 7.3 Sound ➔ 2.1 Installation Location ➔ 7.4 Information ➔ 2.2 Installation Steps ◆ 7.4.1 Heater ◆ 7.4.2 Control Panel ◆ 7.4.3 Atmospheric Pressure OVERVIEW ◆ 7.4.4 Heater Runtime ➔... -
Page 3: Introduction
INTRODUCTION Welcome to the comprehensive guide for your HEATPORT diesel heater. This manual is designed to provide you with all the information you need to safely and effectively operate your heater, ensuring optimal performance and comfort. This is applicable to both Air and Coolant Heaters unless otherwise specified. -
Page 4: Installation Location
2.1 INSTALLATION LOCATION ● The control switch should be installed in a location that is easy to read and operate. ● The opening size of the control switch is 16mm x 22mm, as illustrated in "Figure 1". Figure 1 (The dimensions are in millimeters and not drawn to scale) 2.2 INSTALLATION STEPS 1. -
Page 5: Overview
OVERVIEW 3.1 PARTS IDENTIFICATION 1. OLED Display Screen 2. & 3. LED Indicator 4. Control Knob 5. Settings Button 6. Return button 3.2 BUTTONS AND CONTROL FUNCTIONS INPUT DEVICE DESCRIPTION FUNCTION Rotate/turn or press for Control Knob selection and confirmation of selected function Allows user to navigate to Return Button... -
Page 6: Fuel Line Priming
FUEL LINE PRIMING Note: Prime the fuel line only when it is disconnected from the heating unit. Priming while connected can cause an overfilling burner, white smoke, and startup failure. Service due to this is not covered by warranty. ⚙ ▶... -
Page 7: Operation Modes
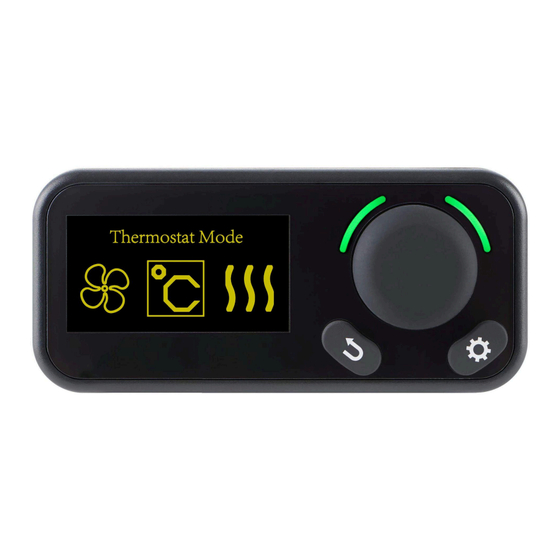
5 OPERATION MODES VARIABLE HEAT MODE Refers to the mode where the user can adjust the heat output manually based on their preference or need. This mode is available only for the following models: H2S, H4S, H2000, H55 THERMOSTAT MODE Refers to the mode where the heater maintains a set temperature automatically, adjusting the heat output as needed to keep... -
Page 8: Using The Modes
USING THE MODES 6.1 DIESEL AIR HEATERS Below instructions are available only for the following models: H2S, H4S, H2000, H55 The Home screen displays the current Operation Mode, set value and the working state. 6.1.1 SELECTION OF MODE ▶ Press the control knob in order to enter mode selection. -
Page 9: Variable Mode
6.1.2 VARIABLE MODE ▶ To TURN ON the Variable Mode, long press the control knob. ▶ Set the heat intensity by turning the control knob clockwise to increase or counterclockwise to decrease it. You can choose between P1-P7. ● P1 is the lowest heat intensity ●... -
Page 10: Ventilation Mode
6.1.4 VENTILATION MODE ▶ To TURN ON the Ventilation Mode, long press the Control Knob. ▶ Set the fan speed by turning the control knob clockwise to increase or counterclockwise to decrease it. You can choose between P1-P7. ● P1 is the lowest fan speed ●... -
Page 11: Coolant Heating Mode
6.2 COOLANT HEATERS Below instructions are available only for the following models: W5S, W90. The home screen displays the current coolant temperature, heating Power, and the working state. 6.2.1 COOLANT HEATING MODE ▶ To TURN ON the Coolant Heating Mode long press the control knob. -
Page 12: Adjustment Of Temperature
6.2.2 ADJUSTMENT OF TEMPERATURE ▶ Press the control knob in order to enter Coolant Temperature Setting. ▶ Set the temperature by turning the control knob clockwise to increase or counterclockwise to decrease it. You can choose between 35℃-95℃. ● 35℃ being the lowest temperature ●... -
Page 13: Diesel Cooktops
6.3 DIESEL COOKTOPS Below instructions are available only for the following models: DS1, SH1, SH2 Note: When using the diesel cooktop, always ensure a pot or pan is on the cooktop, whether you're frying or boiling, to absorb heat and prevent overheating. If you wish to use the cooktop as an air heater, fold the lid down to allow proper airflow. -
Page 14: Cooktop Mode
6.3.2 COOKTOP MODE ▶ To TURN ON the Cooktop Mode long press the control knob. ▶ Adjust the heat intensity by turning the control knob clockwise to increase or counterclockwise to decrease it. You can choose between P1-P7. ● P1 is the lowest cooking intensity ●... -
Page 15: Settings Menu
SETTINGS MENU ⚙ This mode can be activated only from the Home Screen when one of the selected operating modes is off. ▶ Press the settings button in order to enter the settings menu. ▶ Turn the control knob in order to choose the desired option. -
Page 16: Language Settings
7.1 LANGUAGE SETTINGS The Language settings feature includes a memory function that retains settings even when the power is turned off. ▶ Press the control knob in order to confirm selection. ▶ Turn the control knob in order to choose desired option. -
Page 17: Bluetooth Settings
App Store: https://apps.apple.com/nz/app/mybluee/id6445804361 Please note that this feature is currently in BETA. While HEATPORT does not provide any guarantees for the functionality of the iOS app in its current state, customers are welcome to use and enjoy it freely. -
Page 18: Sound Settings
7.3 SOUND SETTINGS The Sound settings feature includes a memory function that retains settings even when the power is turned off. ▶ Press the control knob in order to confirm selection. ▶ Turn the control knob in order to switch the sound ON or OFF. -
Page 19: Information Settings
7.4 INFORMATION SETTINGS ▶ Press the control knob in order to confirm selection. ▶ Turn the control knob in order to choose the desired option. Scroll through: Heater ( see 7.4.1) ● Control Panel ( see 7.4.2) ● Atmospheric Pressure ( see 7.4.3) ●... -
Page 20: Atmospheric Pressure
7.4.3 ATMOSPHERIC PRESSURE The “Atmospheric Pressure” screen displays the approximate measurement of the pressure in kpa and the ambient temperature measured by the temperature sensor inside the SmartCon. The temperature on this screen (measured directly by SmartCon panel) has no direct effect on the regulation of the power in the thermostat mode as this mode uses temperature reading from the air traveling... -
Page 21: Countdown Mode
7.5 COUNTDOWN MODE SETTINGS Below instructions are available only for the following models: H2S, H4S, H2000, H55, W5S, W90 The countdown mode allows the selected mode to activate after desired time. ▶ Press the control knob in order to confirm Selection. -
Page 22: Thermostat Mode
7.5.2 THERMOSTAT MODE In this mode, you can turn the control knob to set the desired temperature between 5-35℃ This screen is available only for the following models: H2S, H4S, H2000, H55 7.5.3 VENTILATION MODE In this mode, you can turn the control knob to set the desired ventilation level. -
Page 23: Factory Reset
7.6 FACTORY RESET ▶ Press the control knob in order to confirm selection. ▶ To reset the panel, short press the control knob. Then panel will revert Initialization state, reverting Language, Bluetooth, Sound and other settings to their factory defaults. -
Page 24: Bluetooth And Upgrade
BLUETOOTH AND UPGRADE 8.1 BLUETOOTH CONNECTIVITY ▶ The main controller supports bluetooth connectivity, allowing control via the MyBluee App on iOS devices. ▶To utilize the bluetooth function, please refer to the user manual (7.2) This indicates that the Bluetooth is connected Functions: ●... -
Page 25: Communication And Faults
COMMUNICATION AND FAULTS 9.1 INITIALIZING Panel is initializing and communicating with the heater. If the panel fails to communicate with the heater during the initializing state, the panel enters the “Disconnected State”. 9.2 STANDBY MODE After the heater is completely turned off, the panel will automatically enter standby mode within 30 seconds. -
Page 26: Communication Disconnected
9.4 COMMUNICATION DISCONNECTED This indicates that the connection between the panel and the heater is disconnected. Communication Recovery will automatically exit. This indicates that the connection between the panel and the heater is disconnected. Communication Recovery will automatically exit. Check the communication cable first when the “Disconnected State”... -
Page 27: Fault Codes
9.5.1 FAULT CODES Note: Any repairs/replacements of the internal components of the heater unit described below must be consulted and pre-approved first with the supplier of the product. The warranty will be voided if there are any repairs/modifications or unauthorized changes in the hardware or firmware of the product without the approval of the supplier or any replacement of non-original parts or components that are not supplied by the supplier. - Page 28 for a longer distance, check the voltage at the main ECU connector. Record the voltage. If the voltage is less than 12.6 (flooded cell) 12.8 ○ (AGM), connect the battery charger and log off the job until the batteries are fully charged. Otherwise, turn on the unit while watching the multimeter.
- Page 29 TEMPERATURE Temperature sensor overheat ● SENSOR Same as 41 ○ COMMUNICATION Communication interruption between the controller and ECU ● INTERRUPTION Check the large multi connector on the wiring harness ○ Check the connector on the rear side of main controller ○...
- Page 30 BLOWER MOTOR Blower motor speed measurement failure ● This occurs when ECU is not able to measure motor speed ○ Fault of the ECU * please see above ● BLOWER MOTOR Blower motor disconnected ● Check connection of the blower motor. ○...
- Page 32 No part of this manual may be copied or reproduced in any form without the express permission of HEATPORT. This publication was correct at the time of going to print; however, HEATPORT has a policy of continuous improvement and reserves the right to amend any specifications without prior notice.
Need help?
Do you have a question about the SmartCon HEATPORT H2S and is the answer not in the manual?
Questions and answers