Advertisement
Quick Links
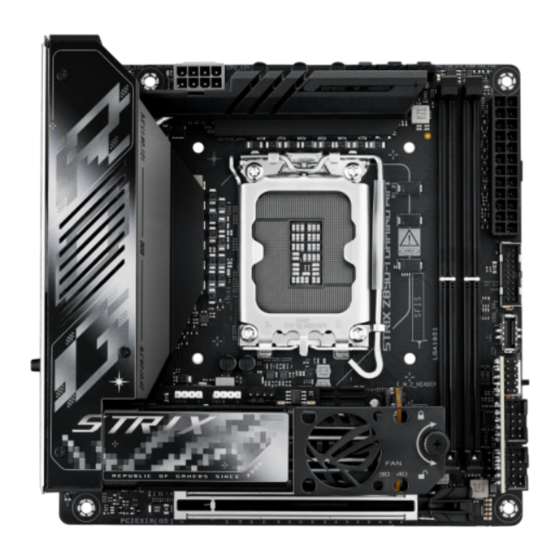
The items labeled below correspond to the installation steps, for steps
and more information on the steps, please refer to the rest of the guide.
SEEKING A SOLUTION?
Scan now for assistance
Support
CPU_12V
USB_E12
HDMI
VRM_HS_FAN
LAN_U5G_7
TBT4_EC1
TBT4_EC2
U10G_8910
U20G_C3
M.2(WIFI)
CHIPSET_FAN
BATT_CON
E_FNA_HEADER_M
BIOS_FLBK
FLBK_LED
ARGB
Top Side
EF_FAN
ADD GEN2_1
ADD GEN2_2
Z890 2F CARD
Bottom Side
E_FAN_HEADER_F
Chassis Fan
CPU_FAN
AIO_PUMP
CHA_FAN
LGA1851
E_M.2_HEADER
Intel
®
Z890
PCIEX16(G5)
USB 2.0
USB_E34
USB13
ALT_PCIE_MODE
CLRTC
SATA 6G_2
CPU_OV
SATA_F_CON
SATA 6G_1
M.2_2(SOCKET3)
USB 5Gbps
USB 20Gbps
POWER_BTN
T_SENSOR
F_PANEL
Front Panel System
PANEL_F_CON
LED1
LED2
M.2_1(SOCKET3)
Advertisement

Related Manuals for Asus ROG STRIX Z890-I GAMING WIFI


Summary of Contents for Asus ROG STRIX Z890-I GAMING WIFI
- Page 1 The items labeled below correspond to the installation steps, for steps and more information on the steps, please refer to the rest of the guide. Chassis Fan CPU_FAN AIO_PUMP CHA_FAN CPU_12V USB_E12 HDMI VRM_HS_FAN LAN_U5G_7 TBT4_EC1 LGA1851 TBT4_EC2 USB 5Gbps U10G_8910 U20G_C3 USB 20Gbps...
- Page 2 Q24354 / First Edition / August 2024 Prepare the components Memory M.2 SSD Chassis CPU Cooler SATA device Power supply unit Graphics card NOTE: The components listed above are recommendations, please prepare components according to your needs. Install key components Please scan for more information on CPU installation steps.
- Page 3 • Install the M.2 SSD Z890 2F CARD Z890 2F CARD Remove...
- Page 4 Install the cooling system • Air Cooler CPU_FAN / CPU_OPT • AIO Cooler CPU_FAN / CPU_OPT (connect to radiator) AIO_PUMP / W_PUMP (connect to pump) NOTE: Please refer to these manual(s) for more information: Cooler Chassis Install the motherboard into the chassis For non pre-mounted I/O shield models only NOTE: Please refer to the manual(s) for more information:...
- Page 5 Connect cables from Chassis Connect to chassis fan and ARGB/RGB headers Chassis fan ARGB header RGB header Ground Data +12V NOTE: Please refer to the manual(s) for more information: Motherboard Chassis Install and connect the power supply unit (PSU) Make sure the PSU is secured to the chassis using screws, and that the chassis has proper airflow NOTE: Input: AC 100~240V, 6A/3A, 50/60Hz...
- Page 6 Connect cables from Chassis Connect everything to the motherboard • Front panel system header • Front panel audio header Power +PWR_LED- PWR_BTN PIN 1 +HDD_LED- RESET • USB connector/header Connect cables from PSU • SATA NOTE: Please refer to the manual(s) for more information: NOTE: Please refer to the manual(s) for more information: Motherboard...
- Page 7 Connect to the Internet via Ethernet/Wi-Fi antenna NOTE: Please refer to the manual(s) for more information: Motherboard Connect peripherals (monitor, keyboard, mouse, etc.) Turn on the PSU and your PC NOTE: Please check the Q-LEDs or Q-LED Core on selected motherboards when powering on your PC for system status.
- Page 8 Stappen: Install the operating Bereid de onderdelen voor system and drivers Installeer belangrijke onderdelen Installeer het koelsysteem Installeer het moederbord in de behuizing Sluit aan op de behuizingsventilator en de ARGB/RGB-koppen Installeer en sluit de voeding (PSU) aan Sluit alles aan op het moederbord Installeer de grafische kaart Maak verbinding met internet via ethernet/wifi-antenne 10.
- Page 9 Βήματα: 단계: Προετοιμάστε τα εξαρτήματα 구성 요소를 준비합니다 Εγκαταστήστε τα βασικά εξαρτήματα 주요 구성 요소를 설치합니다 Εγκαταστήστε το σύστημα ψύξης 냉각 시스템을 설치합니다 Εγκαταστήστε τη μητρική πλακέτα στο πλαίσιο 메인보드를 섀시에 설치합니다 Συνδέστε με τον ανεμιστήρα τους πλαισίου και τις φίσες ARGB/RGB 섀시 팬과 ARGB/RGB 헤더에 연결합니다 Εγκαταστήστε και συνδέστε τη μονάδα τροφοδοσίας (PSU) 전원 공급 장치(PSU)를 설치하고 연결합니다...
- Page 10 Kroki: Kroky: Przygotuj podzespoły Pripraviť všetky súčasti Zainstaluj główne podzespoły Nainštalovať hlavné súčasti Zainstaluj układ chłodzenia Nainštalovať chladiaci systém Zainstaluj płytę główną w obudowie Nainštalovať základnú dosku na rám Podłącz do wentylatora i złączy header ARGB/RGB w obudowie Pripojiť ventilátor na rám a hlavičku ARGB/RGB Zainstaluj i podłącz zasilacz (PSU) Nainštalovať...
- Page 11 :الخطوات Кроки: جهز المكونات . 1 Підготуйте компоненти ثبت المكونات األساسية . 2 Встановіть ключові компоненти ثبت نظام التبريد . 3 Встановіть охолоджувальну систему ثبت اللوحة األم بالهيكل . 4 Встановіть материнську плату в корпус ARGB/RGB صل مروحة الهيكل ورؤوس . 5 Підключіть до корпусу вентилятор і з’єднувачі ARGB/RGB (PSU) ركب وحدة اإلمداد بالطاقة . 6 Встановіть...
- Page 12 Button/Coin Batteries Safety Information 1. Remove and immediately recycle or dispose of used batteries according to local regulations and keep out of reach of children. Do not incinerate or dispose of batteries in household trash. 2. If ingested or inserted inside any part of the body, call a local poison control center for treatment information. Even used batteries may cause serious injury or death.
- Page 13 General Notices FCC Compliance Information Responsible Party: Asus Computer International Address: 48720 Kato Rd., Fremont, CA 94538, USA Phone / Fax No: (510)739-3777 / (510)608-4555 This device complies with part 15 of the FCC Rules. Operation is subject to the following two conditions: (1) This device may not cause harmful interference, and (2) this device must accept any interference received, including interference that may cause undesired operation.
- Page 14 ASUS products sold in Vietnam, on or after September 23, 2011,meet the requirements of the Vietnam Circular 30/2011/ TT-BCT. Các sản phẩm ASUS bán tại Việt Nam, vào ngày 23 tháng 9 năm2011 trở về sau, đều phải đáp ứng các yêu cầu của Thông tư 30/2011/TT-BCT của Việt Nam.
- Page 15 Notices for Wi-Fi model FCC RF Caution Statement WARNING: Any changes or modifications not expressly approved by the party responsible for compliance could void your authority to operate the equipment. FCC 5.925-7.125 GHz Caution Statement Operation of transmitters in the 5.925-7.125 GHz band is prohibited for control of or communications with unmanned aircraft systems.
- Page 16 ASUSTek Computer Inc. hereby declares that this device is in compliance with the essential requirements and other relevant provisions of The Radio Equipment Regulations 2017 (S.I. 2017/1206). Full text of UKCA declaration of conformity is available at https://www.asus.com/support/. The WiFi operating in the band 5150-5350 MHz shall be restricted to indoor use for the country listed below:...
- Page 17 ASUSTek Computer Inc. hereby declares that this device is in compliance with the основным требованиям и другим соответствующим условиям директивы 2014/53/ essential requirements and other relevant provisions of Directive 2014/53/EU. Full text EU. Полный текст декларации соответствия ЕС доступен на https://www.asus.com/ of EU declaration of conformity is available at ru/support/.
- Page 18 ASUSTeK Computer Inc. ar šo paziņo, ka šī ierīce atbilst Direktīvas olennaisten vaatimusten ja muiden asiaankuuluvien lisäysten mukainen. Koko EY:n 2014/53/ES būtiskajām prasībām un citiem citiem saistošajiem nosacījumiem. Pilns ES vaatimustenmukaisuusvakuutuksen teksti on luettavissa osoitteessa https://www.asus. atbilstības paziņojuma teksts pieejams šeit: com/support/.
- Page 19 ďalšími príslušnými ustanoveniami smernice č. 2014/53/ W krajach wymienionych w tabeli działanie sieci Wi-Fi w paśmie 5150–5350 MHz EÚ. Plné znenie vyhlásenia o zhode pre EÚ je k dispozícii na lokalite https://www.asus. powinno być ograniczone wyłącznie do pomieszczeń: com/support/.
- Page 20 Por la presente, ASUSTek Computer Inc. declara que este dispositivo cumple los requisitos básicos y otras disposiciones pertinentes de la directiva 2014/53/EU. En https://www.asus.com/support/ está disponible el texto completo de la declaración de conformidad para la UE. La conexión WiFi con una frecuencia de funcionamiento de 5150-5350 MHz se restringirá...
- Page 21 • Si tiene alguna queja o necesidad de un centro de reparación local o el https://www.asus.com/cz/support/. periodo de garantía del producto ASUS, por favor visite el sitio de Soporte de ASUS en https://www.asus.com/mx/support/ para mayores detalles. ASUS garantioplysninger Información de contacto ASUS •...
- Page 22 Ova ASUS komercijalna garancija daje se nezavisno, kao dodatak zakonskoj • Bảo hành thương mại này của ASUS được cung cấp độc lập và ngoài Bảo đảm pháp pravnoj garanciji, i ni ka koji način ne utiče na i ne ograničava prava data lý...
- Page 23 ASUS COMPUTER INTERNATIONAL (America) Address: 48720 Kato Rd., Fremont, CA 94538, USA ASUS COMPUTER GmbH (Germany and Austria) Address: Harkortstrasse 21-23, 40880 Ratingen, Germany ASUSTeK (UK) LIMITED Address: 1st Floor, Sackville House, 143-149 Fenchurch Street, London, EC3M 6BL, England, United Kingdom ASUS GLOBAL PTE.
- Page 24 15060-33KA0000...
Need help?
Do you have a question about the ROG STRIX Z890-I GAMING WIFI and is the answer not in the manual?
Questions and answers