
Related Manuals for CAHORS Digital STM 18 HD


Summary of Contents for CAHORS Digital STM 18 HD
- Page 1 STM 18 HD Compact Meter DVB-S2 + T2 / C with optical measurement User Manual Ref 0145256R13 Cahors Digital - CS 60022 - 46003 Cahors Cedex 9 - FRANCE www.cahors-ced.com/television...
-
Page 2: Table Of Contents
User Manual SUMMARY 1. MAIN FEATURES ..............................5 2.BUTTONS, SCREEN AND CONNECTORS ......................... 6 3. MAKE A MEASUREMENT ............................. 7 4.MAIN MENU ................................ 9 5. DVB-S / S2 ................................9 "M " ........................10 IDENTIFYING SATELLITE EASURE MENU 5.1.1 ZOOM ................................11 5.1.2 LNB .............................. - Page 3 User Manual 9 SETTINGS SYSTEMS............................. 24 10. ACCESSORIES ..............................24 11.TROUBLESHOOTING ............................25 12.TECHNICAL CHARACTERISTICS .......................... 25 3 / 27 Digital Cahors - CS 60022 - 46003 Cahors Cedex 9 - FRANCE www.cahors-ced.com/television...
- Page 4 User Manual Please refer to the instruction manual before use of the apparatus • Read the manual carefully for use and maintain your device. • The technical specifications and user guides are subject to change without notice. • Please charge the battery for three hours before the first use. •...
-
Page 5: Main Features
User Manual MAIN EATURES Supports standard DVBS / DVB-S2 / DVB-T / DVBT2 / DVBC/ DVBC2 /MCNS / OPTICAL Protection and indicator short circuit of LNB. Very fast and accurate with high sensitivity. Resolution 320 X 240 with backlit LCD color screen. ... -
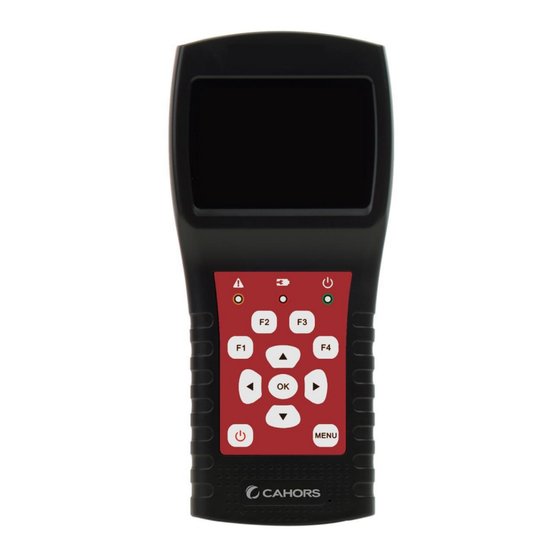
Page 6: Buttons, Screen And Connectors
User Manual BUTTONS SCREEN AND CONNECTORS 1.RF In (Antenna Input): input signal for standards DVB-T and DVB-C. Connect directly the coaxial cable on this outlet. 2.LNB In: input signal DVB-S/ DVB-S2. Connect the coaxial cable from the LNB. 3. Charging indicator: Red: The battery is being charged blhad: The battery is charged. -
Page 7: Make A Measurement
User Manual Hereunder an example of operation of the function keys from the Home Menu F1:Switching on / off of the display screen F2:Switching on / off beeper F3:Please research the control menu TP in the satellite measurement menu F4:Go to the Auto DiSEqC function of the satellite measurement menu. Note: press on to display help on keys function 7. - Page 8 User Manual How to measure the satellite signal: Connect the signal cable to connector socket type F. Get into satellite submenu. Calculate the elevation and azimuth according to your local position in the menu "Angles". Set or adjudt your antenna in the correct position. Set the LNB settings depending on your configuration ground in the menu "LNB Setting".
-
Page 9: Main Menu
User Manual Press on [▲ / ▼ ] to change the wavelength. The available wavelengths are the following: 850, 980, 1300, 1310, 1490, 1550 and 1610 nm. Press F3 to switch from one measurement to a measurement in dBm dB and vice versa. After the starting of the meter, It will arrive on the following main menu. -
Page 10: Identifying Satellite "Measure " Menu
User Manual "M " IDENTIFYING SATELLITE EASURE MENU The meter displays the strength and quality of the live signal. But also the CBER, VBER, LBER, CNR, The modulation type, FEC and power level received. 019.2°E Astra 19E: You are on the first satellite available. Please press [/] to switch Satellites or press [OK] to enter a preprogrammed list and choose the appropriate satellite. -
Page 11: 5.1.1 Zoom
User Manual 5.1.1 ZOOM Press F1 for zoom in on the measurement results. 5.1.2 LNB MEASURES Press F2 to enter the menu showing the voltage LNB and her consomming 5.1.3 CONTROL TRANSPONDERS POINTING MODE When you press F3 in the menu Satellite measurement, he is very easy to control the level and quality of the four polarities LNB Quattro. -
Page 12: Auto D Ise Qc
User Manual 5.1.4 A Press F4 to enter the menu automatic DiSEqC 1.0detection If nothing is found, no Diseqc device is connected, press [MENU] to exit 5.2 SETTINGS LNB All LNB settingd are defined in this menu whose elements are detailed below: ... -
Page 13: Usals Settings
User Manual 5.2.1USALS SETTINGS Press on [OK] to enter the menu USALS . 019.2°E Astra 19E: Satellite currently used. Press on [/] to switch Satellites or [OK] to select from the list. Press again [OK] to validate . The key[MENU] allows exit All other menu items will be discounted by the satellite selected. -
Page 14: Changing The Satellite
User Manual CHANGING THE SATELLITE The satellite parameters, such the orbital position and the transponder can be edited in this menu. The satellites will be listed in this menu. Press on [/] To move through the list Press [F2] to edit Name of satellite or the orbital position in a dialog box. press on [/] To move the cursor and [/] To modify the value of each item displayed in the edit menu. -
Page 15: Angle Calculating
User Manual ATress [OK] to display LNB settings window when it is shown by the orange icon on the screen. Press on [/] to change the current frequency of the LNB (1st line) The lines of the following: Activating or not 22Khz / 13 or 18V / Choice of standard Disecq. - Page 16 User Manual The user needs to adjust the altitude of the meter based on simulation results. Please move the meter untill the selected satellite in red is bunked to the satellite YELLOW present in the round. When the pointing is correct, RED GREEN satellite toggle the status. The elevation and azimuth are automatically updated at the bottom of the screen in real time.
-
Page 17: Monitor D Ise Qc
User Manual Select Compass, press [OK] to get there. The following menu will appear MONITOR Connect a device such as a demodulator (DVB-S / S2) the LNB IN input. The screen below shows the monitoring menu 17 / 27 Digital Cahors - CS 60022 - 46003 Cahors Cedex 9 - FRANCE www.cahors-ced.com/television... - Page 18 User Manual Pow: Display Power tension on cable from demodulator 22KHz: Status 22 Khz or not active (On / Off) E03F20D1: DiSEqC received from the demodulator Move center: Action corresponding the control E03F20D1. E13F21D6: DiSEqC Command received from the demodulator. Move west one step: Action corresponding to the command E13F21D6.
-
Page 19: Dvb T/ T2
User Manual 6.DVB-T / T2 The user can measure the DVB-T / T2 in direct, analyzing the spectrum, measure slope enter a plurality of transponders (canals), scanner all stored frequencies, list those locked. Six sub menus present: Measurement, Auto Scan, Channel List, Slope, Spectrum, Antenna Power supply (0V, 5V, 12V, 18V, 24V) 6.1 T ERRESTRIAL MEASUREMENT The meter will display the channel number, the corresponding frequency,... -
Page 20: Auto Scan
User Manual 6.2 A The meter automatically scan the stored frequencies and show the status for each of it. The return to the main menu automatically done once the scan is complete. If you want to interrupt the search, press the [MENU] CHANNEL LIST This menu displays the complete list of the channel previously found while Auto Scan. -
Page 21: Antenna Feed
User Manual ANTENNA POWER The user can turn on / off the supply voltage of the mast preamplifier. The tensions 5V, 12V, and 24V are supported. 7. DVB-C The user can measure directly the DVB-C signal received. Six sub-menus are available: Measured, Auto Scan, channel list, slope (tilt) , spectrum and Trunk Voltage. -
Page 22: Auto Scan
User Manual 7.2 A The meter automatically scan the stored frequencies and show the status for each of them. The return to the main menu automatically done once the scan is complete. If you want to interrupt the search, press the [MENU] CHANNEL LIST This menu displays the complete list of channels you saved previously when Auto Scan. -
Page 23: Trunk Voltage
User Manual 40 ~50 ~60: Beach level value. Press [F3] to switch between 40~ 60, 40 ~ 80 40 ~ 100. S02/ 115MHz / 0 dBuV: Selection of the current frequency and level. Press on [/] To change the value. - Page 24 User Manual The second measure recorded by pressing [OK] again The third measurement recorded by pressing sur [OK], a third time. M2-M1: Value of the attenuation in dB between the first and second measurement. M3-M2: Value of the attenuation in dB between the second and third step. 9 SETTINGS SYSTEMS ...
-
Page 25: Troubleshooting
User Manual 11.T ROUBLESHOOTING 1. No power: Please charge for three hours the meter. 2. LED Warning flashing: Short circuit of the cable of arrival antenna overload. Turn the meter, Check the quality cable then put the meter in operation. 3. - Page 26 User Manual Guard interval auto spectrum inversion auto DVB-C J83A BER (before Reed Solomon): 1E-7 - 1E-3PER (Packet Error Rate): 1E-6 - 1E-2 Error rate (BER) Frequency range 42-1005MHz Power Level 35-100 dBuV, +/- 2dB SNR (signal / noise ratio) 20 - 40dB +/- 0.5dB symbol rate 1.7 to 7.2 Msym / s...
- Page 27 User Manual spectrum inversion DVB-S2 Symbol rate (BER) CBER (before LDPC): 1E-7 - 1E-3LBER (before BCH): 1E-9 - 1 E-5 fr Rangesequence 950-2150MHz Power Level 35-100 dBuV, +/- 3dB CNR (Signal / Noise) 0 - 20dB +/- 0.5dB Symbol rate 333 Ksym / s to 45 Msym / s Constellation QPSK, 8PSK, 16APSK, 32APSK...
Need help?
Do you have a question about the STM 18 HD and is the answer not in the manual?
Questions and answers