Advertisement
Quick Links
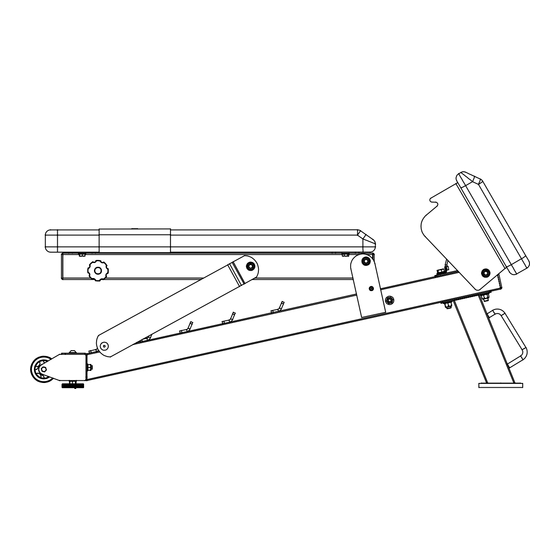
POWERBENCH 2.0 ASSEMBLY INSTRUCTIONS
ITEM NO.
1
2
3
4
5
TOOLS NEEDED: 17 mm WRENCHES
FASTEN THE BENCH FRAME TO THE WHEEL BASE IN POSITION. TIGHTEN THE
1.
BOLTS/NUTS.
5
3
PAGE 1
DESCRIPTION
BENCH FRAME
WHEEL BASE
M10 WASHERES
M10 HEX HEAD BOLTS
1
5
M10 NUTS
3
QTY.
1
1
4
2
2
2
3
4
Advertisement

Related Manuals for PowerBlock POWERBENCH 2.0


Summary of Contents for PowerBlock POWERBENCH 2.0
- Page 1 POWERBENCH 2.0 ASSEMBLY INSTRUCTIONS PAGE 1 ITEM NO. DESCRIPTION QTY. BENCH FRAME WHEEL BASE M10 WASHERES M10 HEX HEAD BOLTS M10 NUTS TOOLS NEEDED: 17 mm WRENCHES FASTEN THE BENCH FRAME TO THE WHEEL BASE IN POSITION. TIGHTEN THE BOLTS/NUTS.
- Page 2 POWERBENCH 2.0 ASSEMBLY INSTRUCTIONS PAGE 2 ITEM NO. DESCRIPTION QTY. BENCH FRAME WHEEL BASE M10 WASHERES M10 ROUND HEAD SCREWS TOOLS NEEDED: 6 mm ALLEN WRENCH FASTEN THE BENCH FRAME TO THE WHEEL BASE IN POSITION. TIGHTEN THE SCREWS.
- Page 3 POWERBENCH 2.0 ASSEMBLY INSTRUCTIONS PAGE 3 ITEM NO. DESCRIPTION QTY. BENCH FRAME FRONT FOOT FRAME M12 WASHERES M12 HEX HEAD BOLTS M12 NUTS TOOLS NEEDED: 19 mm WRENCHES PLACE THE FRONT FOOT FRAME AGAINST BENCH FRAME. ALIGN HOLES OF THE FRONT FOOT FRAME AGAINST BENCH FRAME.
- Page 4 POWERBENCH 2.0 ASSEMBLY INSTRUCTIONS PAGE 4 ITEM NO. DESCRIPTION QTY. BENCH LEVELING MOUNTS TOOLS NEEDED: NONE FOR MAXIMUM QUALITY, ADJUST THE HEIGHT OF THE LEVELING MOUNTS BY LOOSENING OR TIGHTENING THE THREADS. LEVELING MOUNTS...
- Page 5 IMPORTANT SAFETY INSTRUCTIONS Read and fully understand all instructions contained in this manual prior to using the product. Be alerted to the possibility of injury. Do not be careless. This bench was designed and manufactured to allow your workouts to flow as smoothly as possibleand minimize adjustment/set-up time.
Need help?
Do you have a question about the POWERBENCH 2.0 and is the answer not in the manual?
Questions and answers