
Related Manuals for LENCO MDV-15


Summary of Contents for LENCO MDV-15
-
Page 1: Instruction Manual
MDV-15 DVD MICOR HI-FI SYSTEM WITH CASSETTE, USB AND CARDREADER INSTRUCTION MANUAL For information and support, www.lenco.eu... -
Page 2: Foreword
FOREWORD THANKS Dear Customer, May we take this opportunity to thank you for purchasing this player. We strongly recommend that you carefully study the User Manual before attempting to operate the unit and that you note the listed precautions. 1. Ensure a minimum distance of 5 cm around the apparatus for sufficient ventilation. 2. -
Page 3: Table Of Contents
CONTENT FOREWORD......................1 CONTENT.........................2 WARNING.........................2 PANELS........................3 REMOTE CONTROL....................4 CONNECT TO THE TV-SET..................5 CONNECT TO THE AMPLIFIER................6 SYSTEM CONNECTION..................7 BASIC OPERATION...................8-14 MENU SETUP....................15-19 RADIO OPERATION....................20 CASSETTE OPERATION..................21 SPECIFICATION.....................22 TROUBLE SHOOTING..................23 WARNING Please read and understand all the warnings given in the following and those marked on the unit. -
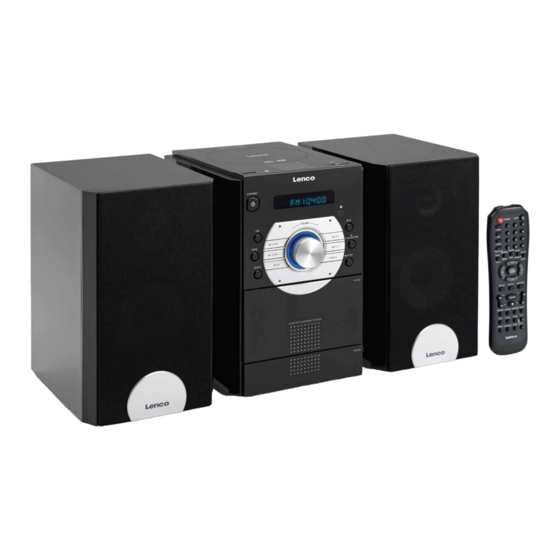
Page 4: Panels
PANELS 1. DISPLAY SCREEN 2. STANDBY BUTTON 3. VOLUME+/- KNOB 4. FM BUTTON 5. TAPE BUTTON 6. AUDIO BUTTON 7. REMOTE CONTROL SENSOR 8. DVD BUTTON 9. PLAY/ENTER BUTTON 10. STOP BUTTON 11. TAPE FAST FORWARD BUTTON 12. TAPE PAUSE BUTTON 13. -
Page 5: Remote Control
REMOTE CONTROL NOTE: 1. Turn on the player, insert the batteries into the remote control, and direct the remote control at the remote sensor on the front panel. 2. Remote control functions at the distance of 7 m (not more) from the player. 3. -
Page 6: Connect To The Tv-Set
CONNECT TO THE TV-SET 1. If your TV-set has AV input, use the AV cable to connect the player to the TV-set. After you make sure the connection is right, give AV status to the TV-set in the settings. 2. If your TV-set has S-video input, use S-video cable to connect the player to the TV-set. This type of connection provide the best quality of picture. -
Page 7: Connect To The Amplifier
CONNECT TO THE AMPLIFIER Digital audio output setting Connect coaxial or optical output of the player to the corresponding inputs of the amplifier. During playing a disc or stop, press the SETUP button on the remote control to open the DVD menu page. Use direction buttons to move to the Audio setup page; Also, move the cursor downwards to Digital audio setup by using the direction buttons;... -
Page 8: System Connection
SYSTEM CONNECTION Before connection of the acoustic equipment, pay attention to the picture below. Each connection must be safe and firm. Connect the power at last. -
Page 9: Basic Operation
BASIC OPERATION Preparation 1) Before turn on the unit, check if all the connections are right and safely made. Insert The plug in the corresponding power socket. 2) Press the POWER button on the front panel of this unit. 3) Press the EJECT button on front panel of this unit, then put the disc on the disc holder and press this button again. - Page 10 BASIC OPERATION Repeat While in playing mode, press the REPEAT button to set repeat mode. 1. For DVD, as you press the REPEAT button, the TV screen will displays: Chapter, Title, All. 2. For VCD, CD, CD-R discs, press the REPEAT button, the screen will displays: Track, All. 3.
- Page 11 BASIC OPERATION Pause During playing a disc, press the PAUSE button to pause, press this button again or PLAY/ENTER button to continue playing. Menu While playing a VCD, press the MENU button , PBC current state view mode will be Opened /closed.
- Page 12 BASIC OPERATION Zoom In playing status, press ZOOM button the TV screen display will be zoomed in 2 times, 3 times, 4 times, 1/2time, 1/3time, 1/4time. Shortcut When playing DVD discs, press the SHORTCUT button to skip the initial title, menu or warnings (If the disc supports this function).
- Page 13 BASIC OPERATION VCD disc display: DVD disc display: You can press the direction key to move the cursor to the setting option according to the above-mentioned screen suggestions, then press PLAY/ENTER to confirm and use number keys to input the corresponding time numbers, after it is done, DVD player will start to play according to the setting time.
- Page 14 BASIC OPERATION 2. Press the direction button to move the cursor to a directory, the press the PLAY/ ENTER button to enter the directory. 3. Press the direction buttons to enter the subdirectory or the file area, select a song with the cursor, then press the PLAY/ ENTER button to play the song .
- Page 15 BASIC OPERATION USB/CARD This is latest function realized only in new generation multimedia DVD-players. Connecting the USB or Card device while playing a disc does not influence the quality of playing.In order to view the contents of the USB device, the following steps need to be performed.
-
Page 16: Menu Setup
MENU SETUP DVD MENU SETUP To access the DVD menu: 1. Press the SETUP button. 2. Press the direction buttons to switch between the different setup pages. 3. Press the direction button to move the cursor to the position you want, then press the PLAY/ENTER button again to enter the subdirectory. - Page 17 MENU SETUP Video Setup Page 1. Video Output This option is used to set the video output mode: S-video,YPbPr, RGB. Note: Make sure that you set the player to the correct video mode. 2. TV Display (4:3PS, 4:3LB,16:9 ) 1) No matter which format you select, if the screen is 4:3 display, the image is displayed in 4:3.
- Page 18 MENU SETUP Audio Setup Page 1. Analog Audio Setup 1) Surround LT/RT: audio output from Left and Right channel Stereo: stereo audio output 2) Dual Mono This option is used to set the mode of audio output, including L-Mono, R-Mono, Mix-Mono,and Stereo.
- Page 19 MENU SETUP 3) Treble Boost ON: set the treble boost on and adjust the treble effect. OFF: set the treble boost off. System Setup Page (This setup page only be available when the player in No Disc or Eject status.) 1.
-
Page 20: Menu Setup
MENU SETUP Password Setup Page 1. Parental Control This unit has 8 different age ratings that can be selected. Move the cursor to select one of them, then press Play/Enter button on the remote control to enter. You are reminded to input the password. 2. -
Page 21: Radio Operation
RADIO OPERATION 1. Enter FM Function In the turn-on or playing status, press the FM button on the remote control (or front panel) to enter FM mode. 2. Select Bands 1) Directly input frequency: press the T/F button on the remote control, then input the frequency that you want. -
Page 22: Cassette Operation
CASSETTE OPERATION 1. Preparation 1) Turn on this unit; and press TAPE button on the front panel or on the remote control to switch to tape playing status. 2) Press the open mark on the cassette door to open the cassette; place a tape in (keep the tape in the right place);close the cassette door. -
Page 23: Specification
SPECIFICATION DVCD SVCD CD-R Disc type MPEG 4*, Divx (hereinafter 5.0 and 5.0) MPEG2 for DVD, and MPEG1 for VCD Video format MPEG1, MPEG2, PCM; Stereo and 2.0CH Audeo format Video format: NTSC, PAL, MUL Signal output Video output: 1.0 Vp-p Audio: 2.0 CH, 2V (RMS) Chromatic aberration output, S-Video output, Output joint... -
Page 24: Trouble Shooting
TROUBLE SHOOTING For your convenience, we have listed some methods to solve common problems you may encounter when you using the system. If the problem occurs repeatedly , contact the nearest maintenance center.
Need help?
Do you have a question about the MDV-15 and is the answer not in the manual?
Questions and answers