Advertisement
Quick Links
B
U
EFORE
SE
Check that the supply details on your heater are in accordance with your electricity supply.
W
M
ALL
OUNTING
The heater must not be located immediately below a fixed socket outlet.
The Wall Mounting brackets are packed separately in the carton. Fit the top mounting brackets to the
wall at the height and centres shown in the diagram. Withdraw the two feet-securing screws from the base
of the heater and use these screws to secure the right-angled brackets to the base of the rear panel of the
heater in the correct holes.
Mount your appliance onto the top brackets via the two slots in the rear panel. Secure the bottom
bracket to the wall.
Both models are supplied without a plug and are intended to be hard wired to a fused spur.
WARNING – THIS APPLIANCE MUST BE EARTHED
C
ONTROLS
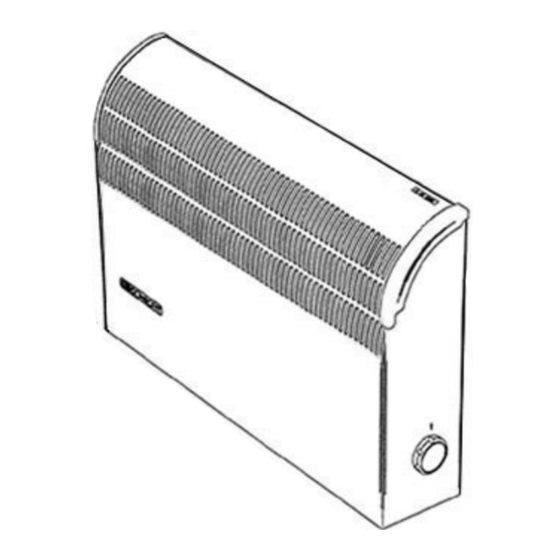
The heater has an output of 2kW.
The heater is fitted with a built-in thermostat to control the temperature level to which the room is
heated. The thermostat adjustment knob is located on the right hand end and is numbered. Rotate the
knob clockwise to a higher number to raise the room temperature. Once set it is unlikely to require to be
touched again.
To set the heater to the Frost Watch mode, turn the thermostat control knob fully anti-clockwise until
the frost symbol aligns with mark.
CN2SC O
NLY
The illuminated switch on the side panel of the heater switches the heater on and off only. This switch
will light up when it is in the on position and there is power to the heater.
CN2SCT O
This model is fitted with two heat switches. Each switch gives half heat (1 kW) when in the 'ON'
position.
T
O
HERMAL
The appliance is fitted with an Electronic Safety Control (ES). This is a safety device, which switches
the heater off if, for any reason, the appliance overheats. The ES control can only be re-set after the
appliance has cooled down. In order to re-set the ES control, proceed as follows:
•
Switch off appliance and leave for approximately 5 minutes.
•
Switch appliance back on and ES control will re-set.
•
Ensure that the appliance is functioning correctly. If the ES control operates again, the appliance
should be checked by a competent electrician.
The heater carries a 'Do Not Cover' label to warn the user that if the appliance is covered, there is a
risk of overheating.
U
T
SING THE
The heater must be connected to the mains supply in order for the timer to operate continuously.
Set the correct time on the timer by rotating the dial clockwise until the correct time is indicated on
the 24-hour clock face.
A
UTOMATIC
1.
Switch the rocker switch immediately beneath the timer to the position designated 'Auto'.
2.
The 24-hour timer can be set to give any combination of On/Off intervals to a minimum of 15 minutes
on. Select the 'On' time required by pressing the black segment (on the circumference of the timer)
adjacent to the time required, out towards the edge of the dial. This will cause the heater to switch
'on' at the selected time for 15 minutes operation. Each additional segment pressed out will give a
further 15 minutes of operation. In this way, select the length of time required for the unit to be
'On' and push out the number of 15-minute segments necessary to select the time period required.
3.
The timer can be set to give as many 'On' periods as required during any 24-hour period.
4.
This program will repeat itself every 24 hours until changed. This program may be overridden at any
time by switching to manual operation.
M
O
ANUAL
PERATION
Switch the rocker switch immediately beneath timer to the position designated 'Manual'.
convector will now run continuously controlled by the heat settings and thermostat as described under
'Controls'.
62001022 Iss 05
NLY
C
-
PERATED
UT
OUT
(M
CN2SCT)
IMER
ODEL
O
PERATION
The
Advertisement

Related Manuals for Consort CN2SC


Summary of Contents for Consort CN2SC
- Page 1 CN2SC O Mount your appliance onto the top brackets via the two slots in the rear panel. Secure the bottom bracket to the wall.
- Page 2 The correct electricity supply voltage is shown on the rating label attached to the appliance. USTOMER ELPLINE Should you need any advice on the use of your new Consort product, or should you require service or repair, please contact our Helpline: 01646 692172 Mon to Fri 8.30 am to 3.30 pm...
Need help?
Do you have a question about the CN2SC and is the answer not in the manual?
Questions and answers