Table of Contents
Advertisement
Quick Links
Advertisement
Table of Contents

Related Manuals for HappyJapan STA-300


Summary of Contents for HappyJapan STA-300
- Page 1 # a0 - 89...
-
Page 2: Important Safety Instructions
INSTRUCTION MANUAL This sewing machine is intended for household use. IMPORTANT SAFETY INSTRUCTIONS When using a sewing machine, basic safety precautions should always be followed, including the following. Read all instructions before using. DANGER - To reduce the risk of electric shock: Never leave unattended when plugged in. -
Page 3: Servicing Of Double-Insulated Products
SERVICING OF DOUBLE-INSULATED PRODUCTS In a double-insulated product, two systems of insulation are provided instead of grounding. No grounding means is provided on a double-insulated product, nor should a means for grounding be added to the product. Servicing a double-insulated product requires extreme care and knowledge of the system, and should be done only by qualified service personnel. -
Page 4: Information For Embroidery Unit
INFORMATION FOR EMBROIDERY UNIT This sewing machine can sew beautiful embroidery by attaching the embroidery unit. (Sold separately) The embroidery unit can sew many embroideries such as one-point embroideries, large-size embroideries and can sew letter embroidery. (Built-in patterns are vary depending on the model.) For models that support USB flash memory, you can also save the supported embroidery data to a USB flash memory and load it into an embroidery unit. -
Page 5: Table Of Contents
CONTENTS IMPORTANT SAFETY INSTRUCTIONS ..STRAIGHT STITCH SEWING (WITH STRAIGHT inside of the front cover INFORMATION FOR EMBROIDERY UNIT ....2 STITCH NEEDLE PLATE) ..........39 MAIN PARTS ..............4 A. H OW TO R E M OV E TH E S TA N D A R D N E ED LE EXTENSION TABLE .............7 PLATE .............. -
Page 6: Main Parts
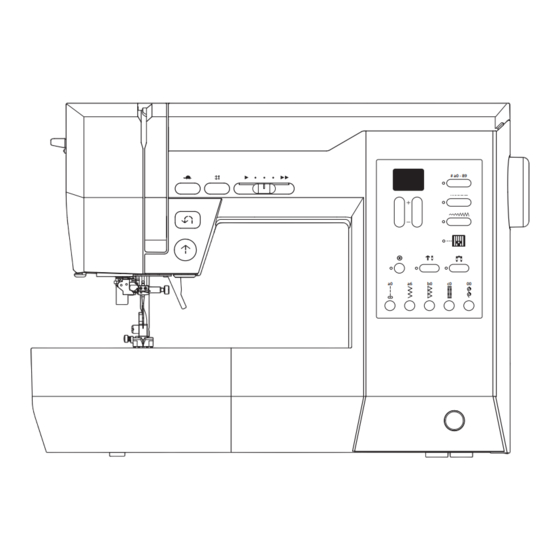
MAIN PARTS 1. Slow Button 2. Needle Up-Down Button 3. Speed Control Button 4. Stitch Selection Buttons 5. Indicator 6. Control Panel 7. Hand Wheel # a0 - 89 8. Face Plate 9. Reverse Button 10. Start/Stop Button 11. Extension Table (Accessory Case) 12. - Page 7 28. Needle Threader Guide 29. Needle Bar Thread Guide 30. Needle 31. Presser Foot 32. Needle Plate 33. Bobbin Cover 34. Needle Clamp Screw 35. Presser Foot Lifter 36. Standard Needle Plate 37. Bobbin Cover Latch 38. Needle Plate Stopper Lever 39.
-
Page 8: Rear View
54. Handle 55. Connecting Port for Embroidery Unit 56. Power Switch 57. Terminal Box 58. Foot Controller Jack 59. Foot Controller 60. Power Line Cord REAR VIEW 61. Drop Feed Lever... -
Page 9: Extension Table
EXTENSION TABLE A. OPENING THE ACCESSORY CASE Hook your finger to upper front of accessory case and pull toward you. B. REMOVING THE EXTENSION TABLE Hook your finger to the left bottom side of extension table and slide it to the left. To attach, insert to the right. -
Page 10: Connecting The Machine
CONNECTING THE MACHINE 1. Place machine on stable table. 2. Connect the power line cord to the machine by inserting the 2-hole plug into the terminal box. 3. Connect the power line plug to the electric outlet. 4. Turn on the power switch. DANGER: To reduce the risk of electric shock. -
Page 11: Foot Controller
FOOT CONTROLLER Use of foot controller will permit control of start, stop and speed with your foot. When the foot controller is connected, start/stop button will be deactivated. (See page 10) 1. Turn off the power switch. (Symbol O) 2. Push foot controller plug into the jack on machine. 3. -
Page 12: Function Of Each Part
FUNCTION OF EACH PART A. START/STOP BUTTON The machine will start running when start/stop button is pressed and will stop when pressed the second time. The machine will rotate slowly at start of sewing. MONITOR LAMP Green Light “ON”: Ready to sew or to wind the bobbin. -
Page 13: Slow Button
C. SLOW BUTTON While sewing, by pressing this button, machine will sew in slow speed. Pressing this button again, the speed will return. D. NEEDLE UP-DOWN BUTTON Needle position will be changed up or down by pressing this button. Needle STOP position will be changed by pressing Needle Stop Position Change Button. -
Page 14: Drop Feed Lever
G. DROP FEED LEVER NOTE: If you raise the feed dog, the feed dog will rise when you start sewing. a: View from frontward b: View from backward c: Feed dog The feed dog project up through the needle plate, directly below the presser foot. -
Page 15: Dust Cover
DUST COVER Cover the machine with dust cover when it is not in use. -
Page 16: To Select A Pattern
TO SELECT A PATTERN This machine has 120 patterns. (See page 15 "PATTERN CHART".) When you turn on the machine, straight stitch ( ) will be selected and indicated on the display. 1. INDICATOR This indicator indicates three stitch modes. A. - Page 17 3. TO SELECT OTHER STITCH PATTERN 1. Press the Stitch Pattern Mode Button (A). Indicator light will turn on and pattern number will appear on the display. (If this mode has been selected already, it is need not to press this button.) 2.
-
Page 18: Stitch Length
5. STITCH LENGTH When you select the pattern number, suitable stitch length will be preset automatically. If you want to change this, adjust as follows. 1. Press the Stitch Length Mode Button (B). Indicator light will turn on and stitch length will appear on the display. -
Page 19: Stitch Width
6. STITCH WIDTH When you select the pattern number, suitable stitch width will be preset automatically. If you want to change this, adjust as follows. 1. Press the Stitch Width Mode Button (C). Indicator light will turn on and stitch width will appear on the display. -
Page 20: Adjusting The Thread Tensions
ADJUSTING THE THREAD TENSIONS Normally, when thread tension regulator is set to "4", thread tensions will be satisfactory for most all sewing. If it is difficult to obtain correct tensions depending on the type of fabric and threads being used, adjust the thread tension regulator to settings shown below. -
Page 21: Setting Of Led Light And Beep
SETTING OF LED LIGHT and BEEP You can turn the LED light on and off. By switching the beep on and off, you can operate the machine without beeping. 1. Turn off the power switch. (Symbol O) 2. Push the bobbin winder spindle to the right. 3. -
Page 22: Bobbin Setting
BOBBIN SETTING A. REMOVING THE BOBBIN 1. Raise the presser foot lifter. 2. Pull the bobbin cover latch to the right and remove the bobbin cover. 3. Lift up the bobbin from the machine. NOTE: Use the plastic bobbin dedicated to this model. 11.5 mm Actual Size B. - Page 23 5. Bring thread backward and pass through the threading guide (i) from left to right. 6. Bring thread to the right and pass thread through the thread guide (j) from rear side. Pass thread under tension disc (k) in counter clockwise direction.
-
Page 24: Inserting The Bobbin
C. INSERTING THE BOBBIN CAUTION: To prevent injury to persons. Turn off the power before carrying out the below operation. 1. Place bobbin into bobbin holder (a) with the thread unwinding counter clockwise. NOTE: Be careful not to make a mistake in the direction of the thread. -
Page 25: Threading The Machine
THREADING THE MACHINE A. PREPARING TO THREAD MACHINE 1. Raise the presser foot lifter. 2. Raise the needle to its highest position by pressing the needle up/down button or turning the hand wheel toward you. When the needle is definitely up, the mark (a) on hand wheel will also be at the top. -
Page 26: Setting Spool Of Thread On Spool Pin
B. SETTING SPOOL OF THREAD ON SPOOL 4. Open the top cover and set spool as below. - Pull up the left end of spool pin. - Set the spool of thread on spool pin so that the thread unrolls from the front of the spool. - Set the spool cap on spool pin as far as it will go. - Page 27 9. To thread the take-up lever, follow the arrow and pull the thread from bottom to top so that the thread hits (h). 10. Pull thread downward along the slit. 11. Draw thread through the needle bar thread guide (i) from right side opening.
-
Page 28: Threading The Needle Eye
D. THREADING THE NEEDLE EYE NOTE: The needle threader is used for needle sizes 11/80 - 16/100 and thread sizes 50- 100. CAUTION: To prevent the accidents or the injury to persons. - Do not put your fingers under the needle. - Make sure the needle is installed correctly. - Page 29 5. Hook the thread to the thread cutter (e) from back to front. Pull and cut thread. 6. Lower the needle threader lever. Push the needle threader lever (f) all the way down. The needle threader equipment will go down and it will pass the thread through the needle eye.
-
Page 30: Changing The Presser Foot
CHANGING THE PRESSER FOOT The presser foot must be changed according to the stitch you sew, or work you do. A. CHANGING THE PRESSER FOOT Use the appropriate presser foot for each sewing pattern or purpose. See page 37, confirm the presser foot for each pattern. -
Page 31: Removing The Presser Foot Holder
B. REMOVING THE PRESSER FOOT HOLDER Remove the presser foot holder when you clean the machine or attaching extra foot (option). CAUTION: To prevent injury to persons. Turn off the power switch before carrying out the below operation. 1. Remove the presser foot. See the previous section "CHANGING THE PRESSER FOOT". -
Page 32: Fabric, Thread And Needle Table
FABRIC, THREAD AND NEEDLE TABLE Select thread size and needle size according to the type of fabric and thickness. Type of Fabric Thread Size Needle Size Ctn #80 - 100 Light Weight georgette, organdy, voile, taffeta, silk, etc. Silk 60 - 80 9/70-11/80 Syn 80 - 100 Ctn 50 - 80... -
Page 33: Inserting The Needle
INSERTING THE NEEDLE Putting a cloth over the needle plate prevents you from dropping the needle into the machine. CAUTION: To prevent injury to persons. Turn off the power before carrying out the below operation. 1. Turn the hand wheel toward you until the needle is at its highest point. -
Page 34: Starting To Sew
STARTING TO SEW Turning on the machine, the straight stitch (center) is selected. A. START AND END OF SEAM 1. Check the presser foot [Regular Foot (H)]. See page 28 for changing the presser foot. NOTE: When sewing straight stitch on thin or stretchy fabrics, you can use the straight stitch needle plate and the straight stitch foot to achieve a beautiful finish. -
Page 35: Reverse Stitching
B. REVERSE STITCHING Reverse stitching is used for reinforcing the beginning and ends of the stitch. You can sew reverse stitch with the reverse button. (The machine will continue sewing reverse stitching while you are pressing the button. When you release the button, reverse stitching will stop.) 1. -
Page 36: Auto Lock Stitch
C. AUTO LOCK STITCH You can sew lock stitch at the beginning and end of the stitch. 1. Press the lock stitch button. Indicator light will turn on. 2. Start to sew. Machine will sew lock stitch automatically and start to sew the selected pattern. -
Page 37: Sewing Heavy Fabric
E. SEWING HEAVY FABRIC CAUTION: To prevent the accidents or the injury to persons. Forcing fabric with a thickness of 6 mm or more under the presser foot may cause the needle to break and cause injury. e-1. START SEWING THICK FABRIC When sewing heavy fabrics, the toe end of presser foot tends to lift up and sewing cannot be started smoothly. -
Page 38: Width Of Seam Allowance
F. WIDTH OF SEAM ALLOWANCE Guide lines on the needle plate indicate the distance from the center needle position. To keep the width of seam allowance, guide fabric edge aligning this guide line. G. IF YOU WANT TO DRAW UP THE BOBBIN THREAD This machine can start to sew without drawing up the bobbin thread. -
Page 39: Straight Stitch Sewing
STRAIGHT STITCH SEWING Straight stitch patterns should be selected to suit the type of fabric being sewn. Stitch Presser Foot Straight stitch Regular Foot (H) (Left needle position) a0 Straight stitch Regular Foot (H) (Center needle position) Straight Stitch Straight stitch with auto-reverse Foot stitch (Center needle position) The needle position can be changed by adjusting... -
Page 40: Straight Stitch With Auto-Reverse Stitch (No. A2)
B. STRAIGHT STITCH WITH AUTO-REVERSE STITCH (No. a2) 1. Position the fabric under the presser foot. Lower the presser foot. 2. Hold the upper thread loosely and start sewing. The machine will sew 4-5 stitches forward and sew 4-5 stitches backward and continue sewing forward. -
Page 41: Straight Stitch Sewing (With Straight Stitch Needle Plate)
STRAIGHT STITCH SEWING (WITH STRAIGHT STITCH NEEDLE PLATE) When sewing straight stitch on thin or stretchy fabrics, using the straight stitch needle plate prevents the fabric from sinking into the hole in the needle plate, you can finish it better. Stitch Presser Foot Straight stitch... -
Page 42: Plate
A. HOW TO REMOVE THE STANDARD NEEDLE PLATE 1. Press the needle up/down button or turn the hand wheel toward you to raise the needle. At this time, the hand wheel mark will come up. 2. Turn off the power switch. (Symbol O) CAUTION: To prevent injury to persons. -
Page 43: How To Attach The Straight Stitch Needle Plate
B. HOW TO ATTACH THE STRAIGHT STITCH NEEDLE PLATE 1. Insert the tab (b) on the left side of the straight stitch needle plate into the the needle plate. CAUTION: To prevent the accidents or the injury to persons. Be careful not to hit the feed dog with the straight stitch needle plate. -
Page 44: Elastic Stitch Sewing
ELASTIC STITCH SEWING It assures you of a stitch that is strong, flexible and will give with the fabric without breaking. Good for easy to ravel and knit fabrics. It is good for joining durable fabrics such as denims. Stitch Presser Foot a3 Stem stitch for stretch fabrics (Center needle position) -
Page 45: Zigzag Stitch Sewing
ZIGZAG STITCH SEWING This machine can sew zigzag stitches of various widths and lengths by changing the settings of the stitch width and stitch length. Stitch Presser Foot a6 Zigzag Stitch Regular Foot (H) a7 Satin Stitch Satin Foot (B) Zigzag stitches are suitable for joining two pieces of fabrics, overcasting and sewing various decorative stitches. -
Page 46: Hand Look Quilting Stitch
HAND LOOK QUILTING STITCH Use invisible nylon thread or very lightweight thread for the upper thread. For bobbin thread, use the thread of color scheme matches the fabric. Increase the thread tension. When you sew, bobbin thread will pull to the top and give the appearance of a traditional hand quilting stitch. -
Page 47: Multi-Stitch Zigzag
MULTI-STITCH ZIGZAG This stitch pattern is used to mend a broken fabric or to sew elastic bands. Stitch Presser Foot a8 Multi-Stitch Zigzag Regular Foot (H) A. MENDING Shorten the length of the stitch and sew. B. ELASTIC BAND SEWING Elastic Band Elastic Band Pull elastic band in front and back of needle while... -
Page 48: Overcasting-Overlocking
OVERCASTING-OVERLOCKING Prevents fraying of the raw edge of all fabrics. Stitch Presser Foot width: Overcasting a6, b0-b2 the automatic width: (width: the automatic settings or over) Foot (C) settings or narrow over a6(width: narrow), a8 Regular Foot (H) CAUTION: To prevent injury to persons. The overcasting foot should only be used for the above patterns (a6, b0-b2). -
Page 49: Using The Regular Foot
B. USING THE REGULAR FOOT Place fabric so that needle will fall nearest to edge of fabric when using the regular foot. a. Use for thick or stretch cloth. b. Use for narrow zigzag width. width: narrow c. You can also cut off the excess material after sewing the inside of fabric. -
Page 50: Blind Hem Stitching
BLIND HEM STITCHING This stitch will sew without stitches showing on right side of fabric. We use this pattern for hemming the skirts and pants. Stitch Presser Foot b3 Blind hem for regular fabric Blind Foot (D) Blind hem for regular or stretch fabric 1. -
Page 51: Buttonhole Sewing
BUTTONHOLE SEWING You can sew 6 types of buttonholes. You can change the width of each buttonhole in 2 - 3 steps. Be sure to try sewing on the same fabric that you will actually be sewing to check the result. Stitch Presser Foot Bar-tack Buttonhole for light to... -
Page 52: When Sewing Stretch Fabric
7. The machine will sew the buttonhole in the order as shown and stop automatically after sewing. 8. Raise the presser foot and cut thread. To sew over the same buttonhole, raise presser foot to return to original position. 9. Cut center of buttonhole being careful not to cut stitches on either side. -
Page 53: Sewing On Buttons
SEWING ON BUTTONS Stitch Presser Foot Regular Foot (H) 1. Lower the feed dog by moving the drop feed lever to the left. 2. Attach the regular foot and align two holes of button with slot of presser foot. 3. Push the button located on the left side of foot and lower the foot to hold the button securely. -
Page 54: Thread Shank
A. THREAD SHANK Sew-through buttons on coats and jackets should have a thread shank to make them stand away from the fabric. Place a straight pin or sewing machine needle on top of button between the holes, and sew over the pin or needle. -
Page 55: Automatic Bar-Tack/Darning
AUTOMATIC BAR-TACK/DARNING Stitch Presser Foot Bar-tack, to reinforce areas that will be subject to strain, such as pocket corners. Buttonhole Foot Darning, mending and other applications. 1. Adjust slide on base according to the length of bar-tack or darning. a= Length of bar-tack or darning 2. -
Page 56: Inserting Zippers (Centered Insertion / Lapped Insertion)
INSERTING ZIPPERS (CENTERED INSERTION / LAPPED INSERTION) Stitch Presser Foot Straight stitch Zipper Foot (E) (Center needle position) NOTE: What is “baste”? Before sewing the fabric with a sewing machine, temporarily sew it with long and loose stitches so that the fabric does not shift. -
Page 57: Lapped Insertion
B. LAPPED INSERTION 1. Baste the front sides of the fabrics face so they each other. Sew until end of opening. a: Top stitch 5 mm b: End of opening 3 mm c: Basting d: Wrong Side of fabric 2. Fold back to the left seam allowance. Turn under the right seam allowance to form a 3 mm fold. -
Page 58: Scallop Stitch
SCALLOP STITCH This stitch is used to sew edges on blouse collars and table cloths. Stitch Presser Foot b8 Scallop hem Regular Foot (H) Satin Foot (B) b9 Scallop edging A. SCALLOP HEM 1. Fold the fabric so that the right side is inward and sew the fabric along folded edge. -
Page 59: Patch Work
PATCH WORK Patch work is used to seam various fabrics and decorate them. Stitch Presser Foot b5, b6 Regular Foot (H) 1. Face the two fabrics with their right sides facing each other and sew them. 2. Press open the seam allowance. 3. -
Page 60: Eyelet
EYELET This stitch pattern is used for making belt holes and other similar applications. Stitch Presser Foot c8 Eyelet Satin Foot (B) You can choose the 3 sizes of eyelet by changing the stitch width. 1. Place the fabric under the presser foot and lower it. Start the machine. -
Page 61: Pin Tuck
PIN TUCK This pattern is used for decorate blouses etc. Stitch Presser Foot Straignt Stitch Straight stitch Foot (Center needle position) Regular Foot (H) Straignt stitch Regular Foot (H) (Left needle position) CAUTION: To prevent injury to persons. When using the straight stitch foot for utility stitch pattern a0, do not change the needle position from the automatic setting. -
Page 62: Quilting
QUILTING A quilt always consists of three layers of material. The top, middle and bottom. The top layer is formed by multiple geometrically shaped pieces of materials joined together. Stitch Presser Foot Straight Stitch Straight stitch Foot (Center needle position) Quilting Bar CAUTION: To prevent accidents. -
Page 63: Twin Needle Sewing
TWIN NEEDLE SEWING Interesting decorative stitches can be produced by using twin needles and threading the machine with two different colors of thread. Always make test samples to help you determine the settings best suited to a specific purpose. Stitch Presser Foot All patterns except No.b0 Regular Foot (H) - Page 64 <<Continued from previous page.>> 8. Always test sew selected stitch, NOTE: Some stitches look better than others sewn with a twin needle. 9. Sew project. Twin needle mode will remain until you press the twin needle button again or turn off the machine. NOTE: - Twin needle sewing may be used with utility and decorative stitch patterns by pressing twin needle...
-
Page 65: Free Arm Sewing
FREE ARM SEWING For free arm sewing, just remove the extension table. You can use this machine as a free arm machine. You can easily sew armhole, lower sleeve edge and hem of trousers etc. - See page 7 for "REMOVING THE EXTENSION TABLE". - See page 48 for "BLIND HEM STITCHING". -
Page 66: Hook Race And Feed Dog
B. HOOK RACE AND FEED DOG Remove the needle plate and clean the hook race and the feed dog regularly. CAUTION: To prevent injury to persons. Pay attention to the point of the needle. 1. Remove the following items. - Extension table - Needle - Presser foot - Presser foot holder... -
Page 67: Error Codes
ERROR CODES PROBLEM CAUSE CORRECTION PAGE System error. The thread winding switch System error. inside the sewing machine is damaged. (Contact your local dealer) Turned on the power switch while pressing Release the start/stop button. 8, 10 the start/stop button. Turned on the power switch while pressing Release the reverse button. -
Page 68: Helpful Hints
HELPFUL HINTS PROBLEM CAUSE CORRECTION PAGE Machine not properly threaded. Re-thread machine. Thread entwined around the bobbin holder. Remove entwined thread. Upper thread breaks Needle inserted incorrectly. Re-insert needle. Thread tension too tight. Readjust thread tension. Thread of incorrect size or poor quality. Choose correct thread. -
Page 69: Specifications
PROBLEM CAUSE CORRECTION PAGE Cord not plugged into electrical outlet. Insert plug fully into outlet. Machine will not run Power switch is not turned on. Turn on the switch. Upper thread or bobbin thread has broken Rethread the upper thread or bobbin 20, 23 Monitor lamp or missing. - Page 72 P. No. 37799 (F)C24 STA-300 English...
Need help?
Do you have a question about the STA-300 and is the answer not in the manual?
Questions and answers