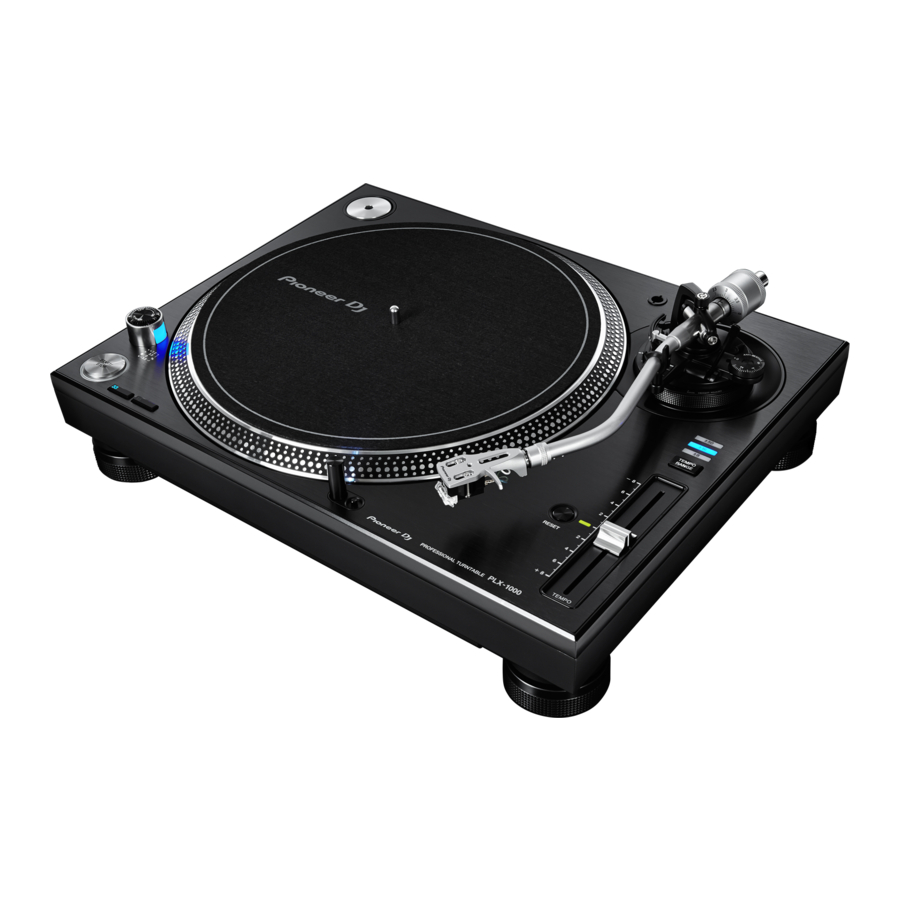
Pioneer PLX-1000 Manual
- Operating instructions manual (20 pages) ,
- Operating instructions manual (116 pages) ,
- Service manual (44 pages)
Advertisement
- 1 Before start
- 2 Before you start
- 3 Part names and functions
- 4 Adjustment
- 5 Connections
- 6 Operation
- 7 Troubleshooting
- 8 Maintenance of each part
- 9 Specifications
- 10 Cautions on use
- 11 IMPORTANT SAFETY INSTRUCTIONS
- 12 LIMITED WARRANTY
- 13 Documents / Resources
Before start
Features
This unit is a professional turntable that provides functions, durability, operability and sound quality suitable for a wide range of occasions, from listening at home to disco or club scenes
Direct drive system that achieves high torque
The unit turns at a constant speed with 0.1% or less wow and flutter, 4.5 kg·cm or more starting torque and start time of 0.3 seconds (at 33 1/3 rpm).
Design focused on high sound quality
- For the RCA terminal, we adopted a gold plated component made of the same cutting product as the TAD player, which is our flagship brand. A stable connection directly transmits the PHONO signal.
- External vibration effects are suppressed by the use of vibration suppression material between the top and bottom cabinet.
Highly accurate, 3-level adjustable tempo control
- Tempo variable width can be adjusted to ±8%, ±16%, and ±50%.
This provides highly flexible playback. - Pressing the [RESET] button instantly returns the tempo to ±0% constant rotation.
Detachable power cord and audio cables
- Cables are not obstacles when the main unit is moved, thus preventing disconnection problems.
- By replacing the audio cable, it is possible to customize the unit to deliver the preferred sound.
What's in the box
- Turntable
- Turntable sheet
- Slip mat
- Slip sheet
- Dust cover
- Adapter for EP record
- Balance weight
- Sub weight
- Headshell
- Shell weight
- Power cord
- Audio cable
- Ground wire
- Operating instructions (this document)
Before you start
About the cartridge
- The cartridge is not provided.
- Refer to the instruction manual for your cartridge.

Attach the cartridge on the headshell.
The lead wires of the headshell part are color-coded. Use tweezers or a similar tool to correctly connect the wires to the corresponding cartridge terminal per the indication on the cartridge.
- When using a cartridge between 3.5 g and 6.5 g, use the supplied shell weight.

Adjusting the overhang
Use the overhang adjustment scale to adjust the position using the cartridge attaching screw so that the stylus tip comes to a position 54 mm from the tone arm attachment part.
Assembly
- Attach the turntable and turntable sheet.
Set the turntable on the center spindle and place the turntable sheet on top of the turntable.

- Be careful not to hit the turntable on the main unit or drop it.
- Make sure that iron powder or other dust is not adhering to the magnet on the back of the turntable.
- Do not touch the magnet fixing screw of the turntable (3 locations). If the fixing screw position is changed, the rated performance cannot be guaranteed.
- Attach the cartridge on the headshell.
The lead wires of the headshell part are color-coded. Use tweezers or a similar tool to correctly connect the wires to the corresponding cartridge terminal per the indication on the cartridge. - Attach the headshell.
Insert the headshell with attached cartridge into the tone arm. Next, while keeping the headshell horizontal, tighten the lock nut.

- Attach the balance weight.
Attach the balance weight to the rear shaft of the tone arm.

- When using a cartridge between 9.5 g and 13 g, attach the sub weight on the rear shaft of the tone arm.

- When using a cartridge between 9.5 g and 13 g, attach the sub weight on the rear shaft of the tone arm.


Part names and functions
Top panel

- POWER switch
When turning the switch to the [ON] side, the power is turned on and the strobe illuminator on the side lights.
⇒ Playback - START/STOP button
Pressing the button starts or stops rotation of the turntable.
⇒ Playback - Speed change button
Changes the speed according to the record to be played.- For a 33 1/3 rpm record, press the [33] button.
- For a 45 rpm record, press the [45] button.
⇒ Playback
- Stylus illuminator
Lights to illuminate the stylus tip.
⇒ Playback - Stylus illuminator switch
The stylus illuminator lights in white and ascends to the position at which the stylus tip is illuminated.
⇒ Playback - Headshell
Used with a cartridge attached. - RESET button
- RESET indicator
Pressing the [RESET] button turns on the [RESET] indicator. While the [RESET] indicator is on, the turntable turns at the specified rotation speed (33 1/3 rpm or 45 rpm) regardless of the position of the TEMPO slider.
⇒ Adjusting the pitch - TEMPO slider
You can slide back and forth to perform fine adjustment of the rotation speed.
⇒ Adjusting the pitch - Tone arm
⇒ Adjustment - TEMPO RANGE button
Each time the button is pressed the tempo range switches, to ±8%, ±16%, or ±50%.
⇒ Adjusting the pitch - TEMPO RANGE indicator
The set tempo range lights in blue. - Arm clamper
Clamps the tone arm. - Arm rest
Serves as the support base for the tone arm. - Lifter lever
The tone arm goes up when the lever is pulled up. The tone arm goes down when the lever is pushed down. - Arm lifter
This device is used to move the tone arm up and down. It is operated by the lifter lever. - ANTI SKATING dial
When a record is played, there is power to pull the stylus tip toward the inner perimeter. By matching this dial to the stylus pressure value, that power is eliminated.
⇒ Adjusting anti-skating - HEIGHT ADJUST lock
Locks the adjusted height of the arm.
⇒ Adjusting the arm height - HEIGHT ADJUST dial
Used to adjust the height of the tone arm.
⇒ Adjusting the arm height - Balance weight
Used to balance the tone arm and adjust the stylus pressure
⇒ Adjustment - Stylus pressure adjustment ring
Used to match to the appropriate stylus pressure of the cartridge.
⇒ Adjusting the stylus pressure - Headshell stand
Used to stand the shell up. - Adapter for EP record
Used to play standard EP records.
⇒ To play a standard EP record
Rear panel

For the terminals used for connections, see Descriptions of terminals.
- Kensington security slot
- Insulator
Suppresses the effect of outside vibration. Turning the insulator adjusts the turntable height.
⇒ Adjusting the height of the main unit
Adjustment
Adjusting the tone arm balance
- Because the cartridge and headshell weights differ depending on the product, the balance of the tone arm is adjusted.
Prepare as follows.
- Remove the stylus cover and arm clamper while paying attention not to touch the stylus tip.
- Push down the lifter lever.
- Set the [ANTI SKATING] dial to "0".

Keep the tone arm from the arm rest and adjust the balance so it is horizontal.
Turn the balance weight until the tone arm becomes almost horizontal.
- When moving the tone arm, make sure that the stylus tip does not directly touch the turntable and the like.
Adjusting the stylus pressure
- To prevent stylus jumping or sound distortion, the stylus pressure is adjusted to the appropriate stylus pressure value determined for each cartridge.
Prepare as follows.
- Return the tone arm to the arm rest and secure with the arm clamp.
- Match the "0" on the stylus pressure adjustment ring to the center line of the arm rear shaft.
While using your finger to hold the balance weight to keep it from moving, turn only the stylus pressure adjustment ring so that the number "0" comes to the black center line of the tone arm rear shaft.

- Adjust the stylus pressure.
Turn the balance weight to adjust to the appropriate stylus pressure value for your cartridge.

- When turning the balance weight, the stylus pressure adjustment ring turns together. While observing the adjustment ring, adjust the stylus pressure to the appropriate value.


Using the balance weight attachment scale
It is recommended to remember the balance weight scale position of your shell with cartridge because you can set the appropriate stylus pressure by simply setting to the set balance weight scale position without adjusting the tone arm horizontal balance.
- Attach your shell with cartridge to the tone arm.
- Using the value set for the balance weight, adjust the balance weight attachment scale position.
Adjusting anti-skating
This adjustment is made to prevent stylus jumping.

Match to the same scale position as the stylus pressure value.
Turn the [ANTI SKATING] dial to match the reference line to the same value as the cartridge stylus pressure value.
When scratch play is performed
To prevent stylus jumping, adjust the scale position to match the play action.
Adjusting the arm lifter height
If necessary, perform adjustment to match the cartridge being used.
Prepare as follows.
- Place a record on the turntable sheet.
- Remove the stylus cover and arm clamper while paying attention not to touch the stylus tip.
- Pull up the lifter lever and move the tone arm onto the record.

Adjust the height by turning the screw while the arm lifter is pushed down.
- Turing clockwise narrows the distance between the record and stylus.
- Turing counterclockwise widens the distance between the record and stylus.
The arm lifter height (the distance between the record and stylus when the lifter lever is pulled up) is factory-adjusted in a range between approximately 8 mm and 13 mm.
Adjusting the arm height
- Turn the [HEIGHT ADJUST] lock to unlock the lock.
![]()
- Push down the lifter lever and place the stylus on the record, then adjust the [HEIGHT ADJUST] dial to make the tone arm and record parallel.


Refer to the following table to adjust the [HEIGHT ADJUST] dial to match the height to your cartridge size.
 | Cartridge size H (mm) | [HEIGHT ADJUST] dial scale position |
| 19 | 0 | |
| 20 | 1 | |
| 21 | 2 | |
| 22 | 3 | |
| 23 | 4 | |
| 24 | 5 | |
| 25 | 6 |
- Turn the [HEIGHT ADJUST] lock to fix the height of the arm.
After adjusting height of the arm, always turn the [HEIGHT ADJUST] lock to fix the arm.
When scratch play is performed
To prevent stylus jumping, use the [HEIGHT ADJUST] dial to adjust the arm height to match the play action.
Connections
- Be sure to turn off the power and unplug the power cord from the power outlet whenever making or changing connections.
- Refer to the operating instructions for the component to be connected.
- Connect the power cord after all the connections between devices have been completed.
Descriptions of terminals

- PHONO OUT terminals
Connect the audio cables (included) here. - SIGNAL GND terminal
Connect the ground wire (accessory). This helps reduce noise when connecting an analog player. - AC IN
Connects to a power outlet using the included power cord. Wait until all connections between the equipment are completed before connecting the power cord.- Be sure to use the included power cord.
Basic style
- Connects to a power outlet using the included power cord. Wait until all connections between the equipment are completed before connecting the power cord.
- Refer to the operating instructions for the component to be connected.
Connecting to a pre-main amplifier and component

- Connect the audio cable and ground wire to the [PHONO] input terminal of the pre-main amplifier or other component.
- If this product is connected to a pre-main amplifier or component that does not have a [PHONO] terminal, sufficient volume and sound quality cannot be obtained. In this case, use the PHONO equalizer.
- Make sure to connect the ground wire. If the unit is not properly grounded, a power hum (humming sound) occurs.
- Connect the power cord.
Connects to a power outlet using the included power cord. Wait until all connections between the equipment are completed before connecting the power cord.- Before connecting to the outlet (AC outlet) mounted on the connected equipment, check the wattage displayed on the outlet. (This unit consumes 9 W of power.)
Connecting to a DJ mixer

- Connect the audio cable and ground wire to the [PHONO] input terminal of the DJ mixer.
- If this product is connected to a DJ mixer that does not have a [PHONO] input terminal, sufficient volume and sound quality cannot be obtained.
- Make sure to connect the ground wire. If the unit is not properly grounded, a power hum (humming sound) occurs.
- Connect the power cord.
Connects to a power outlet using the included power cord. Wait until all connections between the equipment are completed before connecting the power cord.- Before connecting to the outlet (AC outlet) mounted on the connected equipment, check the wattage displayed on the outlet. (This unit consumes 9 W of power.)
Place of installation
Place the unit on a level surface that is free of external vibration.
- To the extent possible, keep the unit away from the speaker system.
- When the unit is very close to a radio (AM/FM broadcasting), the radio could generate noise. Keep the distance as far away from the unit as possible.

Adjusting the height of the main unit
Adjust the height by turning the insulator in a way that the main unit is horizontal.
Operation
Turning the power on
- Make all the connections, then plug the power cord into a power outlet.
⇒ Connections - Change the [POWER] switch to the [ON] side to turn on the power of the unit.
This unit's indicators light and the power turns on.
Turning the power off
Change the [POWER] switch to the [OFF] side to turn off the power of the unit.
This unit's power turns off.
Playback
Prepare as follows.
- Place a record on the turntable.
- Remove the stylus cover and arm clamper.
- Change the [POWER] switch to the [ON] side to turn on the power of the unit.
- Press the [START/STOP] button.
The turntable rotates. - Press the [RESET] button.
The [RESET] indicator lights in yellow-green and the speed returns to the prescribed rpm (33 1/3 or 45 rpm). - Pull up the lifter lever and move the tone arm onto the record.
- Push down the lifter lever.
The tone arm slowly descends and playback begins.
Pausing playback
Pull up the lifter lever.
The stylus of the cartridge lifts away from the record.
- To resume playback, push down the lifter lever.
Finishing playback
- Pull up the lifter lever to return the tone arm to the arm rest and then push down the lifter lever.
- Press the [START/STOP] button.
An electronic brake brings the turntable to a smooth stop. - Change the [POWER] switch to the [OFF] side to turn off the power of the unit.
Use the arm clamper to secure the tone arm.
To protect the stylus tip, attach the stylus cover.
About the slip mat and slip sheet
Slip mat
If you use the mat instead of the turntable sheet, you can stop the record by hand during playing, or turn the turntable in reverse.
Slip sheet
When the slip sheet is used under the slip mat, sliding of scratch becomes smooth.

To play a standard EP record
Attach the EP record adapter to the center spindle and press the [45] button.
Illuminating the stylus tip
When the stylus illuminator switch is pressed, the stylus illuminator lights in white and ascends to the position at which the stylus tip is illuminated.
- If it is not needed, press the stylus illuminator switch to lower it. The stylus illuminator switch goes off.
Attaching the dust cover
When you are done using the unit, hold both sides of the dust cover and place from directly above.
Adjusting the pitch
- Press the [RESET] button to turn off the [RESET] indicator.
- Move the [TEMPO] slider forward or backward.
Moving the slider forward increases the rotation speed and moving it backward decreases the rotation speed.- The scale of the [TEMPO] slider is a rough value. Please use it as a guide.
- Press the [TEMPO RANGE] button.
The [TEMPO] slider's adjustment range switches each time the button is pressed. The adjustment range indicator lights.
| Setting value | Units of adjustment |
| ±8 | 0.016% |
| ±16 | 0.032% |
| ±50 | 0.1% |
Returning to the usual pitch
Press the [RESET] button.
Pressing the [RESET] button turns on the [RESET] indicator. While the [RESET] indicator is on, the turntable turns at the specified rotation speed (33 1/3 rpm or 45 rpm) regardless of the position of the TEMPO slider.
Detecting the pitch
Finer pitch can be detected by looking at the four rows of strobe patterns inscribed around the turntable.
- A strobe illuminator (blue LED light) is used to illuminate the strobe pattern of the unit. Always use the strobe illuminator when detecting pitch.

Strobe pattern
- When strobe pattern looks stopped +7.2% pitch change
- When strobe pattern looks stopped +3.3% pitch change
- When strobe pattern looks stopped Specified rotation speed (33 1/3 rpm or 45 rpm)
- When strobe pattern looks stopped -3.3% pitch change
Troubleshooting
- Incorrect operation is often mistaken for trouble or malfunction. If you think that there is something wrong with this component, check the points below and the [FAQ] for the [PLX-1000] on the Pioneer DJ support site.
http://pioneerdj.com/support/
Sometimes the problem may lie in another component. Inspect the other components and electrical appliances being used. If the problem cannot be rectified, ask your nearest Pioneer authorized service center or your dealer to carry out repair work. - This unit may not operate properly due to static electricity or other external influences. In this case, proper operation may be restored by turning the power off, waiting 1 minute, then turning the power back on.
| Problem | Check | Remedy |
The power is not turned on | Is the power cord properly connected? | Properly connect the included power cord to a power outlet. |
| Is the [POWER] switch for power supply set to [ON]? | Set the [POWER] switch for power supply to [ON]. | |
No sound or small sound | Are the audio cables properly connected? | Connect the audio cables properly. |
| Are the terminals and plugs dirty? | Clean the terminals and plugs before making connections. | |
| Is the headshell attached properly? | Attach the headshell property. | |
The left and right sound are reversed | Are the left and right connections for each piece of equipment reversed? | Correctly connect the audio cable and the lead wires of headshell part. |
| There is a low hum sound (humming or buzzing sound) during playback | Is there an electric device such as a fluorescent lamp or its power cord near the connection cord? | Place the power cord of the fluorescent lamp or other device as far away as possible. |
| Is the ground wire of the turntable system disconnected? | Connect the ground wire properly. | |
| The stylus tip does not come down on the record | Is the stylus pressure adjusted property? | Match the balance weight to the appropriate stylus pressure value for your cartridge. |
| Is the arm horizontally balanced? | Turn the balance weight until the tone arm becomes horizontal state. | |
Stylus jumping occurs | Is the stylus pressure adjusted property? | Match the balance weight to the appropriate stylus pressure value for your cartridge. |
| Is the record warped or does it have scratches? | Check the condition of the record. | |
| Does the stylus tip have a lot of dust on it? | Remove the shell with cartridge and use a soft tip brush or writing brush to carefully remove dust, etc. from the stylus tip. | |
| Is anti-skating adjusted correctly? | Adjust anti-skating correctly. | |
| Is the arm height adjusted correctly? | Adjust the arm height correctly. | |
| The arm stops along the way and does not go ahead | Does the record have scratches? | Check the condition of the record. |
| Is the arm coming into contact with something? | Check around the arm. If there is an obstacle, remove it. | |
Sound volume is low or loud | Is the connection to the amplifier appropriate for the cartridge type (output)? | Connect the connection cables properly. |
Maintenance of each part
When attaching and detaching the headshell, turn off the power of the amplifier.
If you attempt to do so while the volume is loud, the speaker could be damaged.
- Remove the shell with cartridge and use a soft tip brush or writing brush to carefully remove dust, etc. from the stylus tip.
- Use a good quality record cleaner to clean records.
- Use a soft cloth or something similar to clean the headshell terminal and then reattach it to the tone arm.
Cleaning the dust cover, etc.
Use a soft cloth to clean the dust cover and cabinet
- Do not clean the dust cover while playing. Static electricity could cause the tone arm to be pulled by the dust cover.
Specifications
| Power requirements | AC 110 V to 120 V or 220 V to 240 V, 50 Hz/60 Hz |
| Power consumption | 9 W |
| Main unit weight | 14.6 kg (32.2 lb) |
| Max. dimensions | 453 mm (W) × 159 mm (H) × 353 mm (D) (17.8 in. (W) × 6.3 in. (H) × 13.9 in. (D)) |
| Tolerable operating temperature | +5°C to +35°C (+41°F to +95°F) |
| Tolerable operating humidity | 5% to 85% (no condensation) |
| Turntable part | |
| Drive method | Servo type direct drive |
| Motor | 3-phase brushless DC motor |
| Braking system | Electronic brake |
| Rotation speed | 33 1/3 rpm, 45 rpm |
| Rotation speed adjustment range | ±8%, ±16%, ±50% |
| Wow and flutter | 0.01% or less WRMS |
| Measured by obtaining signal from built-in frequency generator of motor assembly. | |
| S/N ratio | 70 dB (DIN-B) |
| Turntable | Aluminum die-casting Diameter: 332 mm |
| Starting torque | 4.5 kg·cm or more |
| Start time | 0.3 seconds (at 33 1/3 rpm) |
| Tone arm part | |
| Arm type | Universal type S-shape tone arm, gimbal-supported type bearing structure, static balance type |
| Effective length | 230 mm |
| Overhang | 15 mm |
| Tracking error | Within 3° |
| Arm height adjustment range | 6 mm |
| Stylus pressure variable range | 0 g to 4.0 g (1 scale 0.1 g) |
| Proper cartridge weight | 3.5 g to 13 g (single cartridge) |
| When shell weight is used | 3.5 g to 6.5 g |
| When only balance weight is used | 6.0 g to 10 g |
| When sub weight is used | 9.5 g to 13 g |
The specifications and design of this product are subject to change without notice.
Cautions on use
About condensation
Water droplets (condensation) may form inside the unit (on operating parts and lenses) in the winter, for example, if the unit is moved from a cold place into a warm room or if the temperature in the room in which the unit is installed rises suddenly (through heating, etc.). The unit will not operate properly and will not be playable with condensation inside. Let the unit stand for 1 to 2 hours at room temperature (though this time depends on the conditions of the condensation) without turning on the power. The water droplets will evaporate and the unit will become playable. Condensation can occur in the summer as well if the unit is exposed to the direct wind from an air-conditioner, etc. If this happens, move the unit to a different location.
When transporting the unit to another location
Use the original packing materials to pack the unit.
If the original packing materials are not available, be sure to perform the following.
- Detach the turntable sheet and turntable and pack carefully.
- Detach the headshell and balance weight from the arm and pack carefully.
- Use the arm clamper to secure the tone arm and use tape to secure it so that it does not move.
- Wrap the main unit in a blanket or soft paper so that it will not be damaged.
IMPORTANT SAFETY INSTRUCTIONS
- Read these instructions.
- Keep these instructions.
- Heed all warnings.
- Follow all instructions.
- Do not use this apparatus near water.
- Clean only with dry cloth.
- Do not block any ventilation openings. Install in accordance with the manufacturer's instructions.
- Do not install near any heat sources such as radiators, heat registers, stoves, or other apparatus (including amplifiers) that produce heat.
- Do not defeat the safety purpose of the polarized or grounding-type plug. A polarized plug has two blades with one wider than the other. A grounding type plug has two blades and a third grounding prong. The wide blade or the third prong are provided for your safety. If the provided plug does not fit into your outlet, consult an electrician for replacement of the obsolete outlet.
- Protect the power cord from being walked on or pinched particularly at plugs, convenience receptacles, and the point where they exit from the apparatus.
- Only use attachments/accessories specified by the manufacturer.
- Use only with the cart, stand, tripod, bracket, or table specified by the manufacturer, or sold with the apparatus. When a cart is used, use caution when moving the cart/apparatus combination to avoid injury from tip-over.
![]()
- Unplug this apparatus during lightning storms or when unused for long periods of time.
- Refer all servicing to qualified service personnel. Servicing is required when the apparatus has been damaged in any way, such as power-supply cord or plug is damaged, liquid has been spilled or objects have fallen into the apparatus, the apparatus has been exposed to rain or moisture, does not operate normally, or has been dropped.


TO PREVENT THE RISK OF ELECTRIC SHOCK, DO NOT REMOVE COVER (OR BACK). NO USER-SERVICEABLE PARTS INSIDE. REFER SERVICING TO QUALIFIED SERVICE PERSONNEL.


This equipment is not waterproof. To prevent a fire or shock hazard, do not place any container filled with liquid near this equipment (such as a vase or flower pot) or expose it to dripping, splashing, rain or moisture.

This product equipped with a three-wire grounding (earthed) plug - a plug that has a third (grounding) pin. This plug only fits a grounding-type power outlet. If you are unable to insert the plug into an outlet, contact a licensed electrician to replace the outlet with a properly grounded one. Do not defeat the safety purpose of the grounding plug.
Operating Environment
Operating environment temperature and humidity:
+5°C to +35°C (+41°F to +95°F); less than 85 %RH (cooling vents not blocked)
Do not install this unit in a poorly ventilated area, or in locations exposed to high humidity or direct sunlight (or strong artificial light).

The POWER switch on this unit will not completely shut off all power from the AC outlet. Since the power cord serves as the main disconnect device for the unit, you will need to unplug it from the AC outlet to shut down all power. Therefore, make sure the unit has been installed so that the power cord can be easily unplugged from the AC outlet in case of an accident. To avoid fire hazard, the power cord should also be unplugged from the AC outlet when left unused for a long period of time (for example, when on vacation).
Voltage selector
You can find the voltage selector switch on the top panel of multi-voltage models.
The factory setting for the voltage selector is 110-120 V. Please set it to the correct voltage for your country or region.

- For Taiwan, please set to 110-120 V before using.
Before changing the voltage, disconnect the AC power cord. Use a medium size screwdriver to change the voltage selector switch.
Information to User
Alterations or modifications carried out without appropriate authorization may invalidate the user's right to operate the equipment.

VENTILATION CAUTION
When installing this unit, make sure to leave space around the unit for ventilation to improve heat radiation (at least 15 cm at top, 5 cm at rear, and 5 cm at each side).
Store small parts out of the reach of children and infants. If accidentally swallowed, contact a doctor immediately.
To prevent a fire hazard, do not place any naked flame sources (such as a lighted candle) on the equipment.
POWER-CORD CAUTION
Handle the power cord by the plug. Do not pull out the plug by tugging the cord and never touch the power cord when your hands are wet as this could cause a short circuit or electric shock. Do not place the unit, a piece of furniture, etc., on the power cord, or pinch the cord. Never make a knot in the cord or tie it with other cords. The power cords should be routed such that they are not likely to be stepped on. A damaged power cord can cause a fire or give you an electrical shock. Check the power cord once in a while. When you find it damaged, ask your nearest PIONEER authorized service center or your dealer for a replacement.

For U.S.A. and Canada
 The lightning flash with arrowhead symbol, within an equilateral triangle, is intended to alert the user to the presence of uninsulated "dangerous voltage" within the product's enclosure that may be of sufficient magnitude to constitute a risk of electric shock to persons.
RISK OF ELECTRIC SHOCK
DO NOT OPEN
TO PREVENT THE RISK OF ELECTRIC SHOCK, DO NOT REMOVE COVER (OR BACK). NO USER-SERVICEABLE PARTS INSIDE. REFER SERVICING TO QUALIFIED SERVICE PERSONNEL.
 The exclamation point within an equilateral triangle is intended to alert the user to the presence of important operating and maintenance (servicing) instructions in the literature accompanying the appliance.
NOTE
THE NO USER-SERVICEABLE PARTS COMPARTMENT WARNING IS LOCATED ON THE APPLIANCE BOTTOM.
THE MODEL NUMBER AND SERIAL NUMBER OF THIS EQUIPMENT ARE ON THE REAR OR BOTTOM. RECORD THESE NUMBERS FOR FUTURE REFERENCE.
Handling the cord on this product or cords associated with accessories sold with the product may expose you to chemicals listed on proposition 65 known to the State of California and other governmental entities to cause cancer and birth defect or other reproductive harm.
Wash hands after handling.
The Safety of Your Ears is in Your Hands
Get the most out of your equipment by playing it at a safe level – a level that lets the sound come through clearly without annoying blaring or distortion and, most importantly, without affecting your sensitive hearing. Sound can be deceiving. Over time, your hearing "comfort level" adapts to higher volumes of sound, so what sounds "normal" can actually be loud and harmful to your hearing. Guard against this by setting your equipment at a safe level BEFORE your hearing adapts.
ESTABLISH A SAFE LEVEL:
- Set your volume control at a low setting.
- Slowly increase the sound until you can hear it comfortably and clearly, without distortion.
- Once you have established a comfortable sound level, set the dial and leave it there.
BE SURE TO OBSERVE THE FOLLOWING GUIDELINES:
- Do not turn up the volume so high that you can't hear what's around you.
- Use caution or temporarily discontinue use in potentially hazardous situations.
- Do not use headphones while operating a motorized vehicle; the use of headphones may create a traffic hazard and is illegal in many areas.
LIMITED WARRANTY
TO OBTAIN SERVICE
To receive warranty service you need to present your sales receipt or, if rented, your rental contract showing place and date of original owner's transaction. The original container is ideal for this purpose. Include your name, address and telephone number where you can be reached during business hours.
On all complaints and concerns in the U.S.A. and Canada call Customer Support at 1-800-872-4159.
For hook-up and operation of your unit or to locate an Authorized Service Company, please call or write:
CUSTOMER SUPPORT
PIONEER ELECTRONICS (USA) INC.
P.O. BOX 1720
LONG BEACH, CALIFORNIA 90801
1-800-872-4159
http://www.pioneerelectronics.com
To register your product, find the nearest authorized service location, to purchase replacement parts, operating instructions, or accessories, please go to one of following URLs:
In the USA & Canada/Aux Etats-Unis & Canada
http://www.pioneerelectronics.com
http://pioneerdj.com/support/
The Pioneer DJ support site shown above offers FAQs, information on software and various other types of information and services to allow you to use your product in greater comfort.
PIONEER CORPORATION
1-1, Shin-ogura, Saiwai-ku, Kawasaki-shi, Kanagawa 212-0031, Japan
PIONEER ELECTRONICS (USA) INC.
P.O. BOX 1720, Long Beach, California 90801-1720, U.S.A. TEL: (800) 421-1404
Documents / Resources
References
![pioneerdj.com]() Keep your product up to date with the latest software and firmware downloads. - Pioneer DJ - Nederland
Keep your product up to date with the latest software and firmware downloads. - Pioneer DJ - Nederland![www.pioneerelectronics.com]() Car Audio, Speakers, Subs & Amps | Pioneer Electronics USA
Car Audio, Speakers, Subs & Amps | Pioneer Electronics USA
Download manual
Here you can download full pdf version of manual, it may contain additional safety instructions, warranty information, FCC rules, etc.
Advertisement


Need help?
Do you have a question about the PLX-1000 and is the answer not in the manual?
Questions and answers