Advertisement
- 1 Foreword
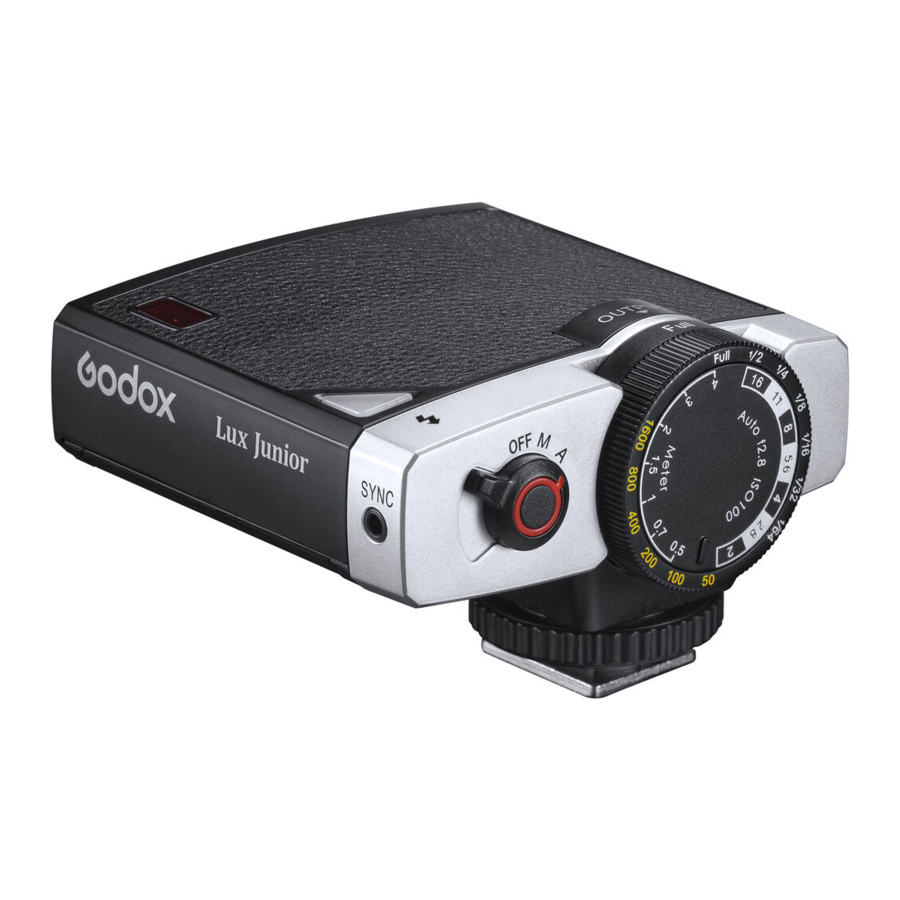
- 2 Product Structure
- 3 Power Adjusting Instruction
- 4 Recycle Indicator Instruction
- 5 What's In Side
- 6 Power adjust dial/Meter panel Settings Instruction
- 7 Battery Installation Instruction
- 8 Operation Instruction
- 9 Technical Data
- 10 Maintenance and Service Support Information
- 11 Safety Precautions
- 12 Documents / Resources
Foreword
The Lux Junior is designed with a compact structure, retro appearance, and practical functions It can provide a guide number of GN12 at ISO100, auto flash and manual flash mode, support two AAA batteries power supply, be compatible with various kinds of cameras, such as Canon, Nikon, Fujifilm, Olympus, Sony, etc.
Product Structure

- Light-emitting area
- Auto light receptor
- Hotshoe
- Test button/RecycIe indicator
- OFF/M/A dial (power off/manual flash/auto flash)
- OFF/S1/S2 button
- Battery compartment
- SYNC hole
- Power adjust dial
- Optical control sensor
- Meter panel
Power Adjusting Instruction
Power adjust dial is rotatable in 7 leveIs, while meter panel is steplessly rotatable with data on it, together precisely setting and adjusting power.

Recycle Indicator Instruction
- When the recycle indicator is constant on red, it means recycling
- When the recycle indicator is constant on green, it means recycle complete
- When the recycle indicator flashes red stably, it means low battery state, please replace the battery in time
- When the recycle indicator flashes rapidly, it means high temperature state
- When the recycle indicator is off, it means battery is dead
What's In Side

Power adjust dial/Meter panel Settings Instruction
| ISO values | 50 | 100 | 200 | 400 | 800 | 1600 | |
| Flash Power Levels | Full | 1/2 | 1/4 | 1/8 | 1/16 | 1/32 | 1/64 |
| Aperture Values | 2 | 2.8 | 4 | 5.6 | 8 | 11 | 16 |
| Best Shooting Distance | 0.5 | 0.7 | 1 | 1.5 | 2 | 3 | 4 |
Battery Installation Instruction
Open the battery compartment, the plumped end marked with + is positive pole, the sunk end marked with is negative pole, put two batteries into the battery compartment correctly, then close the cover and push it upwards.

Operation Instruction
Power On
Turn the OFF/M/A dial to M manual flash mode or A auto flash mode, the device can be powered on Turn it to OFF mode, the device is powered off.
 Note: Install the flash to the camera then turn on the camera and flash.
M Manual Flash Mode
- Turn the OFF/M/A dial to M manual flash mode.
![]()
- According to the ISO value (assuming the ISO value is 100) of the camera, find the ISO value on the power adjust dial. Then turn the meter panel to make the distance value aimed at the ISO value according to the current shooting distance (assuming the distance is 4m).
![]()
- The flash power is the value on the dial aimed at the aperture value (assuming it is f2.8). In the above assumptive situation, the flash power should be Full (1) power. Turn the power adjust dial to make the power value (1) aimed at the OUTPUT arrow, then the flash is ready for use.


Practical Form of M Manual Flash Mode

A Auto Flash Mode
Turn the OFF/M/A dial to A auto flash mode.

The default ISO and aperture are 100 and f2.8 respectively in A auto flash mode.
Practical Form of A Auto Flash Mode
| ISO | 50 | 100 | 200 | 400 | 800 | 1600 |
| Aperture | 2 | 2.8 | 4 | 5.6 | 8 | 11 |
| Distance | Max. 4 meters | |||||
Note: using improper extra long lens may affect the output in A auto flash mode.
Optical Control Mode
S1 optical control
The S1 optical control function is available in M manual flash mode. Push the OFF/S1/S2 button to S1, the flash can function as an optical S1 secondary flash. With this function, the flash will fire synchronously when the main flash fires, the same effect as that by using of radio triggers. This helps create multiple lighting effects.
S2 optical control
The S2 optical control function is available in M manual flash mode. Push the OFF/S1 /S2 button to S2, the flash can also function as an optical S2 secondary flash to be suitable for TTL flash. This is useful when cameras have pre-flash function. With this function, the flash will ignore a single "pre-flash" from the main flash and will only fire in response to the second, actual flash from the main unit.
Note: S1 /S2 optical control is only available in M manual flash mode.
Technical Data
| Model | Lux Junior |
| GN (1/1 level) | GN12 (IS0100, in meters) |
| Flash power | 7 levels: 1/1-1/64 |
| CCT | 6000K ± 200K |
| Focal length | 28mm (fixed value) |
| Compatible cameras | Fujifilm, Canon, Nikon, Olympus, Sony |
| Panel display | Power: full, 1/2, 1/4, 1/8, 1/16, 1/32, 1/64 Aperture: F2 - 16 Distance: 0.5m, 0.7m, 1m, 1.5m, 2m, 3m, 4m Auto f2.8 ISO100 (default value in A auto flash mode) |
| Optical flash | S1 optical control/ S2 optical control |
| Working environment temperature | -10ºC ~ 50ºC |
| Battery | NI-MH battery/ AAA alkaline battery |
| Dimension | 73.8*50.2*71.8 mm |
| Net weight | 130g |
* Product design and specifications are subject to change without notice.
Maintenance and Service Support Information
The warranty period and service types of products are implemented according to the following Product Maintenance Information:
| Product Type | Name | Maintenance period (month) | Warranty Service Type |
| Parts | Circuit Board | 12 | Customer sends the product to designated site |
| Battery | 3 | Customer sends the product to designated site | |
| Electrical parts e.g. battery charger, power cord, sync cable, etc. | 12 | Customer sends the product to designated site | |
| Other Items | Flash tube, modeling lamp, lamp body, lamp cover, locking device, package. etc. | NO | Without warranty |
Safety Precautions

- Always keep this product dry. Do not use in rain or in damp conditions.
- Do not disassemble. Should repairs become necessary, this product must be sent to an authorized maintenance center.
- Keep out of reach of children.
- Stop using this product if it breaks open due to extrusion, falling or strong hit. Otherwise, electric shock may occur if you touch the electronic parts inside it.
- Do not leave or store the flash unit if the ambient temperature reads over 50ºC.
- Do not fire the flash directly into the eyes (especially those of babies) within short distances. Otherwise, visual impairment may occur.
- Do not use the flash unit in the presence of flammable gases, chemicals and other similar materials. In certain circumstance, these materials may be sensitive to the strong light emitting from this flash unit and fire or electromagnetic interference may result.
- Turn off the devices immediately in the event of malfunction.
- Do not use any batteries, power sources or accessories not specified in the instruction manual.
- Keep batteries and other accessories out of the reach of children and infants. In the instance that a child or infant swallows a battery or accessory, immediate emergency medical attention is required.
- Do not use any deformed or modified batteries.
- Do not disassemble or modify this product or battery.
- Do not heat or solder the battery.
- Keep the battery away from fire or water.
- Do not let the battery subject to strong external impact.
- Do not connect metal objects to the positive and negative ends of the battery.
- Do not incorrectly insert the positive and negative ends of batteries, or mix old and new batteries or batteries of different types together.
- If the battery leaks, becomes discolored, deformed, emits smoke, or emits an abnormal odor, remove it immediately. Be careful during removal to avoid burns. Continued use could result in fire, electric shock, or burns.
Documents / ResourcesDownload manual
Here you can download full pdf version of manual, it may contain additional safety instructions, warranty information, FCC rules, etc.
Advertisement


Need help?
Do you have a question about the Lux Junior and is the answer not in the manual?
Questions and answers