Kinesis Advantage2 KB600-JP / KB600LFQ-JP Manual
- Quick start manual (4 pages)
Advertisement
- 1 Introduction
- 2 Installation
- 3 Default layout: QWERTY (Japanese qwerty keyboard driver)
- 4 Alternate built-in layout: Dvorak (Japanese qwerty keyboard driver)
- 5 Thumb Key Modes: Windows, Mac, or PC
- 6 SmartSet Programming Engine
- 7 SmartSet Onboard Programming Tools
- 8 Print Screen, Scroll Lock & Pause Break
- 9 Multimedia Keys
- 10 Keypad Key & Keypad layer
- 11 Palm pads and integrated palm rest
- 12 LED Indicator Lights
- 13 Connecting an optional foot pedal
- 14 Power User Mode - Advanced Features
- 15 Documents / Resources
Introduction
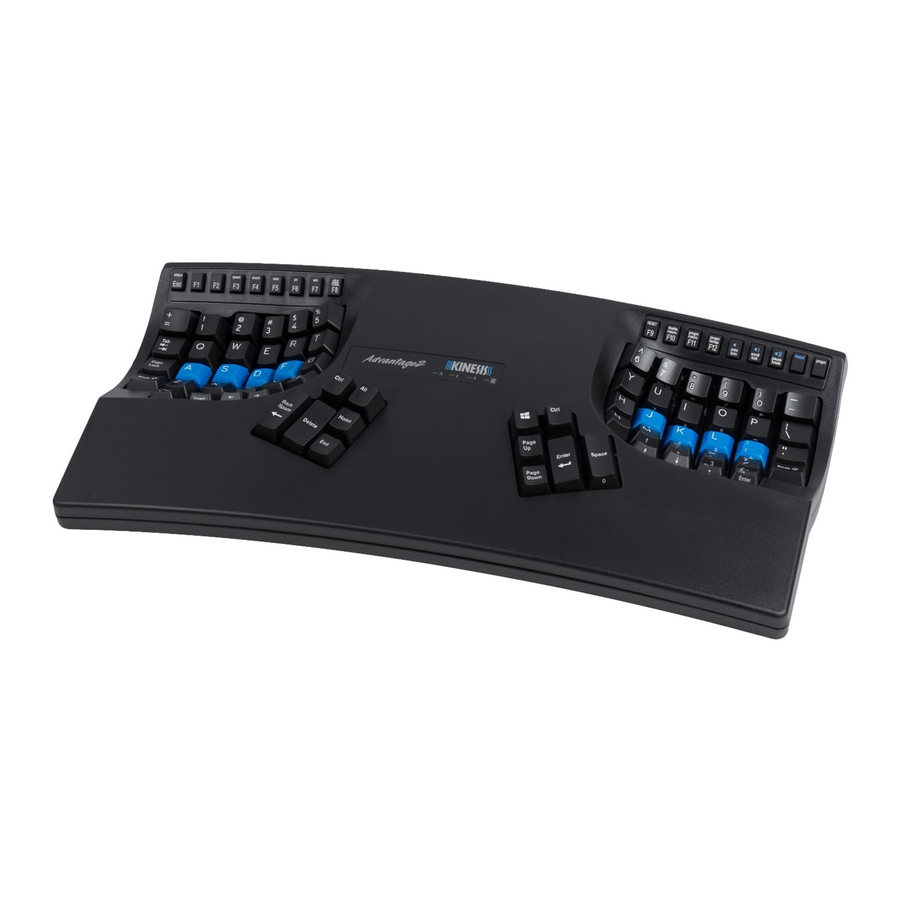
Your Advantage2™ keyboard combines Kinesis' time-tested Contoured™ design with low-force Cherry mechanical key switches and the powerful new SmartSet™ Programming Engine™. The fully programmable Advantage2 sets a new standard for comfort and productivity. With the driverless SmartSet Programming Engine, you can quickly remap keys, record macros, build custom layouts, and access all the Onboard Programming Tools using the Program Key. However, Power User Mode allows backup and sharing of the configuration text files and easy firmware updates, via the integrated v-drive™ (virtual removable drive).

Fig 1. KB600-JP, Japanese layout
No special software or drivers are needed. The Advantage2 is plug-and-play with the Japanese version of recent Windows operating systems that support full-featured USB keyboards.*
This Quick Start Guide covers the installation and basic setup of the Advantage2.
*Certain KVM and specialized telephony devices do not support programmable keyboards like the Advantage2. If you experience compatibility problems please visit the Advantage2 Resources page (link above) or contact Kinesis Technical Support by submitting a ticket at kinesis.com/support/contact-a-technician.
Installation
- Plug Advantage2 into your computer's USB port. A device installation notice will appear on your screen.
- When the auto-installation is completed, you should see a "device is ready to use" notice on your screen.
- For maximum comfort, install the self-adhesive palm pads onto the keyboard's integrated palm rests.
- OPTIONAL: If you are connecting an Advantage foot pedal (FS007RJ11, FS007TAF) to the keyboard, plug it into the telephone-style connector at the back of the keyboard using the coupler provided with the pedal.

The SmartSet Programming Engine provides powerful tools for customizing the keyboard's layout and settings. Because of the risk of inadvertent reprogramming, Kinesis recommends that ALL USERS read this Quick Start Guide before using the keyboard. Even users familiar with the original Advantage keyboard are advised to read this guide since some programming commands have changed and new commands have been added.

The Advantage2 keyboard is not a medical treatment. Please consult the User's Manual for basic Safety & Health Tips.
Default layout: QWERTY (Japanese qwerty keyboard driver)
All Advantage2 keyboards come pre-configured from the factory with the familiar QWERTY layout, but creating custom QWERTY Layouts is easy with the simple Onboard Programming Tools (see below).

Fig 2. QWERTY Layout (progm+F3)
Alternate built-in layout: Dvorak (Japanese qwerty keyboard driver)
Every Advantage2 also comes preloaded with a customizable onboard Dvorak layout. Dvorak typists can elect to purchase a set of US QWERTY-Dvorak (KC020DU-blk) or US Dvorak-only keycaps (KC020DV-blk) to install themselves. However, a few of the key actions will not match the keycap legends.

Fig 3. Dvorak Layout (progm+F3)
Thumb Key Modes: Windows, Mac, or PC
Users may configure the modifier keys in the thumb-operated clusters in one of three modes (see below). These modes are optimized for Windows users, Mac users, and for PC users who don't need a Windows key. Thumb Key Mode is set independently from layout (QWERTY or Dvorak) and can be different for each layout. Thumb Key Mode defaults to the Windows configuration for the Japanese model. An extra Alt keycap is provided for using PC mode.
Extra keycaps are not provided for "Mac Mode" as Mac users should purchase a US model for best usability. A keycap tool is also included in the package

SmartSet Programming Engine
![]()
You may want to create custom layouts by moving ("remapping") one or more key actions, or storing macros (pre-recorded key sequences) triggered by a single alphanumeric key alone or in combination with a modifier key. There are also unique features and settings (e.g. Status Report, macro speed, key clicks, toggle tones) that can be adjusted. The SmartSet Programming Engine provides Onboard Programming to customize your keyboard settings and layouts (see below).
If you plan to use the U.S. keyboard driver instead of the Japanese keyboard driver, you can download the graphical SmartSet App for Advantage2 or try Direct Programming by manually editing the configuration and layout text files. However, these features are intended for U.S. keyboards and the US QWERTY keyboard driver, so the legends of many keys on your Japanese keyboard will not match what is shown in the App or in the text files.
SmartSet Onboard Programming Tools
To access the SmartSet Onboard Programming Tools, press and hold the Program Key (legended "progm"), then press the appropriate key in the Function Key row. One or more LEDs will flash to indicate the programming command was successful. Continuous LED flashing indicates that further actions are necessary to complete the programming command (e.g., for macros and remaps). To exit any active "Program Mode" simply tap the Program Key.

Fig 7. Function key row (Cherry low-force mechanical key switches with tactile ridges)
 Note: Actions legended in lower case require only the Program Key to activate, whereas actions legended in CAPS require the Program Key plus Shift Key to activate.

Fig 8. Status Report example (defaults shown)
- status (progm+esc): Prints detailed configuration Status Report to the screen.
![]()
The keyboard cursor must be in an active text editing screen before running Status Report!
- qwert (progm+F3): Enables the QWERTY Layout, with any customizations.
- dvork (progm+F4): Enables the Dvorak Layout, with any customizations.
- mac (progm+F5): Enables Mac Thumb Key Mode (Fig 5). Also converts Scroll Lock to "shut down."
![]()
On PC, this will initiate an immediate shutdown! - pc (progm+F6): Enables PC Thumb Key Mode (Fig 6).
- win (progm+F7): Enables the default Windows Thumb Key Mode (Fig 4).
- click (progm+F8): Turns off/on the default Electronic Key Click feature. This is designed to help you avoid "bottoming out" the key.
- TONE (progm+Shift+F8): Turns off/on the Electronic Tone to alert users that keys for special "toggle" actions (Caps lock, Num lock, Scroll lock, Insert, Keypad) have been hit. Two tones (double beep) indicates feature is "turned on" and one tone means "turned off."
- RESET (progm+Shift+F9): Performs a Soft Reset which erases any key remapping, macros, and non-default thumb key mode setting for the active layout. It does not reset macro speed, click, or tone settings. To perform a Hard Reset which erases all nondefault settings in both QWERTY and Dvorak layouts, hold progm+F9 until LEDs start flashing while plugging in keyboard.
- macro speed (progm+F10, then tap number row 1-9 or 0): Sets the global macro playback speed ("0" disables macro playback. Playback speed can also be set different from the global speed for individual macros (see User's Manual).
- progm macro (progm+F11): Enter Program Macro Mode.
Step 1: select the trigger key(s). LEDs will flash fast prompting selection of the trigger. One alphanumeric key alone will suffice but can be combined with one or more modifier keys to serve as the macro trigger.
Step 2: type the desired macro content (LEDs flash slowly while macro contents are being recorded). To stop recording, exit Program Macro Mode by tapping the Program Key.
![warning]() Note: For detailed macro programming instructions including setting individual macro playback speed and delays, see User's Manual.
Note: For detailed macro programming instructions including setting individual macro playback speed and delays, see User's Manual. - progm remap (progm+F12): Enter Program Remap Mode.
Step 1: select the source key/action. LEDs will flash fast prompting selection of the source key.
Step 2: select the destination key (LEDs flash slowly awaiting selection of the destination key).
![warning]() Note: Program Remap Mode remains active and will continue to accept key remapping "pairs" until exiting Remap mode by pressing the Program Key. While in Program Remap Mode the keyboard layout temporarily reverts to the default QWERTY or Dvorak layout (whichever is active) when selecting source actions.
Note: Program Remap Mode remains active and will continue to accept key remapping "pairs" until exiting Remap mode by pressing the Program Key. While in Program Remap Mode the keyboard layout temporarily reverts to the default QWERTY or Dvorak layout (whichever is active) when selecting source actions.

Print Screen, Scroll Lock & Pause Break
These keys perform standard keyboard functions which will depend on your Operating System and the application.
Multimedia Keys
The multimedia keys reside in the keypad layer and perform Mute, Volume Down, and Volume Up.
Keypad Key & Keypad layer
The Keypad Key toggles on a second virtual keyboard layer (the "keypad layer") where remapped keys and macros can be stored, and with default multimedia and 10-key actions (Figs 9 & 10).

Default keypad actions which differ from the top layer are legended on the front of the main keys and in blue on the function keys. The Keypad action can be remapped to another key (see Fig 7 for remapping "keypad shift" and User's Manual for remapping "keypad toggle").
PC Note: Num Lock must be on to get numeric 10-Key actions.
Remapping to or from the Keypad Layer
You may remap keys from Keypad Layer to the Top Layer and vice versa. Simply tap the Keypad Key before or during the remap process to move between the two keyboard layers. For example, to remap from the Keypad Layer to the Top Layer, press the Keypad Key to enter the Keypad Layer, enter Remap Mode, tap the source action key, press the Keypad Key (keypd) to enter the Top Layer, and then tap the destination key.
Optional foot pedal to access keypad layer
Frequent Keypad Layer users will benefit from an Advantage foot pedal (purchased separately, see Fig 12) which can be used to temporarily "shift" the Keypad Layer on by pressing and holding the pedal. The pedal can also be re-programmed (see below).
Palm pads and integrated palm rest
The palm rests are designed to provide comfortable support for your hands while not actively typing, though many users do rest their palms while typing to relieve strain on the neck and shoulders. For maximum typing speed hold your palms slightly above the palm rests. Do not expect to reach all of the keys while resting palms on the palm rests. For maximum comfort, install the self-adhesive palm pads. Replacement pads are available for purchase.
LED Indicator Lights
The blue LEDs located near the center of the keyboard indicate the status of the keyboard. The LEDs will illuminate when each of the four basic modes is active (see Fig 11).

Fig.11. Keyboard LEDs
These LEDs also flash during SmartSet programming actions (slow or fast) to indicate the keyboard's temporary programming status.
Connecting an optional foot pedal
Plug the foot pedal into the telephone-style (RJ11) connector at the back of the keyboard. The single foot pedal acts as "keypad shift" — press to access the keypad layer, release to return to top level. It can also be custom-programmed just like any key on the keyboard.
Power User Mode - Advanced Features
For information on enabling Power User Mode to access Advanced Features (Fig. 12), please consult the User's Manual.

For further support, please submit a ticket at kinesis.com/support/contact-a-technician.
Documents / Resources
References
Download manual
Here you can download full pdf version of manual, it may contain additional safety instructions, warranty information, FCC rules, etc.
Advertisement


Need help?
Do you have a question about the Advantage2 KB600-JP and is the answer not in the manual?
Questions and answers