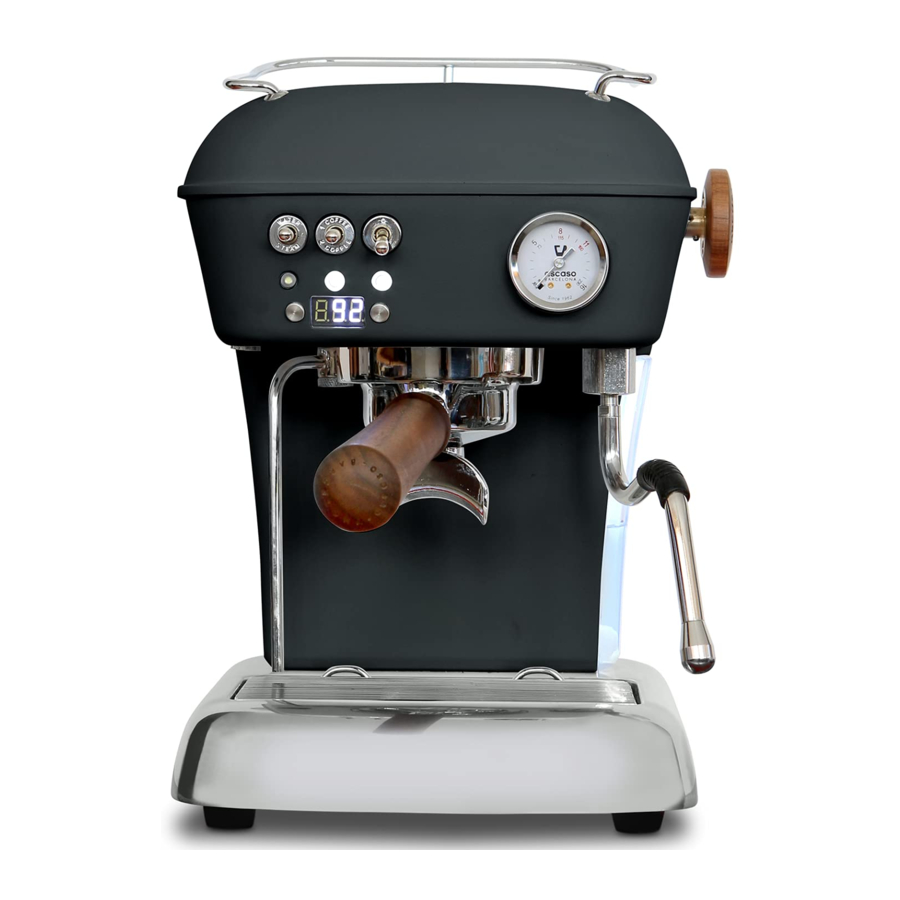
Ascaso Dream PID Manual
- User manual (69 pages) ,
- User manual (84 pages) ,
- User manual (76 pages)
Advertisement
Quick Guide PID

Program the dose
Press and hold 'x' or 'y' seconds and drop to set the dose X''

Make a coffee
Click & drop to make a coffee

Technical features
| DREAM | DREAM PID | |
| Voltage (V) | 230VAC/50Hz - 120VAC/60Hz | |
| Power (W) | 1050 | 1090 |
| Pump pressure (bar) | 20 | |
| Weight (kg) | 8 (FF) / 7 (MF)* | |
| Dimensions (l x w x d)** | 245 x 345 x 280 | |
| Tank capacity (L) | 1,3 | |
| Filter holder size (mm) | Ø 58 | Ø 60 |
* FF: Fixed filer holder. MF: Mobile filter holder
** Length x width x depth (mm)
Features
- 20 bar pump pressure.
- Professional system, exchanger with stainless steel ducts.
- Food-safe materials.
- Electronic temperature control.
- Working pressure gauge in PID models.
- Frother and hot water.
- 360° heat-resistant steam nozzle in PID models.
- Active cup warmer in PID models.
- Lit tank in PID models.
- EC certification.
Start-up diagram

- Espresso switch
- ON/OFF switch
- Steam switch (3-II) / hot water (3-I)
- Steam/hot water control (UNO)
- Steam/hot water wand (UNO) – Steam nozzle (DUO/TRIO)
- ON/OFF pilot light
- Mobile filter holder (ground)
- Coffee group
- Active cup warmer (Caution: hot surface)
- OPV (overpressure valve) (PID models)
- Tray
- Steam pilot light
- Coffee group I temperature pilot light (TRIO)
- Thermometer / Pressure gauge (PID versions)
- Spoon (7 g)
- Coffee tamper
- Screen (PID models)
- & 23 PID system control buttons
- Discharge nozzle (versatile version only)
The installer must read this manual carefully before start-up. The operator should be an adult and fully competent person. Should an anomaly occur, please contact your distributor.
Start-up
Check that the voltage is the same as that indicated on the machine nameplate.

 NB! We recommend using water with a low mineral content.
The quality of the water will affect the taste and quality of your coffee as well as help avoid future malfunctions. See our especial anti-lime scale filters (optional).
Make sure that there is enough water in the tank. Running the machine without water may damage the pump. Water levels should be checked visually.
Versatile model. Place the discharge nozzle  over the tray
  .
.
NB! On ending the service, the filter holder pressure  is released through this nozzle. If not correctly placed, all the remaining water could spill outside the tray.
Plug the machine into the electrical socket.

When turned on for the first time, the machine enters start-up mode. The pilot light  comes on and
  flashes while the machine heats up, until the right temperature is reached. During this process no service can be provided.
The screen  shows the temperature rise to the pre-set temperature.
- Using the machine for the first time or after a long interval.
Replacing the water in the circuit.- Turn the coffee maker on with the general switch
![]() in position (I).
in position (I). - Attach the empty filter holder
![]() with a receptacle underneath.
with a receptacle underneath. - Press the coffee switch
![]() and let approximately half a tank of clean water flow through.
and let approximately half a tank of clean water flow through.
- Turn the coffee maker on with the general switch
- PRIMING.
 in position (I).
- If no coffee comes out
- After a period without use
- After making steam
- If the tank has been emptied
The priming procedure should be carried out:- With the coffee maker on, turn on the steam tap
![]() .
. - Turn on the coffee function (3-I) and release some water (a cup) through the steam wand
![]() .
. - Turn off the water function (3-I) and turn off the steam tap
![]() . The coffee maker is now ready for use.
. The coffee maker is now ready for use.
- With the coffee maker on, turn on the steam tap
 .
. .
.- After producing steam, wait 5 minutes before making coffee. Or carry out the priming operation, but let the water flow (point B2) until the temperature pilot light
![]() stops flashing.
stops flashing.
Making coffee
Check your system: Ground, pod or capsule.
Ground (mobile filter holder)
Any type of coffee may be used, ground or pod, thanks to the 5 filters supplied: 2 ground filters (1- and 2-cup), 2 pressurised filters (1- and 2-cup Cream+) and 1 pod filter.
For optimal results, we advise using ready mixes for espressos, as they have the appropriate ground size for use with ground filters. If the results are not as expected, use pressurised filters, which will give good results regardless of ground size.
Regardless of the type of filter used for ground coffee, and depending on the whether the coffee comes out quickly or slowly, we recommend changing the type of coffee, the ground size or experimenting with compactness to suit your preference.
If using ground coffee:
- Turn on the machine, turning the general switch
![]() to position (I). Place the filter holder
to position (I). Place the filter holder ![]() (with filter) in the group
(with filter) in the group ![]() .
. - Wait for the pilot light
![]() to come on without flashing. This takes approx 1.5 minutes. This shows that the water has reached the right temperature. Turn on the coffee switch
to come on without flashing. This takes approx 1.5 minutes. This shows that the water has reached the right temperature. Turn on the coffee switch ![]() and let the water flow through the group. Performing this procedure before making coffee will eliminate residues and establish the temperature for optimal service.
and let the water flow through the group. Performing this procedure before making coffee will eliminate residues and establish the temperature for optimal service. - The filter must be filled to 3/4 its capacity, once the coffee has been tamped down (see figure 2A).

- Clean the coffee residues that have been deposited on the edges of the filter to ensure a perfect fit.
- Attach the filter holder
![]() to the group and
to the group and ![]() turn from left to right, exerting sufficient pressure at the end. (See figure 3).
turn from left to right, exerting sufficient pressure at the end. (See figure 3).

- Place the cups or cup on the tray and turn on the coffee switch
![]() .
. - When the coffee is made, turn off the coffee switch
![]() .
.


NB! On completing the coffee service, residual water will be released through the discharge nozzle  . Make sure that it is correctly placed over the tray
  .
.
NB! It is normal for the ground coffee in the filter holder  to have a liquid consistency if the filter holder is immediately removed after delivery.

If pods or FAP-capsules are used:
Use the specific filter holder for capsules or pods. Place the pod in the filter holder (see figure 4). Follow points 1, 2, 5, 6 and 7 as in the previous section.
Pod (fixed filter holder)
Proceed as follows:
- Follow Points 1 and 2, as in the section for ground coffee.
- Place a tablet on the filter holder and turn it gently to the right as far as it will go. Do not force it, closure is smooth. (See figure 5).
")
- Point 5, 6, 7 and notes as in the previous section.
![warning]() NB! Do not remove or turn the filter holder while the water is running through, as the machine is under pressure at this time.
NB! Do not remove or turn the filter holder while the water is running through, as the machine is under pressure at this time.
")
General tips:
- The filter holder
![]() should always be fitted in the machine
should always be fitted in the machine ![]() to keep it warm. In the closed position.
to keep it warm. In the closed position. - If the coffee is not very hot when made, increase the pre-set temperature for coffee.
- Place the cups on the cup warmer
![]() . Espresso is best at optimal temperature (40°C/105°F) (see figure 6).
. Espresso is best at optimal temperature (40°C/105°F) (see figure 6).
 - Step 2")
- The coffee will continue to drip out for a few seconds after the coffee is switched off.
 - Step 2")
NB! Tamping.
To obtain perfect espresso, the coffee should be firmly tamped down.
NB! Pressure gauge:
In the PID versions, the temperature is shown on the screen included for this purpose, with the working pressure shown on the pressure gauge  on the front of the machine.
The right working pressure depends on the type of coffee and the ground size. In all cases, a working pressure of between 9 and 12 bar is appropriate.
NB! The machine working pressure can be adjusted using the OPV  next to the coffee group
  . To do this, use the blind filter fitted in the filter holder , attach it to the group and turn on the coffee switch
  . The pressure can be adjusted by turning the OPV using a flat-head screwdriver. Turning it to the right increases the working pressure and turning it to the left reduces it.
Programming the coffee dose
PID models have a coffee dose control function, so that the amount of coffee required can to be adjusted for both the available options (small coffee, large coffee). There is a 3-position coffee switch for this purpose. The two available coffee selections are obtained by turning the switch to the top or bottom positions, while the midpoint turns off the coffee function.
NB! The coffee switch on the two PID models is not a permanent setting. Once the function has been activated, it returns to its original position. The switch does not have to stay in the working position; once the programmed amount of coffee has been obtained, the function will stop automatically.
To programme the dose at either of the two selections, just turn the switch to the desired position until the required amount is obtained. On releasing it, the dose will have been programmed.
Making cappuccino
True 'cappuccino' contains 25 millilitres of espresso coffee and 125 millilitres of cold steamwhipped milk, which goes from 3 or 4 degrees centigrade to nearly 55 degrees centigrade. Use fresh cow's milk with a protein content of over 3.2 percent and a fat content of 3.5 percent. Whip only the amount required for one cup in a steel jug to prevent it from mixing with other odours or tastes. The density of the cream must be uniform and there must be no separation from the liquid, or holes or bubbles.
Proceed as follows:
- Turn on the general switch
![]() . The pilot lights come on
. The pilot lights come on ![]() and pilot light
and pilot light ![]() flashes. The PID system screen
flashes. The PID system screen ![]() shows the temperature rise.
shows the temperature rise. - When the pilot light
![]() comes on and stops flashing and the screen
comes on and stops flashing and the screen ![]() shows the pre-set coffee temperature, turn on the steam switch (3-II). The pilot light
shows the pre-set coffee temperature, turn on the steam switch (3-II). The pilot light ![]() will flash, indicating the heating process to steam temperature. The screen
will flash, indicating the heating process to steam temperature. The screen ![]() will flash the pre-set steam temperature.
will flash the pre-set steam temperature. - Turn on the hot water/steam knob
![]() and let water flow until it is running discontinuously. Turn it off. Wait for the pilot light to
and let water flow until it is running discontinuously. Turn it off. Wait for the pilot light to ![]() come on without flashing. This shows that the water has reached the right temperature. The temperature value will also be shown steadily on the screen
come on without flashing. This shows that the water has reached the right temperature. The temperature value will also be shown steadily on the screen ![]() . The pump will start to work in bursts. When this happens, turn the knob again to get steam
. The pump will start to work in bursts. When this happens, turn the knob again to get steam ![]() .
.
![warning]() NB! The pilot light
NB! The pilot light ![]() will flash faster for about 10 seconds before steam is generated. Use this signal to turn the knob on
will flash faster for about 10 seconds before steam is generated. Use this signal to turn the knob on ![]() .
. - Immerse about half of the steam wand
![]() in the milk to heat it.
in the milk to heat it. - When finished, turn the water/ steam knob
![]() and the steam switch
and the steam switch ![]() off.
off. - If you want to obtain more than three consecutive cappuccino services, or make more coffee afterwards, see sections 2B and 2C.
 will flash, indicating the heating process to steam temperature. The screen
  off.
off. NB! The steam generation system includes a safety limit that cuts off the service after 3 minutes of continual operation.
NB! When the steam service is finished, the machine temperature will be too high to make coffee. The pilot light  will flash until the machine returns to the correct temperature and the screen
  will flash the pre-set coffee temperature. Follow point 2.B to force cooling.
NB! After each use it is advisable to release steam for 5 seconds to clean the tube and prevent blockage. You can use a toothpick or clip to clean the absorption hole. Make sure the nozzle is free of obstructions.
Tips for making cappuccino.
- TEXTURE: Obtaining cream
To obtain what is known as a 'velvety' consistency, place the frother nozzle just beneath the surface of the milk. To do this, move the nozzle at different angles (constantly under the surface of the milk) to attain an emulsion with the circulating air. Once textured, the milk may double its volume. Remember to move the jug and keep the steam nozzle very close to the surface of the milk. Upon completion of this operation, the milk will be textured but still cold. - TEMPERATURE: Heating the milk
- Once you have obtained the texture, submerge the steam nozzle as far as you can into the jug. Move the jug in circles to heat the milk until it reaches the temperature you want.
NB! Texturing should be done immediately beneath the milk's surface, while the nozzle should be placed deeper for heating.

Remember, do not heat to more than 75°C. Beyond this temperature you will scald the milk and it will not be suitable for cappuccino. The espresso is released at 75-80°C. The milk is textured and heated to between 55-70°C. It is important to maintain these temperatures for serving. The cups should therefore be warmed on the cup warmer. If this is not possible, heat the cup with hot water prior to use.
Once the milk is hot and textured, it is ready to be served in the cup by adding it to the espresso base.
Possible problems.
The cream may be too thin and lack consistency.
- One possible reason is that the milk has already been heated.
- The milk has been overheated (the steam nozzle has been placed too deeply in the jug and the milk has been heated without allowing the air to circulate on the surface) before the required texture has been attained.Step 1 (texturing) has not been performed properly and the air has not been allowed to work the milk.
Making hot water
- Put a cup below the steam nozzle
![]() .
. - Turn on the hot water/steam knob
![]() and press button (3-I) (the pilot light will come on
and press button (3-I) (the pilot light will come on ![]() . Carry out the reverse operation to obtain the required water.
. Carry out the reverse operation to obtain the required water.
Functions of the PID model
The PID models have a control system consisting of a screen and two control buttons 
 to control the following functions:
- Coffee temperature, shown on the screen. To change it, press button
![]() , the screen will display the message PrG, indicating that it is in temperature programming mode. Press button
, the screen will display the message PrG, indicating that it is in temperature programming mode. Press button ![]() to reduce the temperature, press
to reduce the temperature, press ![]() to increase it. If three seconds pass without a button being pressed, the system will return to its initial state.
to increase it. If three seconds pass without a button being pressed, the system will return to its initial state. - Temperature units, in °C or F.
- Pre-infusion, selecting a pump activation time during the process, from 0 (off) to 5 seconds.
- Timer, showing the time taken to make a coffee. This function can be turned on or off in the programming menu. If on, the screen
![]() shows the time taken to make a coffee, not the temperature.
shows the time taken to make a coffee, not the temperature. - In stand-by mode, selecting an activation period from 0 (off), 0.5/1/2 hours.
- Correction parameter between water temperature and measurement in the machine. This enables the water temperature to be adjusted according to room temperature.
Enter the programming menu to change the values of parameters 2 to
- The process is as follows:
- With the machine on, press and hold button
![]() while pressing
while pressing ![]() for three seconds. The screen
for three seconds. The screen ![]() will show the words SET UP alternately, indicating that the programming menu has been accessed.
will show the words SET UP alternately, indicating that the programming menu has been accessed. - Press button
![]() to scroll through the different modifiable parameters. Once the required parameter is reached, press button
to scroll through the different modifiable parameters. Once the required parameter is reached, press button ![]() to change its values.
to change its values. - To change the value of the selected parameter, press buttons
![]() and
and ![]() to reduce or increase the values, respectively.
to reduce or increase the values, respectively. - After three seconds without pressing a button, the system saves the data and returns to its initial setting.
NB! The PID system can be reset in the following way: With the machine on, press the button for three seconds. The screen will show the text PrS, indicating that the factory settings have been reset.
The table of parameters and available values is given below:
| Param. | Value - Description | Default value | |
| Ud | C | Degrees Celsius | C |
| F | Degrees Fahrenheit | ||
| Pr | 0 | Pre-infusion off | 0 |
| 1 | Pre-infusion 1 s | ||
| 2 | Pre-infusion de 2 s | ||
| 3 | Pre-infusion de 3 s | ||
| 4 | Pre-infusion de 4 s | ||
| 5 | Pre-infusion de 5 s | ||
| Cr | ON | Timer on | OFF |
| OFF | Timer off | ||
| OFF | OFF | Stand-by mode OFF | OFF |
| 0.5 | Stand-by mode ON, starting in 0.5 h | ||
| 001 | Stand-by mode ON, starting in 1 h | ||
| 002 | Stand-by mode ON, starting in 2 h | ||
| U | X | X indicates the offset between the set temperature and the one shown on the display | 0 |
Stand-by mode
An energy saving mode is included in the PID models, which turns the machine off after two hours without activating a function. When stand-by mode is on, only pilot light  remains lit while all others are turned off.
To turn the machine on again, just press any of the buttons for the machine to go back to its initial status, as if turned on for the first time.
NB! The function can be turned on and off using the PID system controls and .
Maintenance and cleaning
Cleaning and preventive care of the machine's internal system is vital if an espresso of optimum quality is to be obtained.
General warning! Cleaning and maintenance should be done when the machine is cool and disconnected from the power source. Do not place the machine under water. Not dishwasher safe.
- External cleaning: To clean the outside of the machine, use 96° alcohol or specific products for stainless steel.
- Remove and clean the tray from time to time (figure 8).
![]()
- If you are not going to use the machine for a long period of time, empty the water tank.
- Immediately after use, clean the steam nozzle with a damp cloth.
- To clean the inside of the nozzle, let the water circulate.
- Use a toothpick or paper clip to clean the frother hole. This keeps the tube free of obstructions.
- Remove and clean the tray from time to time (figure 8).
- Internal cleaning: Cleaning and preventive care of the machine's internal system is vital if an espresso of optimum quality is to be obtained. To clean the inside of the distribution unit, use
Ascaso Coffee Washer V.666.
This product is also useful for descaling the machine. Regularly descaling your coffee machine helps ensure the excellent quality of the coffee and prolong the useful life of the machine.
Consult your distributor. Recommendations for using Coffee Washer:Coffees/day Descaling >10 monthly 5-10 every 2 months 1-5 every 3 months
To prevent lime-scale problems, you can also use water treatment filters. However, we recommend cleaning in line with consumption. Use of filters and Coffee Washer filters helps prolong the life of the coffee machine in optimum condition.
Internal cleaning (back flushing) - blind filter. Weekly. Except pod models (fixed filter holder).
Put the blind filter in the filter holder and attach it to the machine. Press the coffee button. After 10 seconds, press the button to turn off the group. Repeat the operation twice.
![warning]() NB! On completing the back flush process, residual water will be released through the discharge nozzle
NB! On completing the back flush process, residual water will be released through the discharge nozzle ![]() . Make sure that it is correctly placed over the tray
. Make sure that it is correctly placed over the tray ![]() .
.
![warning]() NB! Grinding system (mobile filter holder). We recommend that you do not leave ground coffee or coffee pods in the filter holder. The coffee will leave behind residue that will affect the cleanliness of the coffee machine and the flavour of the coffee. Should this happen, run a tank of water through the machine.
NB! Grinding system (mobile filter holder). We recommend that you do not leave ground coffee or coffee pods in the filter holder. The coffee will leave behind residue that will affect the cleanliness of the coffee machine and the flavour of the coffee. Should this happen, run a tank of water through the machine. - Cleaning the filter holder and shower heads

- Mobile filter holder: Wash the filter holder with hot water and pH neutral soap. Rinse thoroughly. Dry the holder with a soft cloth. Do not put in the dishwasher.
- The filters, tray and tank can be washed in the top of the dishwasher. If you wash them manually, don't forget to rinse thoroughly. Dry with a soft cloth.
- Use a brush or similar to clean off coffee grounds from the top shower head.
![warning]() NB! Grinding system (mobile filter holder). The top shower head should be cleaned after 80 to 100 espresso coffees. To do this, clean with hot water and neutral soap. Reinsert it after cleaning.
NB! Grinding system (mobile filter holder). The top shower head should be cleaned after 80 to 100 espresso coffees. To do this, clean with hot water and neutral soap. Reinsert it after cleaning.
- Cleaning the water tank
Remove the tank from the side of the machine. Clean the inside with water.
You can find all the information you need on coffee machine cleaning and maintenance at www. ascaso.com.
Safety
- The machine is only suitable for installation in places where its use and maintenance are restricted to qualified personnel only.
- Do not allow the machine to be operated by children or the inexperienced.
- Do not carry out cleaning or maintenance while the machine is plugged in.
- Do not disconnect the coffee machine by pulling on the power cord.
- To ensure safety, if the power cord is damaged, it should be replaced by the manufacturer, after-sales service or similar qualified personnel only.
- Never turn on a defective machine or one with a damaged power cord.
- Do not handle the machine with wet feet or hands.
- Place the machine on a flat, stable surface, out of the reach of children and animals and away from hot surfaces (stovetops, etc.).
- Do not immerse in water.
- In the event of incorrect performance or malfunction, switch the machine off and unplug it. Do not attempt to repair it yourself or intervene directly. Call a service technician.
- This machine is not designed to be used by people with reduced physical, sensory or mental abilities (including children), or who lack experience or knowledge, except where such persons have had due instruction or supervision regarding the use of the appliance by a person responsible for their safety.
- Children should be supervised to ensure they do not play with the machine.
- This machine is not designed for outdoor use.
- Do not use this machine if room temperature is above 40°C or below 0°C.
- Do not use old connecting tubes. Only use those supplied with the machine.
Ignoring these warnings can jeopardise the safety of both the machine and the user. Keep this instruction manual in a safe place.
Lights and alarms
| ON/OFF PILOT LIGHT (6) | TEMPERATURE PILOT LIGHT (13) | STEAM PILOT LIGHT (12) | SCREEN (21) | |
| Coffee mode | ||||
| Start-up | ON | Flashing 1Hz | OFF | Real reading |
| Heating | ON | Flashing 1Hz | OFF | Pre-set coffee temp |
| Ready to work | ON | ON | OFF | Pre-set coffee temp |
| Steam mode | ||||
| Steam mode (heating) | ON | ON | Flashing 1Hz | Pre-set steam temp (Flashing) |
| Steam mode (start-up warning) | ON | ON | Flashing 2Hz | Pre-set steam temp |
| Steam mode (in service) | ON | ON | ON | Pre-set steam temp |
| On ending steam mode (cooling) | ON | Flashing 1Hz | ON | Pre-set coffee temp (Flashing) |
| Others | ||||
| Stand-by mode | ON | OFF | OFF | — |
| Dose control fault | ON | OFF | Flashing 2Hz | E01 |
| Coffee temp. Probe fault | ON | Flashing 2Hz | Flashing 2Hz | E02 |
| Coffee exchanger fault | ON | Flashing 4Hz | Flashing 2Hz | E03 |
| Steam temp. Probe fault | ON | Flashing 2Hz | Flashing 2Hz | E04 |
| Steam exchanger fault | ON | Flashing 2Hz | Flashing 4Hz | E05 |
| Internal fault | ON | OFF | OFF | E98 |
Troubleshooting
| Possible problems | Causes | What to do? |
The coffee is not hot | The coffee is not at the correct temperature. Cold accessories (cup, filter holder). | Wait for the on/off pilot light to go off. See general tips. Point 3. Increase temperature by PID system. |
The coffee comes out very quickly (ground coffee) | The grind you are using is too coarse and/or the coffee has not been properly tamped down. Not enough ground coffee used. | Use espresso coffee. Experiment with tamping the coffee down more or less. Fill to the brim of the filter. |
The coffee comes out very quickly (pods) | The grind you are using is too coarse, there is not enough coffee or it has not been properly packed. | Regulate the pressure using the expansion valve next to the group . This should be carried out by a qualified technician. |
The coffee is not creamy | The grind you are using is too coarse. The coffee has not been correctly tamped down. The coffee is old or poor quality. | Use espresso coffee. Experiment with tamping the coffee down more or less. Change your coffee. Use freshly ground coffee. |
| The coffee doesn't come out or does so slowly. | The water tank is empty or incorrectly placed. The grind you are using is too fine or too tightly tamped down. The filter and/or washer are obstructed. Limescale in the machine. Insufficient pressure. | Fill or correctly replace the tank. Use espresso coffee. Experiment with the way you tamp the coffee down. Clean filter and/or washer. Clean the machine. See point 6. Increase the working pressure using the expansion valve next to the coffee group . This process should be carried out by a qualified technician. |
| There is a lot of water in the filter after making the coffee. | The coffee has not been correctly tamped down. There is not enough coffee in the filter. | Tamp down correctly. See point 3. Add more coffee to the filter. See point 3. |
| The coffee spills over the edges of the filter. | The filter holder has not been placed correctly. Coffee grinds on the edge of the filter. The gasket is dirty. The gasket is defective. | Follow the procedure for adjusting the filter holder. Point 3. Clean the coffee grinds from the edge of the filter. Clean the gasket with a damp cloth. Call the Aftersales Service. |
The milk won't froth | Steam nozzle clogged. Milk has gone off. Milk hot or warm. Insufficient temperature | Clean the steam nozzle. Use fresh, cold milk (refrigeration temperature). |
The machine makes a lot of noise | Water tank empty. The tank is not correctly placed. Water supply is not reaching the tank. Mains connection problems. Old or very dry coffee. | Fill the water tank. Adjust the water tank. Place the tube in the tank. Use fresh coffee. |
Documents / ResourcesDownload manual
Here you can download full pdf version of manual, it may contain additional safety instructions, warranty information, FCC rules, etc.
Advertisement


Need help?
Do you have a question about the Dream PID and is the answer not in the manual?
Questions and answers