Advertisement
- 1 Introduction
- 2 Features
- 3 Before using this watch
- 4 Component identification
- 5 Checking the power reserve
- 6 Changing the mode
- 7 Turning on the light for the LCD indication
- 8 Switching the LCD indication
- 9 Adjusting the time and calendar
- 10 World time
- 11 Using the chronograph
- 12 Using the timer
- 13 Using alarm
- 14 Adjusting settings
- 15 Charging your watch
-
16
Troubleshooting
- 16.1 The second hand moves once every two seconds
- 16.2 The second hand does not move
- 16.3 No hands move
- 16.4 The hands start quick movement suddenly
- 16.5 Cannot check the power reserve
- 16.6 Time/calendar is incorrect
- 16.7 The LCD indication is turned off
- 16.8 What is "USER (USR)"?
- 16.9 The chronograph unexpectedly stops
- 16.10 No alarm sound is emitted
- 16.11 Alarm sound is emitted unexpectedly
- 17 Checking and correcting the reference position
- 18 Eco-Drive watch handling precautions
- 19 Water resistance
- 20 Precautionary items and usage limitations
- 21 Specifications
- 22 Safety precautions — IMPORTANT
- 23 Documents / Resources
Introduction
Before using the watch, read this instruction manual (PDF) carefully to ensure correct use.
Caliber No. of this watch: U822
Some models may be equipped with enhanced features and functions such as slide rules and tachymeters. To see how to use such features and functions, which is not covered with the instruction manual, and other information, access the CITIZEN support page (https://www.citizenwatch-global.com/support/).
Features
- Eco-Drive
No periodical battery replacement is needed. This watch is fueled by light.
![]()
- Analog-digital combination watch
The hands and the liquid crystal display indication show time and other information. - World time
Indicates the time around the world by choosing one of 29 time zones.
![]()
- Chronograph
Measures up to 40 hours by 0.01 seconds. - Alarm
You can set two times for alarm, which emits sound once or all assigned days of week. - Timer
You can use a countdown timer up to 99 minutes and 59 seconds. - Perpetual calendar
No need for monthly and leap-year date correction until December 31, 2199. - Impact detection function
Prevents the second hand from unwanted movement due to impacts and assists accurate time indication. - "Eco-Drive" is an original technology of Citizen.


Before using this watch
This watch has a rechargeable cell which is charged by exposing the dial to light.
Expose the dial to direct sunlight regularly to charge the watch.

Band adjustment
We recommend seeking the assistance of an experienced watch technician for sizing of your watch. If adjustment is not done correctly, the bracelet may unexpectedly become detached leading to loss of your watch or injury (excluding products containing the band adjustment tool).
Consult an authorized service center. Other shops may charge for, or may not provide, the service.
Protective stickers
Be sure to remove any protective stickers that may be on your watch (case back, band, clasp, etc.). Otherwise, perspiration or moisture may enter the gaps between the protective stickers and the parts, which may result in a skin rash and/or corrosion of the metal parts.
How to use a specially designed crown/button
Some models are equipped with a specially designed crown and/or push button to prevent accidental operation.
- Screw down crown/button
Unlock the crown/button prior to operate your watch.Unlock Lock Screw down crown ![]()
Rotate the crown counterclockwise until it releases from the case.![]()
Push the crown in to the case. With gentle pressure towards the case, rotate the crown clockwise to secure it to the case. Be sure to tighten firmly.Screw down push button ![]()
Rotate the locking screw counterclockwise, and loosen until it stops.![]()
Rotate the locking screw clockwise, and tighten firmly.


- Recessed button
Press the button with a non-marring narrow-tipped object.
![]()
- Metal objects may cause marring or scratching of the button.

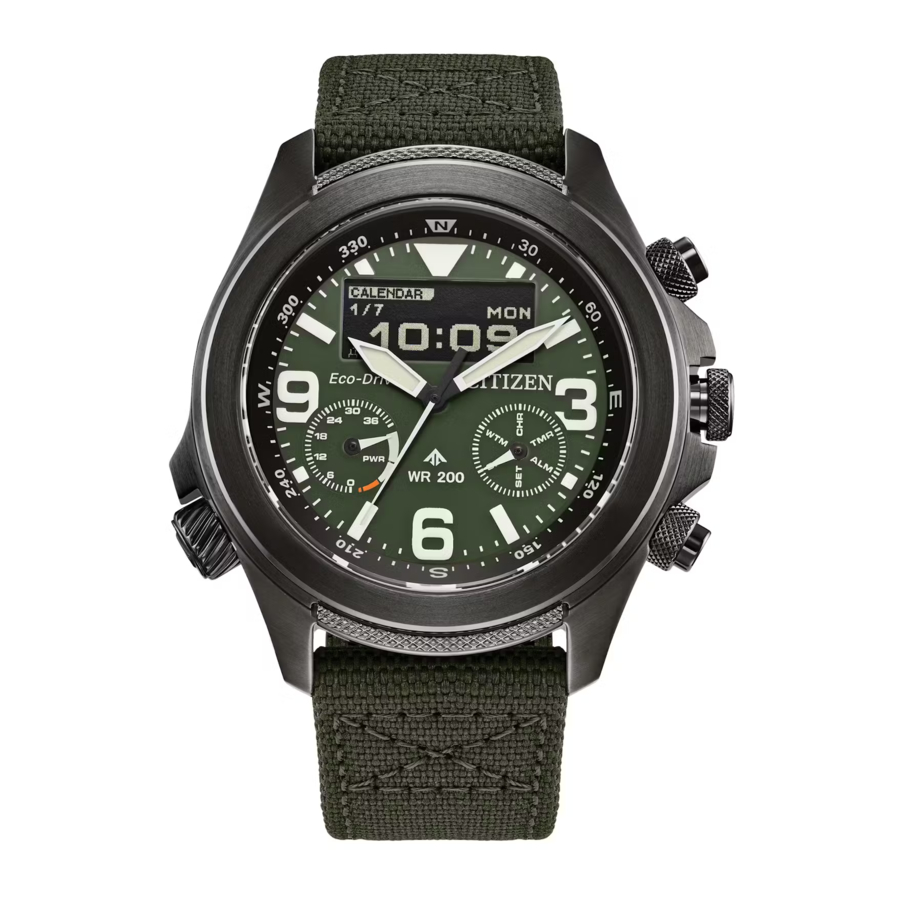
Component identification

- The illustrations in this instruction manual may differ from the actual appearance of your watch.
- A solar cell is placed under the dial.
Checking the power reserve
For details of charging, see "Charging your watch".
The power reserve indication hand indicates power reserve level.
- When the mode is CHR (chronograph), change to any other mode.
Indication of power reserve in levels
| Level | 3 | 2 | 1 | 0 |
| Example of power reserve indication |  |  |  |  |
| LCD indication | Normal | Normal | "BATTERY LOW"  normal normal | "BATTERY EMPTY" turned off |
| Duration (approx.) | 1 year - 10 months | 10 - 4 months | 4 months - 3 days | 3 days |
| Meaning | Power reserve is sufficient. | Power reserve is OK. | Power reserve is getting low. Insufficient charge warning 1 starts on this level. | Power reserve is not enough. Insufficient charge warning 2 starts on this level. |
| OK for normal use | Charge immediately. | |||
Changing the mode
This watch features the following six modes:
- CAL (time and calendar)
- WTM (world time)
- CHR (chronograph)
- TMR (timer)
- ALM (alarm)
- SET (settings)
Change modes to use functions you want.
Ex.: when changing the mode from CAL (time and calendar) to TMR (timer)
- Press and release the middle right button
![]() .
.
Black and white of the LCD indication is inverted.
![]()
- Press and release the lower right button
![]() or the upper right button
or the upper right button ![]() repeatedly to indicate a mode you want.
repeatedly to indicate a mode you want.
The LCD indication changes and the mode hand moves.
 .
.
 repeatedly to indicate a mode you want.
- CAL (time and calendar)
![]()
- WTM (world time)
![]()
- CHR (chronograph)
![]()
- TMR (timer)
![]()
- ALM (alarm)
![]()
- SET (settings)
![]()


- Press and release the middle right button
![]() .
.
Black and white of the LCD indication is inverted and the mode changes to a new one.
![]()
- The mode is automatically changed to the one currently indicated in 5 seconds without pressing the button
![]() .
.
- The mode is automatically changed to the one currently indicated in 5 seconds without pressing the button

Turning on the light for the LCD indication
You can use the light for the LCD indication when the mode is CAL (time and calendar) or WTM (world time).
- Change the mode to CAL (time and calendar) or WTM (world time).
- Press and release the lower right button
![]() .
.
The light for the LCD indication is lit for 2 seconds.
Switching the LCD indication
You can switch the LCD indication when the mode is CAL (time and calendar) or WTM (world time).
- Change the mode to CAL (time and calendar) or WTM (world time).
- Press and release the upper right button
![]() .
.
CAL (time and calendar)
Each time you press button  , the LCD indication changes as follows.
")
WTM (world time)
Each time you press button , the LCD indication changes as follows.
")
Adjusting the time and calendar
- Press and release the middle right button
![]() .
.
Black and white of the LCD indication is inverted. - Press and release the lower right button
![]() or the upper right button
or the upper right button ![]() repeatedly to indicate CAL (time and calendar).
repeatedly to indicate CAL (time and calendar).
![]()
- Press and release the middle right button
![]() . The mode changes to CAL (time and calendar).
. The mode changes to CAL (time and calendar).
![]()
- Press and hold the middle right button
![]() for 2 seconds or more.
for 2 seconds or more.
Black and white of the area name is inverted.
The second hand points to the 30-second and stops. The hour and minute hands may also stop not to interrupt the view of the LCD indication.
![]()
- Choose an area.
To choose: use buttons![]() and
and ![]() .
.
To confirm: press button![]() .
.


- Press and hold the button
![]() or
or ![]() to change area names continuously.
to change area names continuously. - For areas and time zones you can choose, refer to the table.
![]()

- Choose summer time or standard time.
To choose: use buttons![]() and
and ![]() .
.
To confirm: press button![]() .
. DST ON Summer time (1-hour forward from the standard time) DST OFF Standard time
- Summer time (DST, daylight saving time) is a system adopted in some countries/areas to gain an extra daylight during summer.
![]()

- Press and release the lower right button
![]() or the upper right button
or the upper right button ![]() in accordance with a reliable time source. The second is set to 00.
in accordance with a reliable time source. The second is set to 00.
![]()
- Press and release the middle right button
![]() . The minute becomes adjustable.
. The minute becomes adjustable.
![]()
- Set time and calendar.
To adjust: use buttons![]() and
and ![]() . To confirm: press button
. To confirm: press button ![]() .
.
![]()
- Set in the following order.
Minute![]() hour
hour ![]() year
year ![]() month
month ![]() date
date - Press and hold the button
![]() or
or ![]() to change setting values continuously. After setting date, "SETTING COMPLETE" appears and the settings are finished.
to change setting values continuously. After setting date, "SETTING COMPLETE" appears and the settings are finished.
The hands move to the time you set. - When you set a wrong time or calendar, try again from step 4.
- Set in the following order.


 hour
hour Customizing indication
Following items are adjustable. Refer to "Adjusting settings"
- Calendar notation (order of year/month/day)
- Language for days of week
- 12-hour/24-hour notation
Area and time zone
| Indication | Abbreviation | Area | Time zone |
| UTC | UTC | Coordinated Universal Time | 0 |
| LONDON | LON | London | 0 |
| MADRID | MAD | Madrid | +1 |
| PARIS | PAR | Paris | +1 |
| ROME | ROM | Rome | +1 |
| BERLIN | BER | Berlin | +1 |
| CAIRO | CAI | Cairo | +2 |
| ATHENS | ATH | Athens | +2 |
| JOHANNESBURG | JNB | Johannesburg | +2 |
| RIYADH | RUH | Riyadh | +3 |
| TEHRAN | THR | Tehran | +3.5 |
| DUBAI | DXB | Dubai | +4 |
| KABUL | KBL | Kabul | +4.5 |
| KARACHI | KHI | Karachi | +5 |
| DELHI | DEL | Delhi | +5.5 |
| DHAKA | DAC | Dhaka | +6 |
| YANGON | RGN | Yangon | +6.5 |
| BANGKOK | BKK | Bangkok | +7 |
| SINGAPORE | SIN | Singapore | +8 |
| HONG KONG | HKG | Hong Kong | +8 |
| BEIJING | BJS | Beijing | +8 |
| TAIPEI | TPE | Taipei | +8 |
| SEOUL | SEL | Seoul | +9 |
| TOKYO | TYO | Tokyo | +9 |
| ADELAIDE | ADL | Adelaide | +9.5 |
| SYDNEY | SYD | Sydney | +10 |
| NOUMEA | NOU | Noumea | +11 |
| AUCKLAND | AKL | Auckland | +12 |
| SUVA | SUV | Suva | +12 |
| MIDWAY | MDY | Midway | –11 |
| HONOLULU | HNL | Honolulu | –10 |
| ANCHORAGE | ANC | Anchorage | –9 |
| VANCOUVER | YVR | Vancouver | –8 |
| LOS ANGELES | LAX | Los Angeles | –8 |
| DENVER | DEN | Denver | –7 |
| MEXICO CITY | MEX | Mexico City | –6 |
| CHICAGO | CHI | Chicago | –6 |
| NEW YORK | NYC | New York | –5 |
| MONTREAL | YMQ | Montreal | –5 |
| MANAUS | MAO | Manaus | –4 |
| R.JANEIRO | RIO | Rio de Janeiro | –3 |
| F.NORONHA | FEN | Fernando de Noronha | –2 |
| AZORES | PDL | Azores | –1 |
| USER | USR | You can assign any time zone you like in the 15-minute increments. Refer to "CITY TIME". | |
- Values on the "Time zone" column mean time difference between UTC and the standard time of time zones.
- Countries or regions may change time zones for various reasons.
World time
The LCD indication can show a time which is different from that shown with the hands (local time).
- Change the mode to WTM (world time).
- For the way to change modes.
The current time of the area set (local time) appears on the LCD indication.
![]()
- For the way to change modes.

Setting the local time
- Change the mode to WTM (world time).
- Press and hold the middle right button
![]() for 2 seconds or more.
for 2 seconds or more.
Black and white of the area name is inverted.
The second hand points to the 30-second and stops. The hour and minute hands may also stop not to interrupt the view of the LCD indication.
![]()
- Choose an area.
To choose: use buttons![]() and
and ![]() .
.
To confirm: press button![]() .
. - Press and hold the button
![]() or
or ![]() to change area names continuously.
to change area names continuously. - For areas and time zones you can choose, refer to the table on the left column.
- Press and hold the button
- Choose summer time or standard time.
To choose: use buttons![]() and
and ![]() .
.
To confirm: press button![]() .
.
"SETTING COMPLETE" appears and the settings are finished. The hands returns to the current time.DST ON Summer time (1-hour forward from the standard time) DST OFF Standard time

Interchanging times indicated
The time indicated with the hands and the local time can be interchanged.
- Change the mode to CAL (time and calendar) or WTM (world time).
- Press and release both the lower right button
![]() and the upper right button
and the upper right button ![]() simultaneously.
simultaneously.
The time indicated with the hands and the local time are interchanged.
Ex.:Time indicated with the hands Local time UTC
1:12 AM, October 7, 2024New York
8:12 PM, October 6, 2024![]()
Time indicated with the hands Local time New York
8:12 PM, October 6, 2024UTC
1:12 AM, October 7, 2024

Using the chronograph
The chronograph measures up to 40 hours by 0.01 seconds.
- Set the mode to CHR (chronograph).
- For the way to change modes.
The LCD indication changes to the measurement screen.
![]()
- For the way to change modes.
- Press and release the upper right button
![]() . Measurement starts.
. Measurement starts.
![]()


Start/stop: press button .
Taking a split time/lap time: press button  . (up to 999 times)
Reset: press button while the chronograph is stopped. Measurement result is removed.
- The chronograph minute hand shows 00 minutes when it points just upright; each marker means 1 minute.
- Measurement continues even after changing the mode.
- The 1000th and further split times/lap times are recorded over the oldest ones.
The following operations stop chronograph measurement.
- Adjusting the time and calendar
- Adjusting world time settings
- Adjusting timer setting
- Adjusting alarm settings
- Changing the mode to SET (settings) and adjusting settings
Switching split time measurement and lap time measurement
Change it in "CHRONO MODE" in the SET (settings) mode.
Checking the measurement result
- Press and release the upper right button
![]() during measurement. The measurement stops.
during measurement. The measurement stops. - Press and hold the middle right button
![]() for 2 seconds or more.
for 2 seconds or more.
You can see the latest 60 split/lap times three by three. The second hand points to the 30-second and stops. The hour and minute hands may also stop not to interrupt the view of the LCD indication.
![]()

- Press the button
![]() /
/ ![]() to change pages.
to change pages. - By pressing button
![]() , the indicated records are displayed in a two-dimensional code and can be read with your smartphone. To go back to the previous indication, press button
, the indicated records are displayed in a two-dimensional code and can be read with your smartphone. To go back to the previous indication, press button ![]() again.
again.
- Press and hold the middle right button
![]() for 2 seconds or more.
for 2 seconds or more.
The LCD indication go back to the measurement screen. The second hand goes back to show the current chronograph second and the hour and minute hands go back to shown the current time.
Using the timer
You can use a countdown timer up to 99 minutes and 59 seconds in the 1-second increments.
The watch emits sound for 5 seconds as time you set passed.
- Press any button to stop to stop the sound.
- Change the mode to TMR (timer).
- For the way to change modes.
![]()
- For the way to change modes.
- Press and release the upper right button
![]() . Timer countdown starts.
. Timer countdown starts.
![]()


Start/stop: press button .
Reset: press button while countdown is stopped.
- The
![]() icon appears during countdown.
icon appears during countdown. - Countdown continues even after changing the mode.
The following operations stop countdown.
- Adjusting the time and calendar
- Adjusting world time settings
- Adjusting alarm settings
- Changing the mode to SET (settings) and adjusting settings
Setting countdown time
- Change the mode to TMR (timer).
- Press and hold the middle right button
![]() for 2 seconds or more when timer countdown is stopped.
for 2 seconds or more when timer countdown is stopped.
The second hand points to the 30-second and stops. The hour and minute hands may also stop not to interrupt the view of the LCD indication.
![]()
- Set countdown time.
To set: use buttons![]() and
and ![]() .
.
To confirm: press button![]() .
. - Set countdown time in the following order.
2nd digit of minute![]() 1st digit of minute
1st digit of minute ![]() 1nd digit of second
1nd digit of second ![]() 1st digit of second
1st digit of second - Press and hold the button
![]() or
or ![]() to change setting values continuously.
to change setting values continuously.
After setting the 1st digit of second, "SETTING COMPLETE" appears and the settings are finished. The hands returns to the current time.
- Set countdown time in the following order.

 1st digit of minute
 Using alarm
You can set two times for alarm. The alarm is to be set to emit sound once or all assigned days of week.
Alarm emits sound for 15 seconds as the time set comes.
- Press any button to stop the sound.
Checking current alarm settings
- Change the mode to ALM (alarm).
- For the way to change modes.
The current alarm settings are indicated.

*![]() : they appear when alarm 1/alarm 2 are activated.
: they appear when alarm 1/alarm 2 are activated.
- For the way to change modes.


Checking the alarm sound
- Change the mode to ALM (alarm).
- For the way to change modes.
- Press and hold the lower right button
![]() or the upper right button
or the upper right button ![]() .
.
- Press and hold the lower right button
![]() to monitor the sound of alarm 1.
to monitor the sound of alarm 1. - Press and hold the lower right button
![]() to monitor the sound of alarm 2.
to monitor the sound of alarm 2.
Setting alarm
Ex.: When setting alarm 1 to emit sound at 7:20 AM of Tokyo time repeatedly.
- Change the mode to ALM (alarm).
- For the way to change modes.
- Press and hold the middle right button
![]() for 2 seconds or more.
for 2 seconds or more.
Alarm settings become adjustable.
The second hand points to the 30-second and stops. The hour and minute hands may also stop not to interrupt the view of the LCD indication.
![]()
- Choose an alarm to set (alarm 1 or 2).
To choose: use buttons![]() and
and ![]() .
.
To confirm: press button![]() .
.
![]()
- Activate/deactivate the alarm.
To choose: use buttons![]() and
and ![]() .
.
To confirm: press button![]() .
. ON Sound is emitted once. ON ![]()
Sound is emitted in every assigned day. OFF Alarm is deactivated. - After choosing "OFF", "SETTING COMPLETE" appears and the settings are finished.
- Choose an area (time zone) and set time to emit sound.
To choose: use buttons![]() and
and ![]() .
.
To confirm: press button![]() .
.
![]()
- Press and hold the button
![]() or
or ![]() to change area names/setting values continuously.
to change area names/setting values continuously. - When you chose "ON" in step 4, "SETTING COMPLETE" appears and the settings are finished.
- Press and hold the button
- Choose days of week on which you want to activate alarm.
To choose: use buttons![]() and
and ![]() .
.
To confirm: press button![]() .
.
![]()


| SU | Sunday | TH | Thursday |
| MO/M | Monday | FR/F | Friday |
| TU | Tuesday | SA | Saturday |
| WE/W | Wednesday |
After choosing setting for Saturday, "SETTING COMPLETE" appears and the settings are finished.
The hands returns to the current time.
Adjusting settings
Ex.: when adjusting setting of "DATE ORDER"
- Change the mode to SET (settings).
- For the way to change modes.
The second hand points to the 30-second and stops. The hour and minute hands may also stop not to interrupt the view of the LCD indication.
![]()
- For the way to change modes.
- Press and release the lower right button
![]() or the upper right button
or the upper right button ![]() repeatedly to indicate an item you want to set.
repeatedly to indicate an item you want to set.
![]()
- Press and release the middle right button
![]() .
.
Setting values become adjustable.
![]()
- Adjust settings.
To adjust: use buttons![]() and
and ![]() .
.
To confirm: press button![]() .
.
![]()
- To cancel adjusting setting, choose "EXIT" and press button
![]() .
.
- To cancel adjusting setting, choose "EXIT" and press button
- Choose "EXIT" and press the middle right button
![]() .
.
The mode returns to CAL (time and calendar).
The hands returns to the current time.


Setting item
LIGHT LEVEL
Use this to check power generation amount of this watch in levels. You can see current amount/hourly amount of the last 24 hours/daily amount of the last 7 days.
- Press the button
![]() or
or ![]() to switch the 3 periods above.
to switch the 3 periods above.
HOME TIME
Use this to set time.
(Initial setting: UTC)
WORLD TIME
Use this to choose an area which the WTM (world time) mode shows time of.
(Initial setting: NEW YORK)
CHRONO RESULT
Use this to see measurement result of chronograph.
TIMER
Use this to set countdown time.
(Initial setting: 3 minutes)
ALARM
Use this to adjust settings for alarm.
(Initial settings: 0:00 AM, off for both alarm 1 and alarm 2)
HAND POSITION
Use this to check and correct the reference position of the hands.
CHRONO MODE
Use this to choose which to take while chronograph measurement, split time or lap time.
| SPLIT | Choose this to take and show split time. (Initial setting) |
| LAP | Choose this to take and show lap time. |
DAY LANGUAGE
Use this to set language for showing days of week in the modes of CAL (time and calendar) and WTM (world time).
| ENGLISH | English (Initial setting) |
| JAPANESE | Japanese |
| SPANISH | Spanish |
| GERMAN | German |
| FRENCH | French |
| ITALIAN | Italian |
| PORTUGUESE | Portuguese |
| CHINESE | Chinese |
SELECT CITY
Use this to show/hide area names on the area list which appears when choosing an area.
(Initial setting: showing all)

CITY TIME
Use this to assign a time zone to "USER (USR)". You can assign any time zone you like in the 15-minute increments to the standard time and summer time.. (Initial setting: ±0 for both the standard time and summer time)
- Assign a time zone for the standard time.
To adjust: use buttons![]() and
and ![]() . To confirm: press button
. To confirm: press button ![]() .
. - Assign a time zone for summer time.
To adjust: use buttons![]() and
and ![]() . To confirm: press button
. To confirm: press button ![]() .
.
HOUR 12H/24H
Use this to switch time notation between 12-hour and 24-hour.
| 12-HOUR | 12-hour notation (Initial setting) |
| 24-HOUR | 24-hour notation |
DATE ORDER
Use this to choose calendar notation (order of year/month/day).
| YYYY/MM/DD | Year, month, date (Initial setting) |
| MM/DD/YYYY | Month, date, year |
| DD/MM/YYYY | Date, month, year |
INFORMATION
Use this to see firmware version and other information of this watch.
RESET SETTINGS
Use this to return the setting values of the items above to the initial.
Charging your watch
This watch has a solar cell under the dial and stores the power generated by the cell in its built-in rechargeable cell. The cell is charged by exposing the dial to light such as direct sunlight or fluorescent lamps. For optimal performance, be sure to:

- Put the watch in a location where the dial is exposed to bright light such as by the window even when it is not used.
- Expose its dial to direct sunlight for 5 or 6 hours at least every week.
- Avoid leaving it in dark places for long periods of time.

- Do not charge the watch at a high temperature (about 60°C (140°F) or higher) as doing so may cause movement malfunction.
- If the watch is obscured from light by long sleeves frequently, supplemental charging may be needed to ensure continual operation.
- The watch stops charging automatically after finishing (overcharging prevention function). The function prevents damage to performance of the watch and rechargeable cell due to overcharging.
When the watch reaches a low charge state (insufficient charge warning function)
The watch tells you insufficient charge as below. Be sure to fully charge your watch immediately as outlined below.
Insufficient charge

When the watch is left without any operation for 10 seconds, the LCD indication is turned off. By pressing any button, the LCD indication returns to normal after showing "BATTERY LOW" for 3 seconds.
- The time is indicated correctly. The other functions are also available.
The LCD indication is turned off. By pressing any button, the LCD indication shows "BATTERY EMPTY" for 3 seconds and is turned off again.
The second hand moves once every 2 seconds (two-second interval movement).

- The time is indicated correctly. However, other functions of the watch will not be available for use.
- If you do not charge the watch for 3 days or longer after the insufficient charge warning 2 has begun, the watch will be depleted of all power and stop.
Charging time by environment
Below are the approximate charging times when exposing to light continuously. Please use this table as a reference only.
| Environment | Illuminance (lx) | Charging time (approx.) | ||
| To work for one day | To start working normally when the cell is discharged | To become fully charged when the cell is discharged | ||
| Outdoors (sunny) | 100,000 | 3 minutes | 5 hours | 17 hours |
| Outdoors (cloudy) | 10,000 | 20 minutes | 40 hours | — |
| 20 cm (7- 7/8 inches) away from a fluorescent lamp (30 W) | 3,000 | 1.5 hours | — | — |
| Interior lighting | 500 | 7 hours | — | — |
- Exposing to direct sunlight is recommended to charge your watch. A fluorescent lamp or interior lighting does not have sufficient illumination to charge the rechargeable cell efficiently.
Duration without additional charging after charging the watch fully
About 1 year
Power save function
The hands stop and the LCD indication is turned off automatically to save power when the watch has been kept in a dark place for a certain period of time and it cannot generate power.
- The watch works normally even while saving power.
Canceling the power save function
The power save status ends and the hands return to normal indication as the watch is operated or the dial is exposed to light and power generation starts.
Troubleshooting
- When your watch still has problems even after trying remedies below, consult an authorized service center.
Movement of a hand seems strange
| Symptom | Remedies |
The second hand moves once every two seconds | Insufficient charge warning function is active. Power reserve of the watch is nearly empty. Charge immediately. |
The second hand does not move | The second hand stops while the mode is CHR (chronograph) and measurement stops. |
| The second hand points 30 seconds and stops when the mode is SET (settings) or during time and calendar adjustment. | |
No hands move | Charge the watch under direct sunlight until the second hand moves normally. |
| The second hand points 30 seconds and stops when the mode is SET (settings) or during time and calendar adjustment. The hour and minute hands may also stop not to interrupt the view of the LCD indication. | |
The hands start quick movement suddenly | After finishing setting, the hands may move quickly until they show the current time. |
| The power save function is canceled. Wait until the current time is displayed. | |
Cannot check the power reserve | The mode is CHR (chronograph). |
Time/calendar is abnormal.
| Symptom | Remedies |
Time/calendar is incorrect | The second hand points 30 seconds and stops when the mode is SET (settings) or during time and calendar adjustment. The hour and minute hands may also stop not to interrupt the view of the LCD indication. |
| Check the area setting. | |
| Check the summer time (DST) setting. Switching summer time and standard time must be executed manually there. | |
| Adjust the time and calendar. | |
| Check and correct the reference position of the hands. | |
| The time indicated with the hands and that shown on the LCD indication are different. | The hands and the LCD indication may show different times when the mode is WTM (world time). |
| Check and correct the reference position of the hands. |
LCD indication
| Symptom | Remedies |
The LCD indication is turned off | Insufficient charge warning function is active. Power reserve of the watch is nearly empty. Charge immediately. |
World time
| Symptom | Remedies |
| The area you want to choose is not shown on the list. | Use "SELECT CITY" of settings to show the area you want. |
What is "USER (USR)"? | To "USER (USR)", you can assign any time zone you like in the 15-minute increments. Use it when the time zone of your area does not exist on the list. |
Chronograph
| Symptom | Remedies |
The chronograph unexpectedly stops | Changing the mode to SET (settings) to execute settings stops chronograph measurement. |
| The second hand does not point 00 seconds even after resetting chronograph. | Check and correct the reference position of the hands. |
Timer
| Symptom | Remedies |
No alarm sound is emitted | Try alarm sound check. If no sound is emitted, consult an authorized service center. |
Check alarm settings. The  icons appear when alarm 1/alarm 2 are activated. icons appear when alarm 1/alarm 2 are activated. | |
Alarm sound is emitted unexpectedly | Check area setting of alarm settings. |
Alarm
| Symptom | Remedies |
| Time/calendar is incorrect. | The second hand points 30 seconds and stops when the mode is SET (settings) or during time and calendar adjustment. The hour and minute hands may also stop not to interrupt the view of the LCD indication. |
| Check the area setting. | |
| Check the summer time (DST) setting. Switching summer time and standard time must be executed manually there. | |
| Adjust the time and calendar. | |
| Check and correct the reference position of the hands. | |
| The time indicated with the hands and that shown on the LCD indication are different. | The hands and the LCD indication may show different times when the mode is WTM (world time). |
| Check and correct the reference position of the hands. |
Checking and correcting the reference position
Check whether reference position is correct when the hands and the LCD indication show different time in the CAL (time and calendar) mode or the second hand does not point 00 seconds even after resetting chronograph.
What is the reference position?
The base position of all hands to indicate time correctly.

- Chronograph minute hand: 00 minute
- Chronograph hour hand: 00 hour
- Hour, minute and second hands: 0 hour 00 minute 00 second
- Change the mode to SET (settings).
- For the way to change modes
![]()
- For the way to change modes
- Press and release the lower right button
![]() or the upper right button
or the upper right button ![]() repeatedly to choose "HAND POSITION" and press the middle right button
repeatedly to choose "HAND POSITION" and press the middle right button ![]() .
.
The hands start to move to the current reference position.
![]()
- Check the reference positions of them referring to the illustration above.
Correct Press and release the middle right button ![]() to finish the procedure.
to finish the procedure. Wrong Proceed to step 4 and correct the reference position. - Press and release the lower right button
![]() or the upper right button
or the upper right button ![]() repeatedly to choose "TO CORRECT" and press the middle right button
repeatedly to choose "TO CORRECT" and press the middle right button ![]() .
.
The chronograph minute hand slightly moves to show it becomes adjustable.
![]()
- Press and release the lower right button
![]() or the upper right button
or the upper right button ![]() repeatedly to adjust the reference position of the hand and press the middle right button
repeatedly to adjust the reference position of the hand and press the middle right button ![]() .
. - Press and hold the button
![]() or
or ![]() to move the hand continuously.
to move the hand continuously.
- Press and hold the button
- Repeat step 5.
- Adjust the reference position in the following order.
Chronograph minute hand![]() chronograph hour hand
chronograph hour hand ![]() hour and minute hands
hour and minute hands ![]() second hand
second hand
After adjusting the reference position of the second hand, "SETTING COMPLETE" appears and adjustment is finished.
- Adjust the reference position in the following order.
- Press and release the lower right button
![]() or the upper right button
or the upper right button ![]() repeatedly to choose "EXIT" and press the middle right button
repeatedly to choose "EXIT" and press the middle right button ![]() . The mode returns to CAL (time and calendar).
. The mode returns to CAL (time and calendar).


All reset
When the watch does not work properly, you can reset all the settings. If the power reserve is insufficient, charge the watch first.
Be sure to perform the following operations after All Reset.
- Correct the reference positions.
After All Reset, the watch is in the reference position adjustment mode. Refer to step 5. - Adjust the time and calendar.
- Press and hold buttons
![]() ,
, ![]() and
and ![]() at the same time for 4 seconds or more and release them.
at the same time for 4 seconds or more and release them.
The LCD indication is turned off and all reset is performed. Wait until movement of the hands stops.
The setting values after All Reset
| Time | 0 hours 00 minutes 00 seconds |
| Day, date, month and year | January 01, 2023 (Sunday) |
| Time zone setting | UTC |
| Summer time/standard time | Standard time in all areas |
| World time | New York |
Eco-Drive watch handling precautions
<Always Make Sure to Recharge Frequently>
- Long sleeves may inhibit light transmission to your watch. This may result in your watch loosing charge. In these cases supplemental charging may be necessary.
- When you take off the watch, try to place it in as bright a location as possible. This will ensure optimal operation.
Recharging Precautions

- Do not charge the watch at a high temperature (about 60°C (140°F) or higher) as doing so may cause the movement to malfunction.
Ex.:- Charging the watch too close to a light source which generates a large amount of heat such as an incandescent lamp or halogen lamp. When charging under an incandescent lamp, be sure to leave 50 cm (20 inches) or more between the lamp and the watch to avoid exposing the watch to excessive heat.
- Charging the watch in a location where the temperature may become extremely high such as on the dashboard of a vehicle.
<Replacement of Rechargeable Cell>
- This watch utilizes a special rechargeable cell that does not require periodical replacement. However power consumption may increase after using the watch for a number of years due to wear of internal components and deterioration of oils. This may cause stored power to be depleted at a faster rate.
Handling of Rechargeable Cell
- The rechargeable cell should never be removed from the watch. If for any reason it becomes necessary to remove the rechargeable cell from the watch, keep out of the reach of children to prevent accidental swallowing. If the rechargeable cell is accidentally swallowed, consult a doctor immediately.
- Do not dispose of the rechargeable cell with ordinary garbage. Please follow the instructions of your municipality regarding collection of batteries to prevent the risk of fire or environmental contamination.
Use Only the Specified Battery
- Never use a battery other than the rechargeable cell specified for use in this watch.
Although the watch structure is designed so that it will not operate when another type of battery is installed, if a conventional watch battery or other type of battery is installed in the watch and the watch is recharged, there is the risk of overcharging which may cause the battery to rupture. This can cause damage to the watch and injury to the wearer. When replacing the rechargeable cell, always make sure to use the designated rechargeable cell.
Water resistance
Water resistance
- Refer to the watch dial and/or the case back for the indication of the water resistance of your watch. The following chart provides examples of use for reference to ensure that your watch is used properly. (The unit "1bar" is roughly equal to 1 atmosphere.)
- WATER RESIST(ANT) ×× bar may also be indicated as W.R.×× bar.
- Non-water resistant models are not designed to come into contact with any moisture. Take care not to expose a watch with this rating to any type of moisture.
- Water resistance for daily use (to 3 atmospheres) means the watch is water resistant for occasional accidental splashing.
- Upgraded water-resistance for daily use (to 5 atmospheres) means that the watch may be worn while swimming, but is not to be worn while skin diving or scuba diving.
- Upgraded water-resistance for daily use (to 10/20 atmospheres) means that the watch may be worn while skin diving, but not while scuba diving or saturated diving using helium gas.
| Indication | Water-related use | |||||||
| Name | Dial or Case back | Specification | Minor exposure to water (washing face, rain, etc.) | Swimming and general washing work | Skin diving, marine sports | Scuba diving using an air tank | Saturation diving using helium gas | Operate the crown or button when the watch is wet |
| Non-water resistant | − | Non-water resistant | NO | NO | NO | NO | NO | NO |
| Everyday-use water resistant watch | WATER RESIST | Water-resistant to 3 atmospheres | OK | NO | NO | NO | NO | NO |
| Upgraded everyday use water resistant watch | W. R. 5 bar | Water-resistant to 5 atmospheres | OK | OK | NO | NO | NO | NO |
| W. R. 10 bar W. R. 20 bar | Water-resistant to 10 and 20 atmospheres | OK | OK | OK | NO | NO | NO | |
Precautionary items and usage limitations
To Avoid Injury
- Be particularly careful when wearing your watch while holding a small child, to avoid injury.
- Be particularly careful when engaged in strenuous exercise or work, to avoid injury to yourself and others.
- Do NOT wear your watch while in a sauna or other location where your watch may become excessively hot, since there is the risk of burns.
- Be careful when putting on and taking off your watch, since there is a risk of damaging your fingernails, depending on the manner in which the band is fastened.
- Take off your watch before going to bed. It may cause an unexpected injury or a rash.
Precautions
- Always use the watch with the crown pushed in (normal position). If the crown is of the screw lock-type, make sure it is securely locked.
- Do not operate (use the crown and/or buttons) the watch when it is wet. Water may enter the watch causing damage to vital components.
- If water enters the watch or the watch fogs up and does not clear up even after a long time, consult your dealer or an authorized service center for inspection and/or repair.
- Even if your watch has a high level of water resistance, please be careful of the following.
- If your watch is immersed in sea water, rinse thoroughly with fresh water and wipe with a dry cloth.
- Do not pour water from a tap directly onto your watch.
- Take off your watch before taking a bath.
- If seawater enters the watch, place the watch in a box or plastic bag and immediately take it in for repair. Otherwise, pressure inside the watch will increase, and parts (crystal, crown, push button, etc.) may come off.
When Wearing Your Watch <Band>
- Leather bands and rubber (urethane) bands will deteriorate over time due to perspiration or dirt. In addition, they are made of natural material and will be worn, deformed and discolored over time. It is recommended to replace with a new one periodically.
- The durability of a leather band may be affected when wet (fading, peeling of adhesive), owing to the properties of the material. Moreover, wet leather may cause a rash.
- Do not stain a leather band with substances containing volatile materials, bleach, alcohol (including cosmetics). Discoloration and premature aging may be occurred. Ultraviolet light such as direct sunlight may cause discoloration or deformation.
- It is recommended to take off the watch if it gets wet, even if the watch itself is water-resistant.
- Do not wear the band too tightly. Try to leave enough space between the band and your skin to allow adequate ventilation.
- The rubber (urethane) band may be stained by dyes or soil present in or on clothing or other accessories. Since these stains may not be removable, caution is required when wearing your watch with items that tend to easily transfer color (articles of clothing, purses, etc.). In addition, the band may be deteriorated by solvents or moisture in the air. Replace with a new one when it has lost elasticity or become cracked.
- Please request adjustment or repair of the band in the following cases:
- You notice an abnormality with the band due to corrosion.
- The pin of the band is protruding.
- We recommend seeking the assistance of an experienced watch technician for sizing of your watch. If adjustment is not done correctly, the bracelet may unexpectedly become detached leading to loss of your watch or injury (excluding products containing the band adjustment tool).
Consult an authorized service center. Other shops may charge for, or may not provide, the service.
<Temperature>
- The watch may stop or the function of the watch may be impaired in extremely high or low temperature. Do not use the watch in places where the temperature is outside the operating temperature range as stated in the specifications.
<Magnetism>
- Analog quartz watches are powered by a step motor that uses a magnet. Subjecting the watch to strong magnetism from the outside can cause the motor to operate improperly and prevent the watch from keeping time accurately.
Do not allow the watch to come into close proximity to magnetic health devices (magnetic necklaces, magnetic elastic bands, etc.) or the magnets used in the latches of refrigerator doors, clasps used in handbags, the speaker of a cell phone, electromagnetic cooking devices and so on.
<Strong Shock>
- Avoid dropping the watch or subjecting it to other strong impact. It may cause malfunctions and/or performance deterioration as well as damage to the case and bracelet.
<Static Electricity>
- The integrated circuits (IC) used in quartz watches are sensitive to static electricity. Please note the watch may operate erratically or not at all if exposed to intense static electricity.
<Chemicals, Corrosive Gasses and Mercury>
- Do not use the watch in environment with chemicals or corrosive gasses. If paint thinner, benzene or other solvents or products containing these solvents (including gasoline, nail-polish remover, cresol, bathroom cleaners and adhesives, water repellent, etc.) are allowed to come into contact with the watch, they may discolor, dissolve or crack the materials. Be careful when handling these chemicals. Contact with mercury such as that used in thermometers may also cause discoloration of the band and case.
<Protective Stickers>
- Be sure to remove any protective stickers that may be on your watch (case back, band, clasp, etc.). Otherwise, perspiration or moisture may enter the gaps between the protective stickers and the parts, which may result in a skin rash and/or corrosion of the metal parts.
Always Keep Your Watch Clean
- Rotate the crown while it is pressed in fully and press the buttons periodically so they do not become stuck due to accumulations of foreign matter.
- The case and band of the watch come into direct contact with the skin. Corrosion of the metal or accumulated foreign matter may result in black residue coming from the bracelet when exposed to moisture or perspiration unnoticed soiling such as that caused by perspiration. Be sure to keep your watch clean at all times.
- The case and band of the watch come into direct contact with the skin. In rare circumstances, accumulated dirt, foreign matter may cause irritation with the skin. If you think there is something wrong, discontinue wearing the watch immediately and consult your physician.
In the case of accumulation of sweat or dirt on a metal band or case, clean thoroughly using a brush and neutral detergent. In the case of a leather or rubber (urethane) band, wipe clean using a dry cloth. - Leather bands may become discolored by perspiration or dirt. Always keep your leather band clean by wiping with a dry cloth.
Caring for Your Watch
- Wipe any dirt or moisture such as perspiration from the case and crystal with a soft cloth.
- For a metallic, plastic or rubber (urethane) watchband, wash any dirt off with water. Remove the small amounts of dirt trapped between the crevices of the metallic band with a soft brush.
- For a leather band, wipe off dirt using a dry cloth.
- If you will not be using your watch for an extended period of time, carefully wipe off any perspiration, dirt or moisture and store in a proper location, avoiding locations subject to excessively high or low temperatures and high humidity.
When Luminous Paint is used for your watch
The paint on the dial and hands helps you with reading the time in a dark place. The luminous paint stores light (daylight or artificial light) and glows in a dark place.
It is free from any radioactive substance or any other material harmful to a human body or environment.
- The light emission gradually becomes weaker as time passes.
- The duration of the light ("glow") will vary depending on the brightness, types of and distance from a light source, exposure time, and the amount of the paint.
- The paint may not glow and/or may dissipate quickly if exposure to light was not sufficient.
Specifications
| Model | U822 | Type | Solar-powered analog-digital combination watch |
| Timekeeping accuracy | Average monthly accuracy: ±15 seconds when worn at normal operation temperatures (between +5°C - +35°C) | ||
| Operating temperature range | –10°C (14°F) to +60°C (140°F) | ||
| Display functions | Analog section
Digital section
| ||
| Duration |
| ||
| Battery | Rechargeable cell (manganese dioxide lithium cell), 1pc. | ||
| Additional functions |
| ||
Specifications and contents are subject to change without prior notice.
Safety precautions — IMPORTANT
This manual contains instructions that should be strictly followed at all times not only for optimal use, but to prevent any injuries to yourself, other persons or property. We encourage you to read the entire booklet and understand the meaning of the following symbols:
- Safety advisories are categorized and depicted in this manual as follows:
 | Highly likely to cause death or serious injury |
| Can cause serious injury or death |
| Can or will cause minor or moderate injury or damage |
- Important instructions are categorized and depicted in this manual as follows: (Following symbols are examples of Pictograms.)
 | Warning (caution) symbol followed by prohibited matters. |
 | Warning (caution) symbol followed by instructions that should be followed or precautions that should be observed. |
Documents / Resources
References
Download manual
Here you can download full pdf version of manual, it may contain additional safety instructions, warranty information, FCC rules, etc.
Advertisement


Need help?
Do you have a question about the Promaster Land and is the answer not in the manual?
Questions and answers