Advertisement
Technical Support and E-Warranty Certificate www.vevor.com/support
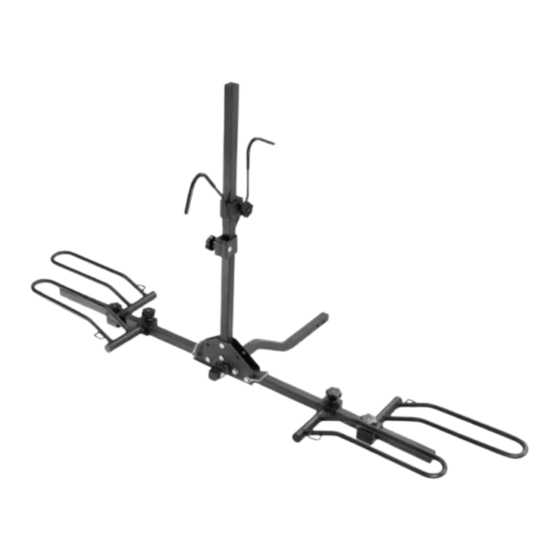
HITCH BIKE RACK
MODEL: RC-1803J
We continue to be committed to provide you tools with competitive price.
"Save Half", "Half Price" or any other similar expressions used by us only represents an
estimate of savings you might benefit from buying certain tools with us compared to the major
top brands and does not necessarily mean to cover all categories of tools offered by us. You
are kindly reminded to verify carefully when you are placing an order with us if you are
actually saving half in comparison with the top major brands.
Advertisement
Table of Contents

Related Manuals for VEVOR RC-1803J


Summary of Contents for VEVOR RC-1803J
- Page 1 Technical Support and E-Warranty Certificate www.vevor.com/support HITCH BIKE RACK MODEL: RC-1803J We continue to be committed to provide you tools with competitive price. "Save Half", "Half Price" or any other similar expressions used by us only represents an estimate of savings you might benefit from buying certain tools with us compared to the major top brands and does not necessarily mean to cover all categories of tools offered by us.
- Page 2 This is the original instruction, please read all manual instructions carefully before operating. VEVOR reserves a clear interpretation of our user manual. The appearance of the product shall be subject to the product you received. Please forgive us that we won't inform you again if there are any technology or software updates on our product.
-
Page 3: Packing List
Warning-To reduce the risk of injury, users must read the instructions manual carefully. PRODUCT PAREMETERS Model RC-1803J Capacity (Bicycles) Maximum Load 80 lbs Car, SUV, Truck, Trailer Vehicle Service Type Applicability(Bicycles) Most Bikes(Up to 60mm bicycle type width) Mounting Size 1.25 inch/2 inch... - Page 4 Frame Frame hook-01 hook-02 Bandage25*5 Bandage25*2 Knob nut Safety pin Flat washer Flat washer M8*25 Spring washer Locknut M10 Outer Square neck hexagonal bolt M8*70 bolt M10*50 Outer Plastic clamp hexagonal block bolt M12*75 Flat washer Lock nut Pressing plate screw Pressing plate Spring washer...
-
Page 5: Safety Instructions
SAFETY INSTRUCTIONS Read these instructions carefully and retain them for future use.If this product is passed to a third party, then these instructions must be included. When using the product, basic safety precautions should always be followed to reduce the risk of injury including the following: Risk of accidents! Any rear overhang on a vehicle must not exceed 60% of the wheelbase or ... -
Page 6: Road Safety
Road Safety Risk of accidents! Sudden brakes, abrupt starts and sharp turns must be avoided as much as possible. The maximum speed of driving over speed bumps must not exceed 6.2 mph (10 kph). If it is not possible to stay within the 3.94 ft (1.2 m) limit beyond the rear of the ... - Page 7 This product is designed such that, with proper assembly, mounting and operation cause no damage to the vehicle. Do not over-tighten the fasteners. This product is designed to be fitted directly on a vehicle and has a 2-inch size ...
- Page 8 not directly behind the exhaust pipe. Use extra protections to protect the bicycles and the tailgate from scratches if necessary. Always position the biggest/heaviest bicycle closest to the vehicle first, and then place others outwards in order of size. The vehicle should be in good condition in the area it which the product is ...
-
Page 9: Installation Instruction
Remove all the packing materials. Clean the vehicle before installation, especially those parts that come into contact with this product. Clean the surface of this product before installing this product. INSTALLATION INSTRUCTION Required tools: 1× Protective Gloves 1×... -
Page 10: Assembly Procedures
1. Assembly Procedures Assemble parts Cx2, D, Kx2, Mx4, Ox2, and Qx2 as shown in the figure, and tighten all nuts using the 17mm wrench tool. Note: After the safety pin of K is threaded into the pin hole, the safety buckle needs to be fastened. - Page 11 Assemble parts Ex2, Fx2,, Lx4 Nx4, Px4, and Sx8 as Take parts Ex2, Fx2, Lx4, Nx4, Px4, Rx4, and ABx8 for shown in the figure,. Pay attention to the direction of the E/F components during assembly, and do not tighten the knob L after assembly to ensure that the E/F components can move and adjust the position on the horizontal pipe.
-
Page 12: Installation Procedures
Take parts G, H, Lx2, Nx2, Px2, Rx2, and Sx4 and assemble them on the component in step 4, as shown in the figure. Do not tighten the knob L to ensure that the G/H component can move up and down on the vertical pipe to adjust its position. - Page 13 After completing step 6, take the M, W, X, Y, and Z accessories as shown in the figure for clearance assembly, ensuring that the Z parts are tightened with a wrench tool. Roughly adjust the distance between the E and F wheel frames according to the actual wheel base of the front and rear wheels of the bicycle.
- Page 14 Follow the method in step 8 to place the second bicycle on the frame, and tighten the locking knobs on E, F, and G. Use straps I to fix the front and rear wheels of the bicycle to the frame, and then use straps J to tie the crossbeams of the two bicycles together.
- Page 15 Note: Some models of bicycles cannot use this product, with a maximum load capacity of 40 lbs x2! - 14 -...
- Page 16 After opening the safety pin on the rack, as shown in the figure, flip the frame backwards to the stop, and the trunk door of the car can be opened smoothly. When the Hitch Bike Rack is temporarily not suspended, the left and right lateral pipes of the frame can be folded up as shown in the figure, and the operation method can be followed in the order of ABC.
-
Page 17: Cleaning And Maintenance
CLEANING AND MAINTENANCE CAUTION Risk of damage! Do not take the product through a car wash. Cleaning When cleaning vehicles and products, use only water soluble cleaners. Never use corrosive detergents, wire brushes, abrasive scourers, metal or sharp utensils to clean the product. - Page 18 Technical Support and E-Warranty Certificate www.vevor.com/support...
Need help?
Do you have a question about the RC-1803J and is the answer not in the manual?
Questions and answers