Blackmagicdesign ATEM Mini Getting Started
Streaming bridge
Hide thumbs
Also See for ATEM Mini:
- Installation and operation manual (154 pages) ,
- Installation and operation manual (2014 pages) ,
- User manual
Advertisement
Quick Links
17.09.2024, 17:25
Getting Started
Blackmagic ATEM Streaming Bridge
Blackmagic ATEM Mini User Manual
Getting Started
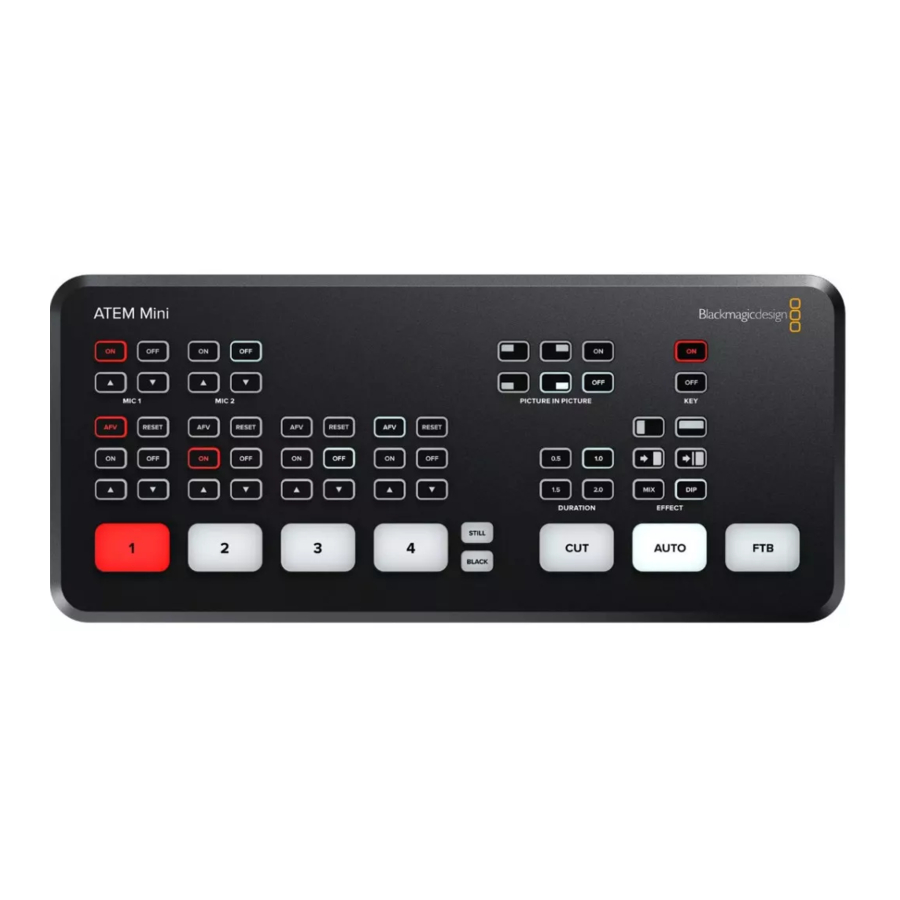
At first glance ATEM Mini might seem intimidating with all the connectors and buttons, however the
unit is actually very easy to set up and use. Each feature serves a specific function and it won't take
long to get familiar with ATEM Mini and know exactly what each feature does.
This section of the manual will show you how to get started with your ATEM Mini, including how to
connect power, connect an HDMI video source, connect a microphone and plug into your computer
so you can start broadcasting online.
Plugging in Power
The first step to getting started is to plug in the mains power supply using the supplied power adapter.
If your power supply has a locking ring, secure the connection to ATEM Mini by tightening the
connector to the unit. This locks the power cable to ATEM Mini preventing it from being accidentally
removed.
Connect power to ATEM Mini's power input using the supplied cable
https://usermanual.com/support/blackmagicdesign/web-manual/atem-mini/getting-started
Blackmagic ATEM Mini User Manual: Getting Started
1/9
Advertisement

Related Manuals for Blackmagicdesign ATEM Mini


Summary of Contents for Blackmagicdesign ATEM Mini
- Page 1 ATEM Mini and know exactly what each feature does. This section of the manual will show you how to get started with your ATEM Mini, including how to connect power, connect an HDMI video source, connect a microphone and plug into your computer so you can start broadcasting online.
-
Page 2: Plugging In Video Sources
Plugging in Video Sources Plug your HDMI cameras and other HDMI sources into ATEM Mini’s HDMI inputs. The first input you plug in will set the video format, so if the first video source you plug in is 1080p50, all other inputs will automatically be converted to 1080p50. - Page 3 This is also a good opportunity to check sources and see if your shots are smoothly switching between each other. Plug an HDMI television or monitor into ATEM Mini’s HDMI output so you can monitor your program output and check all your sources are working properly TIP: ATEM Mini Pro and Extreme models have a powerful multiview feature that lets you ��...
-
Page 4: Connect A Microphone
Blackmagic ATEM Mini User Manual: Getting Started To check your sources, simply press the numbered video out buttons on ATEM Mini’s control panel and watch the HDMI television. If your sources are working correctly, you should see them switch between each other. -
Page 5: Cut Transitions
To perform a cut: Input 1 is illuminated red to indicate input 1 is currently live on air. Select a ‘cut’ by pressing the ‘cut’ button. Pressing ‘cut’ tells ATEM Mini you want to use a straight cut instead of an auto transition. - Page 6 Plug your computer into ATEM Mini’s webcam out USB-C connector Setting the Webcam Source In most cases, your streaming software will automatically set ATEM Mini as the webcam, so when you launch your streaming software you will see the picture from your ATEM Mini straight away. If your software doesn’t select ATEM Mini, simply set the software to use ATEM Mini as the webcam and...
- Page 7 17.09.2024, 17:25 Blackmagic ATEM Mini User Manual: Getting Started Click on the profile picture and select ‘settings’. Select ‘audio & video’ from the sidebar Click on the ‘camera’ menu and select Blackmagic Design from the list. You will see the video from ATEM Mini appear in the preview window.
- Page 8 Now click the ‘audio’ tab and select Blackmagic Design as the microphone. With your ATEM Mini now set as your webcam you are now ready to broadcast your video to the world live! TIP: ATEM Mini Pro and Extreme models can also directly stream via Ethernet to any ��...
Need help?
Do you have a question about the ATEM Mini and is the answer not in the manual?
Questions and answers