Advertisement
Quick Links
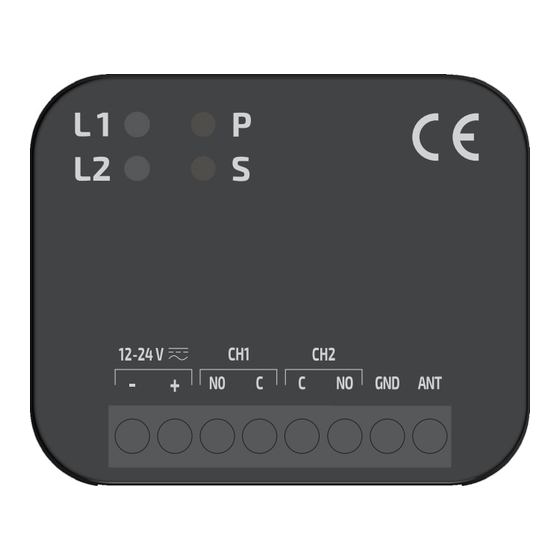
Instruction manual universal receiver
RX2-RS
MINI RECEIVER MULTIFREQUENCY
TECHNICAL FEATURES
Supply
Power consumption
Number of relay
Relay configuration
Frequency
Maximum number of storable codes
Box dimension
Working temperature
WARNING
Dear customer, thank you for choosing our product. We kindly ask you to
read this instruction manual carefully and to keep it at hand as it gives
important displays about the device's operating and safety.
- Overview and patterns of this manual are not binding. NOLOGO S.R.L.
reserves the right to revise them at any time and without obligation for
technical improvement or for any other commercial reason, while keeping
the device's main features unchanged.
- The device is only intended to the purpose for which is has been designed.
Any other use is to be considered improper and dangerous.
1 – REMOTE CONTROLS RECORDING
The receiver is able to record a maximum of 40 codes.
Please note: each button of the remote control matches with a code.
Example: if every button of a 4-channel remote control is recorded, the
receiver will hold 4 codes.
1.1 – STANDARD RECORDING PROCEDURE
- Press button P of your receiver to choose relay 1, LED L1 will start blinking.
Press again button P to switch to relay 2, LED L2 will start blinking.
- Once you've chosen the relay you need, press the button of the remote
control you want to record and keep it pressed until LED L1 and L2 show
a steady light (it may take a few seconds before the receiver decodes the
new code).
- Repeat the procedure for every code you want to include into the receiver.
12-24 Vac/Vdc
20mA, max. 50mA
2
Bistable, Impulsive, Timer: minutes
and seconds
433.92-868 Mhz
40
53x76x24 mm
-20 °C / +70 °C
www.shopnologo.it
1.2– COMPLEX RECORDING PROCEDURE
- Press button P of the receiver to choose relay 1, LED L1 will start blinking.
Press again button P to switch to relay 2, LED L2 will start blinking.
- Once you've chosen the relay you need, press the button of the remote
control you want to record and keep it pressed until LED L1 or L2 shows a
steady light and then makes two slow blinks.
- Transmit the SEED code through the hidden button or the buttons
combination.
- Press again the button of the remote control you need to record and keep
it pressed until the LED turn off
If you're not familiar with the procedure or you can't transmit the SEED
code, keep pressing the button of the remote control you're trying to record,
the latter will be recorded as a fixed code.
Please note: if the code is stored properly, both LED L1 and L2 will show a
steady light; soon after LED L2 will blink two times.
2 – REMOTE CONTROLS CANCELLATION
This function allows you to cancel the remote controls recorded into the
receiver one by one:
- Press button P of the receiver, LED L1 starts blinking, then press button S.
- LED L1 and L2 turn on fixed.
- Press and keep pressing the button of the remote control that you want to
remove until LED L1 and L2 turn off. The remote control has been removed
successfully.
- Repeat this procedure for every remote control you need to remove.
3 – RELAY SETUP
Relays can be set up in 4 different ways:
- Bistable: the status of the relay is maintained until you press the
associated remote control again. The relay contact closes if you press the
remote controls; it opens if you press again.
Warning: without power supply, the relay goes to its ''state of rest'': open
contact.
- Impulsive (factory settings): the relay contact remains ''closed''
throughout the pressing on the associated remote control; if you stop
pressing, the relay opens. Warning: any disturbance may open the contact
even if you're still pressing the button of the remote control.
- Timer seconds: you can set up a time in seconds after which the relay
contact opens. Normally the timer setting is of 30 seconds. Warning: the
timer is reset whenever you press a connected remote control.
- Timer minutes: you can set up a timer in minutes after which the contact
relay opens. Normally the timer setting is of 30 minutes. Warning: the
timer is reset whenever you press a connected remote control.
3.1 RELAY 1 AND 2 SET UP PROCEDURE
- Press and keep pressing button S of your remote controls for more or less
5 seconds.
- LED L1 (related to relay 1) starts blinking; press button S to switch to relay
2: LED L2 starts blinking.
- LED (L1 or L2) of the chosen relay blinks according to the mode set:
☼
1 Blink
☼ ☼
2 Blinks
☼ ☼ ☼
3 Blinks
☼ ☼ ☼ ☼
4 Blinks
- Press button P to switch to the desired operating mode. Whatever new
press of the button P allows you to switch to the following mode in a
cyclical way.
- To exit the setup procedure press button S several times until LED L1 and
L2 switch off.
Bistable
Impulsive
Timer seconds
Timer minutes
Advertisement

Related Manuals for nologo RX2-RS


Summary of Contents for nologo RX2-RS
- Page 1 3.1 RELAY 1 AND 2 SET UP PROCEDURE - Overview and patterns of this manual are not binding. NOLOGO S.R.L. reserves the right to revise them at any time and without obligation for...
- Page 2 Instruction manual universal receiver RX2-RS www.shopnologo.it MINI RECEIVER MULTIFREQUENCY COMPATIBILITY LIST 3.2 TIMER SETTING 900TXB-42R, TXB 44R, SUB 44R TX2, TX2 COLOR, TX4 - Keep button S pressed for two seconds circa in timer mode (seconds or ALLMATIC minutes) and wait until LED L1 or L2 blinks steadily (one blink per second).
Need help?
Do you have a question about the RX2-RS and is the answer not in the manual?
Questions and answers