
Related Manuals for SMAJAYU SMA10


Summary of Contents for SMAJAYU SMA10
- Page 1 Agricultural Guidance System Hardware Installation Manual May 2024 | Rev. 1.0 ©SMAJAYU. All rights reserved.
- Page 2 Agricultural Guidance System Hardware Installation Manual Copyright Notice: SMAJAYU reserves the copyright for this manual and all contents herein. No part of this manual may be reproduced, extracted, reused, and/or reprinted in any form or by any means without the prior written permission of SMAJAYU.
-
Page 3: Technical Support
Agricultural Guidance System Hardware Installation Manual Preface Thank you for using this SMAJAYU product. This manual provides detailed hardware installation guide. If you have any questions, contact the local dealer. Purpose and Intended Users This manual introduces the physical characteristics, installation procedures, and technical specifications of the product as well as the specifications and use of the wiring harnesses and connectors. -
Page 4: Table Of Contents
4.2 Installing the Terminal ..........9 Materials ............9 4.2.1 Installation Steps ..........9 4.2.2 4.3 Installing the SIM Card ..........11 Materials ............. 11 4.3.1 Installation Procedure ......... 11 4.3.2 4.4 Installing Wiring Harnesses ..........12 ©SMAJAYU. All rights reserved. - Page 5 5.1 Site Conditions ............15 5.2 Power-On .............. 15 Check Before Power-on .......... 15 5.2.1 Check After Power-on ........... 15 5.2.2 5.3 Parameter Calibration ..........15 6 Appendix ..............16 6.1 Hardware Specifications ..........16 6.2 Warranty .............. 17 ©SMAJAYU. All rights reserved.
-
Page 7: Product Introduction
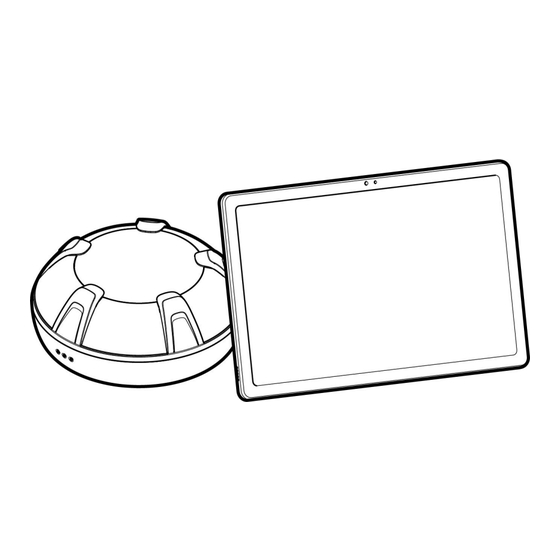
Agricultural Guidance System helps agricultural machinery operators work with a higher accuracy. This system consists of a terminal, a GNSS receiver, and wiring harnesses. The terminal is installed with SMAJAYU ' own navigation software. © SMAJAYU. All rights reserved. -
Page 8: Preparation Before Installation
7. Direct or indirect contact with high voltage or utility power may cause death. 2.2 Requirements for Installation Site To ensure the normal operation of the equipment and prolong its service life, the installation site must meet the following requirements. 2 ©SMAJAYU. All rights reserved. -
Page 9: Position
2.3 Installation Tools Prepare the following tools before installation. Agricultural Guidance System Installation Tools Tool Specifications Qty. Purpose SIM card tray Install the SIM card. ejector Install the GNSS receiver and Cross screwdriver Medium bracket. © SMAJAYU. All rights reserved. -
Page 10: Unpack And Check
User Manual Certification Warranty Card Note: The screws and U-bolts are shipped with the product and not listed here. The items that you receive may differ. Check the items according to the packing list or 4 ©SMAJAYU. All rights reserved. - Page 11 Agricultural Guidance System Hardware Installation Manual purchase order. Contact the dealer if you have any question or if any item is missing. © SMAJAYU. All rights reserved.
-
Page 12: Installation Instructions
5. Keep the device away from strong thunderstorms and electric fields. 6. Unplug the power supply before cleaning. 7. Do not clean the equipment with liquids. 8. Do not open the device housing. 9. Fix the device firmly. 6 ©SMAJAYU. All rights reserved. -
Page 13: Installation Procedure
4.1.2 Installation Steps Install the GNSS receiver bracket on the top of the agricultural machinery with the flat washers, spherical washers, taper washers, and tapping screws or 3M stickers. The installation method is as follows: © SMAJAYU. All rights reserved. - Page 14 Method 1: Use tapping screws to fix the GNSS receiver bracket on the top of the agricultural machinery. Method 2: Use the 3M stickers to fix the GNSS receiver bracket . 8 ©SMAJAYU. All rights reserved.
-
Page 15: Installing The Terminal
Qty. Remarks Terminal Holder bracket Holder bracket base Provided with the Screw terminal Adapter bracket Bracket base U-bolt 4.2.2 Installation Steps Step 1: Select an appropriate position inside the cab for easy operation. Then, fix © SMAJAYU. All rights reserved. - Page 16 Step 3: Install the ball joint of the base into the other ball socket of the adapter bracket , and rotate the handle clockwise to firmly fix the terminal. 10 ©SMAJAYU. All rights reserved.
-
Page 17: Installing The Sim Card
SIM card. If you need to, turn on the terminal and configure them in the Android system settings. 4.3.2 Installation Procedure 1. Locate the SIM card slot, insert the ejector into the hole on the slot, and press to eject the SIM card tray. © SMAJAYU. All rights reserved. -
Page 18: Installing Wiring Harnesses
3. Inset the SIM card try into the slot. 4.4 Installing Wiring Harnesses 4.4.1 Materials Name Qty. Remarks Cab charger cable Main power cable GNSS receiver cable Cab charger 4.4.2 Installation Procedure Connect the cables according to the figure below. Note: 12 ©SMAJAYU. All rights reserved. - Page 19 Type-C port to the terminal. If the agricultural machinery is equipped with a cigarette lighter (item E in the figure below), you can get power directly from it. GNSS receiver cable GNSS receiver Cab charger Power cable Terminal Radio port © SMAJAYU. All rights reserved.
- Page 20 Agricultural Guidance System Hardware Installation Manual Cab charger cable Power supply Power switch USB A—Type-C cable Cab charger 14 ©SMAJAYU. All rights reserved.
-
Page 21: System Commissioning
→ Create or select a task → Create or select a boundary → Create or select a guidance line → Check the implement configuration → Obtain the heading → Start the operation. For details, see the Agricultural Machinery Guidance System Software User Manual . © SMAJAYU. All rights reserved. -
Page 22: Appendix
L1 and L2; BDS B1I, B2I, B3I, B1C, and B2a; Galileo E1, E5a, E5b, and SBAS GNSS receiver Operating voltage: 9 V to 36 V Operating current: <300 mA Operating temperature: -20°C to +70°C Storage temperature: -40°C to +85°C IP rating: IP66 16 ©SMAJAYU. All rights reserved. -
Page 23: Warranty
3. If the agricultural machinery guidance system is damaged due to improper use, maintenance, or adjustment of the user, or other non-quality reasons during the warranty period, the user needs to purchase a spare part, and the dealer or SMAJAYU will repair the system free of charge. - Page 24 ©SMAJAYU. All rights reserved.
Need help?
Do you have a question about the SMA10 and is the answer not in the manual?
Questions and answers